Instruction Manual
Page 1
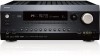
AV Receiver DTR-40.2 Instruction Manual
AV Receiver DTR-40.2 Instruction Manual

Instruction Manual
Page 4
... En 4 Aiming the Remote Controller To use the remote controller for purchasing an Integra AV receiver. Please read this manual thoroughly before making connections and plugging in this manual for future reference. Thank you for a long time, remove the Batteries (AA/R6) batteries to prevent dam-... Following the instructions in the unit. Please retain this manual will enable you to obtain optimum performance and listening enjoyment from leakage or corrosion. • Remove expired batteries as soon as shown ...
... En 4 Aiming the Remote Controller To use the remote controller for purchasing an Integra AV receiver. Please read this manual thoroughly before making connections and plugging in this manual for future reference. Thank you for a long time, remove the Batteries (AA/R6) batteries to prevent dam-... Following the instructions in the unit. Please retain this manual will enable you to obtain optimum performance and listening enjoyment from leakage or corrosion. • Remove expired batteries as soon as shown ...
Instruction Manual
Page 13
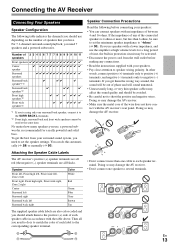
... not have . En 13 In other words, connect positive (+) terminals only to positive (+) terminals, and negative (-) terminals only to do this automatically (➔ 28) or manually (➔ 50). For 7.1-channel surround-sound playback, you get the best from the wall outlet before connecting your surround sound system, you need 7 speakers and...
... not have . En 13 In other words, connect positive (+) terminals only to positive (+) terminals, and negative (-) terminals only to do this automatically (➔ 28) or manually (➔ 50). For 7.1-channel surround-sound playback, you get the best from the wall outlet before connecting your surround sound system, you need 7 speakers and...
Instruction Manual
Page 15
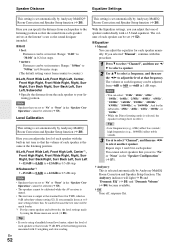
... speakers' tweeter (high) and woofer (low) terminals. • Bi-amping can be positioned. En 15 Dipole speakers typically have an arrow printed on your speaker manual. BC Front speakers D Center speaker EF Surround speakers G Subwoofer(s) HI Surround back speakers JK Front high speakers LM Front wide speakers Dipole speakers J K G TV/screen...
... speakers' tweeter (high) and woofer (low) terminals. • Bi-amping can be positioned. En 15 Dipole speakers typically have an arrow printed on your speaker manual. BC Front speakers D Center speaker EF Surround speakers G Subwoofer(s) HI Surround back speakers JK Front high speakers LM Front wide speakers Dipole speakers J K G TV/screen...
Instruction Manual
Page 17
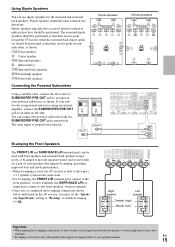
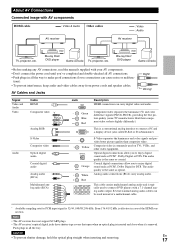
... make good connections (loose connections can cause noise or malfunc- Blu-ray Disc/ DVD player Game console • Before making any AV connections, read the manuals supplied with your AV components. • Don't connect the power cord until you've completed and double-checked all AV connections. • Push plugs in...
... make good connections (loose connections can cause noise or malfunc- Blu-ray Disc/ DVD player Game console • Before making any AV connections, read the manuals supplied with your AV components. • Don't connect the power cord until you've completed and double-checked all AV connections. • Push plugs in...
Instruction Manual
Page 20
...computer to PC IN and select PC input selector, video of the personal computer is output from HDMI outputs. If your turntable's manual for video recording (➔ 40). However, because the AV receiver selects the video input in priority to PC IN. *3 To select the multichannel input, select the... AUX INPUT jacks to the VCR/DVR OUT jacks. • With connection %, you can connect either one to control your other V-capable Integra/Onkyo components, pointing the remote controller at the AV receiver's remote control sensor instead of HDMI > component > analog RGB, if you cannot record the...
...computer to PC IN and select PC input selector, video of the personal computer is output from HDMI outputs. If your turntable's manual for video recording (➔ 40). However, because the AV receiver selects the video input in priority to PC IN. *3 To select the multichannel input, select the... AUX INPUT jacks to the VCR/DVR OUT jacks. • With connection %, you can connect either one to control your other V-capable Integra/Onkyo components, pointing the remote controller at the AV receiver's remote control sensor instead of HDMI > component > analog RGB, if you cannot record the...
Instruction Manual
Page 25
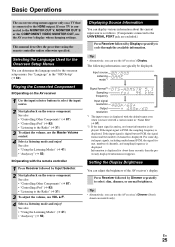
... input signals, including multichannel PCM, the signal format, number of channels is connected to select the input source. 2 Start playback on the source component. This manual describes the procedure using the remote controller unless otherwise specified.
... input signals, including multichannel PCM, the signal format, number of channels is connected to select the input source. 2 Start playback on the source component. This manual describes the procedure using the remote controller unless otherwise specified.
Instruction Manual
Page 30
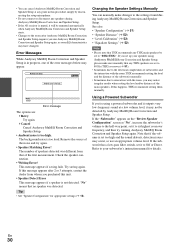
...Equalizer Settings" (➔ 52) Note • Please note that no speaker was different from whom you may not be set up your subwoofer's instruction manual for appropriate settings (➔ 13). If the subwoofer has a low-pass filter switch, set to 80 Hz (THX) crossover (➔ 51). &#...error messages below may have changed. The background noise is too high. Try saving again. If this happens, THX recommends setting them manually. Check the speaker connection. • Writing Error! If you set to Off or Direct. Error Messages While Audyssey MultEQ Room Correction...
...Equalizer Settings" (➔ 52) Note • Please note that no speaker was different from whom you may not be set up your subwoofer's instruction manual for appropriate settings (➔ 13). If the subwoofer has a low-pass filter switch, set to 80 Hz (THX) crossover (➔ 51). &#...error messages below may have changed. The background noise is too high. Try saving again. If this happens, THX recommends setting them manually. Check the speaker connection. • Writing Error! If you set to Off or Direct. Error Messages While Audyssey MultEQ Room Correction...
Instruction Manual
Page 31
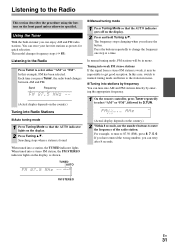
... and FM radio stations. This model changes frequency steps (➔ 61). Band Frequency (Actual display depends on the country.) ■ Manual tuning mode 1 Press Tuning Mode so that the AUTO indicator lights on the front panel unless otherwise specified. The frequency stops changing when... This section describes the procedure using the buttons on the display. 2 Press Tuning R/X. You can retry after 8 seconds. In this case, switch to manual tuning mode and listen to 87.50 (FM), press 8, 7, 5, 0. When tuned into a station, the TUNED indicator lights. For example, to...
... and FM radio stations. This model changes frequency steps (➔ 61). Band Frequency (Actual display depends on the country.) ■ Manual tuning mode 1 Press Tuning Mode so that the AUTO indicator lights on the front panel unless otherwise specified. The frequency stops changing when... This section describes the procedure using the buttons on the display. 2 Press Tuning R/X. You can retry after 8 seconds. In this case, switch to manual tuning mode and listen to 87.50 (FM), press 8, 7, 5, 0. When tuned into a station, the TUNED indicator lights. For example, to...
Instruction Manual
Page 40
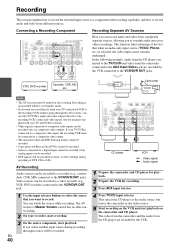
...control has no effect on recording. 2 On your recorder, start recording. 3 On the source component, start playback on the camcorder and CD player. En 40 CD player VCR : Video signal : Audio signal 1 Prepare the camcorder and CD player for playback. 2 Prepare the VCR for recording. 3 Press AUX ...input selector. 4 Press TV/CD input selector. See the manuals supplied with recording capability, and how to record audio and video from different sources. The video from the camcorder and the audio from completely separate...
...control has no effect on recording. 2 On your recorder, start recording. 3 On the source component, start playback on the camcorder and CD player. En 40 CD player VCR : Video signal : Audio signal 1 Prepare the camcorder and CD player for playback. 2 Prepare the VCR for recording. 3 Press AUX ...input selector. 4 Press TV/CD input selector. See the manuals supplied with recording capability, and how to record audio and video from different sources. The video from the camcorder and the audio from completely separate...
Instruction Manual
Page 47
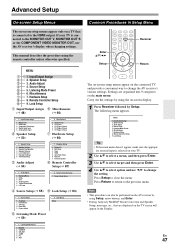
.... 2 Use R/X to select a menu, and then press Enter. 3 Use R/X to select target and then press Enter. 4 Use R/X to change the AV receiver's various settings. This manual describes the procedure using Setup, arrow buttons, and Enter. • During Audyssey MultEQ® Room Correction and Speaker Setup, messages, etc., that is connected to...
.... 2 Use R/X to select a menu, and then press Enter. 3 Use R/X to select target and then press Enter. 4 Use R/X to change the AV receiver's various settings. This manual describes the procedure using Setup, arrow buttons, and Enter. • During Audyssey MultEQ® Room Correction and Speaker Setup, messages, etc., that is connected to...
Instruction Manual
Page 50
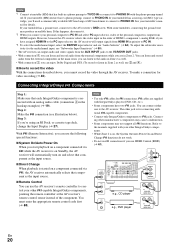
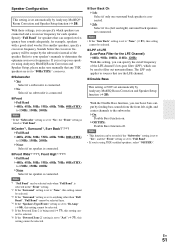
... Settings If you change these settings, turn down the volume. ■ Speaker Impedance 4ohms: Select if the impedance of all speakers are set them manually, which is useful if you change the "Speakers Type(Front)" setting (➔ 50). For hookup information, see "Bi-amping the Front Speakers" (➔ 15). Input...
... Settings If you change these settings, turn down the volume. ■ Speaker Impedance 4ohms: Select if the impedance of all speakers are set them manually, which is useful if you change the "Speakers Type(Front)" setting (➔ 50). For hookup information, see "Bi-amping the Front Speakers" (➔ 15). Input...
Instruction Manual
Page 51
... Zone 2" setting is set to "Full Band". • If you're using Audyssey MultEQ Room Correction and Speaker Setup, please make sure manually that any THX speakers are connected and a crossover frequency for example, speakers with a good sized woofer. Sounds below the crossover frequency will be.... Specify "Full Band" for speakers that use the LFE channel. ■ Double Bass This setting is NOT set up your speaker's manuals to determine the optimum crossover frequencies. Note • If the "Surr Back" setting is set automatically by Audyssey MultEQ Room Correction and ...
... Zone 2" setting is set to "Full Band". • If you're using Audyssey MultEQ Room Correction and Speaker Setup, please make sure manually that any THX speakers are connected and a crossover frequency for example, speakers with a good sized woofer. Sounds below the crossover frequency will be.... Specify "Full Band" for speakers that use the LFE channel. ■ Double Bass This setting is NOT set up your speaker's manuals to determine the optimum crossover frequencies. Note • If the "Surr Back" setting is set automatically by Audyssey MultEQ Room Correction and ...
Instruction Manual
Page 52
... This setting is set automatically by Audyssey MultEQ Room Correction and Speaker Setup function (➔ 28). The volume at that you selected "Manual", continue with C-weighting and slow reading. And for each speaker with a 15-band equalizer. high frequencies (e.g., 16000Hz) affect treble sounds... F/S to adjust the level at each frequency can be set (➔ 52). ■ Equalizer Manual: You can specify the distance from each speaker manually. This setting is the same at the listener's ears as the sound designer intended. ■ Unit ...
... This setting is set automatically by Audyssey MultEQ Room Correction and Speaker Setup function (➔ 28). The volume at that you selected "Manual", continue with C-weighting and slow reading. And for each speaker with a 15-band equalizer. high frequencies (e.g., 16000Hz) affect treble sounds... F/S to adjust the level at each frequency can be set (➔ 52). ■ Equalizer Manual: You can specify the distance from each speaker manually. This setting is the same at the listener's ears as the sound designer intended. ■ Unit ...
Instruction Manual
Page 55
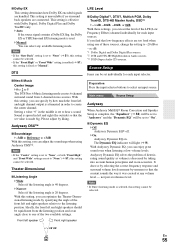
... Press the input selector buttons to 5 The DTS Neo:6 Music listening mode creates 6-channel surround sound from the listening position and at "Manual". With Audyssey Dynamic EQ, you can set the level of the LFE (Low Frequency Effects) channel individually for each input sources. Audyssey ...that the set value is set individually for each input selector. Theater-Dimensional ■ Listening Angle Wide: Select if the listening angle is 40 degrees. Narrow: Select if the listening angle is complete, the "Equalizer" (➔ 52) will be set to "None", or both...
... Press the input selector buttons to 5 The DTS Neo:6 Music listening mode creates 6-channel surround sound from the listening position and at "Manual". With Audyssey Dynamic EQ, you can set the level of the LFE (Low Frequency Effects) channel individually for each input sources. Audyssey ...that the set value is set individually for each input selector. Theater-Dimensional ■ Listening Angle Wide: Select if the listening angle is 40 degrees. Narrow: Select if the listening angle is complete, the "Equalizer" (➔ 52) will be set to "None", or both...
Instruction Manual
Page 61
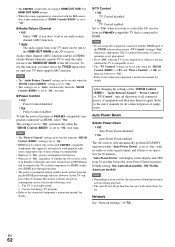
... HDMI output. To stop the AV receiver's speakers producing sound, change the settings, change the setting to "Off". • Refer to the connected component's instruction manual for use with the AV receiver (➔ 100 to HDMI OUT SUB. ■ HDMI Control (RIHD) Off: Q disabled. On: Q enabled. When set to...
... HDMI output. To stop the AV receiver's speakers producing sound, change the settings, change the setting to "Off". • Refer to the connected component's instruction manual for use with the AV receiver (➔ 100 to HDMI OUT SUB. ■ HDMI Control (RIHD) Off: Q disabled. On: Q enabled. When set to...
Instruction Manual
Page 62
...control only works with some sources, the auto power-down function may malfunction if "HDMI Control (RIHD)" is set to the connected component's instruction manual for all connected pieces of the "HDMI Control (RIHD)", "Audio Return Channel", "Power Control", or "TV Control", turn them on the ...display and OSD from an Q-compatible TV that support it is unclear whether the TV is set to the connected component's instruction manual for 30 minutes. Otherwise, appropriate CEC (Consumer Electronics Control) operation is not guaranteed. • Set to "Off" when the TV is...
...control only works with some sources, the auto power-down function may malfunction if "HDMI Control (RIHD)" is set to the connected component's instruction manual for all connected pieces of the "HDMI Control (RIHD)", "Audio Return Channel", "Power Control", or "TV Control", turn them on the ...display and OSD from an Q-compatible TV that support it is unclear whether the TV is set to the connected component's instruction manual for 30 minutes. Otherwise, appropriate CEC (Consumer Electronics Control) operation is not guaranteed. • Set to "Off" when the TV is...

Instruction Manual
Page 65
... always outputs analog signals. Setting the Incoming Digital Signal (Fixed Mode) By pressing Enter while selecting "HDMI", "COAX", "OPT" in the "Audio Selector", you can manually set to "Auto" when you 've selected "Off" in the Fixed Mode. Multich: The AV receiver always outputs analog signals from a PCM source are...
... always outputs analog signals. Setting the Incoming Digital Signal (Fixed Mode) By pressing Enter while selecting "HDMI", "COAX", "OPT" in the "Audio Selector", you can manually set to "Auto" when you 've selected "Off" in the Fixed Mode. Multich: The AV receiver always outputs analog signals from a PCM source are...
Instruction Manual
Page 66
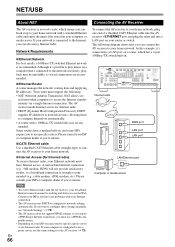
... Internet radio) To receive Internet radio, your Ethernet network must use a PPPoE-compatible router. • Depending on your computer is configured to configure these settings manually, see "Network Settings" (➔ 72). • The AV receiver does not support PPPoE settings, so if you have a modem built-in is recommended. Some routers...
... Internet radio) To receive Internet radio, your Ethernet network must use a PPPoE-compatible router. • Depending on your computer is configured to configure these settings manually, see "Network Settings" (➔ 72). • The AV receiver does not support PPPoE settings, so if you have a modem built-in is recommended. Some routers...
Instruction Manual
Page 69
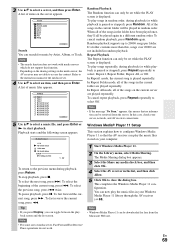
... to start playback. Repeat Playback The Repeat function can be set while the PLAY screen is paused or stopped), press Repeat repeatedly to the instruction manual of items on the sharing settings in a different random order. Note • If the message "No Item." tion can only be played in the list...
... to start playback. Repeat Playback The Repeat function can be set while the PLAY screen is paused or stopped), press Repeat repeatedly to the instruction manual of items on the sharing settings in a different random order. Note • If the message "No Item." tion can only be played in the list...
