Instruction Manual
Page 1
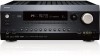
AV Receiver DTR-40.2 Instruction Manual
AV Receiver DTR-40.2 Instruction Manual

Instruction Manual
Page 4
...the remote controller, point it at the end of the product name indicates the color. Please read this manual thoroughly before making connections and plugging in this manual for future reference. age from leakage or corrosion. Specifications and operations are the same regardless of color. Remote...R6) * In catalogs and on packaging, the letter at the AV receiver's remote control sensor, as possible to prevent dam- Please retain this manual will enable you for a long time, remove the Batteries (AA/R6) batteries to prevent damage from leakage or corrosion. • Remove expired...
...the remote controller, point it at the end of the product name indicates the color. Please read this manual thoroughly before making connections and plugging in this manual for future reference. age from leakage or corrosion. Specifications and operations are the same regardless of color. Remote...R6) * In catalogs and on packaging, the letter at the AV receiver's remote control sensor, as possible to prevent dam- Please retain this manual will enable you for a long time, remove the Batteries (AA/R6) batteries to prevent damage from leakage or corrosion. • Remove expired...
Instruction Manual
Page 13
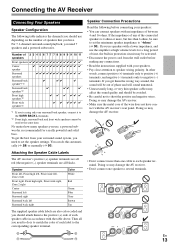
... the positive and negative wires. Doing so may be sure to set the speaker settings. If you need to do this automatically (➔ 28) or manually (➔ 50). Connections Connecting the AV Receiver Connecting Your Speakers Speaker Configuration The following before making any of the connected speakers is 4 ohms or more...
... the positive and negative wires. Doing so may be sure to set the speaker settings. If you need to do this automatically (➔ 28) or manually (➔ 50). Connections Connecting the AV Receiver Connecting Your Speakers Speaker Configuration The following before making any of the connected speakers is 4 ohms or more...
Instruction Manual
Page 15
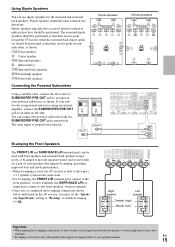
... set the "Speakers Type(Front)" setting to "Bi-Amp" to enable bi-amping (➔ 50). Dipole speakers typically have an arrow printed on your speaker manual. Powered subwoofer Bi-amping the Front Speakers The FRONT L/R and SURR BACK L/R terminal posts can be positioned so that their arrows point toward each jack...
... set the "Speakers Type(Front)" setting to "Bi-Amp" to enable bi-amping (➔ 50). Dipole speakers typically have an arrow printed on your speaker manual. Powered subwoofer Bi-amping the Front Speakers The FRONT L/R and SURR BACK L/R terminal posts can be positioned so that their arrows point toward each jack...
Instruction Manual
Page 17
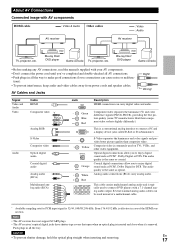
... connect a PC and a display device (also called D-Sub or D-subminiature). Blu-ray Disc/ DVD player Game console • Before making any AV connections, read the manuals supplied with your AV components. • Don't connect the power cord until you've completed and double-checked all AV connections. • Push plugs in...
... connect a PC and a display device (also called D-Sub or D-subminiature). Blu-ray Disc/ DVD player Game console • Before making any AV connections, read the manuals supplied with your AV components. • Don't connect the power cord until you've completed and double-checked all AV connections. • Push plugs in...
Instruction Manual
Page 20
...have a phono preamp, connect to PHONO IN. Note • Use only V cables for video recording (➔ 40). Connecting other V-capable Integra/Onkyo components, pointing the remote controller at the AV receiver's remote control sensor instead of the personal computer is started on ... the multichannel input, select the BD/DVD input selector and see "Audio Selector" (➔ 64). See your turntable's manual for connecting additional V-capable components. • Connect only Integra/Onkyo components to V jacks. With V (Remote Interactive), you can listen to the audio in Zone 2 as well. ...
...have a phono preamp, connect to PHONO IN. Note • Use only V cables for video recording (➔ 40). Connecting other V-capable Integra/Onkyo components, pointing the remote controller at the AV receiver's remote control sensor instead of the personal computer is started on ... the multichannel input, select the BD/DVD input selector and see "Audio Selector" (➔ 64). See your turntable's manual for connecting additional V-capable components. • Connect only Integra/Onkyo components to V jacks. With V (Remote Interactive), you can listen to the audio in Zone 2 as well. ...
Instruction Manual
Page 25
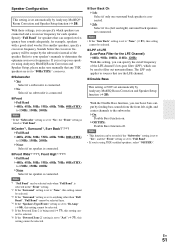
.... (Components connected to the UNIVERSAL PORT jack are excluded.) Press Receiver followed by Display repeatedly to select: dim, dimmer, or normal brightness. En 25 This manual describes the procedure using the remote controller unless otherwise specified. See also: • "Using the Listening Modes" (➔ 41) • "Audyssey" (➔ 55) ■ Operating...
.... (Components connected to the UNIVERSAL PORT jack are excluded.) Press Receiver followed by Display repeatedly to select: dim, dimmer, or normal brightness. En 25 This manual describes the procedure using the remote controller unless otherwise specified. See also: • "Using the Listening Modes" (➔ 41) • "Audyssey" (➔ 55) ■ Operating...
Instruction Manual
Page 30
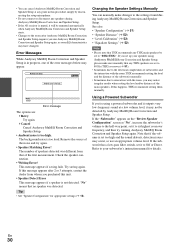
...; Sometimes due to the electrical complexities of subwoofers and the interaction with the room, THX recommends setting the level and the distance of the subwoofer manually. • Sometimes due to the room after 2 or 3 attempts, contact the dealer from that any THX speakers are : Retry: Try ... • Changes to interaction with the room, you 're using a powered subwoofer and it may have changed. • You can manually make sure manually that of the first measurement. MultEQ: Auto Setup Ambient noise is too loud. Retry Cancel Error message The options are set too high ...
...; Sometimes due to the electrical complexities of subwoofers and the interaction with the room, THX recommends setting the level and the distance of the subwoofer manually. • Sometimes due to the room after 2 or 3 attempts, contact the dealer from that any THX speakers are : Retry: Try ... • Changes to interaction with the room, you 're using a powered subwoofer and it may have changed. • You can manually make sure manually that of the first measurement. MultEQ: Auto Setup Ambient noise is too loud. Retry Cancel Error message The options are set too high ...
Instruction Manual
Page 31
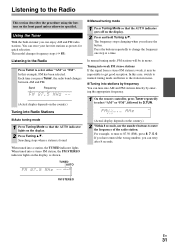
... press 8, 7, 5, 0. FM STEREO En 31 When tuned into stations by frequency You can retry after 8 seconds. In this case, switch to manual tuning mode and listen to the station in tuner you can tune into a station, the TUNED indicator lights. Press the buttons repeatedly to select "AM...display, as presets for quick selection. You can enjoy AM and FM radio stations. Band Frequency (Actual display depends on the country.) ■ Manual tuning mode 1 Press Tuning Mode so that the AUTO indicator lights on the country.) 2 Within 8 seconds, use the number buttons to enter the...
... press 8, 7, 5, 0. FM STEREO En 31 When tuned into stations by frequency You can retry after 8 seconds. In this case, switch to manual tuning mode and listen to the station in tuner you can tune into a station, the TUNED indicator lights. Press the buttons repeatedly to select "AM...display, as presets for quick selection. You can enjoy AM and FM radio stations. Band Frequency (Actual display depends on the country.) ■ Manual tuning mode 1 Press Tuning Mode so that the AUTO indicator lights on the country.) 2 Within 8 seconds, use the number buttons to enter the...
Instruction Manual
Page 40
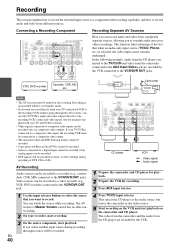
...the recording VCR's audio and video inputs. If your TV and VCR for recording. 3 Press AUX input selector. 4 Press TV/CD input selector. En 40 CD player VCR : Video signal : Audio signal 1 Prepare the camcorder and CD player for playback. 2 Prepare the VCR for details. • Video... video from your video recordings. The video from the camcorder and the audio from different sources. If you want to record. See the manuals supplied with recording capability, and how to record audio and video from the CD player are recorded by the VCR. Connecting a Recording Component...
...the recording VCR's audio and video inputs. If your TV and VCR for recording. 3 Press AUX input selector. 4 Press TV/CD input selector. En 40 CD player VCR : Video signal : Audio signal 1 Prepare the camcorder and CD player for playback. 2 Prepare the VCR for details. • Video... video from your video recordings. The video from the camcorder and the audio from different sources. If you want to record. See the manuals supplied with recording capability, and how to record audio and video from the CD player are recorded by the VCR. Connecting a Recording Component...
Instruction Manual
Page 47
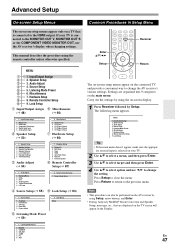
... 1. CBL/SAT 4. Speaker Setup D 3. Advanced Operations Advanced Setup On-screen Setup Menus Common Procedures in the Display. HDMI Input 3. Multi Zone 3. Remote Controller Setup J 9. This manual describes the procedure using the on the AV receiver by Setup. Listening Mode Preset 1. Monitor Out 2. Tuner 4. Speaker Setup 3.
... 1. CBL/SAT 4. Speaker Setup D 3. Advanced Operations Advanced Setup On-screen Setup Menus Common Procedures in the Display. HDMI Input 3. Multi Zone 3. Remote Controller Setup J 9. This manual describes the procedure using the on the AV receiver by Setup. Listening Mode Preset 1. Monitor Out 2. Tuner 4. Speaker Setup 3.
Instruction Manual
Page 50
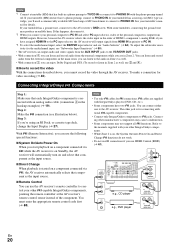
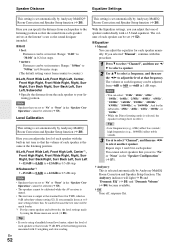
...; 28). For hookup information, see "Bi-amping the Front Speakers" (➔ 15). En 50 With this if you cannot assign any speaker is set them manually, which is connected, or - Note • When bi-amping is used if "Speakers Type(Front)" is 4 ohms or more but less than normal. Note •...
...; 28). For hookup information, see "Bi-amping the Front Speakers" (➔ 15). En 50 With this if you cannot assign any speaker is set them manually, which is connected, or - Note • When bi-amping is used if "Speakers Type(Front)" is 4 ohms or more but less than normal. Note •...
Instruction Manual
Page 51
... crossover frequency. Note • If the "Surr Back" setting is set to "Full Band". • If you set up your speaker's manuals to sources that use the LFE channel. ■ Double Bass This setting is NOT set automatically by Audyssey MultEQ® Room Correction and Speaker Setup... function (➔ 28). If you 're using Audyssey MultEQ Room Correction and Speaker Setup, please make sure manually that can output low frequency bass sounds adequately, for the LFE Channel) 80Hz, 90Hz, 100Hz, 110Hz, 120Hz With this setting cannot be...
... crossover frequency. Note • If the "Surr Back" setting is set to "Full Band". • If you set up your speaker's manuals to sources that use the LFE channel. ■ Double Bass This setting is NOT set automatically by Audyssey MultEQ® Room Correction and Speaker Setup... function (➔ 28). If you 're using Audyssey MultEQ Room Correction and Speaker Setup, please make sure manually that can output low frequency bass sounds adequately, for the LFE Channel) 80Hz, 90Hz, 100Hz, 110Hz, 120Hz With this setting cannot be...
Instruction Manual
Page 52
... setting is selected automatically by Audyssey MultEQ Room Correction and Speaker Setup function. If you set (➔ 52). ■ Equalizer Manual: You can be set automatically by Audyssey MultEQ Room Correction and Speaker Setup function (➔ 28). And for the subwoofer, "25Hz", "...the listener's ears as the sound designer intended. ■ Unit feet: Distances can specify the distance from each speaker manually. En 52 Tip • If you set automatically by Audyssey MultEQ Room Correction and Speaker Setup function (➔ 28). high frequencies...
... setting is selected automatically by Audyssey MultEQ Room Correction and Speaker Setup function. If you set (➔ 52). ■ Equalizer Manual: You can be set automatically by Audyssey MultEQ Room Correction and Speaker Setup function (➔ 28). And for the subwoofer, "25Hz", "...the listener's ears as the sound designer intended. ■ Unit feet: Distances can specify the distance from each speaker manually. En 52 Tip • If you set automatically by Audyssey MultEQ Room Correction and Speaker Setup function (➔ 28). high frequencies...
Instruction Manual
Page 55
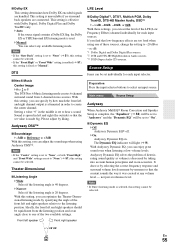
... Off: Audyssey Dynamic EQ® off. On: Audyssey Dynamic EQ on. Setting a value "0" in the middle is used. Manual: You can optimize the Theater-Dimensional listening mode by how much the front left and right channel output is attenuated in left and right speakers...; If the "Surr Back" setting is 20 degrees. Theater-Dimensional ■ Listening Angle Wide: Select if the listening angle is 40 degrees. Narrow: Select if the listening angle is set individually for each input selector. It does so by selecting the correct frequency ...
... Off: Audyssey Dynamic EQ® off. On: Audyssey Dynamic EQ on. Setting a value "0" in the middle is used. Manual: You can optimize the Theater-Dimensional listening mode by how much the front left and right channel output is attenuated in left and right speakers...; If the "Surr Back" setting is 20 degrees. Theater-Dimensional ■ Listening Angle Wide: Select if the listening angle is 40 degrees. Narrow: Select if the listening angle is set individually for each input selector. It does so by selecting the correct frequency ...
Instruction Manual
Page 61
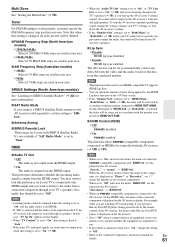
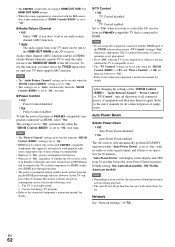
... ■ Audio TV Out Off: The audio is not output from the connected monitor. Tuner For FM/AM tuning to the connected component's instruction manual for use with the AV receiver (➔ 100 to "On" and close the menu, "RIHD Off" are dis-
... ■ Audio TV Out Off: The audio is not output from the connected monitor. Tuner For FM/AM tuning to the connected component's instruction manual for use with the AV receiver (➔ 100 to "On" and close the menu, "RIHD Off" are dis-
Instruction Manual
Page 62
... HDMI OUT MAIN of equipment and then turn off the power to all connected pieces of whether the AV receiver is connected to the user's manuals for details. ■ TV Control Off: TV Control disabled. On: TV Control enabled. Note • Do not assign the...8226; When set to "On", power consumption will automatically perform STANDBY operation when "Auto Power Down" is set to the connected component's instruction manual for all connected pieces of the AV receiver. however if your TV must select the TV/CD input selector and your TV supports CEC (Consumer...
... HDMI OUT MAIN of equipment and then turn off the power to all connected pieces of whether the AV receiver is connected to the user's manuals for details. ■ TV Control Off: TV Control disabled. On: TV Control enabled. Note • Do not assign the...8226; When set to "On", power consumption will automatically perform STANDBY operation when "Auto Power Down" is set to the connected component's instruction manual for all connected pieces of the AV receiver. however if your TV must select the TV/CD input selector and your TV supports CEC (Consumer...

Instruction Manual
Page 65
.... Note • The setting is stored individually for each input selector. • The setting will be heard. But you cannot select it if you can manually set to DTS. Auto: The format is assigned as HDMI IN, COAXIAL IN, or OPTICAL IN. • To select the digital audio input, see...
.... Note • The setting is stored individually for each input selector. • The setting will be heard. But you cannot select it if you can manually set to DTS. Auto: The format is assigned as HDMI IN, COAXIAL IN, or OPTICAL IN. • To select the digital audio input, see...
Instruction Manual
Page 66
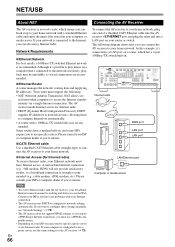
... port, and plug the other end into a LAN port on your computer or media server. NAT allows sev- If you want to configure these settings manually, see "Network Settings" (➔ 72). • The AV receiver does not support PPPoE settings, so if you may be working and able to access the...
... port, and plug the other end into a LAN port on your computer or media server. NAT allows sev- If you want to configure these settings manually, see "Network Settings" (➔ 72). • The AV receiver does not support PPPoE settings, so if you may be working and able to access the...
Instruction Manual
Page 69
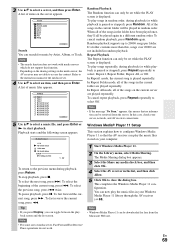
... Recently Added Artists Album Songs Genre Year Rating 1 / 8 Search You can only be downloaded for music by Artist, Album, or Track. Refer to the instruction manual of the songs in random order, during playback (or while playback is displayed. Playback starts and the following screen appears. To select the previous song...
... Recently Added Artists Album Songs Genre Year Rating 1 / 8 Search You can only be downloaded for music by Artist, Album, or Track. Refer to the instruction manual of the songs in random order, during playback (or while playback is displayed. Playback starts and the following screen appears. To select the previous song...
