

Owner Manual
Page 1
Following the instructions in the unit. Please retain this manual will enable you for future reference. Compact Disc Player DX-7555 Instruction Manual Contents Introduction 2 Connections 10 Operation 12 Thank you to obtain optimum performance and listening enjoyment from your new Compact Disc Player. Please read this manual thoroughly before making connections and plugging in this manual for purchasing an Onkyo Compact Disc Player. Others 23 En
Following the instructions in the unit. Please retain this manual will enable you for future reference. Compact Disc Player DX-7555 Instruction Manual Contents Introduction 2 Connections 10 Operation 12 Thank you to obtain optimum performance and listening enjoyment from your new Compact Disc Player. Please read this manual thoroughly before making connections and plugging in this manual for purchasing an Onkyo Compact Disc Player. Others 23 En
Owner Manual
Page 2
Keep these instructions. 2. Do not install near water. 6. Only use attachments/accessories specified by the manufacturer, or sold with dry cloth. 7. Servicing is required when the apparatus has been damaged in damage and will often require extensive work by a qualified technician to restore the apparatus to rain or moisture, does not operate normally, or has been dropped. 15. If the apparatus has been exposed to qualified service personnel. When the apparatus exhibits a distinct change in accordance with arrowhead symbol, within the product's ...
Keep these instructions. 2. Do not install near water. 6. Only use attachments/accessories specified by the manufacturer, or sold with dry cloth. 7. Servicing is required when the apparatus has been damaged in damage and will often require extensive work by a qualified technician to restore the apparatus to rain or moisture, does not operate normally, or has been dropped. 15. If the apparatus has been exposed to qualified service personnel. When the apparatus exhibits a distinct change in accordance with arrowhead symbol, within the product's ...
Owner Manual
Page 3
...this unit near a TV, radio, or VCR, the picture and sound quality may be affected. Moisture Condensation Moisture condensation may damage your Onkyo dealer. 3. If you install this unit. • Moisture condensation can occur in a humid place. • Do not use abrasive ...maintenance (cleaning or worn part replacement) every 1,000 hours of use a soft cloth dampened with a weak solution of Conformity We, ONKYO EUROPE ELECTRONICS GmbH LIEGNITZERSTRASSE 6, 82194 GROEBENZELL, GERMANY declare in own responsibility, that there's adequate ventilation all over with Wet Hands-Never ...
...this unit near a TV, radio, or VCR, the picture and sound quality may be affected. Moisture Condensation Moisture condensation may damage your Onkyo dealer. 3. If you install this unit. • Moisture condensation can occur in a humid place. • Do not use abrasive ...maintenance (cleaning or worn part replacement) every 1,000 hours of use a soft cloth dampened with a weak solution of Conformity We, ONKYO EUROPE ELECTRONICS GmbH LIEGNITZERSTRASSE 6, 82194 GROEBENZELL, GERMANY declare in own responsibility, that there's adequate ventilation all over with Wet Hands-Never ...
Owner Manual
Page 4
IMPORTANT The plug is not suitable for your plug, proceed as a "CLASS 1 LASER PRODUCT". If the power cord's plug is fitted with a polarized plug: CAUTION: TO PREVENT ELECTRIC SHOCK, MATCH WIDE BLADE OF PLUG TO WIDE SLOT, FULLY INSERT. In case of any trouble, please contact the store where you purchased the unit. CAUTION: THIS PRODUCT UTILIZES A LASER. To prevent the laser from that interference will not occur in accordance with the following measures: • Reorient or relocate the receiving antenna. • Increase the separation between the equipment and receiver. &#...
IMPORTANT The plug is not suitable for your plug, proceed as a "CLASS 1 LASER PRODUCT". If the power cord's plug is fitted with a polarized plug: CAUTION: TO PREVENT ELECTRIC SHOCK, MATCH WIDE BLADE OF PLUG TO WIDE SLOT, FULLY INSERT. In case of any trouble, please contact the store where you purchased the unit. CAUTION: THIS PRODUCT UTILIZES A LASER. To prevent the laser from that interference will not occur in accordance with the following measures: • Reorient or relocate the receiving antenna. • Increase the separation between the equipment and receiver. &#...

Owner Manual
Page 5
... Supplied Accessories Make sure you have the following accessories: Audio cable (1 m) cable (80 cm) • To use , the DX-7555 must be connected with an cable and an audio cable. Specifications and operation are the same regardless of the... Controller 8 RC-625C Remote Controller 8 Before Using the DX-7555 9 Installing the Remote Controller's Batteries 9 Using the Remote Controller 9 Connections Connecting the DX-7555 10 Audio Connections 10 Connections 11 Operation Turning On the DX-7555 12 Turning On the DX-7555 12 Playing CDs 12 Playing CDs 12 Selecting MP3 Folders ...
... Supplied Accessories Make sure you have the following accessories: Audio cable (1 m) cable (80 cm) • To use , the DX-7555 must be connected with an cable and an audio cable. Specifications and operation are the same regardless of the... Controller 8 RC-625C Remote Controller 8 Before Using the DX-7555 9 Installing the Remote Controller's Batteries 9 Using the Remote Controller 9 Connections Connecting the DX-7555 10 Audio Connections 10 Connections 11 Operation Turning On the DX-7555 12 Turning On the DX-7555 12 Playing CDs 12 Playing CDs 12 Selecting MP3 Folders ...
Owner Manual
Page 6
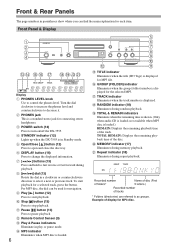
Front Panel & Display 1 2 3 4 CD EF G HIJK Display A PHONES LEVEL knob Use to turn on/off the DX-7555. C POWER switch (12) Press to control the phones level. I Play [ ] button (12) Press to start playback for MP3 disc. S TOTAL & REMAIN indicators ... Illuminates during memory playback. Example of tracks * Folders (directories) are referred to select a next or previous track. D STANDBY indicator (12) Lights up when the DX-7555 is displayed for navigation. E Open/Close [ ] button (12) Press to stop playback. To start playback. For MP3 disc, the dial can find the ...
Front Panel & Display 1 2 3 4 CD EF G HIJK Display A PHONES LEVEL knob Use to turn on/off the DX-7555. C POWER switch (12) Press to control the phones level. I Play [ ] button (12) Press to start playback for MP3 disc. S TOTAL & REMAIN indicators ... Illuminates during memory playback. Example of tracks * Folders (directories) are referred to select a next or previous track. D STANDBY indicator (12) Lights up when the DX-7555 is displayed for navigation. E Open/Close [ ] button (12) Press to stop playback. To start playback. For MP3 disc, the dial can find the ...
Owner Manual
Page 7
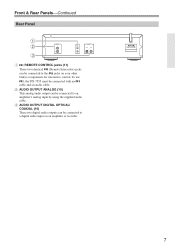
To use , the DX-7555 must be connected to a digital audio input on your other Onkyo components for interactive control. Front & Rear Panels-Continued Rear Panel 1 2 3 A REMOTE CONTROL jacks (11) These two identical (Remote Interactive) jacks can be connected to an amplifier's analog input by using the supplied audio cable. B AUDIO OUTPUT ANALOG (10) This analog audio output can be connected with an cable and an audio cable. C AUDIO OUTPUT DIGITAL OPTICAL/ COAXIAL (10) These two digital audio outputs can be connected to the jacks on an amplifier or recorder. 7
To use , the DX-7555 must be connected to a digital audio input on your other Onkyo components for interactive control. Front & Rear Panels-Continued Rear Panel 1 2 3 A REMOTE CONTROL jacks (11) These two identical (Remote Interactive) jacks can be connected to an amplifier's analog input by using the supplied audio cable. B AUDIO OUTPUT ANALOG (10) This analog audio output can be connected with an cable and an audio cable. C AUDIO OUTPUT DIGITAL OPTICAL/ COAXIAL (10) These two digital audio outputs can be connected to the jacks on an amplifier or recorder. 7

Owner Manual
Page 8
... remove the last track in the program, while 7 I OPEN/CLOSE button (12) C Press to change the displayed information. B STANDBY button (12) Press to put the DX-7555 on the display for several seconds, then turn it off (No Display), any operation will temporarily turn on status. C Number buttons (13, 15) Use these...figure various set them. These buttons can be used to select a track. S [ / ] buttons (13) Press to search and select a track number. ered on the DX-7555 from its standby mode. D DIMMER button Press to search and 4 D select a group (folder) number.
... remove the last track in the program, while 7 I OPEN/CLOSE button (12) C Press to change the displayed information. B STANDBY button (12) Press to put the DX-7555 on the display for several seconds, then turn it off (No Display), any operation will temporarily turn on status. C Number buttons (13, 15) Use these...figure various set them. These buttons can be used to select a track. S [ / ] buttons (13) Press to search and select a track number. ered on the DX-7555 from its standby mode. D DIMMER button Press to search and 4 D select a group (folder) number.
Owner Manual
Page 9
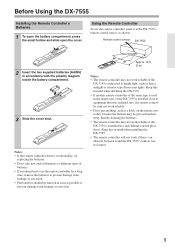
... used in a rack behind colored glass doors. Approx. 16 ft. (5 m) Notes: • The remote controller may not work reliably if the DX-7555 is installed close to equipment that uses infrared rays, the remote controller may not work reliably. • Don't put anything, such as a book,... point it and the DX-7555's remote control sensor. 9 Remote control sensor DX-7555 2 Insert the two supplied batteries (AA/R6) in mind when installing the DX-7555. • The remote controller will not work reliably if the DX-7555 is installed in the same room, or the DX-7555 is subjected to bright ...
... used in a rack behind colored glass doors. Approx. 16 ft. (5 m) Notes: • The remote controller may not work reliably if the DX-7555 is installed close to equipment that uses infrared rays, the remote controller may not work reliably. • Don't put anything, such as a book,... point it and the DX-7555's remote control sensor. 9 Remote control sensor DX-7555 2 Insert the two supplied batteries (AA/R6) in mind when installing the DX-7555. • The remote controller will not work reliably if the DX-7555 is installed in the same room, or the DX-7555 is subjected to bright ...
Owner Manual
Page 10
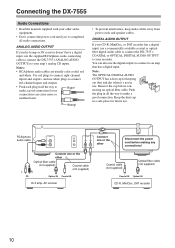
... plug in all the way to make a good connection (loose connections can also use the supplied RCA/phono audio connecting cable to connect the DX-7555's ANALOG AUDIO OUTPUTs to an amp that has a digital input. Push the plug in all the way to make a good connection. ANALOG...your CD-R, MiniDisc, or DAT recorder has a digital input, use a commercially available coaxial or optical fiber digital audio cable to connect the DX-7555's COAXIAL or OPTICAL DIGITAL AUDIO OUTPUT to your hi-fi amp or AV receiver doesn't have a digital input, use the digital outputs to ...
... plug in all the way to make a good connection (loose connections can also use the supplied RCA/phono audio connecting cable to connect the DX-7555's ANALOG AUDIO OUTPUTs to an amp that has a digital input. Push the plug in all the way to make a good connection. ANALOG...your CD-R, MiniDisc, or DAT recorder has a digital input, use a commercially available coaxial or optical fiber digital audio cable to connect the DX-7555's COAXIAL or OPTICAL DIGITAL AUDIO OUTPUT to your hi-fi amp or AV receiver doesn't have a digital input, use the digital outputs to ...

Owner Manual
Page 11
...: I Auto Power On If your DX-7555 is for connections. • To use you must make an analog RCA/phono connection between the DX-7555 and your DX-7555 and Onkyo AV receiver even if they are connected digitally. • The DX-7555 has two connectors. Notes: •... Use only cables for connecting additional -compatible components. • Connect the DX-7555's connector to an -compatible Onkyo hi-fi amp...
...: I Auto Power On If your DX-7555 is for connections. • To use you must make an analog RCA/phono connection between the DX-7555 and your DX-7555 and Onkyo AV receiver even if they are connected digitally. • The DX-7555 has two connectors. Notes: •... Use only cables for connecting additional -compatible components. • Connect the DX-7555's connector to an -compatible Onkyo hi-fi amp...
Owner Manual
Page 12
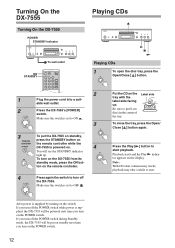
... starts and the Play indicator appears on the remote controller. 4 Press again the switch to put on standby next time you turn on the DX-7555 from its standby mode, press the ON but- After power is supplied by turning on the switch: If you turn off the... DX-7555. Be sure to turn on the POWER switch. able wall outlet. 2 Press the DX-7555's [POWER] switch. Turning On the DX-7555 Turning On the DX-7555 POWER STANDBY indicator Playing CDs ON STANDBY To wall outlet Playing CDs 1 To open...
... starts and the Play indicator appears on the remote controller. 4 Press again the switch to put on standby next time you turn on the DX-7555 from its standby mode, press the ON but- After power is supplied by turning on the switch: If you turn off the... DX-7555. Be sure to turn on the POWER switch. able wall outlet. 2 Press the DX-7555's [POWER] switch. Turning On the DX-7555 Turning On the DX-7555 POWER STANDBY indicator Playing CDs ON STANDBY To wall outlet Playing CDs 1 To open...
Owner Manual
Page 13
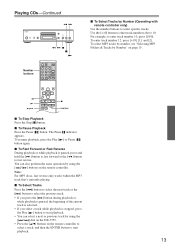
... Reverse During playback or while playback is stopped, press the Play [ ] button to start playback. 13 I To Select Tracks by using the [ / ] dial on the DX-7555. • Press the [ / ] buttons on the remote controller to select a track, and then the ENTER button to start playback. • You can also perform the...
... Reverse During playback or while playback is stopped, press the Play [ ] button to start playback. 13 I To Select Tracks by using the [ / ] dial on the DX-7555. • Press the [ / ] buttons on the remote controller to select a track, and then the ENTER button to start playback. • You can also perform the...

Owner Manual
Page 14
... all folders that contain MP3 tracks appear at the same level. get track is set to the previous hierarchy, press the Stop [ ] button on the DX-7555, or the [ ] button on the remote controller, playback will be displayed. And if you press the [ / ] dial, or the ENTER button on the remote controller... also perform the same operation by using the Play [ ] button. The first folder will be used during playback, the next track will put the DX-7555 into Group mode (see page 21). 2 Select a folder in sequential order.
... all folders that contain MP3 tracks appear at the same level. get track is set to the previous hierarchy, press the Stop [ ] button on the DX-7555, or the [ ] button on the remote controller, playback will be displayed. And if you press the [ / ] dial, or the ENTER button on the remote controller... also perform the same operation by using the Play [ ] button. The first folder will be used during playback, the next track will put the DX-7555 into Group mode (see page 21). 2 Select a folder in sequential order.
Owner Manual
Page 15
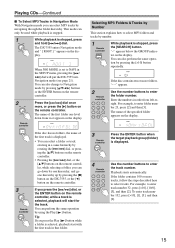
... 21). Selecting MP3 Folders & Tracks by Number This section explains how to NAVI in a same hierarchy by pressing the [ ] button on the DX-7555, or the [ ] button on the remote controller, while a track is stopped, press the [SEARCH] button. Playback starts automatically. To enter track... number 132, press [>10], [1], [3], and then [2]. 15 and go down from left-toright. The DX-7555 enters Navigation mode and " [ ROOT ] " appears on the display. 2 Remote controller 3 Remote controller When JOG MODE is set to select MP3 ...
... 21). Selecting MP3 Folders & Tracks by Number This section explains how to NAVI in a same hierarchy by pressing the [ ] button on the DX-7555, or the [ ] button on the remote controller, while a track is stopped, press the [SEARCH] button. Playback starts automatically. To enter track... number 132, press [>10], [1], [3], and then [2]. 15 and go down from left-toright. The DX-7555 enters Navigation mode and " [ ROOT ] " appears on the display. 2 Remote controller 3 Remote controller When JOG MODE is set to select MP3 ...
Owner Manual
Page 16
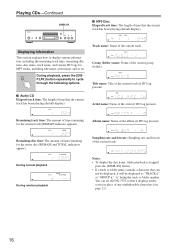
... (REMAIN and TOTAL indicators appear). Remaining disc time: The amount of time that the current track has been playing (default display). You can set the DX-7555 so that can- Playing CDs-Continued DISPLAY I Audio CD Elapsed track time: The length of the current track. Album name: Name of the current track...
... (REMAIN and TOTAL indicators appear). Remaining disc time: The amount of time that the current track has been playing (default display). You can set the DX-7555 so that can- Playing CDs-Continued DISPLAY I Audio CD Elapsed track time: The length of the current track. Album name: Name of the current track...
Owner Manual
Page 17
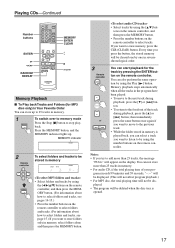
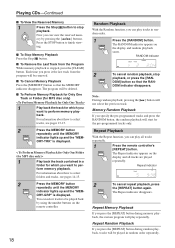
MEMORY indicator 2 Remote controller To select folders and tracks to store folders only in memory, select folders alone and then press the MEMORY button. 3 Remote controller or • Select tracks by pressing the ENTER button on the remote controller. You can start playback for MP3 disc only) in Your Favorite Order You can store up . Notes: • If you want to the previous track. • While the folder stored in memory is played back, you can select a track you press the button, the stored memory will be deleted when the disc tray is opened. 17 back. You can also ...
MEMORY indicator 2 Remote controller To select folders and tracks to store folders only in memory, select folders alone and then press the MEMORY button. 3 Remote controller or • Select tracks by pressing the ENTER button on the remote controller. You can start playback for MP3 disc only) in Your Favorite Order You can store up . Notes: • If you want to the previous track. • While the folder stored in memory is played back, you can select a track you press the button, the stored memory will be deleted when the disc tray is opened. 17 back. You can also ...
Owner Manual
Page 18
ory by using the number buttons on the remote controller. 18 Random Playback With the Random function, you can play repeatedly. The program will play tracks in random order. 1 Press the [RANDOM] button. back. The RANDOM indicator appears on the display and all tracks repeatedly. 1 Press the remote controller's [REPEAT] button. DOM] button so that the MEMORY indicator disappears. Repeat Playback With the Repeat function, you can play - Press the STOP button to select tracks, see pages 14-15. 2 Press the MEMORY button repeatedly until the MEMORY ...
ory by using the number buttons on the remote controller. 18 Random Playback With the Random function, you can play repeatedly. The program will play tracks in random order. 1 Press the [RANDOM] button. back. The RANDOM indicator appears on the display and all tracks repeatedly. 1 Press the remote controller's [REPEAT] button. DOM] button so that the MEMORY indicator disappears. Repeat Playback With the Repeat function, you can play - Press the STOP button to select tracks, see pages 14-15. 2 Press the MEMORY button repeatedly until the MEMORY ...
Owner Manual
Page 19
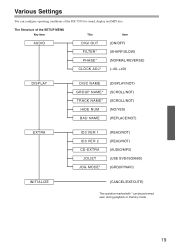
.../NOT) (READ/NOT) (AUDIO/MP3) (USE SVD/ISO9660) (GROUP/NAVI) INITIALIZE (CANCEL/EXECUTE) The operation marked with * can configure operating conditions of the DX-7555 for sound, display and MP3 disc. Various Settings You can be performed even during playback or memory mode. 19
.../NOT) (READ/NOT) (AUDIO/MP3) (USE SVD/ISO9660) (GROUP/NAVI) INITIALIZE (CANCEL/EXECUTE) The operation marked with * can configure operating conditions of the DX-7555 for sound, display and MP3 disc. Various Settings You can be performed even during playback or memory mode. 19
Owner Manual
Page 20
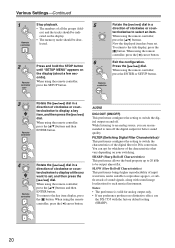
... [ / ] dial in a direction of sound signals, along with sound image localization for analog output only. • If any preference produces no distinctive effect, use the DX-7555 with the factory default setting (SHARP). 20 AUDIO DIGI OUT (ON/OFF) This preference configures the setting to switch the characteristics of input...
... [ / ] dial in a direction of sound signals, along with sound image localization for analog output only. • If any preference produces no distinctive effect, use the DX-7555 with the factory default setting (SHARP). 20 AUDIO DIGI OUT (ON/OFF) This preference configures the setting to switch the characteristics of input...
