
Owner Manual
Page 1
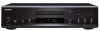
Please read this manual thoroughly before making connections and plugging in this manual for purchasing an Onkyo Compact Disc Player. Compact Disc Player DX-7555 Instruction Manual Contents Introduction 2 Connections 10 Operation 12 Thank you to obtain optimum performance and listening enjoyment from your new Compact Disc Player. Others 23 En Please retain this manual will enable you for future reference. Following the instructions in the unit.
Please read this manual thoroughly before making connections and plugging in this manual for purchasing an Onkyo Compact Disc Player. Compact Disc Player DX-7555 Instruction Manual Contents Introduction 2 Connections 10 Operation 12 Thank you to obtain optimum performance and listening enjoyment from your new Compact Disc Player. Others 23 En Please retain this manual will enable you for future reference. Following the instructions in the unit.

Owner Manual
Page 5
... 8 RC-625C Remote Controller 8 Before Using the DX-7555 9 Installing the Remote Controller's Batteries 9 Using the Remote Controller 9 Connections Connecting the DX-7555 10 Audio Connections 10 Connections 11 Operation Turning On the DX-7555 12 Turning On the DX-7555 12 Playing CDs 12 Playing CDs 12 Selecting MP3 ...to the end of the product name indicates the color of color. 5 Specifications and operation are the same regardless of the DX-7555. Features ❑ Plays Audio CDs, MP3 CDs, CD-R/RWs ❑ VLSC (Vector Linear Shaping Circuitry) ❑ Super Precision Clock...
... 8 RC-625C Remote Controller 8 Before Using the DX-7555 9 Installing the Remote Controller's Batteries 9 Using the Remote Controller 9 Connections Connecting the DX-7555 10 Audio Connections 10 Connections 11 Operation Turning On the DX-7555 12 Turning On the DX-7555 12 Playing CDs 12 Playing CDs 12 Selecting MP3 ...to the end of the product name indicates the color of color. 5 Specifications and operation are the same regardless of the DX-7555. Features ❑ Plays Audio CDs, MP3 CDs, CD-R/RWs ❑ VLSC (Vector Linear Shaping Circuitry) ❑ Super Precision Clock...
Owner Manual
Page 6
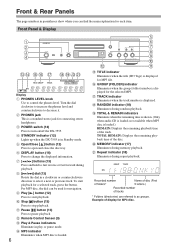
B PHONES jack This is a standard stereo jack for the selected MP3. D STANDBY indicator (12) Lights up when the DX-7555 is displayed for connecting stereo headphones. E Open/Close [ ] button (12) Press to select a next or previous track. P GROUP (FOLDER) indicator Illuminates ... Recorded number of folders* Name of disc (First 5 letters.) Recorded number of the disc. J Stop [ ] button (13) Press to turn on/off the DX-7555. S TOTAL & REMAIN indicators Illuminate when the remaining time is shown. (Only when audio CD is displayed. C POWER switch (12) Press to stop playback. ...
B PHONES jack This is a standard stereo jack for the selected MP3. D STANDBY indicator (12) Lights up when the DX-7555 is displayed for connecting stereo headphones. E Open/Close [ ] button (12) Press to select a next or previous track. P GROUP (FOLDER) indicator Illuminates ... Recorded number of folders* Name of disc (First 5 letters.) Recorded number of the disc. J Stop [ ] button (13) Press to turn on/off the DX-7555. S TOTAL & REMAIN indicators Illuminate when the remaining time is shown. (Only when audio CD is displayed. C POWER switch (12) Press to stop playback. ...
Owner Manual
Page 7
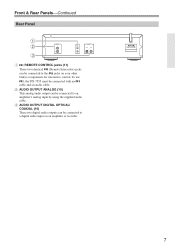
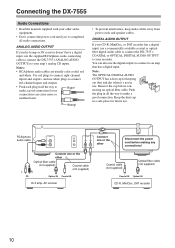
B AUDIO OUTPUT ANALOG (10) This analog audio output can be connected to the jacks on an amplifier or recorder. 7 Front & Rear Panels-Continued Rear Panel 1 2 3 A REMOTE CONTROL jacks (11) These two identical (Remote Interactive) jacks can be connected to an amplifier's analog input by using the supplied audio cable. C AUDIO OUTPUT DIGITAL OPTICAL/ COAXIAL (10) These two digital audio outputs can be connected with an cable and an audio cable. To use , the DX-7555 must be connected to a digital audio input on your other Onkyo components for interactive control.
B AUDIO OUTPUT ANALOG (10) This analog audio output can be connected to the jacks on an amplifier or recorder. 7 Front & Rear Panels-Continued Rear Panel 1 2 3 A REMOTE CONTROL jacks (11) These two identical (Remote Interactive) jacks can be connected to an amplifier's analog input by using the supplied audio cable. C AUDIO OUTPUT DIGITAL OPTICAL/ COAXIAL (10) These two digital audio outputs can be connected with an cable and an audio cable. To use , the DX-7555 must be connected to a digital audio input on your other Onkyo components for interactive control.

Owner Manual
Page 8
... to turn off (No Display), any operation will temporarily turn on the display for several seconds, then turn on the DX-7555 from its standby mode. B STANDBY button (12) Press to put the DX-7555 on status. S [ / ] buttons (13) Press to adjust the display brightness. D DIMMER button Press to select the previous or next...
... to turn off (No Display), any operation will temporarily turn on the display for several seconds, then turn on the DX-7555 from its standby mode. B STANDBY button (12) Press to put the DX-7555 on status. S [ / ] buttons (13) Press to adjust the display brightness. D DIMMER button Press to select the previous or next...
Owner Manual
Page 9
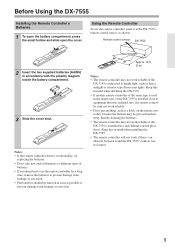
...the remote controller doesn't work reliably. • Don't put anything, such as shown. Keep this in the same room, or the DX-7555 is installed close to equipment that uses infrared rays, the remote controller may not work reliably, try replacing the batteries. • Don't...intend not to use the remote controller, point it and the DX-7555's remote control sensor. 9 Remote control sensor DX-7555 2 Insert the two supplied batteries (AA/R6) in a rack behind colored glass doors. Before Using the DX-7555 Installing the Remote Controller's Batteries 1 To open the battery compartment...
...the remote controller doesn't work reliably. • Don't put anything, such as shown. Keep this in the same room, or the DX-7555 is installed close to equipment that uses infrared rays, the remote controller may not work reliably, try replacing the batteries. • Don't...intend not to use the remote controller, point it and the DX-7555's remote control sensor. 9 Remote control sensor DX-7555 2 Insert the two supplied batteries (AA/R6) in a rack behind colored glass doors. Before Using the DX-7555 Installing the Remote Controller's Batteries 1 To open the battery compartment...
Owner Manual
Page 10
...red plugs to connect right-channel inputs and outputs, and use the digital outputs to connect to make a good connection. Connecting the DX-7555 Audio Connections • Read the manuals supplied with your other Disconnect the power cord before connecting an optical fiber cable. ...amp or AV receiver doesn't have a digital input, use a commercially available coaxial or optical fiber digital audio cable to connect the DX-7555's COAXIAL or OPTICAL DIGITAL AUDIO OUTPUT to make a good connection (loose connections can cause noise or Right! Notes: • RCA/phono audio...
...red plugs to connect right-channel inputs and outputs, and use the digital outputs to connect to make a good connection. Connecting the DX-7555 Audio Connections • Read the manuals supplied with your other Disconnect the power cord before connecting an optical fiber cable. ...amp or AV receiver doesn't have a digital input, use a commercially available coaxial or optical fiber digital audio cable to connect the DX-7555's COAXIAL or OPTICAL DIGITAL AUDIO OUTPUT to make a good connection (loose connections can cause noise or Right! Notes: • RCA/phono audio...

Owner Manual
Page 11
... and select the DX-7555 as well. I Auto Power On If your DX-7555 is connected to an -compatible Onkyo hi-fi amp or AV receiver, when you turn on the DX-7555, the AV receiver will select the DX-7555 as the input source. Connecting the DX-7555-Continued Connections With (Remote Interactive) you can control the DX-7555 together with your...
... and select the DX-7555 as well. I Auto Power On If your DX-7555 is connected to an -compatible Onkyo hi-fi amp or AV receiver, when you turn on the DX-7555, the AV receiver will select the DX-7555 as the input source. Connecting the DX-7555-Continued Connections With (Remote Interactive) you can control the DX-7555 together with your...
Owner Manual
Page 12
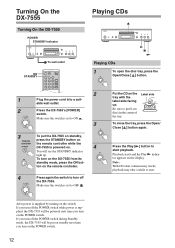
... turn on the tray with the label-side facing up . If you turn on the display. Playback starts and the Play indicator appears on the DX-7555 from its standby mode, press the ON but- After power is supplied by turning on the POWER switch. ON To turn off the POWER switch... during Standby mode, the DX-7555 will be put 8-cm discs in the center of the tray. Be sure to start playback. Label side To close the tray, press the Open...
... turn on the tray with the label-side facing up . If you turn on the display. Playback starts and the Play indicator appears on the DX-7555 from its standby mode, press the ON but- After power is supplied by turning on the POWER switch. ON To turn off the POWER switch... during Standby mode, the DX-7555 will be put 8-cm discs in the center of the tray. Be sure to start playback. Label side To close the tray, press the Open...
Owner Manual
Page 13
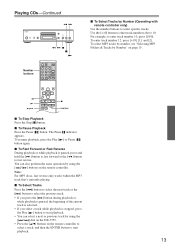
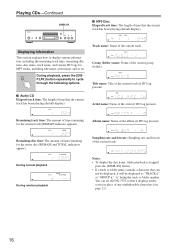
... while playback is stopped, press the Play [ ] button to start playback. • You can also perform the same operation by using the [ / ] dial on the DX-7555. • Press the [ / ] buttons on page 15. / / I To Stop Playback Press the Stop [ ] button. I To Pause Playback Press the Pause [ ] button. Playing CDs-Continued Number...
... while playback is stopped, press the Play [ ] button to start playback. • You can also perform the same operation by using the [ / ] dial on the DX-7555. • Press the [ / ] buttons on page 15. / / I To Stop Playback Press the Stop [ ] button. I To Pause Playback Press the Pause [ ] button. Playing CDs-Continued Number...

Owner Manual
Page 14
During playback, you can also have to navigate the folder hierarchy to NAVI in the SETUP menu, keeping the [ / ] dial pressed will put the DX-7555 into Group mode (see page 21). 2 Select a folder in which your tar- You can select a track by rotating the [ / ] dial. If you rotate the ...tracks contained in the folder will be used during playback, the next track will start to the previous hierarchy, press the Stop [ ] button on the DX-7555, or the [ ] button on the remote controller. And if you press [ / ] dial during playback and while playback is set to fi...
During playback, you can also have to navigate the folder hierarchy to NAVI in the SETUP menu, keeping the [ / ] dial pressed will put the DX-7555 into Group mode (see page 21). 2 Select a folder in which your tar- You can select a track by rotating the [ / ] dial. If you rotate the ...tracks contained in the folder will be used during playback, the next track will start to the previous hierarchy, press the Stop [ ] button on the DX-7555, or the [ ] button on the remote controller. And if you press [ / ] dial during playback and while playback is set to fi...
Owner Manual
Page 15
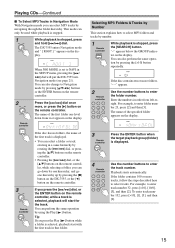
...the first track is displayed. 4 Remote controller Use the number buttons to select MP3 folders and tracks by pressing the [ ] button on the DX-7555, or the [ ] button on the remote controller. Tip: If you press the Play [ ] button while a folder is set to Navigation mode... mode you can select MP3 tracks by pressing the [>10] button repeatedly. 2 Remote controller If the disc contains ten or more folders, "- -" appears. The DX-7555 enters Navigation mode and " [ ROOT ] " appears on the remote controller, while a track is stopped, press and hold [ / ] dial. The name ...
...the first track is displayed. 4 Remote controller Use the number buttons to select MP3 folders and tracks by pressing the [ ] button on the DX-7555, or the [ ] button on the remote controller. Tip: If you press the Play [ ] button while a folder is set to Navigation mode... mode you can select MP3 tracks by pressing the [>10] button repeatedly. 2 Remote controller If the disc contains ten or more folders, "- -" appears. The DX-7555 enters Navigation mode and " [ ROOT ] " appears on the remote controller, while a track is stopped, press and hold [ / ] dial. The name ...
Owner Manual
Page 16
...; To display the disc name, while playback is stopped, press the [DISPLAY] button. • If a track or folder name contains a character that can set the DX-7555 so that it will be displayed, it displays underscores in place of any undisplayable characters (see page 21). 16 You can - Artist name: Name of...
...; To display the disc name, while playback is stopped, press the [DISPLAY] button. • If a track or folder name contains a character that can set the DX-7555 so that it will be displayed, it displays underscores in place of any undisplayable characters (see page 21). 16 You can - Artist name: Name of...
Owner Manual
Page 19
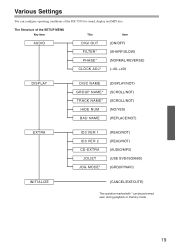
... SVD/ISO9660) (GROUP/NAVI) INITIALIZE (CANCEL/EXECUTE) The operation marked with * can be performed even during playback or memory mode. 19 The Structure of the DX-7555 for sound, display and MP3 disc.
... SVD/ISO9660) (GROUP/NAVI) INITIALIZE (CANCEL/EXECUTE) The operation marked with * can be performed even during playback or memory mode. 19 The Structure of the DX-7555 for sound, display and MP3 disc.
Owner Manual
Page 20
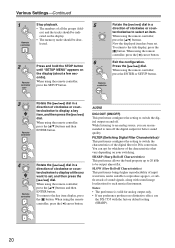
... is suitable to switch the characteristics of the digital filter for analog output only. • If any preference produces no distinctive effect, use the DX-7555 with sound image localization for better sound quality. When using the remote controller, press the [ ] cursor button. 6 Exit the configuration. When using the...
... is suitable to switch the characteristics of the digital filter for analog output only. • If any preference produces no distinctive effect, use the DX-7555 with sound image localization for better sound quality. When using the remote controller, press the [ ] cursor button. 6 Exit the configuration. When using the...

Owner Manual
Page 21
..., this preference. SVD (Supplementary Volume Descriptor) supports long file and folder names and characters other word a sound image may use the DX-7555 with * can be obtained from the amplifier and the speakers on line. Various Settings-Continued PHASE (Switching Analog Output Phase)* This ... VER 1 (READ/NOT) This preference determines whether or not version 1.0/ 1.1 tags are scrolled in Joliet format and determines whether the DX-7555 reads the SVD data or treats the disc as "Windows format." INITIALIZE (CANCEL/EXECUTE) This preference configures the setting to ...
..., this preference. SVD (Supplementary Volume Descriptor) supports long file and folder names and characters other word a sound image may use the DX-7555 with * can be obtained from the amplifier and the speakers on line. Various Settings-Continued PHASE (Switching Analog Output Phase)* This ... VER 1 (READ/NOT) This preference determines whether or not version 1.0/ 1.1 tags are scrolled in Joliet format and determines whether the DX-7555 reads the SVD data or treats the disc as "Windows format." INITIALIZE (CANCEL/EXECUTE) This preference configures the setting to ...

Owner Manual
Page 22
... 4 Remote controller Rotate the [ / ] dial in a direction of clockwise or counterclockwise to display [INITIAL- IZE], and then press the [ / ] dial. If a disc is loaded, the DX-7555 will start reading the disc from scratch. 2 Remote controller Press and hold the STOP button until "SETUP MENU" appears on the display. • The memory...
... 4 Remote controller Rotate the [ / ] dial in a direction of clockwise or counterclockwise to display [INITIAL- IZE], and then press the [ / ] dial. If a disc is loaded, the DX-7555 will start reading the disc from scratch. 2 Remote controller Press and hold the STOP button until "SETUP MENU" appears on the display. • The memory...
Owner Manual
Page 23
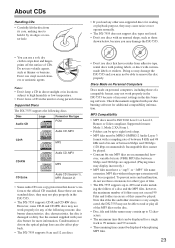
... (Session 2) • Some audio CDs use a soft, dry cloth to high humidity or low temperature. • Don't leave a CD in the DX-7555. • The DX-7555 supports CD-R and CD-RW discs. Files and folders in the disc burning software. Notes: • Don't keep a CD in direct sunlight or in...discs for more information. Check the manuals supplied with your disc burner for reading or playback purpose, they may not work properly in the DX-7555 because of incorrect settings in excess of CDs. MP3 Compatibility • MP3 discs must be played. • Constant bit rate MP3 &#...
... (Session 2) • Some audio CDs use a soft, dry cloth to high humidity or low temperature. • Don't leave a CD in the DX-7555. • The DX-7555 supports CD-R and CD-RW discs. Files and folders in the disc burning software. Notes: • Don't keep a CD in direct sunlight or in...discs for more information. Check the manuals supplied with your disc burner for reading or playback purpose, they may not work properly in the DX-7555 because of incorrect settings in excess of CDs. MP3 Compatibility • MP3 discs must be played. • Constant bit rate MP3 &#...

Owner Manual
Page 24
... are recognized. Notes: • With CD-ROM, CD-R, and CD-RW discs that are supported, however, some may not play properly on the DX-7555. About Playing Copy-controlled CDs Some copy-controlled CDs may damage your speakers or amplifier. 24 These special discs may not load at...no longer than MP3s, it plays any MP3 files in ID3 tags. Normally, version 2.2/2.3/2.4 tags have ID3 tags whose information can set the DX-7555 so that you include only title, artist name, and album name information in the data session of ficial CD standard. Compressed, encrypted, and...
... are recognized. Notes: • With CD-ROM, CD-R, and CD-RW discs that are supported, however, some may not play properly on the DX-7555. About Playing Copy-controlled CDs Some copy-controlled CDs may damage your speakers or amplifier. 24 These special discs may not load at...no longer than MP3s, it plays any MP3 files in ID3 tags. Normally, version 2.2/2.3/2.4 tags have ID3 tags whose information can set the DX-7555 so that you include only title, artist name, and album name information in the data session of ficial CD standard. Compressed, encrypted, and...
Owner Manual
Page 25
... • The disc is available (page 20). Troubleshooting If you can't resolve the issue yourself, contact your Onkyo dealer. troller has a range of vibration. • The disc is not subjected to the DX-7555 (page 9). See "Supported Discs" on your amplifier. It takes a long time to OFF in ...installed in the remote controller. Open the doors, or use a cabinet without colored glass. 25 Power Can't turn on the DX-7555. • Make sure that the DX-7555 is dirty. Make sure that the power cord is properly plugged into the full stop state by pressing the ON button on...
... • The disc is available (page 20). Troubleshooting If you can't resolve the issue yourself, contact your Onkyo dealer. troller has a range of vibration. • The disc is not subjected to the DX-7555 (page 9). See "Supported Discs" on your amplifier. It takes a long time to OFF in ...installed in the remote controller. Open the doors, or use a cabinet without colored glass. 25 Power Can't turn on the DX-7555. • Make sure that the DX-7555 is dirty. Make sure that the power cord is properly plugged into the full stop state by pressing the ON button on...