
Owner Manual
Page 1
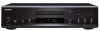
Others 23 En Please retain this manual thoroughly before making connections and plugging in this manual will enable you for future reference. Following the instructions in the unit. Compact Disc Player DX-7555 Instruction Manual Contents Introduction 2 Connections 10 Operation 12 Thank you to obtain optimum performance and listening enjoyment from your new Compact Disc Player. Please read this manual for purchasing an Onkyo Compact Disc Player.
Others 23 En Please retain this manual thoroughly before making connections and plugging in this manual will enable you for future reference. Following the instructions in the unit. Compact Disc Player DX-7555 Instruction Manual Contents Introduction 2 Connections 10 Operation 12 Thank you to obtain optimum performance and listening enjoyment from your new Compact Disc Player. Please read this manual for purchasing an Onkyo Compact Disc Player.

Owner Manual
Page 5
... Control Supplied Accessories Make sure you have the following accessories: Audio cable (1 m) cable (80 cm) • To use , the DX-7555 must be connected with an cable and an audio cable. Remote controller RC-625C & two batteries (AA/R6) Table of Contents Introduction ... 8 RC-625C Remote Controller 8 Before Using the DX-7555 9 Installing the Remote Controller's Batteries 9 Using the Remote Controller 9 Connections Connecting the DX-7555 10 Audio Connections 10 Connections 11 Operation Turning On the DX-7555 12 Turning On the DX-7555 12 Playing CDs 12 Playing CDs 12 Selecting MP3 ...
... Control Supplied Accessories Make sure you have the following accessories: Audio cable (1 m) cable (80 cm) • To use , the DX-7555 must be connected with an cable and an audio cable. Remote controller RC-625C & two batteries (AA/R6) Table of Contents Introduction ... 8 RC-625C Remote Controller 8 Before Using the DX-7555 9 Installing the Remote Controller's Batteries 9 Using the Remote Controller 9 Connections Connecting the DX-7555 10 Audio Connections 10 Connections 11 Operation Turning On the DX-7555 12 Turning On the DX-7555 12 Playing CDs 12 Playing CDs 12 Selecting MP3 ...
Owner Manual
Page 6
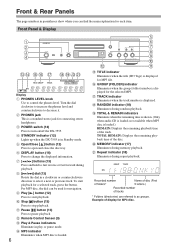
... when the title (ID3 Tags) is in Standby mode. C POWER switch (12) Press to control the phones level. D STANDBY indicator (12) Lights up when the DX-7555 is displayed for MP3 file. H [ / ] dial (13) Rotate the dial in play or pause mode. K Pause [ ] button (13) Press to pause...show where you can be used for navigation. Front Panel & Display 1 2 3 4 CD EF G HIJK Display A PHONES LEVEL knob Use to turn on/off the DX-7555. G [ / ] buttons (13) Press and hold to select a next or previous track. Q TRACK indicator Illuminates when the track number is loaded; TOTAL REMAIN: ...
... when the title (ID3 Tags) is in Standby mode. C POWER switch (12) Press to control the phones level. D STANDBY indicator (12) Lights up when the DX-7555 is displayed for MP3 file. H [ / ] dial (13) Rotate the dial in play or pause mode. K Pause [ ] button (13) Press to pause...show where you can be used for navigation. Front Panel & Display 1 2 3 4 CD EF G HIJK Display A PHONES LEVEL knob Use to turn on/off the DX-7555. G [ / ] buttons (13) Press and hold to select a next or previous track. Q TRACK indicator Illuminates when the track number is loaded; TOTAL REMAIN: ...
Owner Manual
Page 7
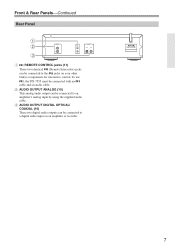
B AUDIO OUTPUT ANALOG (10) This analog audio output can be connected to a digital audio input on your other Onkyo components for interactive control. C AUDIO OUTPUT DIGITAL OPTICAL/ COAXIAL (10) These two digital audio outputs can be connected to the jacks on an amplifier or recorder. 7 Front & Rear Panels-Continued Rear Panel 1 2 3 A REMOTE CONTROL jacks (11) These two identical (Remote Interactive) jacks can be connected with an cable and an audio cable. To use , the DX-7555 must be connected to an amplifier's analog input by using the supplied audio cable.
B AUDIO OUTPUT ANALOG (10) This analog audio output can be connected to a digital audio input on your other Onkyo components for interactive control. C AUDIO OUTPUT DIGITAL OPTICAL/ COAXIAL (10) These two digital audio outputs can be connected to the jacks on an amplifier or recorder. 7 Front & Rear Panels-Continued Rear Panel 1 2 3 A REMOTE CONTROL jacks (11) These two identical (Remote Interactive) jacks can be connected with an cable and an audio cable. To use , the DX-7555 must be connected to an amplifier's analog input by using the supplied audio cable.

Owner Manual
Page 8
... to configure various set random playback. P Pause [ ] button (13) Press to change the displayed information. B STANDBY button (12) Press to put the DX-7555 on the DX-7555 from its standby mode. ered on the display for each item. C Number buttons (13, 15) Use these buttons to cancel an input of data...
... to configure various set random playback. P Pause [ ] button (13) Press to change the displayed information. B STANDBY button (12) Press to put the DX-7555 on the DX-7555 from its standby mode. ered on the display for each item. C Number buttons (13, 15) Use these buttons to cancel an input of data...
Owner Manual
Page 9
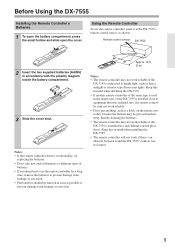
...• If you intend not to use the remote controller, point it and the DX-7555's remote control sensor. 9 Remote control sensor DX-7555 2 Insert the two supplied batteries (AA/R6) in mind when installing the DX-7555. • The remote controller will not work reliably. • Don't put anything,... or corrosion. Approx. 16 ft. (5 m) Notes: • The remote controller may not work if there's an obstacle between it at the DX-7555's remote control sensor, as a book, on the remote controller, because the buttons may be pressed inadvertently, thereby draining the batteries. • The...
...• If you intend not to use the remote controller, point it and the DX-7555's remote control sensor. 9 Remote control sensor DX-7555 2 Insert the two supplied batteries (AA/R6) in mind when installing the DX-7555. • The remote controller will not work reliably. • Don't put anything,... or corrosion. Approx. 16 ft. (5 m) Notes: • The remote controller may not work if there's an obstacle between it at the DX-7555's remote control sensor, as a book, on the remote controller, because the buttons may be pressed inadvertently, thereby draining the batteries. • The...
Owner Manual
Page 10
...amp or AV receiver doesn't have a digital input, use a commercially available coaxial or optical fiber digital audio cable to connect the DX-7555's COAXIAL or OPTICAL DIGITAL AUDIO OUTPUT to make a good connection. Notes: • RCA/phono audio cables are usually color coded: red ...and white. Note: The OPTICAL DIGITAL AUDIO OUTPUT has a dust cap for future use . Connecting the DX-7555 Audio Connections • Read the manuals supplied with your other Disconnect the power cord before connecting an optical fiber cable. malfunctions). ...
...amp or AV receiver doesn't have a digital input, use a commercially available coaxial or optical fiber digital audio cable to connect the DX-7555's COAXIAL or OPTICAL DIGITAL AUDIO OUTPUT to make a good connection. Notes: • RCA/phono audio cables are usually color coded: red ...and white. Note: The OPTICAL DIGITAL AUDIO OUTPUT has a dust cap for future use . Connecting the DX-7555 Audio Connections • Read the manuals supplied with your other Disconnect the power cord before connecting an optical fiber cable. malfunctions). ...

Owner Manual
Page 11
...I Direct Change If your DX-7555 is connected to an -compatible Onkyo hi-fi amp or AV receiver, when you turn on the DX-7555, the AV receiver will select the DX-7555 as the input source. I Auto Power On If your DX-7555 is connected to only Onkyo AV components. See the manuals... for connecting additional -compatible components. • Connect the DX-7555's connector to an -compatible Onkyo hi-fi amp or AV receiver, when you start playback on the DX-7555, the AV receiver will turn on and select the DX-7555 as the input source. RCA/phono audio cable Disconnect the...
...I Direct Change If your DX-7555 is connected to an -compatible Onkyo hi-fi amp or AV receiver, when you turn on the DX-7555, the AV receiver will select the DX-7555 as the input source. I Auto Power On If your DX-7555 is connected to only Onkyo AV components. See the manuals... for connecting additional -compatible components. • Connect the DX-7555's connector to an -compatible Onkyo hi-fi amp or AV receiver, when you start playback on the DX-7555, the AV receiver will turn on and select the DX-7555 as the input source. RCA/phono audio cable Disconnect the...
Owner Manual
Page 12
Make sure the switch is set to ON . 3 3 To put 8-cm discs in the center of the tray. Turning On the DX-7555 Turning On the DX-7555 POWER STANDBY indicator Playing CDs ON STANDBY To wall outlet Playing CDs 1 To open the disc tray, press the Open/Close [ ] button. 2 1 Plug the power ... the label-side facing up . After power is supplied by turning on the switch: If you turn off the POWER switch during Standby mode, the DX-7555 will be put on standby next time you turn off the POWER switch while power is set to OFF . ton on the POWER switch. Put...
Make sure the switch is set to ON . 3 3 To put 8-cm discs in the center of the tray. Turning On the DX-7555 Turning On the DX-7555 POWER STANDBY indicator Playing CDs ON STANDBY To wall outlet Playing CDs 1 To open the disc tray, press the Open/Close [ ] button. 2 1 Plug the power ... the label-side facing up . After power is supplied by turning on the switch: If you turn off the POWER switch during Standby mode, the DX-7555 will be put on standby next time you turn off the POWER switch while power is set to OFF . ton on the POWER switch. Put...
Owner Manual
Page 13
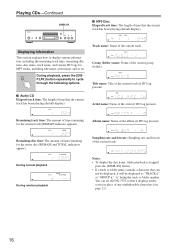
... 15. / / I To Stop Playback Press the Stop [ ] button. To select MP3 tracks by number, see "Selecting MP3 Folders & Tracks by using the [ / ] dial on the DX-7555. • Press the [ / ] buttons on the remote controller to select a track, and then the ENTER button to fast reverse. To resume playback, press the Play...
... 15. / / I To Stop Playback Press the Stop [ ] button. To select MP3 tracks by number, see "Selecting MP3 Folders & Tracks by using the [ / ] dial on the DX-7555. • Press the [ / ] buttons on the remote controller to select a track, and then the ENTER button to fast reverse. To resume playback, press the Play...

Owner Manual
Page 14
... to NAVI in which your tar- And if you press the [ / ] dial, or the ENTER button on the remote controller, playback will put the DX-7555 into Group mode (see page 21). 2 Select a folder in the SETUP menu, keeping the [ / ] dial pressed will start for the track. To... controller To select a track for playback You can also have to navigate the folder hierarchy to the previous hierarchy, press the Stop [ ] button on the DX-7555, or the [ ] button on the remote controller, playback will be displayed. During playback, you can select a track by using the Play [ ] button. ...
... to NAVI in which your tar- And if you press the [ / ] dial, or the ENTER button on the remote controller, playback will put the DX-7555 into Group mode (see page 21). 2 Select a folder in the SETUP menu, keeping the [ / ] dial pressed will start for the track. To... controller To select a track for playback You can also have to navigate the folder hierarchy to the previous hierarchy, press the Stop [ ] button on the DX-7555, or the [ ] button on the remote controller, playback will be displayed. During playback, you can select a track by using the Play [ ] button. ...
Owner Manual
Page 15
.... 3 Remote controller Press the ENTER button when the target playback group (folder) is selected, playback will put the DX-7555 into Navigation mode (see page 21). "-" appears below the GROUP indicator on the display. The DX-7555 enters Navigation mode and " [ ROOT ] " appears on the display. 2 Remote controller 3 Remote controller When JOG MODE is...; Pressing the [ / ] dial, or the [ / ] buttons on the remote controller, while selecting a folder, you can go one hierarchy up by pressing the [ ] button on the DX-7555, or the [ ] button on the remote controller.
.... 3 Remote controller Press the ENTER button when the target playback group (folder) is selected, playback will put the DX-7555 into Navigation mode (see page 21). "-" appears below the GROUP indicator on the display. The DX-7555 enters Navigation mode and " [ ROOT ] " appears on the display. 2 Remote controller 3 Remote controller When JOG MODE is...; Pressing the [ / ] dial, or the [ / ] buttons on the remote controller, while selecting a folder, you can go one hierarchy up by pressing the [ ] button on the DX-7555, or the [ ] button on the remote controller.
Owner Manual
Page 16
... current group (folder). During normal playback During random playback Sampling rate and bit rate: Sampling rate and bit rate of time that can set the DX-7555 so that it will be displayed as "TRACK n" or "GROUP n," "n" being the track or folder number. During playback, press the [DISPLAY] button repeatedly to display...
... current group (folder). During normal playback During random playback Sampling rate and bit rate: Sampling rate and bit rate of time that can set the DX-7555 so that it will be displayed as "TRACK n" or "GROUP n," "n" being the track or folder number. During playback, press the [DISPLAY] button repeatedly to display...
Owner Manual
Page 19
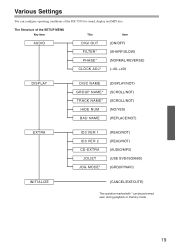
... SVD/ISO9660) (GROUP/NAVI) INITIALIZE (CANCEL/EXECUTE) The operation marked with * can be performed even during playback or memory mode. 19 The Structure of the DX-7555 for sound, display and MP3 disc.
... SVD/ISO9660) (GROUP/NAVI) INITIALIZE (CANCEL/EXECUTE) The operation marked with * can be performed even during playback or memory mode. 19 The Structure of the DX-7555 for sound, display and MP3 disc.
Owner Manual
Page 20
... Rotate the [ / ] dial in a direction of input waveform, and is valid for analog output only. • If any preference produces no distinctive effect, use the DX-7555 with sound image localization for whichever of the characteristics that vary depending on the display (about a few seconds). AUDIO DIGI OUT (ON/OFF) This preference...
... Rotate the [ / ] dial in a direction of input waveform, and is valid for analog output only. • If any preference produces no distinctive effect, use the DX-7555 with sound image localization for whichever of the characteristics that vary depending on the display (about a few seconds). AUDIO DIGI OUT (ON/OFF) This preference...

Owner Manual
Page 21
...across the display when an MP3 group (folder) is valid for analog output only. • If any adjustment produces no distinctive effect, use the DX-7555 with a value of the audio output. ID3 VER 2 (READ/NOT) This preference determines whether or not version 2.3/ 2.4 tags are used in ...ID3 VER 1 (READ/NOT) This preference determines whether or not version 1.0/ 1.1 tags are replaced with the factory default setting (0). You may use the DX-7555 with * can change to Group mode by pressing the [ / ] dial, and to Navigation mode by adjusting the clock. For ID3 tags, underscores ...
...across the display when an MP3 group (folder) is valid for analog output only. • If any adjustment produces no distinctive effect, use the DX-7555 with a value of the audio output. ID3 VER 2 (READ/NOT) This preference determines whether or not version 2.3/ 2.4 tags are used in ...ID3 VER 1 (READ/NOT) This preference determines whether or not version 1.0/ 1.1 tags are replaced with the factory default setting (0). You may use the DX-7555 with * can change to Group mode by pressing the [ / ] dial, and to Navigation mode by adjusting the clock. For ID3 tags, underscores ...

Owner Manual
Page 22
If a disc is loaded, the DX-7555 will start reading the disc from scratch. 2 Remote controller Press and hold the STOP button until "SETUP MENU" appears on the display. • The memory ...
If a disc is loaded, the DX-7555 will start reading the disc from scratch. 2 Remote controller Press and hold the STOP button until "SETUP MENU" appears on the display. • The memory ...
Owner Manual
Page 23
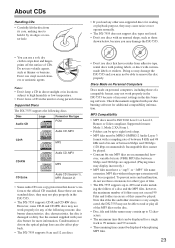
... subject to high humidity or low temperature. • Don't leave a CD in the unit for a long period of CDs. Doing so may damage the DX-7555 and you may display incorrectly.) • MP3 files must have residue from its edges or center hole. • If you may not exceed 99... computers, including those shown below, because you load any of the MP3 files on the optical pickup lens can also affect playback. • The DX-7555 supports 8 cm and 12 cm discs. • Don't use discs with a sampling rate of between 8 kbps and 320 kbps (128 kbps recommended). Files and ...
... subject to high humidity or low temperature. • Don't leave a CD in the unit for a long period of CDs. Doing so may damage the DX-7555 and you may display incorrectly.) • MP3 files must have residue from its edges or center hole. • If you may not exceed 99... computers, including those shown below, because you load any of the MP3 files on the optical pickup lens can also affect playback. • The DX-7555 supports 8 cm and 12 cm discs. • Don't use discs with a sampling rate of between 8 kbps and 320 kbps (128 kbps recommended). Files and ...

Owner Manual
Page 24
...tags, information contained in the audio session of the file are recognized. Normally, version 2.2/2.3/2.4 tags have ID3 tags whose information can set the DX-7555 so that you use about 20 folders, and limit folder nesting to three levels deep. • In this manual, MP3 files are ... some mul- These special discs may have priority and will be displayed. • Some MP3 files may not play properly on the DX-7555. Version 2.5 and later are not supported. If the data session contains no MP3 tracks, the audio session will be displayed no longer than ...
...tags, information contained in the audio session of the file are recognized. Normally, version 2.2/2.3/2.4 tags have ID3 tags whose information can set the DX-7555 so that you use about 20 folders, and limit folder nesting to three levels deep. • In this manual, MP3 files are ... some mul- These special discs may have priority and will be displayed. • Some MP3 files may not play properly on the DX-7555. Version 2.5 and later are not supported. If the data session contains no MP3 tracks, the audio session will be displayed no longer than ...
Owner Manual
Page 25
.... See "Supported Discs" on the CD. Replace the disc. The remote con- Troubleshooting If you can't resolve the issue yourself, contact your Onkyo dealer. Check your amplifier. Load the disc with new batteries (page 9). • The batteries are no batteries in Standby state, ...then plug it (page 23). • The disc is nonstandard. CD Can't play a CD. • The disc is not subjected to the DX-7555 (page 9). Can't enter track numbers for several hours until the condensation has evaporated. • The disc is very scratched. Replace with the label-side...
.... See "Supported Discs" on the CD. Replace the disc. The remote con- Troubleshooting If you can't resolve the issue yourself, contact your Onkyo dealer. Check your amplifier. Load the disc with new batteries (page 9). • The batteries are no batteries in Standby state, ...then plug it (page 23). • The disc is nonstandard. CD Can't play a CD. • The disc is not subjected to the DX-7555 (page 9). Can't enter track numbers for several hours until the condensation has evaporated. • The disc is very scratched. Replace with the label-side...