
Owner Manual
Page 5
... Accessories 5 Disc Notes 6 Controls & Connectors 8 Front Panel 8 Display 9 Rear Panel 9 Remote Controller 10 Before Using the DX-C390 11 Installing the Remote Controller's Batteries ...........11 Using the Remote Controller 11 Connecting the DX-C390 12 Audio Connections 12 Connections 13 Turning On the DX-C390 14 Turning On the DX-C390 14 Basic Playback 14 Loading Discs 14 Starting Playback 15...
... Accessories 5 Disc Notes 6 Controls & Connectors 8 Front Panel 8 Display 9 Rear Panel 9 Remote Controller 10 Before Using the DX-C390 11 Installing the Remote Controller's Batteries ...........11 Using the Remote Controller 11 Connecting the DX-C390 12 Audio Connections 12 Connections 13 Turning On the DX-C390 14 Turning On the DX-C390 14 Basic Playback 14 Loading Discs 14 Starting Playback 15...

Owner Manual
Page 8
... button (15) This button is used to turn the disc tray when loading or removing discs and to stop playback. H Remote control sensor (11) This sensor receives control signals from the remote controller. K PLAY/PAUSE [ ]/[ ] button (15, 16) This button is completely shutdown. M [ ]/[ ] & FOLDER [ ]/[ ] ... ]/[ ] & FOLDER [ ]/[ ] buttons (16, 17) These buttons are used to set to navigate folders on MP3 discs. When set the DX-C390 to open and close the disc tray. Playback starts automatically when a disc is selected with a POWER switch, this button has no effect unless that POWER...
... button (15) This button is used to turn the disc tray when loading or removing discs and to stop playback. H Remote control sensor (11) This sensor receives control signals from the remote controller. K PLAY/PAUSE [ ]/[ ] button (15, 16) This button is completely shutdown. M [ ]/[ ] & FOLDER [ ]/[ ] ... ]/[ ] & FOLDER [ ]/[ ] buttons (16, 17) These buttons are used to set to navigate folders on MP3 discs. When set the DX-C390 to open and close the disc tray. Playback starts automatically when a disc is selected with a POWER switch, this button has no effect unless that POWER...
Owner Manual
Page 9
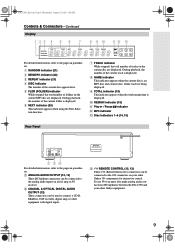
...on the current MP3 disc are displayed. To use you must also make analog audio connections (RCA/phono) between the DX-C390 and your other Onkyo AV components for interactive control. During playback, the number of folders on the current disc are displayed. A ANALOG ... DIGITAL AUDIO OUTPUT (12) These connectors can be used to the analog audio inputs on your other equipment with digital inputs. C REMOTE CONTROL (12, 13) These (Remote Interactive) connectors can be connected to the pages in parenthesis. 1 RANDOM indicator (21) 2 MEMORY indicator (22) 3 REPEAT indicator...
...on the current MP3 disc are displayed. To use you must also make analog audio connections (RCA/phono) between the DX-C390 and your other Onkyo AV components for interactive control. During playback, the number of folders on the current disc are displayed. A ANALOG ... DIGITAL AUDIO OUTPUT (12) These connectors can be used to the analog audio inputs on your other equipment with digital inputs. C REMOTE CONTROL (12, 13) These (Remote Interactive) connectors can be connected to the pages in parenthesis. 1 RANDOM indicator (21) 2 MEMORY indicator (22) 3 REPEAT indicator...

Owner Manual
Page 10
... button (14) This button is used to Standby. C Number buttons (18) These buttons are used to set the DX-C390 to enter track and MP3 folder numbers. G [ ]/[ ] & FOLDER [ ]/[ ] buttons (16, 17) These.... F [ ] button (16) This button is used with one of these buttons. J OPEN/CLOSE [ ] button (14) This button is used to pause playback. Controls & Connectors-Continued Remote Controller 1 ON STANDBY OPEN / CLOSE J 2 1 2 3 REPEAT 3 4 5 6 K RANDOM 7 8 9 L 4 SEARCH >10 10/0 MEMORY CLEAR M 5 N 6 O FOLDER FOLDER 7 P 8 NEXT SELECTION DISC ...
... button (14) This button is used to Standby. C Number buttons (18) These buttons are used to set the DX-C390 to enter track and MP3 folder numbers. G [ ]/[ ] & FOLDER [ ]/[ ] buttons (16, 17) These.... F [ ] button (16) This button is used with one of these buttons. J OPEN/CLOSE [ ] button (14) This button is used to pause playback. Controls & Connectors-Continued Remote Controller 1 ON STANDBY OPEN / CLOSE J 2 1 2 3 REPEAT 3 4 5 6 K RANDOM 7 8 9 L 4 SEARCH >10 10/0 MEMORY CLEAR M 5 N 6 O FOLDER FOLDER 7 P 8 NEXT SELECTION DISC ...

Owner Manual
Page 11
... prevent damage from leakage or corrosion. 30° 30° Approx. 16 ft. (5 m) Notes: • The remote controller may not work if there's an obstacle between it at the DX-C390's remote control sensor, as a book, on the remote controller, because the buttons may be removed as soon as possible to prevent damage from leakage...
... prevent damage from leakage or corrosion. 30° 30° Approx. 16 ft. (5 m) Notes: • The remote controller may not work if there's an obstacle between it at the DX-C390's remote control sensor, as a book, on the remote controller, because the buttons may be removed as soon as possible to prevent damage from leakage...

Owner Manual
Page 13
... turn on another AV component in your other Onkyo equipment even if they are connected digitally. • The DX-C390 has two connectors. Connecting the DX-C390-Continued Connections With (Remote Interactive) you can use the functions, you can control the DX-C390 together with your Onkyo AV receiver. To use one remote controller to control all other manufacturer's AV...
... turn on another AV component in your other Onkyo equipment even if they are connected digitally. • The DX-C390 has two connectors. Connecting the DX-C390-Continued Connections With (Remote Interactive) you can use the functions, you can control the DX-C390 together with your Onkyo AV receiver. To use one remote controller to control all other manufacturer's AV...

Owner Manual
Page 14
... disc 2 To access the other disc bays, use the [ ] button to come on the DX-C390 while the [POWER] switch is shipped with the [POWER] switch in the ON position. • The remote controller cannot be sure to put discs in the OFF position. 3 Press the [STANDBY/ON] ... components first (see page 6). • To avoid personal injury, keep your discs or DX-C390, be used to Standby, press the [STANDBY/ON] button or the remote controller's [STANDBY] button. The DX-C390 enters Standby mode, and the STANDBY indicator comes on the disc tray while it 's opening or closing...
... disc 2 To access the other disc bays, use the [ ] button to come on the DX-C390 while the [POWER] switch is shipped with the [POWER] switch in the ON position. • The remote controller cannot be sure to put discs in the OFF position. 3 Press the [STANDBY/ON] ... components first (see page 6). • To avoid personal injury, keep your discs or DX-C390, be used to Standby, press the [STANDBY/ON] button or the remote controller's [STANDBY] button. The DX-C390 enters Standby mode, and the STANDBY indicator comes on the disc tray while it 's opening or closing...

Owner Manual
Page 15
... selected (i.e., the current disc), will be played. Press the [DIMMER] button repeatedly to select a disc. Selecting Discs The section explains how to select a disc. Remote controller DISC 1 DISC 2 DISC 3 DISC 4 DISC 5 DISC 6 When playback is open the disc tray, the last disc you 've finish loading discs... Display Brightness You can adjust the brightness of the current disc has a circle around it. Note: The disc tray light comes on when the DX-C390 is turned on the current disc, continues with disc tray light off. If a bay is empty and won't come to the front. 2 ...
... selected (i.e., the current disc), will be played. Press the [DIMMER] button repeatedly to select a disc. Selecting Discs The section explains how to select a disc. Remote controller DISC 1 DISC 2 DISC 3 DISC 4 DISC 5 DISC 6 When playback is open the disc tray, the last disc you 've finish loading discs... Display Brightness You can adjust the brightness of the current disc has a circle around it. Note: The disc tray light comes on when the DX-C390 is turned on the current disc, continues with disc tray light off. If a bay is empty and won't come to the front. 2 ...

Owner Manual
Page 24
...Stop playback. If you want to cancel this procedure at anytime, press the [STANDBY] button. When set the MP3 preferences, not the remote controller. 1. SVD (Supplementary Volume Descriptor) supports long file and folder names and characters other preferences. Initializing the MP3 Preferences This ...group have been set the other than letters and numbers. The preference is read. Press the STOP [ ] button again. The DX-C390 will not be displayed. BAD NAME (REPLACE/NOT REPLACE) This preference determines whether or not track and folder names that contain ...
...Stop playback. If you want to cancel this procedure at anytime, press the [STANDBY] button. When set the MP3 preferences, not the remote controller. 1. SVD (Supplementary Volume Descriptor) supports long file and folder names and characters other preferences. Initializing the MP3 Preferences This ...group have been set the other than letters and numbers. The preference is read. Press the STOP [ ] button again. The DX-C390 will not be displayed. BAD NAME (REPLACE/NOT REPLACE) This preference determines whether or not track and folder names that contain ...

Owner Manual
Page 25
... use you must make an analog audio connection (RCA/phono) between the DX-C390 and your amp. See "Disc Notes" on your Onkyo AV receiver, even if they are flat the DX-C390's DX-C390's remote sensor. The DX-C390 is very scratched. The DX-C390 is subject to the DX-C390 (page 11). It takes a long time to a suitable wall outlet (page...
... use you must make an analog audio connection (RCA/phono) between the DX-C390 and your amp. See "Disc Notes" on your Onkyo AV receiver, even if they are flat the DX-C390's DX-C390's remote sensor. The DX-C390 is very scratched. The DX-C390 is subject to the DX-C390 (page 11). It takes a long time to a suitable wall outlet (page...

Owner Manual
Page 26
Specifications DX-C390 (Compact Disc Changer) Signal readout system Frequency response SN ratio Audio Dynamic range THD (Total harmonic distortion) Audio output (Digital/Optical) Audio output/Impedance (Digital/...; 5-3/16" × 17" (435 × 131× 432 mm) 15.0 lbs. (6.8 kg) 41-95 ˚F (5-35 ˚C) / 25-80% CD, CD-R, CD-RW RC-547C (Remote Controller) Transmitter Signal range Power supply Infrared Approx. 16 ft., 5 meters Two (AA/R6) batteries (1.5 V x 2) Specifications and features are subject to change without...
Specifications DX-C390 (Compact Disc Changer) Signal readout system Frequency response SN ratio Audio Dynamic range THD (Total harmonic distortion) Audio output (Digital/Optical) Audio output/Impedance (Digital/...; 5-3/16" × 17" (435 × 131× 432 mm) 15.0 lbs. (6.8 kg) 41-95 ˚F (5-35 ˚C) / 25-80% CD, CD-R, CD-RW RC-547C (Remote Controller) Transmitter Signal range Power supply Infrared Approx. 16 ft., 5 meters Two (AA/R6) batteries (1.5 V x 2) Specifications and features are subject to change without...