
Owner Manual
Page 1
Please retain this manual will enable you for purchasing the Onkyo AV Receiver. Contents Before using Important safeguards 2 Precautions 3 Features 4 Supplied accessories 4 Before using the unit 5 Facilities and connections Index to parts and controls 6 Connecting to all ... common to audio/video equipment 10 Positioning speakers/Connecting speakers .... 12 Connecting antennas 14 Connections for future reference. Following the instructions in the unit. AV Receiver HT-R500 Instruction Manual Thank you to obtain optimum performance and listening enjoyment from your new...
Please retain this manual will enable you for purchasing the Onkyo AV Receiver. Contents Before using Important safeguards 2 Precautions 3 Features 4 Supplied accessories 4 Before using the unit 5 Facilities and connections Index to parts and controls 6 Connecting to all ... common to audio/video equipment 10 Positioning speakers/Connecting speakers .... 12 Connecting antennas 14 Connections for future reference. Following the instructions in the unit. AV Receiver HT-R500 Instruction Manual Thank you to obtain optimum performance and listening enjoyment from your new...

Owner Manual
Page 15
...of the "Important Safeguards" on page 2 when you install an outdoor antenna. If you install the outdoor antenna. Directional linkage type splitter To AV Receiver To TV (or VCR) 15 Connecting antennas Connecting an FM outdoor antenna If the FM reception is not very clear with each other. FM ...outdoor antenna AM FM 75 Connecting an AM outdoor antenna An outdoor antenna will be received. • Keep the antenna away from noise sources (neon signs, busy roads, etc.). • It is necessary. Follow item 14 of ...
...of the "Important Safeguards" on page 2 when you install an outdoor antenna. If you install the outdoor antenna. Directional linkage type splitter To AV Receiver To TV (or VCR) 15 Connecting antennas Connecting an FM outdoor antenna If the FM reception is not very clear with each other. FM ...outdoor antenna AM FM 75 Connecting an AM outdoor antenna An outdoor antenna will be received. • Keep the antenna away from noise sources (neon signs, busy roads, etc.). • It is necessary. Follow item 14 of ...
Owner Manual
Page 16
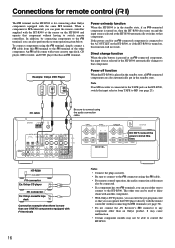
... L R R AC OUTLET DO CENTER SPEAKER NOT connect the power cord at the HT-R500 automatically switches to MD (see page 36). • Do not connect the AV Receiver's z connector to any component other than one ONKYO components equipped with z terminals Notes • Connect the plugs securely. • Be...connected to the TAPE jack on and the input source selected at this z terminal to control the HT-R500. 16 Power off function When the HT-R500 is more than an Onkyo product. In addition, by connecting components to the z terminal, you can also perform the system operation...
... L R R AC OUTLET DO CENTER SPEAKER NOT connect the power cord at the HT-R500 automatically switches to MD (see page 36). • Do not connect the AV Receiver's z connector to any component other than one ONKYO components equipped with z terminals Notes • Connect the plugs securely. • Be...connected to the TAPE jack on and the input source selected at this z terminal to control the HT-R500. 16 Power off function When the HT-R500 is more than an Onkyo product. In addition, by connecting components to the z terminal, you can also perform the system operation...
Owner Manual
Page 17
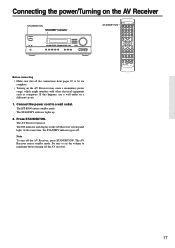
... the volume to minimum before turning off . Press STANDBY/ON. Note To turn off the AV Receiver, press STANDBY/ON. The ON indicator and display on . The HT-R500 enters standby mode. The AV Receiver turns on the AV Receiver's front panel light. The AV Receiver enters standby mode. If this happens, use a wall outlet on a different circuit. 1. Connect the...
... the volume to minimum before turning off . Press STANDBY/ON. Note To turn off the AV Receiver, press STANDBY/ON. The ON indicator and display on . The HT-R500 enters standby mode. The AV Receiver turns on the AV Receiver's front panel light. The AV Receiver enters standby mode. If this happens, use a wall outlet on a different circuit. 1. Connect the...
Owner Manual
Page 21
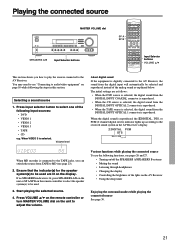
...2. Volume level About digital sound If the equipment is connected to the TAPE jacks, you how to play the sources connected to the AV Receiver. The initial settings are lit on /off the SPEAKERS A/SPEAKERS B systems • Muting the sound • Listening through headphones •...; Changing the display • Controlling the brightness of the following the steps in the AV Receiver's display. ŸDIGITAL PCM DTS When MD recorder is digitally connected to audio/video equipment" on the unit to adjust the volume. ...
...2. Volume level About digital sound If the equipment is connected to the TAPE jacks, you how to play the sources connected to the AV Receiver. The initial settings are lit on /off the SPEAKERS A/SPEAKERS B systems • Muting the sound • Listening through headphones •...; Changing the display • Controlling the brightness of the following the steps in the AV Receiver's display. ŸDIGITAL PCM DTS When MD recorder is digitally connected to audio/video equipment" on the unit to adjust the volume. ...
Owner Manual
Page 23
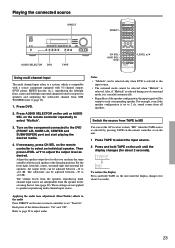
... SUBWOOFER) port and start playing the desired media. 4. Refer to page 29 to page 13). 1. For example, even if the speaker configuration is set the AV receiver to show "MD" when the TAPE source is selected by pressing TAPE on the remote controller or on the unit. 1 Press TAPE to select the...
... SUBWOOFER) port and start playing the desired media. 4. Refer to page 29 to page 13). 1. For example, even if the speaker configuration is set the AV receiver to show "MD" when the TAPE source is selected by pressing TAPE on the remote controller or on the unit. 1 Press TAPE to select the...

Owner Manual
Page 24
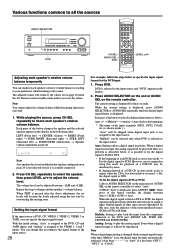
e.g. Press and hold PRESET/ADJUST ™/£ short time, the AV Receiver enters the selecting preset stations mode. The FM STEREO indicator goes off. Each time you may not be heard.) When the band is received. When the band is selected. 2. When a broadcast is received, scanning stops and the frequency flashes in 50 kHz steps...
e.g. Press and hold PRESET/ADJUST ™/£ short time, the AV Receiver enters the selecting preset stations mode. The FM STEREO indicator goes off. Each time you may not be heard.) When the band is received. When the band is selected. 2. When a broadcast is received, scanning stops and the frequency flashes in 50 kHz steps...

Owner Manual
Page 25
... about 8 seconds), press PRESET/ADJUST ™/£ to preset the radio stations. Press PRESET 2/3 on the remote controller or PRESET/ADJUST ™/£ on the AV Receiver • Using the sleep timer Enjoying the surround modes while listening to the previous page). 2. Various functions while listening to radio programs To use the...
... about 8 seconds), press PRESET/ADJUST ™/£ to preset the radio stations. Press PRESET 2/3 on the remote controller or PRESET/ADJUST ™/£ on the AV Receiver • Using the sleep timer Enjoying the surround modes while listening to the previous page). 2. Various functions while listening to radio programs To use the...

Owner Manual
Page 26
... "Stereo" after connecting the headphones to the PHONES jack. Listening through headphones Connect the plug of the stereo headphones to the PHONES jack on the AV Receiver. Press SPEAKER B on the unit or SP B on the remote controller to turn on or off the SPEAKERS A system. Press SPEAKER A on the unit or...
... "Stereo" after connecting the headphones to the PHONES jack. Listening through headphones Connect the plug of the stereo headphones to the PHONES jack on the AV Receiver. Press SPEAKER B on the unit or SP B on the remote controller to turn on or off the SPEAKERS A system. Press SPEAKER A on the unit or...

Owner Manual
Page 27
... indicator is lit in the display while the sleep timer is On. Checking the remaining time Press SLEEP while the sleep timer is on the AV Receiver Press DIMMER. The format display returns to the other than FM or AM is dimmed. ↓ The display becomes bright. "Sleep 90 min" appears in... sleep timer Press SLEEP repeatedly until the SLEEP indicator goes off and enter standby mode in the multipurpose display for about 5 seconds, which means the AV Receiver will be skipped.
... indicator is lit in the display while the sleep timer is On. Checking the remaining time Press SLEEP while the sleep timer is on the AV Receiver Press DIMMER. The format display returns to the other than FM or AM is dimmed. ↓ The display becomes bright. "Sleep 90 min" appears in... sleep timer Press SLEEP repeatedly until the SLEEP indicator goes off and enter standby mode in the multipurpose display for about 5 seconds, which means the AV Receiver will be skipped.
Owner Manual
Page 28
... DTS. • If the beginning of a DTS-CD may be reproduced. Press AUDIO SELECTOR on the unit or AUDIO SEL on page 20 when the AV Receiver enters standby mode unless you can specify the input signal format. Multich: Setting to specify the input signal format for the DVD input 1. Setting the...
... DTS. • If the beginning of a DTS-CD may be reproduced. Press AUDIO SELECTOR on the unit or AUDIO SEL on page 20 when the AV Receiver enters standby mode unless you can specify the input signal format. Multich: Setting to specify the input signal format for the DVD input 1. Setting the...
Owner Manual
Page 30
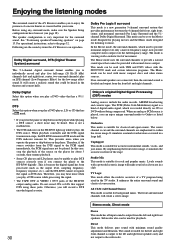
...rock and popular music. Studio-Mix This mode is viewing woth a realistic feel as if you to Onkyo as created in front of the stage. Following are the sound systems the AV Receiver can enjoy unique surround modes to enjoy the presence of a movie theater or concert hall in your... Unplugged This mode is because the digital signal has been processed (such as the output level, sampling frequency, frequency response, etc.), and the HT-R500 cannot recognize the signal as noise. By emphasizing the front stereo image, it plays the DTS source. Subwoofer also can be played. See "Positioning...
...rock and popular music. Studio-Mix This mode is viewing woth a realistic feel as if you to Onkyo as created in front of the stage. Following are the sound systems the AV Receiver can enjoy unique surround modes to enjoy the presence of a movie theater or concert hall in your... Unplugged This mode is because the digital signal has been processed (such as the output level, sampling frequency, frequency response, etc.), and the HT-R500 cannot recognize the signal as noise. By emphasizing the front stereo image, it plays the DTS source. Subwoofer also can be played. See "Positioning...
Owner Manual
Page 38
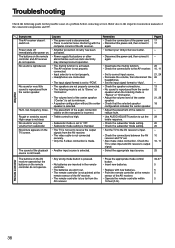
...Check the connections between the AV receiver and TV set. • Also make video connection. No sound is not clear. Remedies • Check the connection of the power cord. • Disconnect the power cord, then connect it again. • Contact your Onkyo Service Center. • ...Disconnect the power cord, then connect it again. • Deactivate the muting function. • Check the connections to the AV receiver. • Set to correct input source. • Decrease the volume...
...Check the connections between the AV receiver and TV set. • Also make video connection. No sound is not clear. Remedies • Check the connection of the power cord. • Disconnect the power cord, then connect it again. • Contact your Onkyo Service Center. • ...Disconnect the power cord, then connect it again. • Deactivate the muting function. • Check the connections to the AV receiver. • Set to correct input source. • Decrease the volume...


