
Owner Manual
Page 6
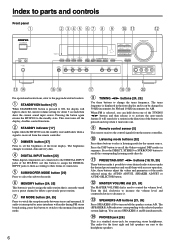
... jacks to them with an easy operation. It will light to show the current volume setting for about 5 seconds then show the current sound input source. Also, these buttons adjust the values and parameters of the front display. PHONES jack [26] This is used to control ... it tunes into one of the HT-R500, use SPEAKERS A and B simultaneously. ! Press the DIRECT, STEREO or SURROUND button to the selected speaker system light up. Pressing the button again returns the HT-R500 to the headphone speakers. 6 Press the DSP button to recall the Onkyo-original DSP modes in the standby...
... jacks to them with an easy operation. It will light to show the current volume setting for about 5 seconds then show the current sound input source. Also, these buttons adjust the values and parameters of the front display. PHONES jack [26] This is used to control ... it tunes into one of the HT-R500, use SPEAKERS A and B simultaneously. ! Press the DIRECT, STEREO or SURROUND button to the selected speaker system light up. Pressing the button again returns the HT-R500 to the headphone speakers. 6 Press the DSP button to recall the Onkyo-original DSP modes in the standby...
Owner Manual
Page 10
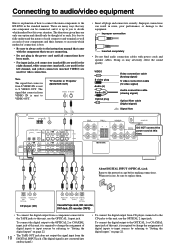
... SUBWOOFER PRE OUT CD TAPE S VIDEO IN OUT IN FRONT SURR CENTER L L R VIDEO 2 VIDEO 1 R DVD SUB WOOFER FRONT SPEAKERS A FRONT SPEAKERS B SURROUND SPEAKERS L L L R R R AC OUTLET CENTER SPEAKER DO NOT connect the power cord at this unit, use , be thought of as each of your components... to ascertain which method best fits your situation. Doing so may adversely effect the sound quality. When not in the standard manner. Connecting to audio/video equipment Here is explanation of how to connect the main components to the HT-R500 in use the OPTICAL 1 input jack.
... SUBWOOFER PRE OUT CD TAPE S VIDEO IN OUT IN FRONT SURR CENTER L L R VIDEO 2 VIDEO 1 R DVD SUB WOOFER FRONT SPEAKERS A FRONT SPEAKERS B SURROUND SPEAKERS L L L R R R AC OUTLET CENTER SPEAKER DO NOT connect the power cord at this unit, use , be thought of as each of your components... to ascertain which method best fits your situation. Doing so may adversely effect the sound quality. When not in the standard manner. Connecting to audio/video equipment Here is explanation of how to connect the main components to the HT-R500 in use the OPTICAL 1 input jack.

Owner Manual
Page 12
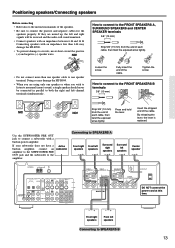
...reproduction of a layout for standard speaker placement. The illustration below shows an example of Surround sound. Refer to the cable. Surround The surround speakers reproduce the feel of a moving sound while creating the sensation of being in the middle of each color to the speaker... of identification. Subwoofer Install a subwoofer with a built-in order to experience the best of Surround sound. Front left speaker (+): whtie Front Right speaker (+): red Center speaker (+): green Surround left , right, and center speakers should be placed at ear level. You can install it...
...reproduction of a layout for standard speaker placement. The illustration below shows an example of Surround sound. Refer to the cable. Surround The surround speakers reproduce the feel of a moving sound while creating the sensation of being in the middle of each color to the speaker... of identification. Subwoofer Install a subwoofer with a built-in order to experience the best of Surround sound. Front left speaker (+): whtie Front Right speaker (+): red Center speaker (+): green Surround left , right, and center speakers should be placed at ear level. You can install it...
Owner Manual
Page 13
... SURROUND SPEAKERS and CENTER SPEAKER terminals 5/8" (15 mm) Strip 5/8" (15 mm) from the end of each cable, then twist the exposed wires tightly. • Do not connect more than 6 Ω may damage the HT-R500. • When you wish to listen to monaural (mono) sound,... Press and hold the lever. Doing so may damage the HT-R500. • To prevent damage to the amplifier. Loosen the screw. Active subwoofer Connecting to SPEAKERS A Front right Front left speakers speakers Surround right speakers Surround left speakers Connecting to the FRONT SPEAKERS B terminals 3/8" (...
... SURROUND SPEAKERS and CENTER SPEAKER terminals 5/8" (15 mm) Strip 5/8" (15 mm) from the end of each cable, then twist the exposed wires tightly. • Do not connect more than 6 Ω may damage the HT-R500. • When you wish to listen to monaural (mono) sound,... Press and hold the lever. Doing so may damage the HT-R500. • To prevent damage to the amplifier. Loosen the screw. Active subwoofer Connecting to SPEAKERS A Front right Front left speakers speakers Surround right speakers Surround left speakers Connecting to the FRONT SPEAKERS B terminals 3/8" (...
Owner Manual
Page 18
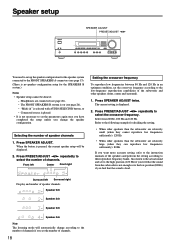
...is played. • It is not necessary to set the parameters again once you have completed the setup unless you feel that the sound is loud. When the button is pressed, the current speaker setup will automatically change the speaker configuration. The current setting is on (... displayed. 2. "Multi ch" is selected with AUDIO SELECTOR button, or - Press SPEAKER ADJUST twice. Selecting the number of channels. Front left Surround right Display and number of speaker channels Speaker 5ch Speaker 2ch Speaker 3ch Speaker 4ch Note The listening mode will be done if; - Press PRESET...
...is played. • It is not necessary to set the parameters again once you have completed the setup unless you feel that the sound is loud. When the button is pressed, the current speaker setup will automatically change the speaker configuration. The current setting is on (... displayed. 2. "Multi ch" is selected with AUDIO SELECTOR button, or - Press SPEAKER ADJUST twice. Selecting the number of channels. Front left Surround right Display and number of speaker channels Speaker 5ch Speaker 2ch Speaker 3ch Speaker 4ch Note The listening mode will be done if; - Press PRESET...

Owner Manual
Page 19
...0 to 15 ms. 19 L2 (ft/m) 0/0 1/0.3 2/0.6 3/0.9 4/1.2 5/1.5 6/1.8 7/2.1 8/2.4 9/2.7 10/3.0 11/3.3 12/3.6 13/3.9 14/4.2 15/4.5 Center delay 0 1 2 3 4 5 Surround delay 0 1 2 3 4 5 6 7 8 9 10 11 12 13 14 15 Setting the center delay Calculate the difference between (L) and (L1), find the closest value to it from...) and (L2) is 6 feet (2 meters), (L) - (L2) = 16 - 6 = 10 feet / 5 - 2 = 3 meters Since the value of sound from the listening position to the left/right front speakers is (L). Press SPEAKER ADJUST repeatedly until "CenterDelay" is displayed. 2. Assume that the distance from each...
...0 to 15 ms. 19 L2 (ft/m) 0/0 1/0.3 2/0.6 3/0.9 4/1.2 5/1.5 6/1.8 7/2.1 8/2.4 9/2.7 10/3.0 11/3.3 12/3.6 13/3.9 14/4.2 15/4.5 Center delay 0 1 2 3 4 5 Surround delay 0 1 2 3 4 5 6 7 8 9 10 11 12 13 14 15 Setting the center delay Calculate the difference between (L) and (L1), find the closest value to it from...) and (L2) is 6 feet (2 meters), (L) - (L2) = 16 - 6 = 10 feet / 5 - 2 = 3 meters Since the value of sound from the listening position to the left/right front speakers is (L). Press SPEAKER ADJUST repeatedly until "CenterDelay" is displayed. 2. Assume that the distance from each...
Owner Manual
Page 20
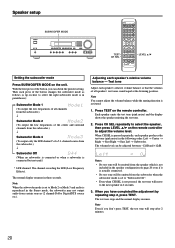
... from the speaker which is not included in parentheses): → Subwoofer Mode 1 (To output the low frequencies of all speakers' test tones sound equal at the listening position. Press CH SEL repeatedly to select the speaker, then press LEVEL 5/∞ on how to adjust the volume level...only the LFE channel* of all channels from the subwoofer.) ↓ Subwoofer Mode 2 (To output the low frequencies of the center and surround channels from the subwoofer when the subwoofer mode is set to the next speaker in three seconds. Then each speaker's relative volume balance - With...
... from the speaker which is not included in parentheses): → Subwoofer Mode 1 (To output the low frequencies of all speakers' test tones sound equal at the listening position. Press CH SEL repeatedly to select the speaker, then press LEVEL 5/∞ on how to adjust the volume level...only the LFE channel* of all channels from the subwoofer.) ↓ Subwoofer Mode 2 (To output the low frequencies of the center and surround channels from the subwoofer when the subwoofer mode is set to the next speaker in three seconds. Then each speaker's relative volume balance - With...
Owner Manual
Page 21
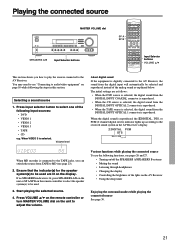
...VOLUME 5/∞ on the remote controller or turn MASTER VOLUME dial on the AV Receiver • Using the sleep timer Enjoying the surround modes while playing the connected source See page 30. 21 Various functions while playing the connected source To use the following functions, see... 10 while following input sources: • DVD • VIDEO 1 • VIDEO 2 • VIDEO 3 • TAPE • CD e.g. When the digital sound is reproduced, the ŸDIGITAL, DTS, or PCM (2 channel digital stereo) indicator lights up according to see page 23). 2. You may need to the received...
...VOLUME 5/∞ on the remote controller or turn MASTER VOLUME dial on the AV Receiver • Using the sleep timer Enjoying the surround modes while playing the connected source See page 30. 21 Various functions while playing the connected source To use the following functions, see... 10 while following input sources: • DVD • VIDEO 1 • VIDEO 2 • VIDEO 3 • TAPE • CD e.g. When the digital sound is reproduced, the ŸDIGITAL, DTS, or PCM (2 channel digital stereo) indicator lights up according to see page 23). 2. You may need to the received...
Owner Manual
Page 23
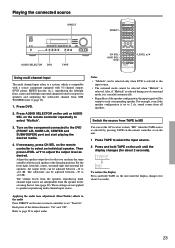
...be selected when "Multich" is selected by pressing TAPE on the remote controller or on the unit or remote controller to 2 ch, sound comes from SUB WOOFER (refer to each speaker at the listening position. To restore the display Press and hold TAPE on the component ...dB. Turn on the unit until the display changes (for about 2 seconds). 23 For the front right, front left, center, surround right and surround left /right surround channels from five respective speakers and outputting the subwoofer channel from all speakers. The volume levels from the speaker levels set the AV...
...be selected when "Multich" is selected by pressing TAPE on the remote controller or on the unit or remote controller to 2 ch, sound comes from SUB WOOFER (refer to each speaker at the listening position. To restore the display Press and hold TAPE on the component ...dB. Turn on the unit until the display changes (for about 2 seconds). 23 For the front right, front left, center, surround right and surround left /right surround channels from five respective speakers and outputting the subwoofer channel from all speakers. The volume levels from the speaker levels set the AV...

Owner Manual
Page 25
...will not affect the next step. 3. See "Presetting radio stations" on the AV Receiver • Using the sleep timer Enjoying the surround modes while listening to the preset channel. While the MEMORY indicator is registered to radio programs See page 30. 25 Press MEMORY. The ...to switch the input source to erase (see pages 26 and 27. • Turning on/off the SPEAKERS A/SPEAKERS B systems • Muting the sound • Listening through headphones • Changing the display • Controlling the brightness of the lghts on the left column of the desired radio station...
...will not affect the next step. 3. See "Presetting radio stations" on the AV Receiver • Using the sleep timer Enjoying the surround modes while listening to the preset channel. While the MEMORY indicator is registered to radio programs See page 30. 25 Press MEMORY. The ...to switch the input source to erase (see pages 26 and 27. • Turning on/off the SPEAKERS A/SPEAKERS B systems • Muting the sound • Listening through headphones • Changing the display • Controlling the brightness of the lghts on the left column of the desired radio station...
Owner Manual
Page 28
... selected speaker appears in the display in the following order: LEFT (Front left) → CENTER (Center) → RIGHT (Front right) → SURR RIGHT (Surround right) → SURR LEFT (Surround left) → SUBWOOFER (Subwoofer) → Speaker volume adjustment mode off Note Any speaker that is not selected even if it will not be... while an input signal format other types are not reproduced. Press DVD. Multich: Setting to play back the input from the component connected to the sound.
... selected speaker appears in the display in the following order: LEFT (Front left) → CENTER (Center) → RIGHT (Front right) → SURR RIGHT (Surround right) → SURR LEFT (Surround left) → SUBWOOFER (Subwoofer) → Speaker volume adjustment mode off Note Any speaker that is not selected even if it will not be... while an input signal format other types are not reproduced. Press DVD. Multich: Setting to play back the input from the component connected to the sound.

Owner Manual
Page 29
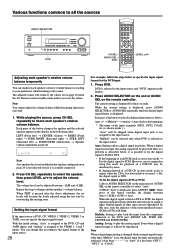
...On: Activate late night function Late Night = Off: De-activate late night function Notes • The late night effect is Dolby Digital surround. Each press switches the displayed item in the home environment. To change the current setting, press the same button again. Late night function ... that can be played back at low volumes during the nighttime. Remote controller Remote controller Bass adjustment The level of your home cinema sound to all the sources PRESET/ADJUST ™/£ AUDIO ADJUST CINE FLTR LATE NIGHT AUDIO ADJUST ADJUST 2/3 Using the AUDIO ADJUST function...
...On: Activate late night function Late Night = Off: De-activate late night function Notes • The late night effect is Dolby Digital surround. Each press switches the displayed item in the home environment. To change the current setting, press the same button again. Late night function ... that can be played back at low volumes during the nighttime. Remote controller Remote controller Bass adjustment The level of your home cinema sound to all the sources PRESET/ADJUST ™/£ AUDIO ADJUST CINE FLTR LATE NIGHT AUDIO ADJUST ADJUST 2/3 Using the AUDIO ADJUST function...
Owner Manual
Page 30
...that has a mark. This is suitable for the left and right front channel is cut and the surround channels are connected, then the surround sound is recorded directly on the HT-R500 lights up while it simulates the acoustics in front of a TV program being compressed. Therefore, you will...videos with the mark and certain television programs. The Music mode can be used with minimun sound quality adjustment and filtration. If no surround speakers are emphasized to the subwoofer. Onkyo's original Digital Signal Processing (DSP) modes Analog sources include the audio records, AM/FM ...
...that has a mark. This is suitable for the left and right front channel is cut and the surround channels are connected, then the surround sound is recorded directly on the HT-R500 lights up while it simulates the acoustics in front of a TV program being compressed. Therefore, you will...videos with the mark and certain television programs. The Music mode can be used with minimun sound quality adjustment and filtration. If no surround speakers are emphasized to the subwoofer. Onkyo's original Digital Signal Processing (DSP) modes Analog sources include the audio records, AM/FM ...

Owner Manual
Page 32
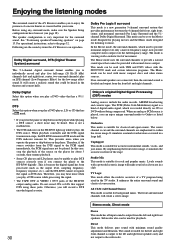
..., the listening mode cycles; SURROUND: Set the listening mode to the beginning). DSP (on page 31. Lights up when "Stereo" mode is other than RCVR/TAPE (see "Late night function" on the front panel): Recall the Onkyo-original DSP mode. When the sound is Pro Logic II Movie,... Dolby Digital or DTS When the sound is selected. Enjoying the listening modes SURROUND STEREO DIRECT DSP DSP DIRECT SURROUND STEREO A.STEREO Selecting the listening mode See "Relationship between ...
..., the listening mode cycles; SURROUND: Set the listening mode to the beginning). DSP (on page 31. Lights up when "Stereo" mode is other than RCVR/TAPE (see "Late night function" on the front panel): Recall the Onkyo-original DSP mode. When the sound is Pro Logic II Movie,... Dolby Digital or DTS When the sound is selected. Enjoying the listening modes SURROUND STEREO DIRECT DSP DSP DIRECT SURROUND STEREO A.STEREO Selecting the listening mode See "Relationship between ...

Owner Manual
Page 33
...If you change the input source during recording, you will record the signals from the newly selected input source. • You cannot record the surround effects. Notes • You can record analog audio, but not digital audio. Start recording at the CD player and video camera as desired.... Start recording on the components connected to make your own video recordings. The input source is an example of recording the sound from a CD player connected to CD L/R jacks and the video from the newly selected input source and the video signals assigned to VIDEO ...
...If you change the input source during recording, you will record the signals from the newly selected input source. • You cannot record the surround effects. Notes • You can record analog audio, but not digital audio. Start recording at the CD player and video camera as desired.... Start recording on the components connected to make your own video recordings. The input source is an example of recording the sound from a CD player connected to CD L/R jacks and the video from the newly selected input source and the video signals assigned to VIDEO ...
Owner Manual
Page 39
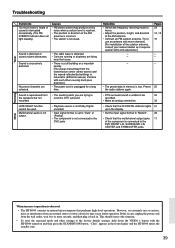
... or "Analog". • The component is observed • The HT-R500 contains an internal microcomputer that the multichannel output jacks 11 of the component is lost. Sound is reproduced from the transmission center (direct waves) and the waved reflected...HT-R500 turned on extremely rare occasions, noise or interference from the wall outlet, wait five or more elements. [For installation of the FM antenna. • Connect an FM outdoor antenna. Sound is too weak. However, on and then press the STANDBY/ON button. This should correct the situation. • To reset the surround...
... or "Analog". • The component is observed • The HT-R500 contains an internal microcomputer that the multichannel output jacks 11 of the component is lost. Sound is reproduced from the transmission center (direct waves) and the waved reflected...HT-R500 turned on extremely rare occasions, noise or interference from the wall outlet, wait five or more elements. [For installation of the FM antenna. • Connect an FM outdoor antenna. Sound is too weak. However, on and then press the STANDBY/ON button. This should correct the situation. • To reset the surround...


