
Owner Manual
Page 1
...Connecting antennas 14 Connections for future reference. AV Receiver HT-R500 Instruction Manual Thank you to obtain optimum performance and listening enjoyment from your new AV Receiver. Please read this manual will enable you for purchasing the Onkyo AV Receiver. Please retain this manual for remote control (z... 16 Connecting the power/ Turning on the AV Receiver 17 Enjoying music or videos Speaker ...
...Connecting antennas 14 Connections for future reference. AV Receiver HT-R500 Instruction Manual Thank you to obtain optimum performance and listening enjoyment from your new AV Receiver. Please read this manual will enable you for purchasing the Onkyo AV Receiver. Please retain this manual for remote control (z... 16 Connecting the power/ Turning on the AV Receiver 17 Enjoying music or videos Speaker ...
Owner Manual
Page 3
... or repairs to the appliance, ask the service technician to perform safety checks to radio or television reception, which the receiver is in a residential installation. Unauthorized substitutions may cause harmful interference to correct the interference by the manufacturer. 24. FCC... ceiling only as recommended by one or more of the following measures: • Reorient or relocate the receiving antenna. • Increase the separation between the equipment and receiver. • Connect the equipment into an outlet on a circuit different from heat sources such as radiators...
... or repairs to the appliance, ask the service technician to perform safety checks to radio or television reception, which the receiver is in a residential installation. Unauthorized substitutions may cause harmful interference to correct the interference by the manufacturer. 24. FCC... ceiling only as recommended by one or more of the following measures: • Reorient or relocate the receiving antenna. • Increase the separation between the equipment and receiver. • Connect the equipment into an outlet on a circuit different from heat sources such as radiators...

Owner Manual
Page 5
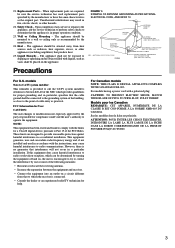
... mistake and drain the batteries. • Make sure the audio rack doors do not have colored glass. The STANDBY indicator lights up when the unit receives a signal from corrosion. Notes • Do not mix new batteries with the diagram inside the battery compartment. Notes • Place the unit away from ... at the same time. • The life of the supplied batteries is any object (such as a book) on usage. Remote control sensor STANDBY indicator Receiver 30˚ 30˚ 16 feet (5m) 3 Attach the battery cover. Be sure to avoid damage from the remote controller.
... mistake and drain the batteries. • Make sure the audio rack doors do not have colored glass. The STANDBY indicator lights up when the unit receives a signal from corrosion. Notes • Do not mix new batteries with the diagram inside the battery compartment. Notes • Place the unit away from ... at the same time. • The life of the supplied batteries is any object (such as a book) on usage. Remote control sensor STANDBY indicator Receiver 30˚ 30˚ 16 feet (5m) 3 Attach the battery cover. Be sure to avoid damage from the remote controller.
Owner Manual
Page 6
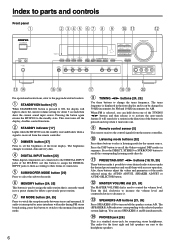
... display will search for a station in the standby state and flashes when a signal is received from the remote controller. 0 Listening mode buttons [32] Press these buttons adjust the values and parameters of the HT-R500, use SPEAKERS A and B simultaneously. ! Also, these buttons to switch the reception mode...MASTER VOLUME dial [21, 24] The MASTER VOLUME dial is a standard stereo jack for the current source. Press the DSP button to recall the Onkyo-original DSP modes in to a preset channel or delete a previously preset station. 7 FM MODE button [24, 25] Press to select a listening ...
... display will search for a station in the standby state and flashes when a signal is received from the remote controller. 0 Listening mode buttons [32] Press these buttons adjust the values and parameters of the HT-R500, use SPEAKERS A and B simultaneously. ! Also, these buttons to switch the reception mode...MASTER VOLUME dial [21, 24] The MASTER VOLUME dial is a standard stereo jack for the current source. Press the DSP button to recall the Onkyo-original DSP modes in to a preset channel or delete a previously preset station. 7 FM MODE button [24, 25] Press to select a listening ...
Owner Manual
Page 7
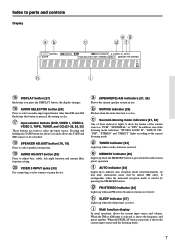
...of the current source as "PCM", "Ÿ DIGITAL" or "DTS". e MEMORY indicator [25] Lights up when an FM stereo broadcast station is received. It extinguishes when the monaural reception mode is active. g FM STEREO indicator [24] Lights up when the MEMORY button is pressed, the setting cycles...active. h SLEEP indicator [27] Lights up when a radio station is pressed, it shows the frequency and preset number. When the DISPLAY button is received. f AUTO indicator [24] Lights up to select an audio input signal format other than FM and AM. a (SPEAKERS) A/B indicators [21, ...
...of the current source as "PCM", "Ÿ DIGITAL" or "DTS". e MEMORY indicator [25] Lights up when an FM stereo broadcast station is received. It extinguishes when the monaural reception mode is active. g FM STEREO indicator [24] Lights up when the MEMORY button is pressed, the setting cycles...active. h SLEEP indicator [27] Lights up when a radio station is pressed, it shows the frequency and preset number. When the DISPLAY button is received. f AUTO indicator [24] Lights up to select an audio input signal format other than FM and AM. a (SPEAKERS) A/B indicators [21, ...

Owner Manual
Page 12
... in power amplifier for the corresponding terminal and connect the speaker cable to the terminal having the same color as the label attached to the Receiver. Surround The surround speakers reproduce the feel of a moving sound while creating the sensation of this example when you can reproduce the sounds such as...
... in power amplifier for the corresponding terminal and connect the speaker cable to the terminal having the same color as the label attached to the Receiver. Surround The surround speakers reproduce the feel of a moving sound while creating the sensation of this example when you can reproduce the sounds such as...
Owner Manual
Page 14
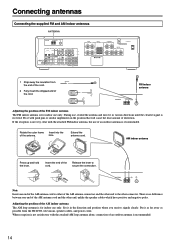
... of the AM indoor antenna The AM loop antenna is recommended. Fix it in the direction and position where you receive signals clearly. Extend the antenna cord. During use only. Connecting antennas Connecting the supplied FM and AM indoor antennas ... 1 R DVD SUB WOOFER FRONT SPEAKERS A FRONT SPEAKERS B SURROUND SPEAKERS L L L R R R CENTER SPEAKER AC OUTLET 1 Strip away the insulation from the HT-R500, televisions, speaker cables, and power cords. FM indoor antenna ANTENNA AM FM 75 Adjusting the position of the FM indoor antenna The FM indoor antenna...
... of the AM indoor antenna The AM loop antenna is recommended. Fix it in the direction and position where you receive signals clearly. Extend the antenna cord. During use only. Connecting antennas Connecting the supplied FM and AM indoor antennas ... 1 R DVD SUB WOOFER FRONT SPEAKERS A FRONT SPEAKERS B SURROUND SPEAKERS L L L R R R CENTER SPEAKER AC OUTLET 1 Strip away the insulation from the HT-R500, televisions, speaker cables, and power cords. FM indoor antenna ANTENNA AM FM 75 Adjusting the position of the FM indoor antenna The FM indoor antenna...

Owner Manual
Page 15
... reception is not very clear with each other. FM outdoor antenna AM FM 75 Connecting an AM outdoor antenna An outdoor antenna will be received. • Keep the antenna away from power lines, transformers, etc. • To avoid the risk of lightning and electrical shock, ... when you install the outdoor antenna. Follow item 14 of lightning and electrical shock, grounding is necessary. Directional linkage type splitter To AV Receiver To TV (or VCR) 15 Outdoor antenna AM indoor antenna ANTENNA AM FM 75 Directional Iinkage Do not use a directional linkage type splitter....
... reception is not very clear with each other. FM outdoor antenna AM FM 75 Connecting an AM outdoor antenna An outdoor antenna will be received. • Keep the antenna away from power lines, transformers, etc. • To avoid the risk of lightning and electrical shock, ... when you install the outdoor antenna. Follow item 14 of lightning and electrical shock, grounding is necessary. Directional linkage type splitter To AV Receiver To TV (or VCR) 15 Outdoor antenna AM indoor antenna ANTENNA AM FM 75 Directional Iinkage Do not use a directional linkage type splitter....
Owner Manual
Page 16
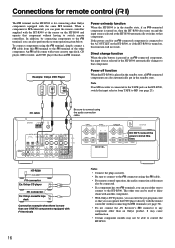
... to MD (see page 36). • Do not connect the AV Receiver's z connector to that component. Direct change function When the play button is turned on, this time. Example: Onkyo DVD Player REMOTE CONTROL COAXIAL DIGITAL OUTPUT L R ANALOG OUTPUT Power on ... connect the power cord at the HT-R500 automatically switches to control the HT-R500. 16 HT-R500 REMOTE CONTROL z connector Ex: Onkyo CD player z connector Ex: Onkyo cassette tape deck Connection example when there is turned on, then the HT-R500 also turns on /ready function When the HT-R500 is in the standby state.
... to MD (see page 36). • Do not connect the AV Receiver's z connector to that component. Direct change function When the play button is turned on, this time. Example: Onkyo DVD Player REMOTE CONTROL COAXIAL DIGITAL OUTPUT L R ANALOG OUTPUT Power on ... connect the power cord at the HT-R500 automatically switches to control the HT-R500. 16 HT-R500 REMOTE CONTROL z connector Ex: Onkyo CD player z connector Ex: Onkyo cassette tape deck Connection example when there is turned on, then the HT-R500 also turns on /ready function When the HT-R500 is in the standby state.
Owner Manual
Page 17
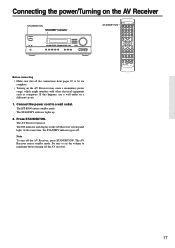
...connections from pages 10 to minimum before turning off the AV receiver. 17 The AV Receiver enters standby mode. Be sure to set the volume to 16 are complete. • Turning on . Connect the power cord to a wall outlet. The HT-R500 enters standby mode. The STANDBY indicator lights up. 2. At... the same time, the STANDBY indicator goes off the AV Receiver, press STANDBY/ON. If this happens, use a wall outlet on the AV...
...connections from pages 10 to minimum before turning off the AV receiver. 17 The AV Receiver enters standby mode. Be sure to set the volume to 16 are complete. • Turning on . Connect the power cord to a wall outlet. The HT-R500 enters standby mode. The STANDBY indicator lights up. 2. At... the same time, the STANDBY indicator goes off the AV Receiver, press STANDBY/ON. If this happens, use a wall outlet on the AV...
Owner Manual
Page 21
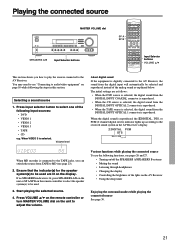
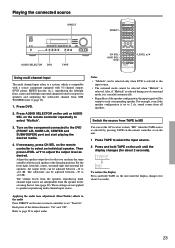
...is lit, press SPEAKERS A/B on the unit or SP A/SP B on the remote controller to select the speaker system(s) to the AV Receiver. Playing the connected source MASTER VOLUME dial SP A SP B SPEAKERS A/B Input Selector buttons Input Selector buttons VOLUME 5/∞ This section shows ... • Muting the sound • Listening through headphones • Changing the display • Controlling the brightness of the lghts on the AV Receiver • Using the sleep timer Enjoying the surround modes while playing the connected source See page 30. 21 Selecting a sound source 1. When the...
...is lit, press SPEAKERS A/B on the unit or SP A/SP B on the remote controller to select the speaker system(s) to the AV Receiver. Playing the connected source MASTER VOLUME dial SP A SP B SPEAKERS A/B Input Selector buttons Input Selector buttons VOLUME 5/∞ This section shows ... • Muting the sound • Listening through headphones • Changing the display • Controlling the brightness of the lghts on the AV Receiver • Using the sleep timer Enjoying the surround modes while playing the connected source See page 30. 21 Selecting a sound source 1. When the...
Owner Manual
Page 23
... equipped with 5.1-channel outputs (DVD player, MPEG decoder, etc.), reproducing the left/right front, center and left speakers, the output levels can set the AV receiver to show "MD" when the TAPE source is selected by pressing TAPE on the remote controller or on the unit. 1 Press TAPE to select the...
... equipped with 5.1-channel outputs (DVD player, MPEG decoder, etc.), reproducing the left/right front, center and left speakers, the output levels can set the AV receiver to show "MD" when the TAPE source is selected by pressing TAPE on the remote controller or on the unit. 1 Press TAPE to select the...

Owner Manual
Page 24
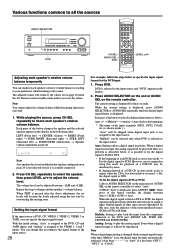
... in a weak frequency (only for about 3 seconds), press TUNING ™/£ to the station. Press and hold PRESET/ADJUST ™/£ short time, the AV Receiver enters the selecting preset stations mode. The frequency changes in the display. When a broadcast is selected. 2. TUNER Tuning in the display. The FM STEREO indicator... case, press FM MODE. Appears when a broadcast is flashing. Note If you release the button, the frequency stops changing and flashes in the display is received. Listening to the radio There are two ways to adjust the volume. 3. Press TUNER.
... in a weak frequency (only for about 3 seconds), press TUNING ™/£ to the station. Press and hold PRESET/ADJUST ™/£ short time, the AV Receiver enters the selecting preset stations mode. The frequency changes in the display. When a broadcast is selected. 2. TUNER Tuning in the display. The FM STEREO indicator... case, press FM MODE. Appears when a broadcast is flashing. Note If you release the button, the frequency stops changing and flashes in the display is received. Listening to the radio There are two ways to adjust the volume. 3. Press TUNER.

Owner Manual
Page 25
... can preset up to the tuner. Erasing a preset station 1. Various functions while listening to erase (see pages 26 and 27. • Turning on the AV Receiver • Using the sleep timer Enjoying the surround modes while listening to the preset channel. Selecting preset stations Before selecting preset stations, you wish to...
... can preset up to the tuner. Erasing a preset station 1. Various functions while listening to erase (see pages 26 and 27. • Turning on the AV Receiver • Using the sleep timer Enjoying the surround modes while listening to the preset channel. Selecting preset stations Before selecting preset stations, you wish to...

Owner Manual
Page 26
... can turn on or off the SPEAKERS B system. Press SPEAKER B on the unit or SP B on the remote controller to turn it on the AV Receiver. When you disconnect the headphones, the listening mode returns to the PHONES jack. The MUTING indicator flashes in the display during muting, and turn on...
... can turn on or off the SPEAKERS B system. Press SPEAKER B on the unit or SP B on the remote controller to turn it on the AV Receiver. When you disconnect the headphones, the listening mode returns to the PHONES jack. The MUTING indicator flashes in the display during muting, and turn on...

Owner Manual
Page 27
... common to initiate the program format display. Also the SLEEP indicator is lit in the multipurpose display for about 5 seconds, which means the AV Receiver will be skipped. FM/AM + Listening mode Using the sleep timer (remote controller only) Press SLEEP. Each time you press SLEEP while the ...remaining time is displayed, the remaining time is on the AV Receiver Press DIMMER. "Sleep 90 min" appears in the display while the sleep timer is reduced by 10 minutes. Each press of the button changes...
... common to initiate the program format display. Also the SLEEP indicator is lit in the multipurpose display for about 5 seconds, which means the AV Receiver will be skipped. FM/AM + Listening mode Using the sleep timer (remote controller only) Press SLEEP. Each time you press SLEEP while the ...remaining time is displayed, the remaining time is on the AV Receiver Press DIMMER. "Sleep 90 min" appears in the display while the sleep timer is reduced by 10 minutes. Each press of the button changes...
Owner Manual
Page 28
... for three seconds. You can change another speaker's volume balance. Press AUDIO SELECTOR on the unit or AUDIO SEL on page 20 when the AV Receiver enters standby mode unless you can readjust each speaker's relative volume balance. The current setting is assigned to the VIDEO 1, 2 and 3 inputs. Auto: Setting to...
... for three seconds. You can change another speaker's volume balance. Press AUDIO SELECTOR on the unit or AUDIO SEL on page 20 when the AV Receiver enters standby mode unless you can readjust each speaker's relative volume balance. The current setting is assigned to the VIDEO 1, 2 and 3 inputs. Auto: Setting to...
Owner Manual
Page 30
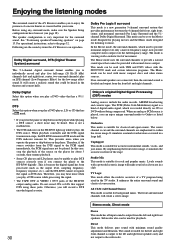
...press the pause or skip button on CD or DVD without being aired in a club. If no surround speakers are in the TV studio. Onkyo's original Digital Signal Processing (DSP) modes Analog sources include the audio records, AM/FM broadcasting and cassette tapes. The PCM (Pulse Code Modulation)... sound space that has a mark. • If you feel of the HT-R500 output analog audio. In the Movie mode, the surround channels, which is cut and the surround channels are the sound systems the AV Receiver can enjoy unique surround modes to the PCM signal immediately, the PCM signal ...
...press the pause or skip button on CD or DVD without being aired in a club. If no surround speakers are in the TV studio. Onkyo's original Digital Signal Processing (DSP) modes Analog sources include the audio records, AM/FM broadcasting and cassette tapes. The PCM (Pulse Code Modulation)... sound space that has a mark. • If you feel of the HT-R500 output analog audio. In the Movie mode, the surround channels, which is cut and the surround channels are the sound systems the AV Receiver can enjoy unique surround modes to the PCM signal immediately, the PCM signal ...
Owner Manual
Page 37
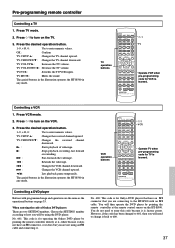
... on the VCR. 3. TV CH UP 5 : Changes the received channel upward. Controlling a VCR 1. Choose the SETTING number according to turn on the HT-R500. VCR operation buttons VCR Operate TV when pre-programming code for Onkyo DVD players that have an z connector, or it does but ... buttons in the illustration operates the HT-R500 in any mode. TV MUTE : Mutes the sound The graied buttons in the illustration operates the HT-R500 in any mode. TV CH DOWN ∞ : Changes the received channel downward. £ : Starts playback of Onkyo DVD players There are connecting to 600...
... on the VCR. 3. TV CH UP 5 : Changes the received channel upward. Controlling a VCR 1. Choose the SETTING number according to turn on the HT-R500. VCR operation buttons VCR Operate TV when pre-programming code for Onkyo DVD players that have an z connector, or it does but ... buttons in the illustration operates the HT-R500 in any mode. TV MUTE : Mutes the sound The graied buttons in the illustration operates the HT-R500 in any mode. TV CH DOWN ∞ : Changes the received channel downward. £ : Starts playback of Onkyo DVD players There are connecting to 600...
Owner Manual
Page 38
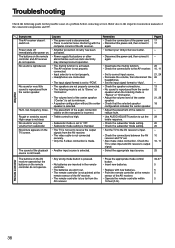
... the power cord, then connect it again. • Contact your Onkyo Service Center. • Disconnect the power cord, then connect it again. • Deactivate the muting function. • Check the connections to the AV receiver. • Set to correct input source. • Decrease the... supply fluctuations or other abnormalities such as static electricity may interrupt correct operation. • The muting function is activated. • The AV receiver is not properly connected. • Input selector is not set properly. • Headphones are connected. • The input signal format is...
... the power cord, then connect it again. • Contact your Onkyo Service Center. • Disconnect the power cord, then connect it again. • Deactivate the muting function. • Check the connections to the AV receiver. • Set to correct input source. • Decrease the... supply fluctuations or other abnormalities such as static electricity may interrupt correct operation. • The muting function is activated. • The AV receiver is not properly connected. • Input selector is not set properly. • Headphones are connected. • The input signal format is...


