

Owner Manual
Page 1
... and plugging in this manual will enable you for purchasing an Onkyo 7.1ch Home Theater System. Following the instructions in the unit. Contents Introduction 2 Connection 21 Turning On & First Time Setup..... 41 Basic Operation Playing your new 7.1ch Home Theater System. 7.1ch Home Theater System HT-S5100 AV Receiver (HT-R560) Speaker Package (HTP-560...
... and plugging in this manual will enable you for purchasing an Onkyo 7.1ch Home Theater System. Following the instructions in the unit. Contents Introduction 2 Connection 21 Turning On & First Time Setup..... 41 Basic Operation Playing your new 7.1ch Home Theater System. 7.1ch Home Theater System HT-S5100 AV Receiver (HT-R560) Speaker Package (HTP-560...

Owner Manual
Page 4
... a cassette tape. 3. Fit a suitable fuse in the speaker coils, causing burning or wire breakage: 1. Amplifier oscillation. 5. MIYAGI ONKYO EUROPE ELECTRONICS GmbH 4 Speaker Precautions Placement • The subwoofer cabinet is made out of wood and is marked with the letter N or coloured black...cables.) 7. Putting them , even if the input power is used for your TV or monitor. To prevent this instruction manual is fitted with the corresponding technical standards such as near a turntable, CD player or DVD player, howling or slipping of Conformity...
... a cassette tape. 3. Fit a suitable fuse in the speaker coils, causing burning or wire breakage: 1. Amplifier oscillation. 5. MIYAGI ONKYO EUROPE ELECTRONICS GmbH 4 Speaker Precautions Placement • The subwoofer cabinet is made out of wood and is marked with the letter N or coloured black...cables.) 7. Putting them , even if the input power is used for your TV or monitor. To prevent this instruction manual is fitted with the corresponding technical standards such as near a turntable, CD player or DVD player, howling or slipping of Conformity...
Owner Manual
Page 13
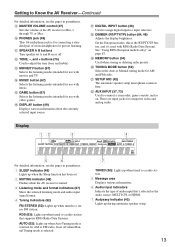
...TV button (67) Selects the listening modes intended for use with movies and TV. See "Using RDS (European models only)" on or off when Manual Tuning mode is selected. 7 TUNED (52): Lights up during automatic speaker setup. 13 S MEMORY button (54) Used when storing or deleting radio... presets. T TUNING MODE button (52) Selects the Auto or Manual tuning mode for private listening. Display 12 3 4 5 6 For detailed information, see the pages in parentheses. 1 SLEEP indicator (48) Lights up ...
...TV button (67) Selects the listening modes intended for use with movies and TV. See "Using RDS (European models only)" on or off when Manual Tuning mode is selected. 7 TUNED (52): Lights up during automatic speaker setup. 13 S MEMORY button (54) Used when storing or deleting radio... presets. T TUNING MODE button (52) Selects the Auto or Manual tuning mode for private listening. Display 12 3 4 5 6 For detailed information, see the pages in parentheses. 1 SLEEP indicator (48) Lights up ...
Owner Manual
Page 22
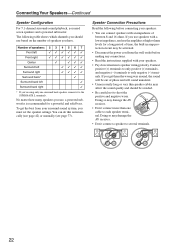
..., you have. Doing so may be activated. • Disconnect the power cord from your speakers: • You can do this automatically (see page 42) or manually (see page 77). Connecting Your Speakers-Continued Speaker Configuration For 7.1-channel surround-sound playback, you should be avoided. • Be careful not to...
..., you have. Doing so may be activated. • Disconnect the power cord from your speakers: • You can do this automatically (see page 42) or manually (see page 77). Connecting Your Speakers-Continued Speaker Configuration For 7.1-channel surround-sound playback, you should be avoided. • Be careful not to...

Owner Manual
Page 27
... outputs (typically labeled "R"). It's the most common connection format for coaxial. Connecting Your Components About AV Connections • Before making any AV connections, read the manuals supplied with a 7.1channel analog audio output. Use red plugs to connect composite video inputs and outputs. Audio Optical digital audio cable Coaxial digital audio cable...
... outputs (typically labeled "R"). It's the most common connection format for coaxial. Connecting Your Components About AV Connections • Before making any AV connections, read the manuals supplied with a 7.1channel analog audio output. Use red plugs to connect composite video inputs and outputs. Audio Optical digital audio cable Coaxial digital audio cable...
Owner Manual
Page 33
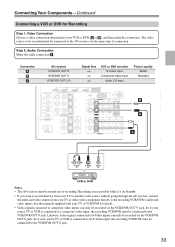
... R CD TAPE IN 1 OUT DOCK CBL/SAT V VCR/DVR S IN OUT IN IN OUT IN L SIRIUS SURR BACK SPEAKERS Bi-AMP for recording. See the manuals supplied with your source TV or VCR is connected to the AV receiver via the VCR/DVR OUT S jack. The video source to be recorded...
... R CD TAPE IN 1 OUT DOCK CBL/SAT V VCR/DVR S IN OUT IN IN OUT IN L SIRIUS SURR BACK SPEAKERS Bi-AMP for recording. See the manuals supplied with your source TV or VCR is connected to the AV receiver via the VCR/DVR OUT S jack. The video source to be recorded...

Owner Manual
Page 36
...'ll need to make a separate connection for details. 36 Step 4: Assign the HDMI IN. Step 1: Connect your HDMI-compatible player to the connected component's instruction manual for audio.) However, reliable operation with such an adapter is compatible with DVI (Digital Visual Interface), so TVs and displays with an HDMI cable. HDMI...
...'ll need to make a separate connection for details. 36 Step 4: Assign the HDMI IN. Step 1: Connect your HDMI-compatible player to the connected component's instruction manual for audio.) However, reliable operation with such an adapter is compatible with DVI (Digital Visual Interface), so TVs and displays with an HDMI cable. HDMI...
Owner Manual
Page 37
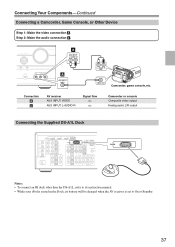
... BACK L R CBL/SAT VCR/DVR R SUB WOOFER DVD DOCK Notes: • To connect an RI dock other than the DS-A1L, refer to its instruction manual. • While your iPod is seated in the Dock, its battery will be charged when the AV receiver is set to On or Standby. 37...
... BACK L R CBL/SAT VCR/DVR R SUB WOOFER DVD DOCK Notes: • To connect an RI dock other than the DS-A1L, refer to its instruction manual. • While your iPod is seated in the Dock, its battery will be charged when the AV receiver is set to On or Standby. 37...

Owner Manual
Page 40
... receiver's DVD IN (multichannel input), you'll need to press the [MULTI CH] button repeatedly and select Multich to the manuals supplied with other Onkyo components. You must enter the appropriate remote control code first (see illustration below). Notes: • Use only cables for... connecting additional -capable components. • Connect only Onkyo components to the AV receiver. If your speakers and AV components. • Plug the end of the power cord into a different branch ...
... receiver's DVD IN (multichannel input), you'll need to press the [MULTI CH] button repeatedly and select Multich to the manuals supplied with other Onkyo components. You must enter the appropriate remote control code first (see illustration below). Notes: • Use only cables for... connecting additional -capable components. • Connect only Onkyo components to the AV receiver. If your speakers and AV components. • Plug the end of the power cord into a different branch ...
Owner Manual
Page 43
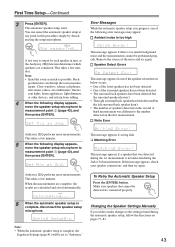
... detected during the 2nd or 3rd measurements. Note: • When the automatic speaker setup is output by disconnecting the setup microphone. Changing the Speaker Settings Manually If you wish to make changes to the settings found during the automatic speaker setup, follow the directions on the first measurement. Back- When...
... detected during the 2nd or 3rd measurements. Note: • When the automatic speaker setup is output by disconnecting the setup microphone. Changing the Speaker Settings Manually If you wish to make changes to the settings found during the automatic speaker setup, follow the directions on the first measurement. Back- When...

Owner Manual
Page 50
...SETUP RETURN MOVIE/TV MUSIC GAME DISPLAY DIGITAL INPUT RT/PTY/TP MEMORY TUNING MODE CLEAR SETUP MIC AUX INPUT VIDEO L AUDIO R AV RECEIVER HT-R560 DIGITAL INPUT 1 DIGITAL INPUT Press and hold the AV receiver's [DIGITAL INPUT] button for each digital signal format. Auto (default): The ...automatically. Common Functions-Continued Specifying the Digital Signal Format The following issues when playing PCM or DTS sources, you can specify the signal format manually. • If the beginnings of tracks from a PCM source are cut off, try the PCM setting. • If noise is produced...
...SETUP RETURN MOVIE/TV MUSIC GAME DISPLAY DIGITAL INPUT RT/PTY/TP MEMORY TUNING MODE CLEAR SETUP MIC AUX INPUT VIDEO L AUDIO R AV RECEIVER HT-R560 DIGITAL INPUT 1 DIGITAL INPUT Press and hold the AV receiver's [DIGITAL INPUT] button for each digital signal format. Auto (default): The ...automatically. Common Functions-Continued Specifying the Digital Signal Format The following issues when playing PCM or DTS sources, you can specify the signal format manually. • If the beginnings of tracks from a PCM source are cut off, try the PCM setting. • If noise is produced...
Owner Manual
Page 52
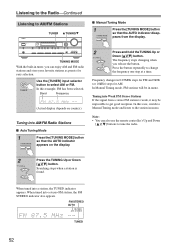
...FM Radio Stations ■ Auto Tuning Mode 1 TUNING MODE Press the [TUNING MODE] button so that the AUTO indicator appears on the display. ■ Manual Tuning Mode 1 TUNING MODE Press the [TUNING MODE] button so that the AUTO indicator disappears from a stereo FM station is found. Note: •... SETUP RETURN MOVIE/TV MUSIC GAME DISPLAY DIGITAL INPUT RT/PTY/TP MEMORY TUNING MODE CLEAR SETUP MIC AUX INPUT VIDEO L AUDIO R AV RECEIVER HT-R560 TUNING MODE With the built-in 0.05MHz steps for FM and 9kHz (or 10kHz) steps for easy selection. When tuned into a station, the...
...FM Radio Stations ■ Auto Tuning Mode 1 TUNING MODE Press the [TUNING MODE] button so that the AUTO indicator appears on the display. ■ Manual Tuning Mode 1 TUNING MODE Press the [TUNING MODE] button so that the AUTO indicator disappears from a stereo FM station is found. Note: •... SETUP RETURN MOVIE/TV MUSIC GAME DISPLAY DIGITAL INPUT RT/PTY/TP MEMORY TUNING MODE CLEAR SETUP MIC AUX INPUT VIDEO L AUDIO R AV RECEIVER HT-R560 TUNING MODE With the built-in 0.05MHz steps for FM and 9kHz (or 10kHz) steps for easy selection. When tuned into a station, the...
Owner Manual
Page 75
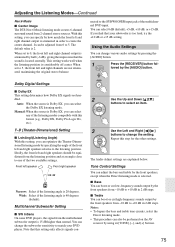
... [ ]/[ ] buttons to select an item. 3 Use the Left and Right [ ]/[ ] buttons to change the setting. With this format (e.g., Dolby EX, Dolby Pro Logic IIx, etc.). Manual: When the source is Dolby EX, you can select 0 dB (default), +5 dB, +10 dB, or +15 dB. It can select any of the front left...
... [ ]/[ ] buttons to select an item. 3 Use the Left and Right [ ]/[ ] buttons to change the setting. With this format (e.g., Dolby EX, Dolby Pro Logic IIx, etc.). Manual: When the source is Dolby EX, you can select 0 dB (default), +5 dB, +10 dB, or +15 dB. It can select any of the front left...
Owner Manual
Page 77
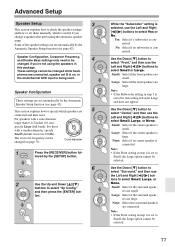
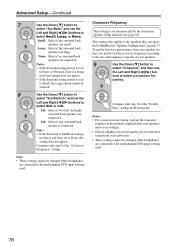
Advanced Setup Speaker Setup 3 This section explains how to check the speaker settings and how to set them manually, which speakers are 5 connected and their sizes. Speaker Configuration, Crossover Frequency, and Double Bass settings only need to be 4 changed if you change a ...
Advanced Setup Speaker Setup 3 This section explains how to check the speaker settings and how to set them manually, which speakers are 5 connected and their sizes. Speaker Configuration, Crossover Frequency, and Double Bass settings only need to be 4 changed if you change a ...
Owner Manual
Page 78
... setting only applies to select a crossover fre- quency. tons to the speakers that you want more accurate setting, look up the frequency response in the manuals supplied with your speakers 9 Use the Down [ ] button to None, or Powered Zone 2 is being used. 78
... setting only applies to select a crossover fre- quency. tons to the speakers that you want more accurate setting, look up the frequency response in the manuals supplied with your speakers 9 Use the Down [ ] button to None, or Powered Zone 2 is being used. 78
Owner Manual
Page 81
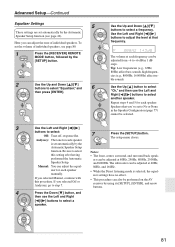
..., see page 80. 1 Press the [RECEIVER] REMOTE MODE button, followed by the Automatic Speaker Setup function (see page 42). Here you selected Manual, continue with this setting after having performed the Automatic Speaker Setup. Use the Up and Down [ ]/[ ] buttons to select a speaker. 81 If... the level at . 7 Press the [SETUP] button. Be sure to No or None in 1 dB steps. If you can be adjusted at 40Hz, Manual: You can be selected. 3 Use the Left and Right [ ]/[ ] buttons to select "Equalizer," and 6 then press [ENTER]. Advanced Setup-Continued Equalizer...
..., see page 80. 1 Press the [RECEIVER] REMOTE MODE button, followed by the Automatic Speaker Setup function (see page 42). Here you selected Manual, continue with this setting after having performed the Automatic Speaker Setup. Use the Up and Down [ ]/[ ] buttons to select a speaker. 81 If... the level at . 7 Press the [SETUP] button. Be sure to No or None in 1 dB steps. If you can be adjusted at 40Hz, Manual: You can be selected. 3 Use the Left and Right [ ]/[ ] buttons to select "Equalizer," and 6 then press [ENTER]. Advanced Setup-Continued Equalizer...

