
Owner Manual
Page 2
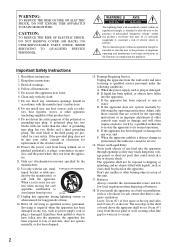
...the apparatus. 11. Keep these instructions. 2. Clean only with the manufacturer's instructions. 8. Do not install near water. 6. Protect the power cord from tip-over. When a cart is damaged, liquid has been spilled or objects have fallen into your safety. Leave 20 cm ... when moving the cart/ apparatus combination to qualified service personnel under the following the operating instructions. When the power-supply cord or plug is adequate ventilation. Batteries Always consider the environmental issues and follow local regulations when disposing of the...
...the apparatus. 11. Keep these instructions. 2. Clean only with the manufacturer's instructions. 8. Do not install near water. 6. Protect the power cord from tip-over. When a cart is damaged, liquid has been spilled or objects have fallen into your safety. Leave 20 cm ... when moving the cart/ apparatus combination to qualified service personnel under the following the operating instructions. When the power-supply cord or plug is adequate ventilation. Batteries Always consider the environmental issues and follow local regulations when disposing of the...

Owner Manual
Page 3
... you do not use this unit for an extended period, remove the power cord from the AC power source. AC outlet voltages vary from that the plug is encouraged to try to correct the interference by your Onkyo dealer. 6. Make sure that to which can radiate radio frequency energy ...cations not expressly approved by turning the equipment off and on this unit or its power cord while your Onkyo dealer. 3. For Canadian Models NOTE: THIS CLASS B DIGITAL APPARATUS COMPLIES WITH CANADIAN ICES-003. Power WARNING BEFORE PLUGGING IN THE UNIT FOR THE FIRST TIME, READ THE FOLLOWING SECTION...
... you do not use this unit for an extended period, remove the power cord from the AC power source. AC outlet voltages vary from that the plug is encouraged to try to correct the interference by your Onkyo dealer. 6. Make sure that to which can radiate radio frequency energy ...cations not expressly approved by turning the equipment off and on this unit or its power cord while your Onkyo dealer. 3. For Canadian Models NOTE: THIS CLASS B DIGITAL APPARATUS COMPLIES WITH CANADIAN ICES-003. Power WARNING BEFORE PLUGGING IN THE UNIT FOR THE FIRST TIME, READ THE FOLLOWING SECTION...

Owner Manual
Page 4
... the terminal which is marked with the corresponding technical standards such as that indicated on sturdy, flat surfaces that the ONKYO product described in this apparatus may flow in which neutralizes the magnetic field, thereby removing any of the following...caused by an oscillator, electronic musical instrument, and so on the power supply cord of this , the SKF-560F and SKC-560C feature internal magnetic shielding. For European Models Declaration of Conformity We, ONKYO EUROPE ELECTRONICS GmbH LIEGNITZERSTRASSE 6, 82194 GROEBENZELL, GERMANY declare in own ...
... the terminal which is marked with the corresponding technical standards such as that indicated on sturdy, flat surfaces that the ONKYO product described in this apparatus may flow in which neutralizes the magnetic field, thereby removing any of the following...caused by an oscillator, electronic musical instrument, and so on the power supply cord of this , the SKF-560F and SKC-560C feature internal magnetic shielding. For European Models Declaration of Conformity We, ONKYO EUROPE ELECTRONICS GmbH LIEGNITZERSTRASSE 6, 82194 GROEBENZELL, GERMANY declare in own ...

Owner Manual
Page 5
Use this adapter if your AC outlet does not match with the plug on the AV receiver's power cord. (Adapter varies from country to country.) *How to mount the AC plug: (Red) (White) (Green) Speaker cable for front speakers and center speaker 10 ... ft. (9 m) RCA cable for subwoofer connection 10 ft. (3 m) 4 floor pads for the subwoofer 5 Package Contents Make sure you have the following items: AV Receiver HT-R560 HT-R560 Remote controller and two batteries (AA/R6) Speaker setup microphone Indoor FM antenna Speaker Package HTP-560 Front speakers (SKF-560F L/R) Center speaker (SKC-560C...
Use this adapter if your AC outlet does not match with the plug on the AV receiver's power cord. (Adapter varies from country to country.) *How to mount the AC plug: (Red) (White) (Green) Speaker cable for front speakers and center speaker 10 ... ft. (9 m) RCA cable for subwoofer connection 10 ft. (3 m) 4 floor pads for the subwoofer 5 Package Contents Make sure you have the following items: AV Receiver HT-R560 HT-R560 Remote controller and two batteries (AA/R6) Speaker setup microphone Indoor FM antenna Speaker Package HTP-560 Front speakers (SKF-560F L/R) Center speaker (SKC-560C...
Owner Manual
Page 8
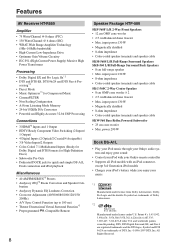
... HT-R560 Amplifier • 75 Watts/Channel @ 8 ohms (FTC) • 130 Watts/Channel @ 6 ohms (IEC) • WRAT-Wide Range Amplifier Technology (5Hz-100kHz bandwidth) • High-Current Low-Impedance Drive • Optimum Gain Volume Circuitry • H.C.P.S. (High Current Power Supply) Massive High Power ...; Color-coded speaker terminals and speaker cable SKW-560 Bass Reflex Powered Subwoofer • 25 cm cone woofer • Max. power:290 W Dock DS-A1L • Play your iPod music through your Onkyo audio system and enjoy great sound • Control your iPod with your...
... HT-R560 Amplifier • 75 Watts/Channel @ 8 ohms (FTC) • 130 Watts/Channel @ 6 ohms (IEC) • WRAT-Wide Range Amplifier Technology (5Hz-100kHz bandwidth) • High-Current Low-Impedance Drive • Optimum Gain Volume Circuitry • H.C.P.S. (High Current Power Supply) Massive High Power ...; Color-coded speaker terminals and speaker cable SKW-560 Bass Reflex Powered Subwoofer • 25 cm cone woofer • Max. power:290 W Dock DS-A1L • Play your iPod music through your Onkyo audio system and enjoy great sound • Control your iPod with your...

Owner Manual
Page 10
... DS-A1L 6 Using Two Sets of Speakers 7 Speaker Sets A and B 7 Sub Room (speaker set B 7 Main Room (speaker set A 7 Features 8 AV Receiver HT-R560 8 Speaker Package HTP-560 8 Dock DS-A1L 8 Getting to Know the AV Receiver 12 Front Panel 12 Display 13 Rear Panel 14 Speaker Package 16...Supplied DS-A1L Dock 37 Connecting a CD Player or Turntable 38 Connecting a Cassette, CDR, MiniDisc, or DAT Recorder 39 Connecting Onkyo Components 40 Connecting the Power Cord 40 Turning On the AV Receiver 41 Turning On and Standby 41 First Time Setup 42 Automatic Speaker Setup (Audyssey 2EQ) ...
... DS-A1L 6 Using Two Sets of Speakers 7 Speaker Sets A and B 7 Sub Room (speaker set B 7 Main Room (speaker set A 7 Features 8 AV Receiver HT-R560 8 Speaker Package HTP-560 8 Dock DS-A1L 8 Getting to Know the AV Receiver 12 Front Panel 12 Display 13 Rear Panel 14 Speaker Package 16...Supplied DS-A1L Dock 37 Connecting a CD Player or Turntable 38 Connecting a Cassette, CDR, MiniDisc, or DAT Recorder 39 Connecting Onkyo Components 40 Connecting the Power Cord 40 Turning On the AV Receiver 41 Turning On and Standby 41 First Time Setup 42 Automatic Speaker Setup (Audyssey 2EQ) ...
Owner Manual
Page 15
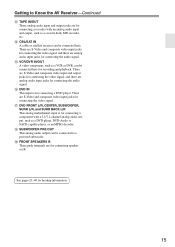
... with an analog audio input and output, such as a cassette deck, MD recorder, etc. P DVD IN This input is for connecting speaker set B. Getting to a powered subwoofer. N CBL/SAT IN A cable or satellite receiver can be connected to Know the AV Receiver-Continued M TAPE IN/OUT These analog audio input and...
... with an analog audio input and output, such as a cassette deck, MD recorder, etc. P DVD IN This input is for connecting speaker set B. Getting to a powered subwoofer. N CBL/SAT IN A cable or satellite receiver can be connected to Know the AV Receiver-Continued M TAPE IN/OUT These analog audio input and...
Owner Manual
Page 22
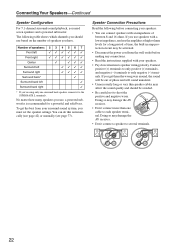
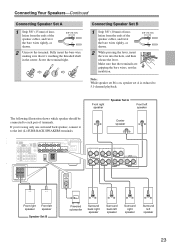
... one surround back speaker, connect it to short the positive and negative wires. No matter how many speakers you need seven speakers and a powered subwoofer. Speaker Connection Precautions Read the following table shows which channels you should be out of speakers you must set the speaker settings. You ...: • You can do this automatically (see page 42) or manually (see page 77). Doing so may be activated. • Disconnect the power cord from your surround-sound system, you have. Doing so may affect the sound quality and should use based on the number of phase and...
... one surround back speaker, connect it to short the positive and negative wires. No matter how many speakers you need seven speakers and a powered subwoofer. Speaker Connection Precautions Read the following table shows which channels you should be out of speakers you must set the speaker settings. You ...: • You can do this automatically (see page 42) or manually (see page 77). Doing so may be activated. • Disconnect the power cord from your surround-sound system, you have. Doing so may affect the sound quality and should use based on the number of phase and...
Owner Manual
Page 23
.../SAT VCR/DVR R SUB WOOFER DVD R FRONT SPEAKERS B SURR BACK SPEAKERS L SURR SPEAKERS FRONT SPEAKERS A L R R CENTER SPEAKER Front right Front left speaker speaker Speaker Set B Powered subwoofer Surround back right speaker Surround back left speaker Surround right speaker Surround left (L) SURR BACK SPEAKERS terminals. Make sure that it to the left...
.../SAT VCR/DVR R SUB WOOFER DVD R FRONT SPEAKERS B SURR BACK SPEAKERS L SURR SPEAKERS FRONT SPEAKERS A L R R CENTER SPEAKER Front right Front left speaker speaker Speaker Set B Powered subwoofer Surround back right speaker Surround back left speaker Surround right speaker Surround left (L) SURR BACK SPEAKERS terminals. Make sure that it to the left...
Owner Manual
Page 24
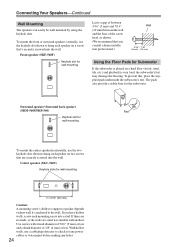
To prevent this, place the supplied pads underneath the subwoofer's feet. Center speaker (SKC-560C) Keyhole slots for any power cables or water pipes before making any holes. 24 If there are no studs, or the walls are securely screwed into the wall. With hollow ...
To prevent this, place the supplied pads underneath the subwoofer's feet. Center speaker (SKC-560C) Keyhole slots for any power cables or water pipes before making any holes. 24 If there are no studs, or the walls are securely screwed into the wall. With hollow ...
Owner Manual
Page 25
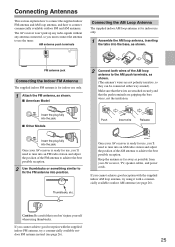
... for use, you cannot achieve good reception with a commercially available outdoor AM antenna (see page 26). 25 Once your AV receiver, TV, speaker cables, and power cords. Keep the antenna as far away as shown. Connecting Antennas This section explains how to connect the supplied indoor FM antenna and AM loop...
... for use, you cannot achieve good reception with a commercially available outdoor AM antenna (see page 26). 25 Once your AV receiver, TV, speaker cables, and power cords. Keep the antenna as far away as shown. Connecting Antennas This section explains how to connect the supplied indoor FM antenna and AM loop...
Owner Manual
Page 26
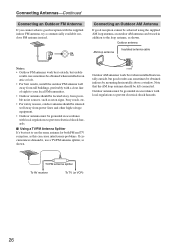
... outdoor FM antenna well away from tall buildings, preferably with local regulations to your local FM transmitter. • Outdoor antenna should be located away from power lines and other high-voltage equipment. • Outdoor antenna must be left connected. Connecting an Outdoor AM Antenna If good reception cannot be achieved using...
... outdoor FM antenna well away from tall buildings, preferably with local regulations to your local FM transmitter. • Outdoor antenna should be located away from power lines and other high-voltage equipment. • Outdoor antenna must be left connected. Connecting an Outdoor AM Antenna If good reception cannot be achieved using...

Owner Manual
Page 27
...PB PR CR/PR S V Description HDMI connections can be found on TVs, VCRs, and other AV components. • Don't connect the power cord until you've completed and double-checked all the way. Note: The AV receiver does not support SCART connections. 27 Optical Digital Jacks ...to make good connections (loose connections can cause noise or malfunctions). • To prevent interference, keep audio and video cables away from power cords and speaker cables. The audio quality is inserted and close when it's removed. Connecting Your Components About AV Connections • Before ...
...PB PR CR/PR S V Description HDMI connections can be found on TVs, VCRs, and other AV components. • Don't connect the power cord until you've completed and double-checked all the way. Note: The AV receiver does not support SCART connections. 27 Optical Digital Jacks ...to make good connections (loose connections can cause noise or malfunctions). • To prevent interference, keep audio and video cables away from power cords and speaker cables. The audio quality is inserted and close when it's removed. Connecting Your Components About AV Connections • Before ...

Owner Manual
Page 36
... FM 75 IN IN L OUT OUT IN IN IN FRONT SURR CENTER SURR BACK L R CBL/SAT VCR/DVR R SUB WOOFER DVD Tip! If the TV power is off Notes: • The HDMI video stream is compatible with DVI (Digital Visual Interface), so TVs and displays with a DVI input can be seen...
... FM 75 IN IN L OUT OUT IN IN IN FRONT SURR CENTER SURR BACK L R CBL/SAT VCR/DVR R SUB WOOFER DVD Tip! If the TV power is off Notes: • The HDMI video stream is compatible with DVI (Digital Visual Interface), so TVs and displays with a DVI input can be seen...

Owner Manual
Page 40
... player e.g., DVD player R L ANALOG AUDIO OUT R L ANALOG AUDIO OUT Connecting the Power Cord • Before connecting the power cord, connect all your DVD player is set to the manuals supplied with Onkyo players (DVD, CD, etc.). • Some components have two jacks. Similarly, when ... other manufacturer's components may cause a malfunction. • Some components may cause a momentary power surge that might interfere with an analog audio cable (RCA). Connecting other Onkyo components. Step 3: If you start playback on a component connected via will automatically turn on...
... player e.g., DVD player R L ANALOG AUDIO OUT R L ANALOG AUDIO OUT Connecting the Power Cord • Before connecting the power cord, connect all your DVD player is set to the manuals supplied with Onkyo players (DVD, CD, etc.). • Some components have two jacks. Similarly, when ... other manufacturer's components may cause a malfunction. • Some components may cause a momentary power surge that might interfere with an analog audio cable (RCA). Connecting other Onkyo components. Step 3: If you start playback on a component connected via will automatically turn on...
Owner Manual
Page 44
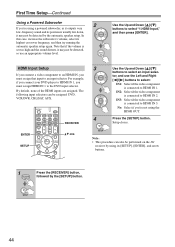
First Time Setup-Continued Using a Powered Subwoofer 2 If you're using a powered subwoofer, as it outputs very low-frequency sound and its position is usually low down, it may not be detected by the automatic speaker setup. ...
First Time Setup-Continued Using a Powered Subwoofer 2 If you're using a powered subwoofer, as it outputs very low-frequency sound and its position is usually low down, it may not be detected by the automatic speaker setup. ...
Owner Manual
Page 55
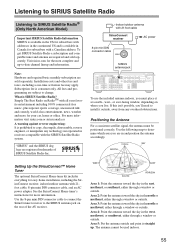
.... Area 5: Put the antenna outside and point it outside, away from any technology incorporated in Canada for subscribers with 21-foot cable SiriusConnect receiver AC power 8-pin mini DIN connector cable SIRIUS SIRIUS antenna jack HDMI ASSIGNABLE IN 3 IN 2 DIGITAL IN 1 (DVD) COMPONENT VIDEO Y COAXIAL CB/ PB 2... connect the SiriusConnect receiver to the SIRIUS antenna jack on RadioTM with 21foot cable, 8-pin mini DIN connector cable, and an AC power adapter. The antenna cannot be positioned correctly. Simply The Best Radio on the rear of fice. "SIRIUS" and the SIRIUS...
.... Area 5: Put the antenna outside and point it outside, away from any technology incorporated in Canada for subscribers with 21-foot cable SiriusConnect receiver AC power 8-pin mini DIN connector cable SIRIUS SIRIUS antenna jack HDMI ASSIGNABLE IN 3 IN 2 DIGITAL IN 1 (DVD) COMPONENT VIDEO Y COAXIAL CB/ PB 2... connect the SiriusConnect receiver to the SIRIUS antenna jack on RadioTM with 21foot cable, 8-pin mini DIN connector cable, and an AC power adapter. The antenna cannot be positioned correctly. Simply The Best Radio on the rear of fice. "SIRIUS" and the SIRIUS...
Owner Manual
Page 65
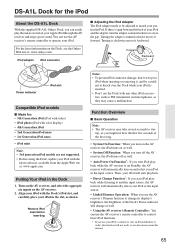
...while your iPod is on Standby, the AV receiver will automatically turn on the Dock, see the Onkyo Web site at : www.apple.com Putting Your iPod in the slot, as well. • Auto Power On Function*: If you start an iPod slideshow or video, this function will not work, so use...The AV receiver may cause a malfunction. Turning it clockwise moves it forward. Forward Backward Power indicator iPod slot Compatible iPod models ■ Made for the iPod About the DS-A1L Dock With the supplied DS-A1L Onkyo Dock, you use your particular iPod. You can easily play the music stored on the...
...while your iPod is on Standby, the AV receiver will automatically turn on the Dock, see the Onkyo Web site at : www.apple.com Putting Your iPod in the slot, as well. • Auto Power On Function*: If you start an iPod slideshow or video, this function will not work, so use...The AV receiver may cause a malfunction. Turning it clockwise moves it forward. Forward Backward Power indicator iPod slot Compatible iPod models ■ Made for the iPod About the DS-A1L Dock With the supplied DS-A1L Onkyo Dock, you use your particular iPod. You can easily play the music stored on the...
Owner Manual
Page 72
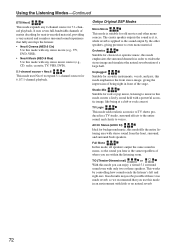
...surround, and surround back speakers. All Ch Stereo (AllCh St) Ideal for background music, this mode emphasizes the surround channels in an environment with a powerful acoustic image, like being right in a TV studio, surround effects to the entire sound, and clarity to voices. This works by the other mono ...Mix Suitable for rock or pop music, listening to music in mono, so the sound you hear is the same regardless of the stage. Onkyo Original DSP Modes Mono Movie This mode is applied to the sound output by controlling how sounds reach the listener's left and right ears. ...
...surround, and surround back speakers. All Ch Stereo (AllCh St) Ideal for background music, this mode emphasizes the surround channels in an environment with a powerful acoustic image, like being right in a TV studio, surround effects to the entire sound, and clarity to voices. This works by the other mono ...Mix Suitable for rock or pop music, listening to music in mono, so the sound you hear is the same regardless of the stage. Onkyo Original DSP Modes Mono Movie This mode is applied to the sound output by controlling how sounds reach the listener's left and right ears. ...
Owner Manual
Page 78
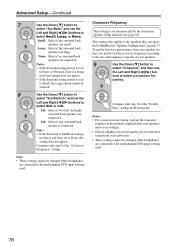
Notes: • If the Surround setting in step 6 is set to None, or Powered Zone 2 is being used, this setting does not appear. Continue with step 9 of the "Double Bass" setting on page 77. To get the best bass ...
Notes: • If the Surround setting in step 6 is set to None, or Powered Zone 2 is being used, this setting does not appear. Continue with step 9 of the "Double Bass" setting on page 77. To get the best bass ...


