

Owner Manual
Page 1
... unit. Contents Introduction 2 Connection 21 Turning On & First Time Setup..... 41 Basic Operation Playing your new 7.1ch Home Theater System. 7.1ch Home Theater System HT-S5100 AV Receiver (HT-R560) Speaker Package (HTP-560) Front Speakers (SKF-560F L/R) Center Speaker (SKC-560C) Surround Speakers (SKM-560S L/R) Surround Back Speakers (SKB-560 L/R) Subwoofer (SKW-560... obtain optimum performance and listening enjoyment from your AV components ....... 47 Using the Tuner 51 SIRIUS Satellite Radio 55 DS-A1L Dock for purchasing an Onkyo 7.1ch Home Theater System.
... unit. Contents Introduction 2 Connection 21 Turning On & First Time Setup..... 41 Basic Operation Playing your new 7.1ch Home Theater System. 7.1ch Home Theater System HT-S5100 AV Receiver (HT-R560) Speaker Package (HTP-560) Front Speakers (SKF-560F L/R) Center Speaker (SKC-560C) Surround Speakers (SKM-560S L/R) Surround Back Speakers (SKB-560 L/R) Subwoofer (SKW-560... obtain optimum performance and listening enjoyment from your AV components ....... 47 Using the Tuner 51 SIRIUS Satellite Radio 55 DS-A1L Dock for purchasing an Onkyo 7.1ch Home Theater System.

Owner Manual
Page 3
...any other chemical solvents, because they may leave marks on this unit or its power cord while your Onkyo dealer. 6. This is encouraged to try to radio or television reception, which the receiver is readily operable (easily accessible) at all over with a soft cloth. If this unit for ...a Class B digital device, pursuant to Part 15 of the following measures: • Reorient or relocate the receiving antenna. • Increase the separation between the equipment and receiver. • Connect the equipment into an outlet on , the user is normal. • If you do not intend...
...any other chemical solvents, because they may leave marks on this unit or its power cord while your Onkyo dealer. 6. This is encouraged to try to radio or television reception, which the receiver is readily operable (easily accessible) at all over with a soft cloth. If this unit for ...a Class B digital device, pursuant to Part 15 of the following measures: • Reorient or relocate the receiving antenna. • Increase the separation between the equipment and receiver. • Connect the equipment into an outlet on , the user is normal. • If you do not intend...

Owner Manual
Page 5
Package Contents Make sure you have the following items: AV Receiver HT-R560 HT-R560 Remote controller and two batteries (AA/R6) Speaker setup microphone Indoor FM antenna Speaker Package HTP-560 Front speakers (SKF-560F L/R) Center speaker (SKC-560C) ... antenna * Power-plug adapter Only supplied in certain countries. Use this adapter if your AC outlet does not match with the plug on the AV receiver's power cord. (Adapter varies from country to country.) *How to mount the AC plug: (Red) (White) (Green) Speaker cable for front speakers and center speaker...
Package Contents Make sure you have the following items: AV Receiver HT-R560 HT-R560 Remote controller and two batteries (AA/R6) Speaker setup microphone Indoor FM antenna Speaker Package HTP-560 Front speakers (SKF-560F L/R) Center speaker (SKC-560C) ... antenna * Power-plug adapter Only supplied in certain countries. Use this adapter if your AC outlet does not match with the plug on the AV receiver's power cord. (Adapter varies from country to country.) *How to mount the AC plug: (Red) (White) (Green) Speaker cable for front speakers and center speaker...

Owner Manual
Page 7
... RETURN MOVIE/TV MUSIC GAME DISPLAY DIGITAL INPUT RT/PTY/TP MEMORY TUNING MODE CLEAR SETUP MIC MASTER VOLUME or AUX INPUT VIDEO L AUDIO R AV RECEIVER HT-R560 Speaker set A On Off Speaker set B On Off On Off Indicator AB A B Output Set A: 5.1 channels Set B: 2 channels Set A: 7.1 channels Set ...speakers with an analog connection. 7 Using Two Sets of Speakers Speaker Sets A and B You can be used in your source component with the AV receiver: speaker set A and speaker set A is reduced to 7.1-channel playback. *While speaker set B is on , speaker set B. Connect your main...
... RETURN MOVIE/TV MUSIC GAME DISPLAY DIGITAL INPUT RT/PTY/TP MEMORY TUNING MODE CLEAR SETUP MIC MASTER VOLUME or AUX INPUT VIDEO L AUDIO R AV RECEIVER HT-R560 Speaker set A On Off Speaker set B On Off On Off Indicator AB A B Output Set A: 5.1 channels Set B: 2 channels Set A: 7.1 channels Set ...speakers with an analog connection. 7 Using Two Sets of Speakers Speaker Sets A and B You can be used in your source component with the AV receiver: speaker set A and speaker set A is reduced to 7.1-channel playback. *While speaker set B is on , speaker set B. Connect your main...
Owner Manual
Page 8
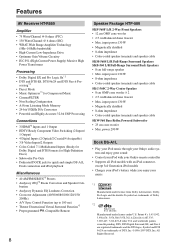
... Balanced dome tweeter • Max. power:290 W Dock DS-A1L • Play your iPod music through your Onkyo audio system and enjoy great sound • Control your iPod with your Onkyo remote controller • Supports all iPod models with an iPod connector, except 3rd Generation iPod models • Charges... Neo:6 are registered trademarks and the DTS logos, Symbol and DTS 96/24 are trademarks of DTS, Inc. ©1996-2007 DTS, Inc. Features AV Receiver HT-R560 Amplifier • 75 Watts/Channel @ 8 ohms (FTC) • 130 Watts/Channel @ 6 ohms (IEC) • WRAT-Wide Range Ampli&#...
... Balanced dome tweeter • Max. power:290 W Dock DS-A1L • Play your iPod music through your Onkyo audio system and enjoy great sound • Control your iPod with your Onkyo remote controller • Supports all iPod models with an iPod connector, except 3rd Generation iPod models • Charges... Neo:6 are registered trademarks and the DTS logos, Symbol and DTS 96/24 are trademarks of DTS, Inc. ©1996-2007 DTS, Inc. Features AV Receiver HT-R560 Amplifier • 75 Watts/Channel @ 8 ohms (FTC) • 130 Watts/Channel @ 6 ohms (IEC) • WRAT-Wide Range Ampli&#...

Owner Manual
Page 10
... 7 Speaker Sets A and B 7 Sub Room (speaker set B 7 Main Room (speaker set A 7 Features 8 AV Receiver HT-R560 8 Speaker Package HTP-560 8 Dock DS-A1L 8 Getting to Know the AV Receiver 12 Front Panel 12 Display 13 Rear Panel 14 Speaker Package 16 Subwoofer (SKW-560 16 Front, Center, Surround...Connecting a CD Player or Turntable 38 Connecting a Cassette, CDR, MiniDisc, or DAT Recorder 39 Connecting Onkyo Components 40 Connecting the Power Cord 40 Turning On the AV Receiver 41 Turning On and Standby 41 First Time Setup 42 Automatic Speaker Setup (Audyssey 2EQ) ......... 42 HDMI...
... 7 Speaker Sets A and B 7 Sub Room (speaker set B 7 Main Room (speaker set A 7 Features 8 AV Receiver HT-R560 8 Speaker Package HTP-560 8 Dock DS-A1L 8 Getting to Know the AV Receiver 12 Front Panel 12 Display 13 Rear Panel 14 Speaker Package 16 Subwoofer (SKW-560 16 Front, Center, Surround...Connecting a CD Player or Turntable 38 Connecting a Cassette, CDR, MiniDisc, or DAT Recorder 39 Connecting Onkyo Components 40 Connecting the Power Cord 40 Turning On the AV Receiver 41 Turning On and Standby 41 First Time Setup 42 Automatic Speaker Setup (Audyssey 2EQ) ......... 42 HDMI...
Owner Manual
Page 11
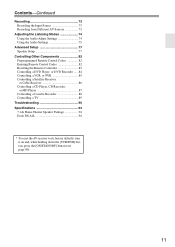
... Codes 82 Resetting the Remote Controller 83 Controlling a DVD Player, or DVD Recorder ......84 Controlling a VCR, or PVR 85 Controlling a Satellite Receiver or Cable Receiver 86 Controlling a CD Player, CD Recorder, or MD Player 87 Controlling a Cassette Recorder 88 Controlling a TV 89 Troubleshooting 90 Specifications 93 ...7.1ch Home Theater Speaker Package 94 Dock DS-A1L 94 * To reset the AV receiver to its factory defaults, turn it on and, while holding down the [VCR/DVR] button, press the [ON/STANDBY] button (see page...
... Codes 82 Resetting the Remote Controller 83 Controlling a DVD Player, or DVD Recorder ......84 Controlling a VCR, or PVR 85 Controlling a Satellite Receiver or Cable Receiver 86 Controlling a CD Player, CD Recorder, or MD Player 87 Controlling a Cassette Recorder 88 Controlling a TV 89 Troubleshooting 90 Specifications 93 ...7.1ch Home Theater Speaker Package 94 Dock DS-A1L 94 * To reset the AV receiver to its factory defaults, turn it on and, while holding down the [VCR/DVR] button, press the [ON/STANDBY] button (see page...
Owner Manual
Page 12
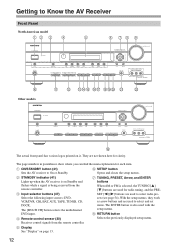
... TUNER CD SETUP RETURN MOVIE/TV MUSIC GAME LISTENING MODE DISPLAY DIGITAL INPUT DIMMER MEMORY TUNING MODE CLEAR SETUP MIC AUX INPUT VIDEO L AUDIO R AV RECEIVER HT-R560 J K Other models ON/STANDBY STANDBY L MNO PQ RST U V TUNING PRESET ENTER MASTER VOLUME DOCK PHONES MULTI CH A SPEAKERS B DVD TONE... GAME LISTENING MODE DISPLAY DIGITAL INPUT RT/PTY/TP MEMORY TUNING MODE CLEAR SETUP MIC AUX INPUT VIDEO L AUDIO R AV RECEIVER HT-R560 R The actual front panel has various logos printed on it. Opens and closes the setup menus. They are used with the setup ...
... TUNER CD SETUP RETURN MOVIE/TV MUSIC GAME LISTENING MODE DISPLAY DIGITAL INPUT DIMMER MEMORY TUNING MODE CLEAR SETUP MIC AUX INPUT VIDEO L AUDIO R AV RECEIVER HT-R560 J K Other models ON/STANDBY STANDBY L MNO PQ RST U V TUNING PRESET ENTER MASTER VOLUME DOCK PHONES MULTI CH A SPEAKERS B DVD TONE... GAME LISTENING MODE DISPLAY DIGITAL INPUT RT/PTY/TP MEMORY TUNING MODE CLEAR SETUP MIC AUX INPUT VIDEO L AUDIO R AV RECEIVER HT-R560 R The actual front panel has various logos printed on it. Opens and closes the setup menus. They are used with the setup ...
Owner Manual
Page 13
... Sleep function has been set A and B on page 63. K SPEAKER A B buttons Turn speaker set . 2 MUTING indicator (48) Flashes while the AV receiver is muted. 3 Listening mode and format indicators (67) Show the selected listening mode and audio input signal format. 4 Tuning indicators (52) FM STEREO (52...): Lights up when tuned to a radio station. 5 Message area Displays various information. 6 Audio input indicators Indicate the type of the AV receiver to Min, 1 through 79, or Max. M MOVIE/TV button (67) Selects the listening modes intended for AM or FM radio. P DISPLAY button ...
... Sleep function has been set A and B on page 63. K SPEAKER A B buttons Turn speaker set . 2 MUTING indicator (48) Flashes while the AV receiver is muted. 3 Listening mode and format indicators (67) Show the selected listening mode and audio input signal format. 4 Tuning indicators (52) FM STEREO (52...): Lights up when tuned to a radio station. 5 Message area Displays various information. 6 Audio input indicators Indicate the type of the AV receiver to Min, 1 through 79, or Max. M MOVIE/TV button (67) Selects the listening modes intended for AM or FM radio. P DISPLAY button ...

Owner Manual
Page 14
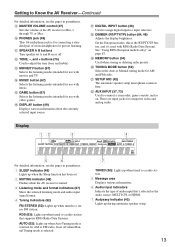
... on your setup. They're assignable, which means you can be connected to a video input on another -capable Onkyo component for connecting the SiriusConnect receiver (not supplied). See "Component Video Input Setup" on page 46. I AM and FM ANTENNA The AM push terminals... they are for connecting components with an HDMI output, such as a DVD player, DVD recorder, or DVR (digital video recorder). Getting to Know the AV Receiver-Continued Rear Panel 12 3 4 5 8 Only North American model 67 9 J HDMI ASSIGNABLE IN 3 IN 2 DIGITAL IN 1 (DVD) COMPONENT VIDEO Y COAXIAL ...
... on your setup. They're assignable, which means you can be connected to a video input on another -capable Onkyo component for connecting the SiriusConnect receiver (not supplied). See "Component Video Input Setup" on page 46. I AM and FM ANTENNA The AM push terminals... they are for connecting components with an HDMI output, such as a DVD player, DVD recorder, or DVR (digital video recorder). Getting to Know the AV Receiver-Continued Rear Panel 12 3 4 5 8 Only North American model 67 9 J HDMI ASSIGNABLE IN 3 IN 2 DIGITAL IN 1 (DVD) COMPONENT VIDEO Y COAXIAL ...
Owner Manual
Page 15
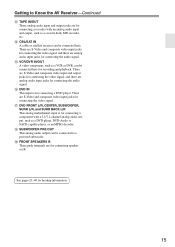
N CBL/SAT IN A cable or satellite receiver can be connected to Know the AV Receiver-Continued M TAPE IN/OUT These analog audio input and output jacks are for connecting a recorder with a 5.1/7.1-channel analog audio output, such as a DVD player, DVD-...
N CBL/SAT IN A cable or satellite receiver can be connected to Know the AV Receiver-Continued M TAPE IN/OUT These analog audio input and output jacks are for connecting a recorder with a 5.1/7.1-channel analog audio output, such as a DVD player, DVD-...
Owner Manual
Page 16
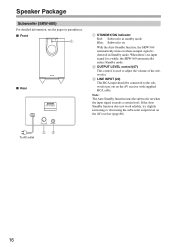
... (23) This RCA input should be connected to adjust the volume of the subwoofer. Note: The Auto Standby function turns the subwoofer on the AV receiver with supplied RCA cable. To AC outlet 23 16 B OUTPUT LEVEL control (47) This control is detected in Standby mode. If the Auto Standby function...
... (23) This RCA input should be connected to adjust the volume of the subwoofer. Note: The Auto Standby function turns the subwoofer on the AV receiver with supplied RCA cable. To AC outlet 23 16 B OUTPUT LEVEL control (47) This control is detected in Standby mode. If the Auto Standby function...
Owner Manual
Page 18
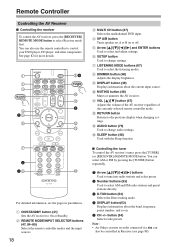
...Sleep function. ■ Controlling the tuner To control the AV receiver's tuner, press the [TUNER] (or [RECEIVER]) REMOTE MODE button. Note: • An Onkyo cassette recorder connected via can also be controlled in Receiver (see the pages in parentheses. B REMOTE MODE/INPUT SELECTOR ...preset stations directly. 3 D.TUN button (53) Selects the Direct tuning mode. 4 DISPLAY button(53) Displays information about the current input source. A 2 3 RECEIVER 4 15 6 94 TUNER J K 5 L M 7 2 38 N For detailed information, see page 88). I DISPLAY button (49) Displays information about the...
...Sleep function. ■ Controlling the tuner To control the AV receiver's tuner, press the [TUNER] (or [RECEIVER]) REMOTE MODE button. Note: • An Onkyo cassette recorder connected via can also be controlled in Receiver (see the pages in parentheses. B REMOTE MODE/INPUT SELECTOR ...preset stations directly. 3 D.TUN button (53) Selects the Direct tuning mode. 4 DISPLAY button(53) Displays information about the current input source. A 2 3 RECEIVER 4 15 6 94 TUNER J K 5 L M 7 2 38 N For detailed information, see page 88). I DISPLAY button (49) Displays information about the...

Owner Manual
Page 19
... command. Press it twice to navigate menus and select items. C Previous [ ] button Restarts the current song. H MUTING button (48) Mutes or unmutes the AV receiver. O Fast Forward [ ] button Press and hold to rewind. E Pause [ ] button Pauses playback. (With 3rd generation iPod models, it works as a Play/...A1L Dock. J VOL [ ]/[ ] button (47) Adjusts the volume of the AV receiver. If the component is connected to fast forward. See page 37 for 30 seconds. D Rewind [ ] button Press and hold to the HT-R560's DOCK jack, press the [DOCK] REMOTE MODE button. R RANDOM button* Used with ...
... command. Press it twice to navigate menus and select items. C Previous [ ] button Restarts the current song. H MUTING button (48) Mutes or unmutes the AV receiver. O Fast Forward [ ] button Press and hold to rewind. E Pause [ ] button Pauses playback. (With 3rd generation iPod models, it works as a Play/...A1L Dock. J VOL [ ]/[ ] button (47) Adjusts the volume of the AV receiver. If the component is connected to fast forward. See page 37 for 30 seconds. D Rewind [ ] button Press and hold to the HT-R560's DOCK jack, press the [DOCK] REMOTE MODE button. R RANDOM button* Used with ...
Owner Manual
Page 20
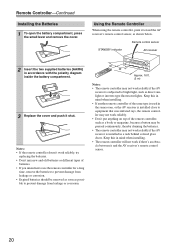
... inside the battery compartment. 3 Replace the cover and push it and the AV receiver's remote control sensor. 20 Using the Remote Controller When using the remote controller, point it toward the AV receiver's remote control sensor, as direct sunlight or inverter-type fluorescent lights. Notes...: • If the remote controller doesn't work reliably if the AV receiver is installed in the same room, or the AV receiver is installed close to equipment that uses infrared rays, the remote controller may not work reliably. • Don...
... inside the battery compartment. 3 Replace the cover and push it and the AV receiver's remote control sensor. 20 Using the Remote Controller When using the remote controller, point it toward the AV receiver's remote control sensor, as direct sunlight or inverter-type fluorescent lights. Notes...: • If the remote controller doesn't work reliably if the AV receiver is installed in the same room, or the AV receiver is installed close to equipment that uses infrared rays, the remote controller may not work reliably. • Don...
Owner Manual
Page 21
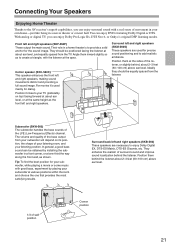
.... Tip: To find the best position for dialog. Connecting Your Speakers Enjoying Home Theater Thanks to the AV receiver's superb capabilities, you can enjoy Dolby Pro Logic IIx, DTS Neo:6, or Onkyo's original DSP listening modes. Position them inward slightly so as shown. They enhance the realism of your listening room...
.... Tip: To find the best position for dialog. Connecting Your Speakers Enjoying Home Theater Thanks to the AV receiver's superb capabilities, you can enjoy Dolby Pro Logic IIx, DTS Neo:6, or Onkyo's original DSP listening modes. Position them inward slightly so as shown. They enhance the realism of your listening room...
Owner Manual
Page 22
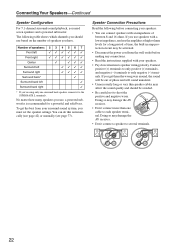
... can connect speakers with an impedance of speakers you 're using only one cable to each speaker terminal. Doing so may damage the AV receiver. • Don't connect more than one surround back speaker, connect it to the SURR BACK L terminals. Connecting Your Speakers-Continued Speaker ...sound quality and should use , a powered subwoofer is recommended for a long period of time, the built-in amp protection circuit may damage the AV receiver. • Don't connect a speaker to several terminals. 22 Doing so may be activated. • Disconnect the power cord from your speakers. •...
... can connect speakers with an impedance of speakers you 're using only one cable to each speaker terminal. Doing so may damage the AV receiver. • Don't connect more than one surround back speaker, connect it to the SURR BACK L terminals. Connecting Your Speakers-Continued Speaker ...sound quality and should use , a powered subwoofer is recommended for a long period of time, the built-in amp protection circuit may damage the AV receiver. • Don't connect a speaker to several terminals. 22 Doing so may be activated. • Disconnect the power cord from your speakers. •...
Owner Manual
Page 25
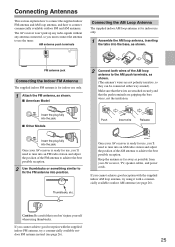
...similar to fix the FM antenna into the base, as possible from your AV receiver is for use, you cannot achieve good reception with a commercially available outdoor AM antenna (see page 26).... 25 Once your AV receiver is for use, you don't injure yourself when using it with the supplied indoor AM loop...If you 'll need to tune into the jack. Push Insert wire Release AM ANTENNA Once your AV receiver, TV, speaker cables, and power cords. Make sure that the wires are attached securely and that ...
...similar to fix the FM antenna into the base, as possible from your AV receiver is for use, you cannot achieve good reception with a commercially available outdoor AM antenna (see page 26).... 25 Once your AV receiver is for use, you don't injure yourself when using it with the supplied indoor AM loop...If you 'll need to tune into the jack. Push Insert wire Release AM ANTENNA Once your AV receiver, TV, speaker cables, and power cords. Make sure that the wires are attached securely and that ...
Owner Manual
Page 26
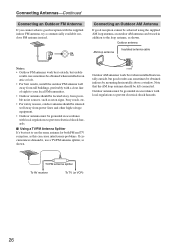
... to use the same antenna for both FM and TV reception, as shown. Outdoor antenna must be left connected. TV/FM antenna splitter To AV receiver To TV (or VCR) 26 Connecting Antennas-Continued Connecting an Outdoor FM Antenna If you cannot achieve good reception with local regulations to prevent electrical...
... to use the same antenna for both FM and TV reception, as shown. Outdoor antenna must be left connected. TV/FM antenna splitter To AV receiver To TV (or VCR) 26 Connecting Antennas-Continued Connecting an Outdoor FM Antenna If you cannot achieve good reception with local regulations to prevent electrical...

Owner Manual
Page 27
... noise or malfunctions). • To prevent interference, keep audio and video cables away from power cords and speaker cables. Note: The AV receiver does not support SCART connections. 27 AV Connection Color Coding RCA-type AV connections are usually color coded: red, white, and yellow. Left... inputs and outputs. L This cable carries analog audio. It's the most common connection format for coaxial. Optical Digital Jacks The AV receiver's optical digital jacks have shutter-type covers that open when an optical plug is the same as for optical. Component video separates the ...
... noise or malfunctions). • To prevent interference, keep audio and video cables away from power cords and speaker cables. Note: The AV receiver does not support SCART connections. 27 AV Connection Color Coding RCA-type AV connections are usually color coded: red, white, and yellow. Left... inputs and outputs. L This cable carries analog audio. It's the most common connection format for coaxial. Optical Digital Jacks The AV receiver's optical digital jacks have shutter-type covers that open when an optical plug is the same as for optical. Component video separates the ...


