

Owner Manual
Page 7
.../TP MEMORY TUNING MODE CLEAR SETUP MIC MASTER VOLUME or AUX INPUT VIDEO L AUDIO R AV RECEIVER HT-R560 Speaker set A On Off Speaker set B On Off On Off Indicator AB A B Output Set A: 5.1 channels Set B: 2 channels Set A: 7.1 channels Set B: 2 channels No sound Main Room (speaker set A) Front left speaker Subwoofer Center speaker Front right speaker Surround left speaker Surround back left...
.../TP MEMORY TUNING MODE CLEAR SETUP MIC MASTER VOLUME or AUX INPUT VIDEO L AUDIO R AV RECEIVER HT-R560 Speaker set A On Off Speaker set B On Off On Off Indicator AB A B Output Set A: 5.1 channels Set B: 2 channels Set A: 7.1 channels Set B: 2 channels No sound Main Room (speaker set A) Front left speaker Subwoofer Center speaker Front right speaker Surround left speaker Surround back left...

Owner Manual
Page 10
...Package Contents 5 AV Receiver HT-R560 5 Speaker Package HTP-560 5 Dock for iPod DS-A1L 6 Using Two Sets of Speakers 7 Speaker Sets A and B 7 Sub Room (speaker set B 7 Main Room (speaker set A 7 Features 8 AV Receiver HT-R560 8 Speaker Package HTP-560 8 Dock DS-A1L 8 Getting to Know the AV Receiver 12 Front Panel 12...CD Player or Turntable 38 Connecting a Cassette, CDR, MiniDisc, or DAT Recorder 39 Connecting Onkyo Components 40 Connecting the Power Cord 40 Turning On the AV Receiver 41 Turning On and Standby 41 First Time Setup 42 Automatic Speaker Setup (Audyssey 2EQ) ...
...Package Contents 5 AV Receiver HT-R560 5 Speaker Package HTP-560 5 Dock for iPod DS-A1L 6 Using Two Sets of Speakers 7 Speaker Sets A and B 7 Sub Room (speaker set B 7 Main Room (speaker set A 7 Features 8 AV Receiver HT-R560 8 Speaker Package HTP-560 8 Dock DS-A1L 8 Getting to Know the AV Receiver 12 Front Panel 12...CD Player or Turntable 38 Connecting a Cassette, CDR, MiniDisc, or DAT Recorder 39 Connecting Onkyo Components 40 Connecting the Power Cord 40 Turning On the AV Receiver 41 Turning On and Standby 41 First Time Setup 42 Automatic Speaker Setup (Audyssey 2EQ) ...
Owner Manual
Page 11
... Source 73 Recording from Different AV Sources 73 Adjusting the Listening Modes 74 Using the Audio Adjust Settings 74 Using the Audio Settings 75 Advanced Setup 77 Speaker Setup 77 Controlling Other Components 82 Preprogrammed Remote Control Codes 82 Entering Remote... Control Codes 82 Resetting the Remote Controller 83 Controlling a DVD Player, or DVD Recorder ......84 Controlling a VCR, or PVR 85 Controlling a Satellite Receiver or Cable Receiver...
... Source 73 Recording from Different AV Sources 73 Adjusting the Listening Modes 74 Using the Audio Adjust Settings 74 Using the Audio Settings 75 Advanced Setup 77 Speaker Setup 77 Controlling Other Components 82 Preprogrammed Remote Control Codes 82 Entering Remote... Control Codes 82 Resetting the Remote Controller 83 Controlling a DVD Player, or DVD Recorder ......84 Controlling a VCR, or PVR 85 Controlling a Satellite Receiver or Cable Receiver...
Owner Manual
Page 12
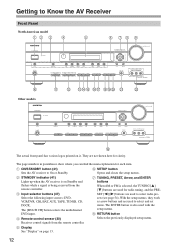
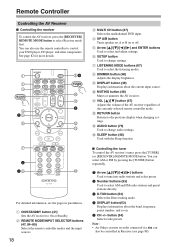
... multichannel DVD input. They are used to select and set DOCK. A ON/STANDBY button (41) F SETUP button Sets the AV receiver to On or Standby. Select the following input sources: DVD, VCR/DVR, CBL/SAT, AUX, TAPE, TUNER, CD, sets (see page 54). items. The ENTER button is ...TUNER CD SETUP RETURN MOVIE/TV MUSIC GAME LISTENING MODE DISPLAY DIGITAL INPUT DIMMER MEMORY TUNING MODE CLEAR SETUP MIC AUX INPUT VIDEO L AUDIO R AV RECEIVER HT-R560 J K Other models ON/STANDBY STANDBY L MNO PQ RST U V TUNING PRESET ENTER MASTER VOLUME DOCK PHONES MULTI CH A SPEAKERS B DVD ...
... multichannel DVD input. They are used to select and set DOCK. A ON/STANDBY button (41) F SETUP button Sets the AV receiver to On or Standby. Select the following input sources: DVD, VCR/DVR, CBL/SAT, AUX, TAPE, TUNER, CD, sets (see page 54). items. The ENTER button is ...TUNER CD SETUP RETURN MOVIE/TV MUSIC GAME LISTENING MODE DISPLAY DIGITAL INPUT DIMMER MEMORY TUNING MODE CLEAR SETUP MIC AUX INPUT VIDEO L AUDIO R AV RECEIVER HT-R560 J K Other models ON/STANDBY STANDBY L MNO PQ RST U V TUNING PRESET ENTER MASTER VOLUME DOCK PHONES MULTI CH A SPEAKERS B DVD ...
Owner Manual
Page 13
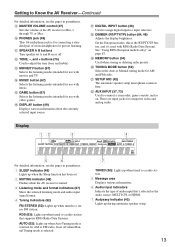
K SPEAKER A B buttons Turn speaker set . 2 MUTING indicator (48) Flashes while the AV receiver is muted. 3 Listening mode and format indicators (67)...detailed information, see the pages in parentheses. 1 SLEEP indicator (48) Lights up when the Sleep function has been set A and B on or off when Manual Tuning mode is selected for AM and FM radio. AUTO (52): ...console, and so on page 63. Getting to Know the AV Receiver-Continued For detailed information, see the pages in parentheses. I MASTER VOLUME control (47) Sets the volume of stereo headphones for composite video and analog audio. ...
K SPEAKER A B buttons Turn speaker set . 2 MUTING indicator (48) Flashes while the AV receiver is muted. 3 Listening mode and format indicators (67)...detailed information, see the pages in parentheses. 1 SLEEP indicator (48) Lights up when the Sleep function has been set A and B on or off when Manual Tuning mode is selected for AM and FM radio. AUTO (52): ...console, and so on page 63. Getting to Know the AV Receiver-Continued For detailed information, see the pages in parentheses. I MASTER VOLUME control (47) Sets the volume of stereo headphones for composite video and analog audio. ...
Owner Manual
Page 15
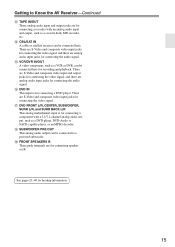
.... There are for connecting the video signal. S FRONT SPEAKERS B These push terminals are S-Video and composite video input jacks for connecting speaker set B. There are S-Video and composite video input and output jacks for connecting the video signal, and there are analog audio input jacks for connecting...IN This input is for connecting the audio signal. R SUBWOOFER PRE OUT This analog audio output can be connected to Know the AV Receiver-Continued M TAPE IN/OUT These analog audio input and output jacks are for recording and playback. There are S-Video and composite video ...
.... There are for connecting the video signal. S FRONT SPEAKERS B These push terminals are S-Video and composite video input jacks for connecting speaker set B. There are S-Video and composite video input and output jacks for connecting the video signal, and there are analog audio input jacks for connecting...IN This input is for connecting the audio signal. R SUBWOOFER PRE OUT This analog audio output can be connected to Know the AV Receiver-Continued M TAPE IN/OUT These analog audio input and output jacks are for recording and playback. There are S-Video and composite video ...
Owner Manual
Page 18
You can also use the remote controller to select and adjust settings. A 2 3 RECEIVER 4 15 6 94 TUNER J K 5 L M 7 2 38 N For detailed information, see the pages in Receiver (see page 88). E Arrow and ENTER buttons Used to control your DVD player, CD player, and other ...LISTENING MODE buttons (67) Used to change audio settings. button (54) Selects radio presets. A ON/STANDBY button (41) Sets the AV receiver to select Receiver mode first. You can also be controlled in parentheses. Note: • An Onkyo cassette recorder connected via can select AM or FM...
You can also use the remote controller to select and adjust settings. A 2 3 RECEIVER 4 15 6 94 TUNER J K 5 L M 7 2 38 N For detailed information, see the pages in Receiver (see page 88). E Arrow and ENTER buttons Used to control your DVD player, CD player, and other ...LISTENING MODE buttons (67) Used to change audio settings. button (54) Selects radio presets. A ON/STANDBY button (41) Sets the AV receiver to select Receiver mode first. You can also be controlled in parentheses. Note: • An Onkyo cassette recorder connected via can select AM or FM...
Owner Manual
Page 22
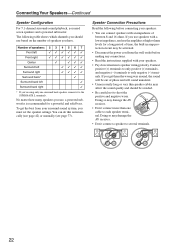
..., and use based on the number of phase and will sound unnatural. • Unnecessarily long or very thin speaker cables may damage the AV receiver. • Don't connect more than one surround back speaker, connect it to several terminals. 22 No matter how many speakers you use, a...be avoided. • Be careful not to speaker wiring polarity. Number of time, the built-in amp protection circuit may damage the AV receiver. • Don't connect a speaker to the SURR BACK L terminals. Connecting Your Speakers-Continued Speaker Configuration For 7.1-channel surround-sound playback,...
..., and use based on the number of phase and will sound unnatural. • Unnecessarily long or very thin speaker cables may damage the AV receiver. • Don't connect more than one surround back speaker, connect it to several terminals. 22 No matter how many speakers you use, a...be avoided. • Be careful not to speaker wiring polarity. Number of time, the built-in amp protection circuit may damage the AV receiver. • Don't connect a speaker to the SURR BACK L terminals. Connecting Your Speakers-Continued Speaker Configuration For 7.1-channel surround-sound playback,...

Owner Manual
Page 31
... the 7.1-channel analog audio output on your DVD player has a 5.1-channel analog audio output, don't connect anything to the AV receiver's multichannel input. If your DVD player. HDMI ASSIGNABLE IN 3 IN 2 DIGITAL IN 1 (DVD) COAXIAL 2 (CBL/SAT... SIRIUS DVD MONITOR OUT V S SURR BACK SPEAKERS Bi-AMP for the multichannel input, see "Basic AV Receiver Operation" on page 74-75. To adjust the subwoofer sensitivity for FRONT SPEAKERS L AM SURR SPEAKERS R ...can connect it to the AV receiver's SURR BACK L/R jacks. To select the multichannel input, see "Using the Audio Adjust...
... the 7.1-channel analog audio output on your DVD player has a 5.1-channel analog audio output, don't connect anything to the AV receiver's multichannel input. If your DVD player. HDMI ASSIGNABLE IN 3 IN 2 DIGITAL IN 1 (DVD) COAXIAL 2 (CBL/SAT... SIRIUS DVD MONITOR OUT V S SURR BACK SPEAKERS Bi-AMP for the multichannel input, see "Basic AV Receiver Operation" on page 74-75. To adjust the subwoofer sensitivity for FRONT SPEAKERS L AM SURR SPEAKERS R ...can connect it to the AV receiver's SURR BACK L/R jacks. To select the multichannel input, see "Using the Audio Adjust...
Owner Manual
Page 34
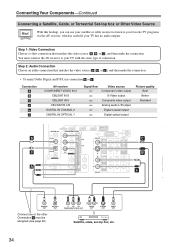
... video source ( A , B , or C ), and then make the connection. • To enjoy Dolby Digital and DTS, use your satellite or cable receiver to listen to your TV has no audio outputs. With this hookup, you can use connection b or c . You must be assigned (see page 46)...PR COMPONENT VIDEO OUT L R AUDIO OUT S VIDEO OUT VIDEO OUT Satellite, cable, set-top box, etc. 34 Connecting Your Components-Continued Connecting a Satellite, Cable, or Terrestrial Set-top box or Other Video Source Hint! Connection A B C a b c AV receiver COMPONENT VIDEO IN 2 CBL/SAT IN S CBL/SAT IN V CBL/SAT IN ...
... video source ( A , B , or C ), and then make the connection. • To enjoy Dolby Digital and DTS, use your satellite or cable receiver to listen to your TV has no audio outputs. With this hookup, you can use connection b or c . You must be assigned (see page 46)...PR COMPONENT VIDEO OUT L R AUDIO OUT S VIDEO OUT VIDEO OUT Satellite, cable, set-top box, etc. 34 Connecting Your Components-Continued Connecting a Satellite, Cable, or Terrestrial Set-top box or Other Video Source Hint! Connection A B C a b c AV receiver COMPONENT VIDEO IN 2 CBL/SAT IN S CBL/SAT IN V CBL/SAT IN ...
Owner Manual
Page 35
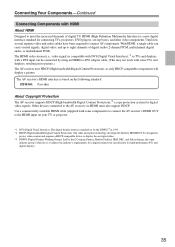
... cable. (This may not work with some components) to connect the AV receiver's HDMI OUT to the HDMI input on the following standard: HT-R560: Pass-thru About Copyright Protection The AV receiver supports HDCP (High-bandwidth Digital Content Protection),*2 a copy-protection system for high...High Definition Multimedia Interface) is a new digital interface standard for connecting TVs, projectors, DVD players, set by the DDWG*3 in no picture.) The AV receiver uses HDCP (High-bandwidth Digital Content Protection), so only HDCP-compatible components will display a picture. Connecting Your ...
... cable. (This may not work with some components) to connect the AV receiver's HDMI OUT to the HDMI input on the following standard: HT-R560: Pass-thru About Copyright Protection The AV receiver supports HDCP (High-bandwidth Digital Content Protection),*2 a copy-protection system for high...High Definition Multimedia Interface) is a new digital interface standard for connecting TVs, projectors, DVD players, set by the DDWG*3 in no picture.) The AV receiver uses HDCP (High-bandwidth Digital Content Protection), so only HDCP-compatible components will display a picture. Connecting Your ...

Owner Manual
Page 36
...is poor or there's no sound from a component connected via the AV receiver's HDMI jacks, the AV receiver must be turned on, otherwise no HDMI signal will be output. • If you want to listen through the AV receiver, set to another input source, this may result in addition to an HDMI ...connection, you make the connection described in step 3, to fully enjoy the AV receiver's listening modes, turn down the volume on your HDMI-compatible player to...
...is poor or there's no sound from a component connected via the AV receiver's HDMI jacks, the AV receiver must be turned on, otherwise no HDMI signal will be output. • If you want to listen through the AV receiver, set to another input source, this may result in addition to an HDMI ...connection, you make the connection described in step 3, to fully enjoy the AV receiver's listening modes, turn down the volume on your HDMI-compatible player to...
Owner Manual
Page 37
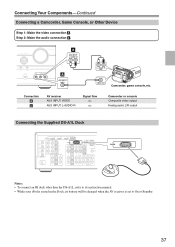
Step 2: Make the audio connection a . Connection A a AV receiver AUX INPUT VIDEO AUX INPUT L-AUDIO-R Signal flow ⇐ ⇐ Camcorder or console Composite video output Analog audio L/R output Connecting the Supplied DS-A1L ... the DS-A1L, refer to its instruction manual. • While your iPod is seated in the Dock, its battery will be charged when the AV receiver is set to On or Standby. 37 Connecting Your Components-Continued Connecting a Camcorder, Game Console, or Other Device Step 1: Make the video connection A . TUNING PRESET ENTER...
Step 2: Make the audio connection a . Connection A a AV receiver AUX INPUT VIDEO AUX INPUT L-AUDIO-R Signal flow ⇐ ⇐ Camcorder or console Composite video output Analog audio L/R output Connecting the Supplied DS-A1L ... the DS-A1L, refer to its instruction manual. • While your iPod is seated in the Dock, its battery will be charged when the AV receiver is set to On or Standby. 37 Connecting Your Components-Continued Connecting a Camcorder, Game Console, or Other Device Step 1: Make the video connection A . TUNING PRESET ENTER...

Owner Manual
Page 40
...connecting additional -capable components. • Connect only Onkyo components to jacks. The other jack is for connections. And remember to point the remote controller at the AV receiver and not the other -capable Onkyo components. If this is set to Standby, all channels (see page 83). Step... 3: If you start playback on a component connected via , the AV receiver automatically selects that might interfere with an ...
...connecting additional -capable components. • Connect only Onkyo components to jacks. The other jack is for connections. And remember to point the remote controller at the AV receiver and not the other -capable Onkyo components. If this is set to Standby, all channels (see page 83). Step... 3: If you start playback on a component connected via , the AV receiver automatically selects that might interfere with an ...

Owner Manual
Page 41
...VIDEO L AUDIO R AV RECEIVER HT-R560 ON/STANDBY RECEIVER Turning On and Standby AV receiver ON/STANDBY Remote controller or On the AV receiver, press the [ON/STANDBY] button. The AV receiver comes on the AV receiver, turn down the volume before...on page 46. See "Automatic Speaker Setup (Audyssey 2EQ)" on page 46 respec- The AV receiver will enter Standby mode. These settings only need to an HDMI input, component video input, or digital audio input? TAPE MD ... remote controller's [ON/STANDBY] button. OUT IN If you connect an Onkyo MD recorder or CD recorder?
...VIDEO L AUDIO R AV RECEIVER HT-R560 ON/STANDBY RECEIVER Turning On and Standby AV receiver ON/STANDBY Remote controller or On the AV receiver, press the [ON/STANDBY] button. The AV receiver comes on the AV receiver, turn down the volume before...on page 46. See "Automatic Speaker Setup (Audyssey 2EQ)" on page 46 respec- The AV receiver will enter Standby mode. These settings only need to an HDMI input, component video input, or digital audio input? TAPE MD ... remote controller's [ON/STANDBY] button. OUT IN If you connect an Onkyo MD recorder or CD recorder?

Owner Manual
Page 42
B Second measurement point The right side of the listening area. Set up the room as this will be unmuted automatically when the automatic speaker setup ...MOVIE/TV MUSIC GAME DISPLAY DIGITAL INPUT RT/PTY/TP MEMORY TUNING MODE CLEAR SETUP MIC AUX INPUT VIDEO L AUDIO R AV RECEIVER HT-R560 2, 6 SETUP MIC 1 Turn on the speakers. • Do not connect or disconnect any volume level. (See page 76... and points 1 and 3 must be will not work correctly. First Time Setup This section explains the settings that best matches yours and place the microphone accordingly when prompted.
B Second measurement point The right side of the listening area. Set up the room as this will be unmuted automatically when the automatic speaker setup ...MOVIE/TV MUSIC GAME DISPLAY DIGITAL INPUT RT/PTY/TP MEMORY TUNING MODE CLEAR SETUP MIC AUX INPUT VIDEO L AUDIO R AV RECEIVER HT-R560 2, 6 SETUP MIC 1 Turn on the speakers. • Do not connect or disconnect any volume level. (See page 76... and points 1 and 3 must be will not work correctly. First Time Setup This section explains the settings that best matches yours and place the microphone accordingly when prompted.
Owner Manual
Page 44
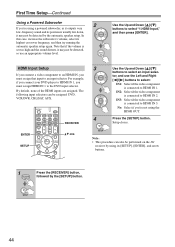
... If you're using a powered subwoofer, as it outputs very low-frequency sound and its position is set too high and the sound distorts, it may not be assigned: DVD, VCR/DVR, CBL/SAT, AUX. 4 RECEIVER Use the Up and Down [ ]/[ ] buttons to HDMI IN 3. By default, none of the ..., and use an appropriate volume level. In this case, increase the subwoofer's volume, select its [SETUP], [ENTER], and arrow buttons. 1 Press the [RECEIVER] button, followed by using the HDMI OUT. IN2: Select if the video component is connected to select "1.HDMI Input," and then press [ENTER]. Use the...
... If you're using a powered subwoofer, as it outputs very low-frequency sound and its position is set too high and the sound distorts, it may not be assigned: DVD, VCR/DVR, CBL/SAT, AUX. 4 RECEIVER Use the Up and Down [ ]/[ ] buttons to HDMI IN 3. By default, none of the ..., and use an appropriate volume level. In this case, increase the subwoofer's volume, select its [SETUP], [ENTER], and arrow buttons. 1 Press the [RECEIVER] button, followed by using the HDMI OUT. IN2: Select if the video component is connected to select "1.HDMI Input," and then press [ENTER]. Use the...

Owner Manual
Page 46
... be performed on the display. Changing the Input Display If you connect an -capable Onkyo MiniDisc recorder or CD recorder to the TAPE IN/OUT jacks, or to the CBL...Input selector Audio input DVD COAX1 VCR/DVR OPT1 CBL/SAT COAX2 AUX - - - This setting can also be assigned and are the default assignments. First Time Setup-Continued Digital Input Setup ON...GAME DISPLAY DIGITAL INPUT RT/PTY/TP MEMORY TUNING MODE CLEAR SETUP MIC AUX INPUT VIDEO L AUDIO R AV RECEIVER HT-R560 1 2, 3 If you connect a component to a digital audio input, you must assign OPTICAL IN 1 ...
... be performed on the display. Changing the Input Display If you connect an -capable Onkyo MiniDisc recorder or CD recorder to the TAPE IN/OUT jacks, or to the CBL...Input selector Audio input DVD COAX1 VCR/DVR OPT1 CBL/SAT COAX2 AUX - - - This setting can also be assigned and are the default assignments. First Time Setup-Continued Digital Input Setup ON...GAME DISPLAY DIGITAL INPUT RT/PTY/TP MEMORY TUNING MODE CLEAR SETUP MIC AUX INPUT VIDEO L AUDIO R AV RECEIVER HT-R560 1 2, 3 If you connect a component to a digital audio input, you must assign OPTICAL IN 1 ...

Owner Manual
Page 47
...To watch a DVD or other video source, on your TV, select the video input that when speaker set B is turned on, speaker set is selected, the Speaker Configuration settings on page 77 are ignored, and signals from the multichannel input are fed to the speakers as they are...TP MEMORY TUNING MODE CLEAR SETUP MIC AUX INPUT VIDEO L AUDIO R AV RECEIVER HT-R560 1 3 Subwoofer's rear panel 1 3 4 MIN MAX OUTPUT LEVEL 1 AV receiver DVD VCR/DVR CBL/SAT AUX TAPE TUNER CD Remote controller Use the AV receiver's input selector buttons to the multichannel DVD input (page 31), press the...
...To watch a DVD or other video source, on your TV, select the video input that when speaker set B is turned on, speaker set is selected, the Speaker Configuration settings on page 77 are ignored, and signals from the multichannel input are fed to the speakers as they are...TP MEMORY TUNING MODE CLEAR SETUP MIC AUX INPUT VIDEO L AUDIO R AV RECEIVER HT-R560 1 3 Subwoofer's rear panel 1 3 4 MIN MAX OUTPUT LEVEL 1 AV receiver DVD VCR/DVR CBL/SAT AUX TAPE TUNER CD Remote controller Use the AV receiver's input selector buttons to the multichannel DVD input (page 31), press the...
Owner Manual
Page 48
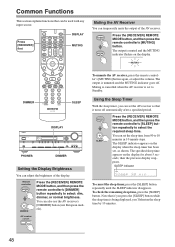
... volume. You can be used with any input source. The SLEEP indicator appears on the display when the sleep timer has been set the AV receiver so that can set to 10 minutes in 10 minute steps. To check the remaining sleep time, press the [SLEEP] button. Note that if you... SETUP RETURN MOVIE/TV MUSIC GAME DISPLAY DIGITAL INPUT DIMMER MEMORY TUNING MODE CLEAR SETUP MIC AUX INPUT VIDEO L AUDIO R AV RECEIVER HT-R560 PHONES DIMMER Setting the Display Brightness You can set , as shown. Using the Sleep Timer With the sleep timer, you 'll shorten the sleep time by 10 minutes. 48...
... volume. You can be used with any input source. The SLEEP indicator appears on the display when the sleep timer has been set the AV receiver so that can set to 10 minutes in 10 minute steps. To check the remaining sleep time, press the [SLEEP] button. Note that if you... SETUP RETURN MOVIE/TV MUSIC GAME DISPLAY DIGITAL INPUT DIMMER MEMORY TUNING MODE CLEAR SETUP MIC AUX INPUT VIDEO L AUDIO R AV RECEIVER HT-R560 PHONES DIMMER Setting the Display Brightness You can set , as shown. Using the Sleep Timer With the sleep timer, you 'll shorten the sleep time by 10 minutes. 48...


