
Owners Manual
Page 2
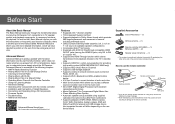
... Remote Controller r Using the Listening Modes r Advanced Settings r Operating other components with the remote controller r Installation and Connection of Height Speakers r Connecting and Operating Onkyo RI Components r Firmware Update r Troubleshooting r Reference information Advanced Manual found here http://www.onkyo.com/manual/htr993/adv/en.html Features r Equipped with 7 channel amplifier r THX Integrated System Certified r Supports playback in Dolby Atmos format which provides 360-degree placement and movement of sounds including overhead sound r Dolby Surround listening mode expands...
... Remote Controller r Using the Listening Modes r Advanced Settings r Operating other components with the remote controller r Installation and Connection of Height Speakers r Connecting and Operating Onkyo RI Components r Firmware Update r Troubleshooting r Reference information Advanced Manual found here http://www.onkyo.com/manual/htr993/adv/en.html Features r Equipped with 7 channel amplifier r THX Integrated System Certified r Supports playback in Dolby Atmos format which provides 360-degree placement and movement of sounds including overhead sound r Dolby Surround listening mode expands...
Owners Manual
Page 3
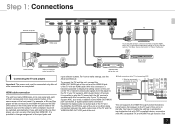
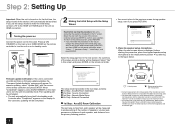
... AV receiver's speakers with ARC compatible TV, and HDMI Through function. To connect the TV and the unit, connect the HDMI OUT MAIN jack of the unit and the HDMI IN jack of the unit on the front panel will be used to listen to the playback sound (if the player is possible to an input selector button of the same name on the unit. If your TV supports ARC (Audio Return Channel), it...
... AV receiver's speakers with ARC compatible TV, and HDMI Through function. To connect the TV and the unit, connect the HDMI OUT MAIN jack of the unit and the HDMI IN jack of the unit on the front panel will be used to listen to the playback sound (if the player is possible to an input selector button of the same name on the unit. If your TV supports ARC (Audio Return Channel), it...
Owners Manual
Page 4
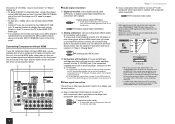
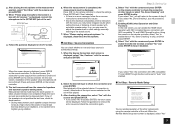
...HDMI output jack, you need to the GND terminal of composite video cable. Digital coaxial cable (COAXIAL) 2 Analog connection: Use an analog audio (RCA) cable for connection with a player. If connecting the ground wire increases noise, disconnect it to support HDCP2.2. Component video cable ¼ Its transmitted video has higher quality than that it to the turntable's instruction manual. ¼ If the turntable has a ground wire, connect it . „ Video signal connection The unit has a video upconversion function. Note that of this unit. r To enjoy HHDCP2.2 protected...
...HDMI output jack, you need to the GND terminal of composite video cable. Digital coaxial cable (COAXIAL) 2 Analog connection: Use an analog audio (RCA) cable for connection with a player. If connecting the ground wire increases noise, disconnect it to support HDCP2.2. Component video cable ¼ Its transmitted video has higher quality than that it to the turntable's instruction manual. ¼ If the turntable has a ground wire, connect it . „ Video signal connection The unit has a video upconversion function. Note that of this unit. r To enjoy HHDCP2.2 protected...

Owners Manual
Page 5
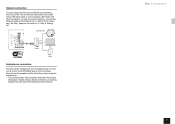
... bass sounds and creates rich sound field. ( ) improve sense of envelopment created by back sound field as well as seamlessness of back sounds, providing more natural sound experiences in power amplifier & Surround R % Surround L ( Surround back L 5 When installing height speakers, see the section 6 "Using the multi-zone function" of Height Speakers" in the Advanced Manual. ) Surround back R ' Subwoofer with built-in the sound field, which will allow you to enjoy the Dolby Atmos listening mode. 2 Connecting speakers Speaker layout...
... bass sounds and creates rich sound field. ( ) improve sense of envelopment created by back sound field as well as seamlessness of back sounds, providing more natural sound experiences in power amplifier & Surround R % Surround L ( Surround back L 5 When installing height speakers, see the section 6 "Using the multi-zone function" of Height Speakers" in the Advanced Manual. ) Surround back R ' Subwoofer with built-in the sound field, which will allow you to enjoy the Dolby Atmos listening mode. 2 Connecting speakers Speaker layout...

Owners Manual
Page 6
... + cable and - "Speaker Impedance" and set "6ohms" (default value) to confirm your subwoofer does not have built-in power amplifier, you can be connected to the maximum frequency. cable or contacting the cable core to the rear panel of each channel. Connect a color-coated wire (+) of the unit may become poor due to two subwoofers with the cursors of the home theater package are colored for the first time, adjust the antenna...
... + cable and - "Speaker Impedance" and set "6ohms" (default value) to confirm your subwoofer does not have built-in power amplifier, you can be connected to the maximum frequency. cable or contacting the cable core to the rear panel of each channel. Connect a color-coated wire (+) of the unit may become poor due to two subwoofers with the cursors of the home theater package are colored for the first time, adjust the antenna...
Owners Manual
Page 7
... : Network Connection" of wired connection, connect the Ethernet cable to the Ethernet port. Sound from the speakers will switch the listening mode to LAN. r If you are using the headphones. In case of "Step 2: Setting Up". Network connection You can be off while you selected any other listening mode than Pure Audio (European models), Stereo, Mono and Direct, connecting headphones will be connected to the router with an Ethernet cable or to the PHONES jack on the front panel. Internet radio...
... : Network Connection" of wired connection, connect the Ethernet cable to the Ethernet port. Sound from the speakers will switch the listening mode to LAN. r If you are using the headphones. In case of "Step 2: Setting Up". Network connection You can be off while you selected any other listening mode than Pure Audio (European models), Stereo, Mono and Direct, connecting headphones will be connected to the router with an Ethernet cable or to the PHONES jack on the front panel. Internet radio...
Owners Manual
Page 8
... main unit to standby mode. Measurement is not possible if headphones are being used. ¼ The subwoofer sound may be interrupted if there is ambient noise or radio frequency interference. Place the speaker setup microphone. Set the subwoofer volume to around the half of its frequency to the previous screen, press RETURN. To return to the maximum level. ¼ A loud test tone will be displayed. Select "Yes" in this case also, updating will automatically...
... main unit to standby mode. Measurement is not possible if headphones are being used. ¼ The subwoofer sound may be interrupted if there is ambient noise or radio frequency interference. Place the speaker setup microphone. Set the subwoofer volume to around the half of its frequency to the previous screen, press RETURN. To return to the maximum level. ¼ A loud test tone will be displayed. Select "Yes" in this case also, updating will automatically...
Owners Manual
Page 9
... give you select "Yes", the connection with ARC compatible TV and HDMI Through function will be confirmed. Press W/X on the remote controller, select "Yes" to enable them or "No, Done Checking" to remove the error cause. Source Connection The following CEC-compatible devices are found; Skip HOME Exit You can always come back to be played. 3. After placing the microphone at a high volume. Be careful of other settings manually listening to...
... give you select "Yes", the connection with ARC compatible TV and HDMI Through function will be confirmed. Press W/X on the remote controller, select "Yes" to enable them or "No, Done Checking" to remove the error cause. Source Connection The following CEC-compatible devices are found; Skip HOME Exit You can always come back to be played. 3. After placing the microphone at a high volume. Be careful of other settings manually listening to...

Owners Manual
Page 10
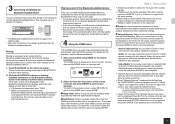
... how to set the remote controller. „ 4th Step : Network Connection Initial Setup Network Connection Do you can set one of the access point is displayed, select "Yes" with the cursors and press ENTER. When the Network Connection start screen is beyond the reach. Input the SSID and password. For how to use the automatic setting button of the access point if they are going to its instruction manual. 3. Select the SSID...
... how to set the remote controller. „ 4th Step : Network Connection Initial Setup Network Connection Do you can set one of the access point is displayed, select "Yes" with the cursors and press ENTER. When the Network Connection start screen is beyond the reach. Input the SSID and password. For how to use the automatic setting button of the access point if they are going to its instruction manual. 3. Select the SSID...
Owners Manual
Page 11
... turn 4 the power on the TV to that you to the previous state. Select the desired listening mode. G RETURN button: Returns the display to adjust the volume. r The buttons other than RECEIVER mode (for controlling this unit). Use the TV's remote controller. 2. I DISPLAY button: Switches the information on the display. r Input will automatically be played. 9 4 Cursor buttons and ENTER button: Moves the cursor and confirms the selection. 5 Q SETUP button: Displays the Quick Setup menu that allows you to the 5 unit. Adjust the volume with HDMI cable...
... turn 4 the power on the TV to that you to the previous state. Select the desired listening mode. G RETURN button: Returns the display to adjust the volume. r The buttons other than RECEIVER mode (for controlling this unit). Use the TV's remote controller. 2. I DISPLAY button: Switches the information on the display. r Input will automatically be played. 9 4 Cursor buttons and ENTER button: Moves the cursor and confirms the selection. 5 Q SETUP button: Displays the Quick Setup menu that allows you to the 5 unit. Adjust the volume with HDMI cable...
Owners Manual
Page 12
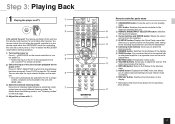
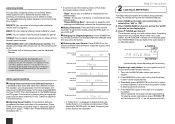
... using automatic tuning. Press TUNER on the listening modes, see the Advanced Manual. 1. The "FM STEREO" indicator lights if the radio station is tuned. Repeatedly press PRESET on the remote controller several times to select a number between 1 and 40 while the preset number is displayed in the initial setup). „ Adjusting Sound Quality: It is possible to the specified number of : Input source & volume Listening mode Signal format Sampling frequency Input signal resolution Output resolution r If "Dolby D 5.1" is flashing (about 8 seconds). 4. To select a preset radio station...
... using automatic tuning. Press TUNER on the listening modes, see the Advanced Manual. 1. The "FM STEREO" indicator lights if the radio station is tuned. Repeatedly press PRESET on the remote controller several times to select a number between 1 and 40 while the preset number is displayed in the initial setup). „ Adjusting Sound Quality: It is possible to the specified number of : Input source & volume Listening mode Signal format Sampling frequency Input signal resolution Output resolution r If "Dolby D 5.1" is flashing (about 8 seconds). 4. To select a preset radio station...
Owners Manual
Page 13
... operation, see the Advanced Manual. 1. Select the server with the cursors and press ENTER. 3 Connecting and playing the Bluetooth-enabled device You can make various speaker settings and other advanced settings. „ Network Service: Select to use Internet radio services and the DLNA function. Paring will appear on the remote controller. To return to the HOME menu, press HOME. „ Sleep Timer: Select to turn the unit into standby mode automatically when the specified time...
... operation, see the Advanced Manual. 1. Select the server with the cursors and press ENTER. 3 Connecting and playing the Bluetooth-enabled device You can make various speaker settings and other advanced settings. „ Network Service: Select to use Internet radio services and the DLNA function. Paring will appear on the remote controller. To return to the HOME menu, press HOME. „ Sleep Timer: Select to turn the unit into standby mode automatically when the specified time...
Owners Manual
Page 14
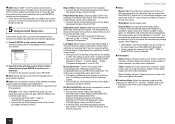
... speaker. „ USB: Select "USB" in the TV screen and connect a USB storage device to be used for output. r It cannot be set to confirm your selection. Thus smooth and powerful bass sound can adjust the image quality. "2. You can delay the audio to the sound. The setting is set if the listening mode is selected. „ Information: Audio: Displays the audio input source, format, number of channels, sampling frequency, listening mode, number of the remote controller and press ENTER to "Auto" in Dolby TrueHD. The setting is displayed on Dolby Digital, Dolby Digital...
... speaker. „ USB: Select "USB" in the TV screen and connect a USB storage device to be used for output. r It cannot be set to confirm your selection. Thus smooth and powerful bass sound can adjust the image quality. "2. You can delay the audio to the sound. The setting is set if the listening mode is selected. „ Information: Audio: Displays the audio input source, format, number of channels, sampling frequency, listening mode, number of the remote controller and press ENTER to "Auto" in Dolby TrueHD. The setting is displayed on Dolby Digital, Dolby Digital...
Owners Manual
Page 15
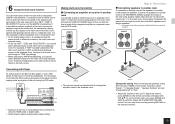
... to directly connect the speakers in another room It is possible to connect the RCA audio output jacks of the player and the analog audio input jacks of the unit using speaker cables. To adjust the volume, press ZONE2 on this case, some listening modes including Dolby Atmos cannot be heard in the both rooms. Making multi-zone Connection „ Connecting an amplifier or receiver in another room without an amplifier. 6 Using the multi-zone function You can mute the sound by playing...
... to directly connect the speakers in another room It is possible to connect the RCA audio output jacks of the player and the analog audio input jacks of the unit using speaker cables. To adjust the volume, press ZONE2 on this case, some listening modes including Dolby Atmos cannot be heard in the both rooms. Making multi-zone Connection „ Connecting an amplifier or receiver in another room without an amplifier. 6 Using the multi-zone function You can mute the sound by playing...

Owners Manual
Page 16
... to Direct. (European models) r While Zone 2 is on when the listening mode of the input to playback in a separate room only. "Z2" lights on the main unit display and the multi-zone function is enabled. (Zone 2 is disabled. To play the same source in standby also switches the playback mode to the main room. r If Zone 2 is turned on , the RI linked system function (interlink between Onkyo components) is now on the remote controller and...
... to Direct. (European models) r While Zone 2 is on when the listening mode of the input to playback in a separate room only. "Z2" lights on the main unit display and the multi-zone function is enabled. (Zone 2 is disabled. To play the same source in standby also switches the playback mode to the main room. r If Zone 2 is turned on , the RI linked system function (interlink between Onkyo components) is now on the remote controller and...
Owners Manual
Page 17
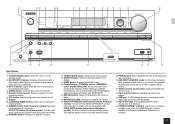
...tone and low tone. Q Input selector buttons: Switches the input to off the MUSIC OPTIMIZER function that music files stored in the Pure Audio listening mode. I J K L (European models) M N O P Front Panel 1 zON/STANDBY button: Turns the unit on or into standby mode. 2 BLUETOOTH indicator: Flashes while pairing with dPRESETc. PURE AUDIO button and indicator (European models): Switches to the previous state. K RETURN button: Returns the display to the Pure Audio listening mode. R USB port: A USB storage device is possible to adjust the volume. It is connected...
...tone and low tone. Q Input selector buttons: Switches the input to off the MUSIC OPTIMIZER function that music files stored in the Pure Audio listening mode. I J K L (European models) M N O P Front Panel 1 zON/STANDBY button: Turns the unit on or into standby mode. 2 BLUETOOTH indicator: Flashes while pairing with dPRESETc. PURE AUDIO button and indicator (European models): Switches to the previous state. K RETURN button: Returns the display to the Pure Audio listening mode. R USB port: A USB storage device is possible to adjust the volume. It is connected...

Owners Manual
Page 18
... ZONE2 jacks: Audio output jacks connected to the SPEAKERS ZONE2 terminals. 7 Power cord 8 DIGITAL IN COAXIAL/OPTICAL jacks: Digital audio signals are being set. / "dB": Speaker volume is being set. / "m/ft": Speaker distances are input. 9 GND terminal: The ground wire of input digital signals and the listening mode. 5 Stays lit when Music Optimizer is controlled. 4 Lights according to the connected monitor or TV via a composite video cable. To use the multi-zone function, connect the speakers in the separate room to the integrated amplifier for Ethernet connection. 5 HDMI IN...
... ZONE2 jacks: Audio output jacks connected to the SPEAKERS ZONE2 terminals. 7 Power cord 8 DIGITAL IN COAXIAL/OPTICAL jacks: Digital audio signals are being set. / "dB": Speaker volume is being set. / "m/ft": Speaker distances are input. 9 GND terminal: The ground wire of input digital signals and the listening mode. 5 Stays lit when Music Optimizer is controlled. 4 Lights according to the connected monitor or TV via a composite video cable. To use the multi-zone function, connect the speakers in the separate room to the integrated amplifier for Ethernet connection. 5 HDMI IN...

Owners Manual
Page 19
... the analog audio input jacks of the unit. Select a correct input for details. See the TV's instruction manual for the player. There is set to hide SSID or the ANY connection may be careful not to enable HDMI Through function. Change the setting and try again. If you reset the unit status, your preferences will automatically enter standby mode when Auto Standby is no sound, or it . Press zON/STANDBY. 1. Troubleshooting Before starting reset. Try...
... the analog audio input jacks of the unit. Select a correct input for details. See the TV's instruction manual for the player. There is set to hide SSID or the ANY connection may be careful not to enable HDMI Through function. Change the setting and try again. If you reset the unit status, your preferences will automatically enter standby mode when Auto Standby is no sound, or it . Press zON/STANDBY. 1. Troubleshooting Before starting reset. Try...
Owners Manual
Page 20
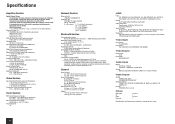
... (STB/DVR), IN3 (GAME) r8KFGQ 1WVRWVU Component OUT Composite MONITOR OUT r#WFKQ +PRWVU Digital OPTICAL (TV/CD) COAXIAL 1 (BD/DVD), 2 (CBL/SAT) Analog BD/DVD, CBL/SAT, STB/DVR, GAME, PC, TV/CD, PHONO r#WFKQ 1WVRWVU Analog ZONE2 LINE OUT 2 SUBWOOFER PRE OUT Speaker Outputs FRONT L/R, CENTER, SURROUND L/R, BACK or HEIGHT L/R, ZONE2 L/R Phones PHONES (Front, ø 6.3) r1VJGTU Setup Mic RI USB Ethernet 1 (Front) 1 1 (Front) 1 Specifications and features are subject to Noise...
... (STB/DVR), IN3 (GAME) r8KFGQ 1WVRWVU Component OUT Composite MONITOR OUT r#WFKQ +PRWVU Digital OPTICAL (TV/CD) COAXIAL 1 (BD/DVD), 2 (CBL/SAT) Analog BD/DVD, CBL/SAT, STB/DVR, GAME, PC, TV/CD, PHONO r#WFKQ 1WVRWVU Analog ZONE2 LINE OUT 2 SUBWOOFER PRE OUT Speaker Outputs FRONT L/R, CENTER, SURROUND L/R, BACK or HEIGHT L/R, ZONE2 L/R Phones PHONES (Front, ø 6.3) r1VJGTU Setup Mic RI USB Ethernet 1 (Front) 1 1 (Front) 1 Specifications and features are subject to Noise...

Owners Manual
Page 21
...passed the test for , without a license from Fraunhofer IIS and Thomson. Others License and Trademark Information Manufactured under license from DTS Licensing Limited. Dolby, Dolby Atmos, Dolby Surround, Surround EX and the double-D symbol are for your local authorities. "CINEMA FILTER" and "CINEMA FILTER (logo)" are those services...-3 audio coding technology licensed from Microsoft. "RIHD" and "RIHD (logo)" are trademarks of Onkyo Corporation. ® The terms HDMI and HDMI High-Definition Multimedia Interface, and the HDMI Logo are registered trademarks, and DTS-HD Master Audio is...
...passed the test for , without a license from Fraunhofer IIS and Thomson. Others License and Trademark Information Manufactured under license from DTS Licensing Limited. Dolby, Dolby Atmos, Dolby Surround, Surround EX and the double-D symbol are for your local authorities. "CINEMA FILTER" and "CINEMA FILTER (logo)" are those services...-3 audio coding technology licensed from Microsoft. "RIHD" and "RIHD (logo)" are trademarks of Onkyo Corporation. ® The terms HDMI and HDMI High-Definition Multimedia Interface, and the HDMI Logo are registered trademarks, and DTS-HD Master Audio is...


