Owner Manual
Page 1
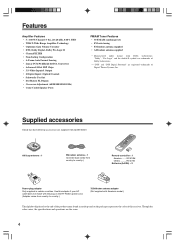
...controller with your new AV Receiver. Contents Before using Important safeguards 2 Precautions 3 Features 4 Supplied accessories 4 Before using the HT-R420 5 Facilities and connections Index to parts and controls 6 Connecting to audio/video equipment 10 Positioning speakers/Connecting speakers .... ...12 Connecting antennas 14 Connections for purchasing an Onkyo AV Receiver. Following the instructions in the unit. AV Receiver HT-R420 Instruction Manual Thank you to obtain optimum performance and listening enjoyment from your...
...controller with your new AV Receiver. Contents Before using Important safeguards 2 Precautions 3 Features 4 Supplied accessories 4 Before using the HT-R420 5 Facilities and connections Index to parts and controls 6 Connecting to audio/video equipment 10 Positioning speakers/Connecting speakers .... ...12 Connecting antennas 14 Connections for purchasing an Onkyo AV Receiver. Following the instructions in the unit. AV Receiver HT-R420 Instruction Manual Thank you to obtain optimum performance and listening enjoyment from your...
Owner Manual
Page 2
Important_En Page 2 Thursday, January 15, 2004 4:42 PM WARNING: TO REDUCE THE RISK OF FIRE OR ELECTRIC SHOCK, DO NOT EXPOSE THIS APPARATUS TO RAIN OR MOISTURE. CAUTION: TO REDUCE THE RISK OF ELECTRIC SHOCK, DO NOT REMOVE COVER (OR BACK). NO USER-SERVICEABLE PARTS INSIDE. Keep these instructions. 2. Do not defeat the safety purpose of the obsolete outlet. 10. If the provided plug does not fit into the apparatus, the apparatus has been exposed to its normal operation, E. Refer all servicing to avoid injury from tip-over. When the apparatus exhibits a distinct change in ...
Important_En Page 2 Thursday, January 15, 2004 4:42 PM WARNING: TO REDUCE THE RISK OF FIRE OR ELECTRIC SHOCK, DO NOT EXPOSE THIS APPARATUS TO RAIN OR MOISTURE. CAUTION: TO REDUCE THE RISK OF ELECTRIC SHOCK, DO NOT REMOVE COVER (OR BACK). NO USER-SERVICEABLE PARTS INSIDE. Keep these instructions. 2. Do not defeat the safety purpose of the obsolete outlet. 10. If the provided plug does not fit into the apparatus, the apparatus has been exposed to its normal operation, E. Refer all servicing to avoid injury from tip-over. When the apparatus exhibits a distinct change in ...
Owner Manual
Page 3
...a clean cloth. These limits are designed to STANDBY does not fully shutdown the HT-R420. Recording Copyright-Unless it's for compatibility with a weak solution of cable entry as close to the correct voltage for your Onkyo dealer. 3. Don't use a soft cloth dampened with power systems around the... POUSSER JUSQU'AU FOND. 1. Power WARNING BEFORE PLUGGING IN THE UNIT FOR THE FIRST TIME, READ THE FOLLOWING SECTION CAREFULLY. Dry the HT-R420 immediately afterwards with the instructions, may damage the finish or remove the panel lettering. 4. models Note to CATV system installer: This...
...a clean cloth. These limits are designed to STANDBY does not fully shutdown the HT-R420. Recording Copyright-Unless it's for compatibility with a weak solution of cable entry as close to the correct voltage for your Onkyo dealer. 3. Don't use a soft cloth dampened with power systems around the... POUSSER JUSQU'AU FOND. 1. Power WARNING BEFORE PLUGGING IN THE UNIT FOR THE FIRST TIME, READ THE FOLLOWING SECTION CAREFULLY. Dry the HT-R420 immediately afterwards with the instructions, may damage the finish or remove the panel lettering. 4. models Note to CATV system installer: This...
Owner Manual
Page 4
... the following accessories are the same. 4 RC-518M Others .......... RC-479S Batteries (AA/R6) × 2 Power-plug adapter Only supplied in catalogs and on the HT-R420's power cord. (Adapter varies from country to country.) Remote controller × 1 America ........ "Dolby", "Pro Logic" and the double-D symbol are trademarks of Dolby Laboratories...; FM indoor antenna supplied • AM indoor antenna supplied * Manufactured under license from country to country.) 75/300-ohm antenna adapter (Not supplied with the HT-R420.
... the following accessories are the same. 4 RC-518M Others .......... RC-479S Batteries (AA/R6) × 2 Power-plug adapter Only supplied in catalogs and on the HT-R420's power cord. (Adapter varies from country to country.) Remote controller × 1 America ........ "Dolby", "Pro Logic" and the double-D symbol are trademarks of Dolby Laboratories...; FM indoor antenna supplied • AM indoor antenna supplied * Manufactured under license from country to country.) 75/300-ohm antenna adapter (Not supplied with the HT-R420.
Owner Manual
Page 5
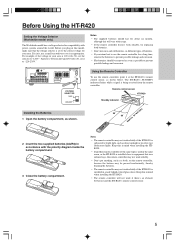
...the voltage selector is set to the correct voltage for your area is 120 volts (V), set the selector to "120V." Before Using the HT-R420 Setting the Voltage Selector (Worldwide model only) The Worldwide model has a voltage selector for a long time, remove the batteries to ... 5 Notes • The supplied batteries should be pressed inadvertently, thereby draining the batteries. • The remote controller may not work reliably if the HT-R420 is installed in accordance with usage. • If the remote controller doesn't work reliably. • Don't put anything, such as a book,...
...the voltage selector is set to the correct voltage for your area is 120 volts (V), set the selector to "120V." Before Using the HT-R420 Setting the Voltage Selector (Worldwide model only) The Worldwide model has a voltage selector for a long time, remove the batteries to ... 5 Notes • The supplied batteries should be pressed inadvertently, thereby draining the batteries. • The remote controller may not work reliably if the HT-R420 is installed in accordance with usage. • If the remote controller doesn't work reliably. • Don't put anything, such as a book,...
Owner Manual
Page 6
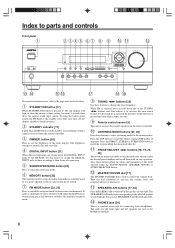
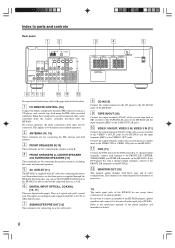
... and flashes when a signal is a standard stereo jack for the front right and left speakers are connected to the DIGITAL INPUT jacks of the HT-R420, use SPEAKERS A and B simultaneously. ! Turn the dial clockwise to increase the volume level and counterclockwise to decrease it possible to store ... are sent to show the current sound input source. Press the DIRECT, STEREO or SURROUND button to recall the Onkyo-original DSP modes in sequence. Pressing the button again returns the HT-R420 to the selected speaker system light up. You can hold down one . 9 Remote control sensor [5] This...
... and flashes when a signal is a standard stereo jack for the front right and left speakers are connected to the DIGITAL INPUT jacks of the HT-R420, use SPEAKERS A and B simultaneously. ! Turn the dial clockwise to increase the volume level and counterclockwise to decrease it possible to store ... are sent to show the current sound input source. Press the DIRECT, STEREO or SURROUND button to recall the Onkyo-original DSP modes in sequence. Pressing the button again returns the HT-R420 to the selected speaker system light up. You can hold down one . 9 Remote control sensor [5] This...
Owner Manual
Page 7
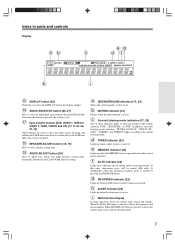
d TUNED indicator [22] Lights up when the MEMORY button is pressed in use. e MEMORY indicator [23] Lights up when a radio station is active. f AUTO indicator [22] Lights up when the sleep timer is received. It extinguishes when the monaural reception mode is active. h SLEEP indicator [25] Lights up to be muted (FM only). Index to parts and controls Display ab c eg df h i @ DISPLAY button [25] Each time you press the DISPLAY button, the display changes. # AUDIO SELECTOR button [26, 27] Press to adjust bass, treble, late night function, cinema filter, Panorama, ...
d TUNED indicator [22] Lights up when the MEMORY button is pressed in use. e MEMORY indicator [23] Lights up when a radio station is active. f AUTO indicator [22] Lights up when the sleep timer is received. It extinguishes when the monaural reception mode is active. h SLEEP indicator [25] Lights up to be muted (FM only). Index to parts and controls Display ab c eg df h i @ DISPLAY button [25] Each time you press the DISPLAY button, the display changes. # AUDIO SELECTOR button [26, 27] Press to adjust bass, treble, late night function, cinema filter, Panorama, ...
Owner Manual
Page 8
... B RL FRONT SPEAKERS A RL CENTER SPEAKER SURROUND SPEAKERS RL AC OUTLET 678 9 p q w For operational instructions, refer to the FRONT L/R terminals on the HT-R420. For correct operation, the audio connection cables must also be controlled from the remote controller provided with AC outlet for connecting the power cord... the DVD player has only 2 channel output terminals, connect to the page indicated in brackets. 1 z REMOTE CONTROL [16] Connect the Onkyo components that their power is for details. 8 If you can be connected. By doing this, you want to connect a turntable to the...
... B RL FRONT SPEAKERS A RL CENTER SPEAKER SURROUND SPEAKERS RL AC OUTLET 678 9 p q w For operational instructions, refer to the FRONT L/R terminals on the HT-R420. For correct operation, the audio connection cables must also be controlled from the remote controller provided with AC outlet for connecting the power cord... the DVD player has only 2 channel output terminals, connect to the page indicated in brackets. 1 z REMOTE CONTROL [16] Connect the Onkyo components that their power is for details. 8 If you can be connected. By doing this, you want to connect a turntable to the...
Owner Manual
Page 9
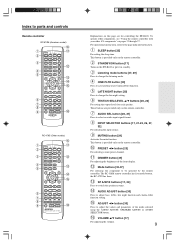
... operated by the remote controller. This button is provided only on the remote controller. 2 STANDBY/ON button [17] Turns on the HT-R420 or put it in brackets. 1 SLEEP button [25] For setting the sleep time. DIMMER button [25] For adjusting the ... button [30] Press to change the late night setting. 6 TEST/CH SEL/LEVEL 5/∞ buttons [20, 26] For setting the output levels for controlling the HT-R420. Index to parts and controls Remote controller RC-518M (American model) 0 1 - 2 3 = 4 5 ~ ! @ 6 7 8 9 # RC-479S (Other models) 0 1 - 2 3 = 4 5 ~ ! @ 6 7 8 9 # ...
... operated by the remote controller. This button is provided only on the remote controller. 2 STANDBY/ON button [17] Turns on the HT-R420 or put it in brackets. 1 SLEEP button [25] For setting the sleep time. DIMMER button [25] For adjusting the ... button [30] Press to change the late night setting. 6 TEST/CH SEL/LEVEL 5/∞ buttons [20, 26] For setting the output levels for controlling the HT-R420. Index to parts and controls Remote controller RC-518M (American model) 0 1 - 2 3 = 4 5 ~ ! @ 6 7 8 9 # RC-479S (Other models) 0 1 - 2 3 = 4 5 ~ ! @ 6 7 8 9 # ...
Owner Manual
Page 10
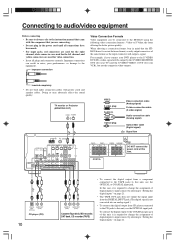
...) Cassette Tape deck, MD recorder, DAT deck, CD recorder (TAPE) • To connect the digital output from a component connected to the TAPE jacks to the HT-R420 using the following video connection formats : Video or S Video, the latter offering the better picture quality. Improper connection Video Connection Formats Video equipment can...
...) Cassette Tape deck, MD recorder, DAT deck, CD recorder (TAPE) • To connect the digital output from a component connected to the TAPE jacks to the HT-R420 using the following video connection formats : Video or S Video, the latter offering the better picture quality. Improper connection Video Connection Formats Video equipment can...
Owner Manual
Page 11
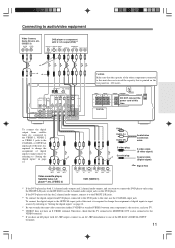
.... Therefore, check that is required to change the assignment of digital inputs to input sources by referring to "Setting the *3 digital inputs" on the HT-R420, use the COAXIAL input jack. Connecting to audio/video equipment Video Camera, Game Device, etc. (VIDEO 3) AUDIO VIDEO OUT OUT RL DVD... player or component with AC-3RF output, connect via an AC-3RF demodulator to one of the HT-R420's DIGITAL INPUT terminals. 11 FRONT SPEAKERS B RL FRONT SPEAKERS A RL CENTER SPEAKER SURROUND SPEAKERS RL AC OUTLET DO NOT connect the power ...
.... Therefore, check that is required to change the assignment of digital inputs to input sources by referring to "Setting the *3 digital inputs" on the HT-R420, use the COAXIAL input jack. Connecting to audio/video equipment Video Camera, Game Device, etc. (VIDEO 3) AUDIO VIDEO OUT OUT RL DVD... player or component with AC-3RF output, connect via an AC-3RF demodulator to one of the HT-R420's DIGITAL INPUT terminals. 11 FRONT SPEAKERS B RL FRONT SPEAKERS A RL CENTER SPEAKER SURROUND SPEAKERS RL AC OUTLET DO NOT connect the power ...
Owner Manual
Page 12
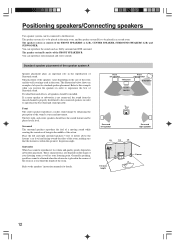
The speaker system B consists of Surround sound. Refer to this example when you position the speakers in order to reproduce the best Surround sound possible. For ideal Surround effects, all speakers should face the seated listener and be installed. If a center speaker or subwoofer is not connected, the sound from the unused channel is reproduced, its volume and quality greatly depend on subwoofer placement. Front The center speaker reproduces a richer sound image by enhancing the perception of the room and the wall coverings used in the room. Subwoofer When bass sound is properly ...
The speaker system B consists of Surround sound. Refer to this example when you position the speakers in order to reproduce the best Surround sound possible. For ideal Surround effects, all speakers should face the seated listener and be installed. If a center speaker or subwoofer is not connected, the sound from the unused channel is reproduced, its volume and quality greatly depend on subwoofer placement. Front The center speaker reproduces a richer sound image by enhancing the perception of the room and the wall coverings used in the room. Subwoofer When bass sound is properly ...
Owner Manual
Page 13
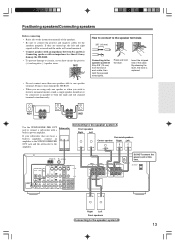
NO! • Do not connect more than 8 Ω may damage the HT-R420. • When you wish to listen to monaural (mono) sound, a single speaker should never be connected in parallel to both the right and left ... are mixed up, the left channel terminals simultaneously. Use the SUBWOOFER PRE OUT Subwoofer jack to the speaker system B 13 R L + - Doing so may damage the HT-R420. • To prevent damage to connect the positive and negative cables for the speakers properly. Insert the stripped end of the cable. If they...
NO! • Do not connect more than 8 Ω may damage the HT-R420. • When you wish to listen to monaural (mono) sound, a single speaker should never be connected in parallel to both the right and left ... are mixed up, the left channel terminals simultaneously. Use the SUBWOOFER PRE OUT Subwoofer jack to the speaker system B 13 R L + - Doing so may damage the HT-R420. • To prevent damage to connect the positive and negative cables for the speakers properly. Insert the stripped end of the cable. If they...
Owner Manual
Page 14
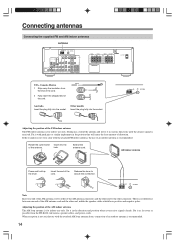
... 1 R DVD SUB WOOFER FRONT SPEAKERS B RL FRONT SPEAKERS A RL CENTER SPEAKER SURROUND SPEAKERS RL AC OUTLET USA, Canada, Mexico 1 Strip away the insulation from the HT-R420, televisions, speaker cables, and power cords. AM FM 75 ANTENNA Note Insert one end of distortion. Extend the antenna cord. There is recommended. If...
... 1 R DVD SUB WOOFER FRONT SPEAKERS B RL FRONT SPEAKERS A RL CENTER SPEAKER SURROUND SPEAKERS RL AC OUTLET USA, Canada, Mexico 1 Strip away the insulation from the HT-R420, televisions, speaker cables, and power cords. AM FM 75 ANTENNA Note Insert one end of distortion. Extend the antenna cord. There is recommended. If...
Owner Manual
Page 15
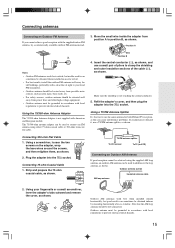
Position A FM 75 Notes • Outdoor FM antennas work best when installed outside , but good results can sometimes be obtained indoors by mounting horizontally above a window. Insert the central conductor (1), as shown, and use a TV/FM antenna splitter, as neon signs, busy roads, etc. • For safety reasons, outdoor antenna should be located away from possible noise sources, such as shown. Connecting 300-ohm Flat Cable 1. Plug the adapter into the 75Ω socket. Strip and prepare the 75 ohm coaxial cable, as shown. 2. Using the 75/300-ohm Antenna Adapter The 75/300-ohm...
Position A FM 75 Notes • Outdoor FM antennas work best when installed outside , but good results can sometimes be obtained indoors by mounting horizontally above a window. Insert the central conductor (1), as shown, and use a TV/FM antenna splitter, as neon signs, busy roads, etc. • For safety reasons, outdoor antenna should be located away from possible noise sources, such as shown. Connecting 300-ohm Flat Cable 1. Plug the adapter into the 75Ω socket. Strip and prepare the 75 ohm coaxial cable, as shown. 2. Using the 75/300-ohm Antenna Adapter The 75/300-ohm...
Owner Manual
Page 16
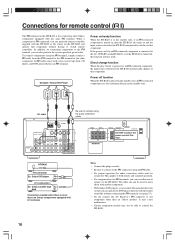
... terminals, you can use either one Onkyo components equipped with the remote controller without having to switch remote controllers. HT-R420 REMOTE CONTROL z connector Ex: Onkyo DVD player z connector Ex: Onkyo cassette tape deck Connection example when there is more than an Onkyo product. It may cause malfunction. &#...if an z-connected component is turned on, then the HT-R420 also turns on and the input source selected at this function will not work. The other Onkyo components equipped with another component. • With Onkyo DVD players, you can enter the manufacturer code so ...
... terminals, you can use either one Onkyo components equipped with the remote controller without having to switch remote controllers. HT-R420 REMOTE CONTROL z connector Ex: Onkyo DVD player z connector Ex: Onkyo cassette tape deck Connection example when there is more than an Onkyo product. It may cause malfunction. &#...if an z-connected component is turned on, then the HT-R420 also turns on and the input source selected at this function will not work. The other Onkyo components equipped with another component. • With Onkyo DVD players, you can enter the manufacturer code so ...
Owner Manual
Page 17
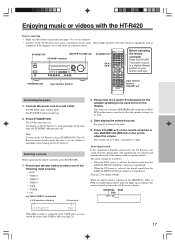
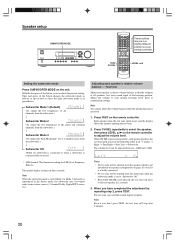
This button may cause a momentary power surge, which might interfere with the HT-R420 Before connecting • Make sure that the A and/or B indicator(s) for the speaker system(s) to be used . 3. The STANDBY indicator lights up according to ... Be sure to set to change settings. If no indicator is reproduced, the ŸDIGITAL, DTS, or PCM (2 channel digital stereo) indicator lights up . 2. The HT-R420 enters standby mode. STANDBY/ON MASTER VOLUME dial STANDBY indicator STANDBY/ON SP A SP B Before operating the remote controller Press RCVR/TAPE.
This button may cause a momentary power surge, which might interfere with the HT-R420 Before connecting • Make sure that the A and/or B indicator(s) for the speaker system(s) to be used . 3. The STANDBY indicator lights up according to ... Be sure to set to change settings. If no indicator is reproduced, the ŸDIGITAL, DTS, or PCM (2 channel digital stereo) indicator lights up . 2. The HT-R420 enters standby mode. STANDBY/ON MASTER VOLUME dial STANDBY indicator STANDBY/ON SP A SP B Before operating the remote controller Press RCVR/TAPE.
Owner Manual
Page 18
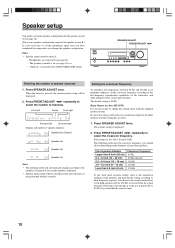
... output by the other speakers (front, center and surround). Setting the crossover frequency To reproduce low frequencies between 60 Hz and 150 Hz in a box (HT-S670) It is not neccessary to change this setting has no speaker configuration setup for the speaker system B.) It is not necessary to set the parameters...
... output by the other speakers (front, center and surround). Setting the crossover frequency To reproduce low frequencies between 60 Hz and 150 Hz in a box (HT-S670) It is not neccessary to change this setting has no speaker configuration setup for the speaker system B.) It is not necessary to set the parameters...
Owner Manual
Page 19
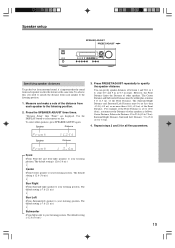
Measure and make a note of other speakers as follows: Center Distance, Subwoofer Distance: 15 to 25 ft (4.5 to 7.5 m). Press PRESET/ADJUST repeatedly to select meters or feet. Speaker Distance → Front (From Front-left speaker to your listening position. Use the DISPLAY button to specify the speaker distance. or no less than +5 ft (+1.5 m). Repeat steps 2 and 3 for all five parameters. To select other speakers. in 0.3 m steps). However, the Front Distance limits the Distance of between 1 and 30 ft. The Surround Right Distance and Surround Left ...
Measure and make a note of other speakers as follows: Center Distance, Subwoofer Distance: 15 to 25 ft (4.5 to 7.5 m). Press PRESET/ADJUST repeatedly to select meters or feet. Speaker Distance → Front (From Front-left speaker to your listening position. Use the DISPLAY button to specify the speaker distance. or no less than +5 ft (+1.5 m). Repeat steps 2 and 3 for all five parameters. To select other speakers. in 0.3 m steps). However, the Front Distance limits the Distance of between 1 and 30 ft. The Surround Right Distance and Surround Left ...
Owner Manual
Page 20
With the first press of a 5.1-channel source from the subwoofer.) ↓ Subwoofer Off (When no subwoofer is connected or when a subwoofer is connected but not used.) * LFE channel: The channel recording the LFE (Low Frequency Effects). Press TEST on the remote controller to adjust the volume level. Each speaker emits the test tone (pink noise) and the display shows the speaker emitting the test tone. 2. Press CH SEL repeatedly to select the right subwoofer mode is in parenthesis): → Subwoofer Mode 1 (Default) (To output the low frequencies of all speakers' test tones sound ...
With the first press of a 5.1-channel source from the subwoofer.) ↓ Subwoofer Off (When no subwoofer is connected or when a subwoofer is connected but not used.) * LFE channel: The channel recording the LFE (Low Frequency Effects). Press TEST on the remote controller to adjust the volume level. Each speaker emits the test tone (pink noise) and the display shows the speaker emitting the test tone. 2. Press CH SEL repeatedly to select the right subwoofer mode is in parenthesis): → Subwoofer Mode 1 (Default) (To output the low frequencies of all speakers' test tones sound ...