
Owner Manual
Page 1
... Theater System. Please retain this manual thoroughly before making connections and plugging in this manual will enable you for future reference. 6.1ch Home Theater System HT-S680 AV Receiver (HT-R430) Front Speakers (SKF-330F L/R) Center Speaker (SKC-330C) Surround Speakers (SKM-330S L/R) Surround Back Speaker (SKB-330) Powered Subwoofer (SKW-420) Instruction Manual... the Tuner 36 Enjoying the Listening Modes ..... 40 Advanced Operation 44 Troubleshooting 52 Specification 54 En Please read this manual for purchasing an Onkyo 6.1ch Home Theater System.
... Theater System. Please retain this manual thoroughly before making connections and plugging in this manual will enable you for future reference. 6.1ch Home Theater System HT-S680 AV Receiver (HT-R430) Front Speakers (SKF-330F L/R) Center Speaker (SKC-330C) Surround Speakers (SKM-330S L/R) Surround Back Speaker (SKB-330) Powered Subwoofer (SKW-420) Instruction Manual... the Tuner 36 Enjoying the Listening Modes ..... 40 Advanced Operation 44 Troubleshooting 52 Specification 54 En Please read this manual for purchasing an Onkyo 6.1ch Home Theater System.

Owner Manual
Page 3
...frequency energy and, if not installed and used in humid climates. Handling Notes • If you originally bought it checked by your Onkyo dealer. 3. Memory Backup The AV receiver uses a battery-less memory backup system in your area meets the voltage requirements printed on the unit, contact your... Onkyo dealer. 6. NOTE: This equipment has been tested and found to transport this unit or its power cord while your area. However, ...
...frequency energy and, if not installed and used in humid climates. Handling Notes • If you originally bought it checked by your Onkyo dealer. 3. Memory Backup The AV receiver uses a battery-less memory backup system in your area meets the voltage requirements printed on the unit, contact your... Onkyo dealer. 6. NOTE: This equipment has been tested and found to transport this unit or its power cord while your area. However, ...
Owner Manual
Page 5
...MiniDisc, or DAT Recorder 30 Connecting the Power Cord of Another Component 30 Connecting Onkyo Components 31 Connecting the Power Cord 31 Turning On & First Time Setup Turning On 32 Turning On the AV Receiver 32 First Time Setup 33 Assigning Digital Inputs to Input Sources ..... 33 Changing ...36 Common Functions 38 Using the OptiResponse Equalizer 38 Setting the Display Brightness 38 Adjusting the Bass & Treble 38 Muting the AV Receiver 38 Using the Sleep Timer 39 Using Headphones 39 Adjusting Speaker Levels 39 Enjoying the Listening Modes Using the Listening Modes 40 Selecting...
...MiniDisc, or DAT Recorder 30 Connecting the Power Cord of Another Component 30 Connecting Onkyo Components 31 Connecting the Power Cord 31 Turning On & First Time Setup Turning On 32 Turning On the AV Receiver 32 First Time Setup 33 Assigning Digital Inputs to Input Sources ..... 33 Changing ...36 Common Functions 38 Using the OptiResponse Equalizer 38 Setting the Display Brightness 38 Adjusting the Bass & Treble 38 Muting the AV Receiver 38 Using the Sleep Timer 39 Using Headphones 39 Adjusting Speaker Levels 39 Enjoying the Listening Modes Using the Listening Modes 40 Selecting...

Owner Manual
Page 6
... same regardless of the product name indicates the color. Use this adapter if your AC outlet does not match with the plug on the AV receiver's power cord. (Adapter varies from country to country.) (Blue) (Gray) (Brown) Speaker cables for surround speakers 30 ft. (9 m) HTP-...cable for center speaker 10 ft. (3 m) Power-plug adapter Only supplied in certain countries. Supplied Accessories Make sure you have the following accessories: HT-R430 HT-R430 Surround speakers (SKM-330S L/R) Surround Back speaker (SKB-330) Remote controller & two batteries (AA/R6) Subwoofer (SKW-420) Indoor FM ...
... same regardless of the product name indicates the color. Use this adapter if your AC outlet does not match with the plug on the AV receiver's power cord. (Adapter varies from country to country.) (Blue) (Gray) (Brown) Speaker cables for surround speakers 30 ft. (9 m) HTP-...cable for center speaker 10 ft. (3 m) Power-plug adapter Only supplied in certain countries. Supplied Accessories Make sure you have the following accessories: HT-R430 HT-R430 Surround speakers (SKM-330S L/R) Surround Back speaker (SKB-330) Remote controller & two batteries (AA/R6) Subwoofer (SKW-420) Indoor FM ...
Owner Manual
Page 7
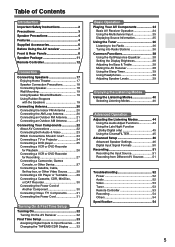
...last for about six months, although this will not work reliably. • Don't put anything, such as shown below. Remote control sensor STANDBY indicator AV receiver 2 Insert the two supplied batteries (AA/R6) in mind when installing. • The remote controller will vary with the polarity diagram inside the battery ... batteries. • Don't mix new and old batteries or different types of the same type is used in the same room, or the AV receiver is installed close to equipment that uses infrared rays, the remote controller may not work if there's an obstacle between it at the AV...
...last for about six months, although this will not work reliably. • Don't put anything, such as shown below. Remote control sensor STANDBY indicator AV receiver 2 Insert the two supplied batteries (AA/R6) in mind when installing. • The remote controller will vary with the polarity diagram inside the battery ... batteries. • Don't mix new and old batteries or different types of the same type is used in the same room, or the AV receiver is installed close to equipment that uses infrared rays, the remote controller may not work if there's an obstacle between it at the AV...
Owner Manual
Page 8
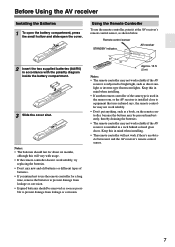
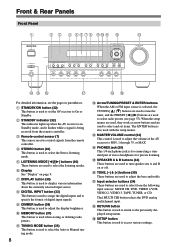
... input source. P TONE, [-] & [+] buttons (38) These buttons are used when storing or deleting radio presets. C Remote-control sensor (7) This sensor receives control signals from the following input sources: MULTI CH, DVD, VIDEO 1/VCR, VIDEO 2, VIDEO 3, TAPE, TUNER, or CD. G DISPLAY button (35)... This button is used to select the listening modes. I DIMMER button (38) This button is used to select and set the AV receiver to specify the format of stereo headphones for connecting a standard pair of digital input signals. Q Input selector buttons (34) These buttons...
... input source. P TONE, [-] & [+] buttons (38) These buttons are used when storing or deleting radio presets. C Remote-control sensor (7) This sensor receives control signals from the following input sources: MULTI CH, DVD, VIDEO 1/VCR, VIDEO 2, VIDEO 3, TAPE, TUNER, or CD. G DISPLAY button (35)... This button is used to select the listening modes. I DIMMER button (38) This button is used to select and set the AV receiver to specify the format of stereo headphones for connecting a standard pair of digital input signals. Q Input selector buttons (34) These buttons...
Owner Manual
Page 9
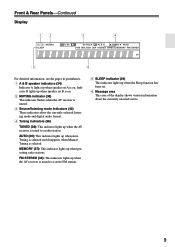
...This indicator lights up when the Sleep function has been set A is on . 2 MUTING indicator (38) This indicator flashes when the AV receiver is muted. 3 Source/listening mode indicators (42) These indicators show the currently selected listening mode and digital audio format. 4 Tuning indicators (36) ... indicator lights up when presetting radio stations. MEMORY (37): This indicator lights up when the AV receiver is selected. FM STEREO (36): This indicator lights up when the AV receiver is tuned to a stereo FM station. 5 SLEEP indicator (39) This indicator lights up when Auto...
...This indicator lights up when the Sleep function has been set A is on . 2 MUTING indicator (38) This indicator flashes when the AV receiver is muted. 3 Source/listening mode indicators (42) These indicators show the currently selected listening mode and digital audio format. 4 Tuning indicators (36) ... indicator lights up when presetting radio stations. MEMORY (37): This indicator lights up when the AV receiver is selected. FM STEREO (36): This indicator lights up when the AV receiver is tuned to a stereo FM station. 5 SLEEP indicator (39) This indicator lights up when Auto...
Owner Manual
Page 10
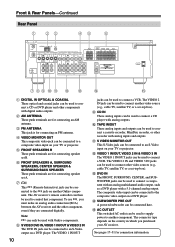
...). The VIDEO 2 IN jack can be used to a composite video input on your AV receiver. L VIDEO 1 IN/OUT, VIDEO 2 IN & VIDEO 3 IN The VIDEO 1 IN/OUT jacks can be used to another Onkyo component. N SUBWOOFER PRE OUT A powered subwoofer can be used to control that component. O... a component with an analog multichannel audio output, such as a DVD player with Onkyo components. To use , you purchased your TV or projector. E FRONT SPEAKERS B These push terminals are connected digitally. The AV receiver's remote controller can only be used with a 5.1-channel analog output. Note: can...
...). The VIDEO 2 IN jack can be used to a composite video input on your AV receiver. L VIDEO 1 IN/OUT, VIDEO 2 IN & VIDEO 3 IN The VIDEO 1 IN/OUT jacks can be used to another Onkyo component. N SUBWOOFER PRE OUT A powered subwoofer can be used to control that component. O... a component with an analog multichannel audio output, such as a DVD player with Onkyo components. To use , you purchased your TV or projector. E FRONT SPEAKERS B These push terminals are connected digitally. The AV receiver's remote controller can only be used with a 5.1-channel analog output. Note: can...

Owner Manual
Page 11
...This control is detected in standby mode Green: Subwoofer on With the Auto Standby function, the SKW-420 automatically turns on your HT-R430 AV receiver, amp, or other receiver with the supplied speaker cables. To turn on the SKW-420, set the POWER switch to adjust the volume of the ... be used to the SUBWOOFER PREOUT on when the input signal exceeds a certain level. Note: The Auto Standby function turns the subwoofer on your receiver or amp (see page 47). 11 The supplied speaker cables are for about 20 minutes, the SKW-420 automatically enters Standby mode. Note: Use...
...This control is detected in standby mode Green: Subwoofer on With the Auto Standby function, the SKW-420 automatically turns on your HT-R430 AV receiver, amp, or other receiver with the supplied speaker cables. To turn on the SKW-420, set the POWER switch to adjust the volume of the ... be used to the SUBWOOFER PREOUT on when the input signal exceeds a certain level. Note: The Auto Standby function turns the subwoofer on your receiver or amp (see page 47). 11 The supplied speaker cables are for about 20 minutes, the SKW-420 automatically enters Standby mode. Note: Use...

Owner Manual
Page 12
...to select a mode. 2 Use the buttons supported by using the five REMOTE MODE buttons. ■ RECEIVER/TAPE Mode In RECEIVER/TAPE mode, you can control the AV receiver and an Onkyo cassette recorder connected via . ■ DVD, CD, MD, & CDR Modes With these modes, you can be... used to control the AV receiver. RECEIVER Mode RECEIVER mode is used to control up to six different components. Remote Controller How to Use the Remote Controller Including the AV receiver, the remote controller can control an DVD Onkyo DVD player and CD/MD/CDR player/recorder.
...to select a mode. 2 Use the buttons supported by using the five REMOTE MODE buttons. ■ RECEIVER/TAPE Mode In RECEIVER/TAPE mode, you can control the AV receiver and an Onkyo cassette recorder connected via . ■ DVD, CD, MD, & CDR Modes With these modes, you can be... used to control the AV receiver. RECEIVER Mode RECEIVER mode is used to control up to six different components. Remote Controller How to Use the Remote Controller Including the AV receiver, the remote controller can control an DVD Onkyo DVD player and CD/MD/CDR player/recorder.

Owner Manual
Page 13
...select the remote controller modes. I RETURN button This button is on, you press a button on the AV receiver. When you can be used to select any of the currently selected remote controller mode. When the OptiResponse equalizer ...set the Sleep function. P MUTING button (38) This button is used to adjust the volume of the AV receiver regardless of each speaker. B ON button (32) This button is used to select the multichannel DVD input. ... and B on the OptiResponse equalizer, which optimizes performance when the HT-R430 is used to select the input sources.
...select the remote controller modes. I RETURN button This button is on, you press a button on the AV receiver. When you can be used to select any of the currently selected remote controller mode. When the OptiResponse equalizer ...set the Sleep function. P MUTING button (38) This button is used to adjust the volume of the AV receiver regardless of each speaker. B ON button (32) This button is used to select the multichannel DVD input. ... and B on the OptiResponse equalizer, which optimizes performance when the HT-R430 is used to select the input sources.
Owner Manual
Page 14
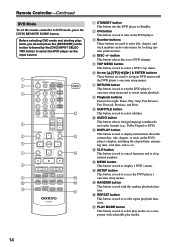
C Number buttons These buttons are used to display a DVD's menu. I J K ON STANDBY REMOTE MODE RECEIVER DVD TAPE/AMP INPUT SELECTOR 1 2 3 C D V1 V2 V3 4 5 6 MD MULTI CH DVD 7 8 9 CDR TAPE TUNER C D +10 0 CLR --/--- P REPEAT button This button is ... button is used to enter title, chapter, and track numbers and to select subtitles. Before selecting DVD mode and starting playback, you should press the [RECEIVER] mode button followed by the [DVD] INPUT SELECTOR button to access the DVD player's onscreen setup menus. D DISC +/- N SETUP button This button...
C Number buttons These buttons are used to display a DVD's menu. I J K ON STANDBY REMOTE MODE RECEIVER DVD TAPE/AMP INPUT SELECTOR 1 2 3 C D V1 V2 V3 4 5 6 MD MULTI CH DVD 7 8 9 CDR TAPE TUNER C D +10 0 CLR --/--- P REPEAT button This button is ... button is used to enter title, chapter, and track numbers and to select subtitles. Before selecting DVD mode and starting playback, you should press the [RECEIVER] mode button followed by the [DVD] INPUT SELECTOR button to access the DVD player's onscreen setup menus. D DISC +/- N SETUP button This button...
Owner Manual
Page 15
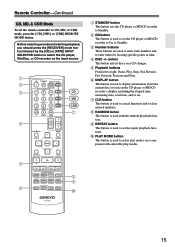
... the elapsed time, remaining time, total time, and so on. Before selecting a mode and starting playback, you should press the [RECEIVER] mode button followed by the [CD] or [TAPE] INPUT SELECTOR button to set the repeat playback functions. DIMMER SLEEP CH DISC ... discs on a component with the random playback function. H RANDOM button This button is used with selectable play modes on a CD changer. A B C D ON STANDBY REMOTE MODE RECEIVER DVD TAPE/AMP INPUT SELECTOR 1 2 3 C D V1 V2 V3 4 5 6 MD MULTI CH DVD 7 8 9 CDR TAPE TUNER C D +10 0 CLR --/--- D DISC...
... the elapsed time, remaining time, total time, and so on. Before selecting a mode and starting playback, you should press the [RECEIVER] mode button followed by the [CD] or [TAPE] INPUT SELECTOR button to set the repeat playback functions. DIMMER SLEEP CH DISC ... discs on a component with the random playback function. H RANDOM button This button is used with selectable play modes on a CD changer. A B C D ON STANDBY REMOTE MODE RECEIVER DVD TAPE/AMP INPUT SELECTOR 1 2 3 C D V1 V2 V3 4 5 6 MD MULTI CH DVD 7 8 9 CDR TAPE TUNER C D +10 0 CLR --/--- D DISC...
Owner Manual
Page 16
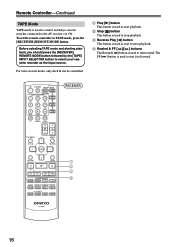
... V1 V2 V3 4 5 6 MD MULTI CH DVD 7 8 9 CDR TAPE TUNER C D +10 0 CLR --/--- Before selecting TAPE mode and starting playback, you should press the [RECEIVER] REMOTE MODE button followed by the [TAPE] INPUT SELECTOR button to start rewind. For twin cassette decks, only deck B can be controlled. D Rewind & FF [ ]/[ ] buttons...- The FF [ ] button is used to start fast forward. B Stop [ ] button This button is used to the AV receiver via . Remote Controller-Continued TAPE Mode TAPE mode is used to control an Onkyo cassette recorder connected to stop playback.
... V1 V2 V3 4 5 6 MD MULTI CH DVD 7 8 9 CDR TAPE TUNER C D +10 0 CLR --/--- Before selecting TAPE mode and starting playback, you should press the [RECEIVER] REMOTE MODE button followed by the [TAPE] INPUT SELECTOR button to start rewind. For twin cassette decks, only deck B can be controlled. D Rewind & FF [ ]/[ ] buttons...- The FF [ ] button is used to start fast forward. B Stop [ ] button This button is used to the AV receiver via . Remote Controller-Continued TAPE Mode TAPE mode is used to control an Onkyo cassette recorder connected to stop playback.

Owner Manual
Page 17
...-third the width of the LFE (Low-Frequency Effects) channel. Connecting Speakers Enjoying Home Theater You can use two sets of speakers with the AV receiver: speaker set A and speaker set A is reduced to 2.1-channel playback. They should set A is reduced to enjoy certain listening modes (i.e., Dolby Digital EX and DTS...
...-third the width of the LFE (Low-Frequency Effects) channel. Connecting Speakers Enjoying Home Theater You can use two sets of speakers with the AV receiver: speaker set A and speaker set A is reduced to 2.1-channel playback. They should set A is reduced to enjoy certain listening modes (i.e., Dolby Digital EX and DTS...
Owner Manual
Page 18
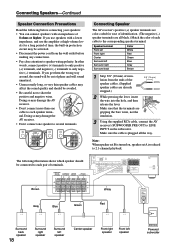
...all black.) Match the color of phase and will sound unnatural. • Unnecessarily long, or very thin speaker cables may damage the AV receiver. • Don't connect one cable to 2.1-channel playback. Note: When speaker set A is plugged all the way. The following before...lower impedance, and use the amplifier at high volume levels for ease of 8 ohms or higher. Connecting Speaker The AV receiver's positive (+) speaker terminals are color-coded for a long period of terminals. Connecting Speakers-Continued Speaker Connection Precautions Read the following ...
...all black.) Match the color of phase and will sound unnatural. • Unnecessarily long, or very thin speaker cables may damage the AV receiver. • Don't connect one cable to 2.1-channel playback. Note: When speaker set A is plugged all the way. The following before...lower impedance, and use the amplifier at high volume levels for ease of 8 ohms or higher. Connecting Speaker The AV receiver's positive (+) speaker terminals are color-coded for a long period of terminals. Connecting Speakers-Continued Speaker Connection Precautions Read the following ...
Owner Manual
Page 20
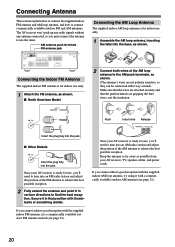
... best possible reception. 2 Fully extend the antenna and point it in various directions to the AM push terminals, as possible from your AV receiver is for use the tuner. Push Insert wire Release Insert the plug fully into the jack. ■ Other Models Insert the plug fully ...way around). Keep the antenna as far away as shown. (The antenna's wires are gripping the bare wires, not the insulation. The AV receiver won't pick up any radio signals without any antenna connected, so you cannot achieve good reception with thumbtacks or something similar. Connecting Antenna This ...
... best possible reception. 2 Fully extend the antenna and point it in various directions to the AM push terminals, as possible from your AV receiver is for use the tuner. Push Insert wire Release Insert the plug fully into the jack. ■ Other Models Insert the plug fully ...way around). Keep the antenna as far away as shown. (The antenna's wires are gripping the bare wires, not the insulation. The AV receiver won't pick up any radio signals without any antenna connected, so you cannot achieve good reception with thumbtacks or something similar. Connecting Antenna This ...
Owner Manual
Page 21
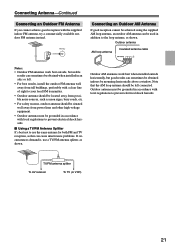
... well away from tall buildings, preferably with the supplied indoor FM antenna, try a commercially available outdoor FM antenna instead. TV/FM antenna splitter To AV receiver To TV (or VCR) 21 Connecting Antenna-Continued Connecting an Outdoor FM Antenna If you cannot achieve good reception with a clear line of sight to...
... well away from tall buildings, preferably with the supplied indoor FM antenna, try a commercially available outdoor FM antenna instead. TV/FM antenna splitter To AV receiver To TV (or VCR) 21 Connecting Antenna-Continued Connecting an Outdoor FM Antenna If you cannot achieve good reception with a clear line of sight to...

Owner Manual
Page 22
.... The audio quality is typically used to make good connections (loose connections can be used on virtually all AV connections. Optical Digital Jacks The AV receiver's optical digital jack has shutter-type cover that open when an optical plug is commonly used instead of a multichannel cable. 22 And use yellow plugs...
.... The audio quality is typically used to make good connections (loose connections can be used on virtually all AV connections. Optical Digital Jacks The AV receiver's optical digital jack has shutter-type cover that open when an optical plug is commonly used instead of a multichannel cable. 22 And use yellow plugs...

Owner Manual
Page 23
... Both Audio & Video By connecting both the audio and video outputs of your DVD player and other AV components to the AV receiver, you can select both the audio and video simultaneously simply by selecting the appropriate input source on the formats supported by your other...For example, audio signals connected to an OPTICAL or COAXIAL digital input are not output by any composite video output. Output Optical IN AV Receiver Optical Coaxial Coaxial Analog Multichannel Analog Multichannel OUT Input Cassette recorder, etc. For video components, such as a guide. For example, if ...
... Both Audio & Video By connecting both the audio and video outputs of your DVD player and other AV components to the AV receiver, you can select both the audio and video simultaneously simply by selecting the appropriate input source on the formats supported by your other...For example, audio signals connected to an OPTICAL or COAXIAL digital input are not output by any composite video output. Output Optical IN AV Receiver Optical Coaxial Coaxial Analog Multichannel Analog Multichannel OUT Input Cassette recorder, etc. For video components, such as a guide. For example, if ...


