
Owner Manual
Page 1
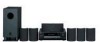
...Introduction 2 Connection 17 Turning On & First Time Setup..... 32 Basic Operation Playing your new 6.1ch Home Theater System. 6.1ch Home Theater System HT-S680 AV Receiver (HT-R430) Front Speakers (SKF-330F L/R) Center Speaker (SKC-330C) Surround Speakers (SKM-330S L/R) Surround Back Speaker (SKB-330) Powered Subwoofer (... 54 En Please read this manual thoroughly before making connections and plugging in this manual for purchasing an Onkyo 6.1ch Home Theater System. Following the instructions in the unit. Please retain this manual will enable you for future reference.
...Introduction 2 Connection 17 Turning On & First Time Setup..... 32 Basic Operation Playing your new 6.1ch Home Theater System. 6.1ch Home Theater System HT-S680 AV Receiver (HT-R430) Front Speakers (SKF-330F L/R) Center Speaker (SKC-330C) Surround Speakers (SKM-330S L/R) Surround Back Speaker (SKB-330) Powered Subwoofer (... 54 En Please read this manual thoroughly before making connections and plugging in this manual for purchasing an Onkyo 6.1ch Home Theater System. Following the instructions in the unit. Please retain this manual will enable you for future reference.
Owner Manual
Page 2
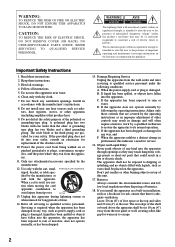
CAUTION: TO REDUCE THE RISK OF ELECTRIC SHOCK, DO NOT REMOVE COVER (OR BACK). WARNING AVIS RISK OF ELECTRIC SHOCK RISQUE DE CHOC ELECTRIQUE DO NOT OPEN NE PAS OUVRIR The lightning flash with arrowhead symbol, within an equilateral triangle, is damaged, B. Do not use this indicates a need for your outlet, consult an electrician for long periods of the shelf or board above the apparatus shall be placed on top of this apparatus during lightning storms or when unused for replacement of other apparatus (including amplifiers) that there is required when the apparatus ...
CAUTION: TO REDUCE THE RISK OF ELECTRIC SHOCK, DO NOT REMOVE COVER (OR BACK). WARNING AVIS RISK OF ELECTRIC SHOCK RISQUE DE CHOC ELECTRIQUE DO NOT OPEN NE PAS OUVRIR The lightning flash with arrowhead symbol, within an equilateral triangle, is damaged, B. Do not use this indicates a need for your outlet, consult an electrician for long periods of the shelf or board above the apparatus shall be placed on top of this apparatus during lightning storms or when unused for replacement of other apparatus (including amplifiers) that there is required when the apparatus ...

Owner Manual
Page 3
... Models NOTE: THIS CLASS B DIGITAL APPARATUS COMPLIES WITH CANADIAN ICES-003. AC Fuse-The AC fuse inside this unit or its power cord while your Onkyo dealer. 3. If water or any other chemical solvents, because they may leave marks on the case. • This unit's top and rear panels may not... it how it was when you plug in such a model, make sure that interference will not occur in order to correct the interference by your Onkyo dealer. 6. Modèle canadien REMARQUE: CET APPAREIL NUMÉRIQUE DE LA CLASSE B EST CONFORME À LA NORME NMB-003 DU CANADA. Memory Backup...
... Models NOTE: THIS CLASS B DIGITAL APPARATUS COMPLIES WITH CANADIAN ICES-003. AC Fuse-The AC fuse inside this unit or its power cord while your Onkyo dealer. 3. If water or any other chemical solvents, because they may leave marks on the case. • This unit's top and rear panels may not... it how it was when you plug in such a model, make sure that interference will not occur in order to correct the interference by your Onkyo dealer. 6. Modèle canadien REMARQUE: CET APPAREIL NUMÉRIQUE DE LA CLASSE B EST CONFORME À LA NORME NMB-003 DU CANADA. Memory Backup...

Owner Manual
Page 4
...8226; RDS (Radio Data System) (Europe only) Remote Controller • Remote controller can handle the specified input power when used to control Onkyo CD, CDR, MD components, and cassette tape deck Front / Center / Surround Speakers • Color-coded speaker terminals and speaker cables • 3-1/8"...may occur. Do not use with no magnetic shield. Using Close to a TV or Computer TVs and computer monitors are trademarks of Onkyo Corporation. *2. If discoloration problems persist, try moving the speakers away from an untuned FM radio. 2. Interstation noise from your ampli&#...
...8226; RDS (Radio Data System) (Europe only) Remote Controller • Remote controller can handle the specified input power when used to control Onkyo CD, CDR, MD components, and cassette tape deck Front / Center / Surround Speakers • Color-coded speaker terminals and speaker cables • 3-1/8"...may occur. Do not use with no magnetic shield. Using Close to a TV or Computer TVs and computer monitors are trademarks of Onkyo Corporation. *2. If discoloration problems persist, try moving the speakers away from an untuned FM radio. 2. Interstation noise from your ampli&#...
Owner Manual
Page 5
... Source........... 28 Connecting a CD Player or Turntable .......... 29 Connecting a Cassette, CDR, MiniDisc, or DAT Recorder 30 Connecting the Power Cord of Another Component 30 Connecting Onkyo Components 31 Connecting the Power Cord 31 Turning On & First Time Setup Turning On 32 Turning On the AV Receiver 32 First Time Setup 33...
... Source........... 28 Connecting a CD Player or Turntable .......... 29 Connecting a Cassette, CDR, MiniDisc, or DAT Recorder 30 Connecting the Power Cord of Another Component 30 Connecting Onkyo Components 31 Connecting the Power Cord 31 Turning On & First Time Setup Turning On 32 Turning On the AV Receiver 32 First Time Setup 33...

Owner Manual
Page 6
Supplied Accessories Make sure you have the following accessories: HT-R430 HT-R430 Surround speakers (SKM-330S L/R) Surround Back speaker (SKB-330) Remote controller & two batteries (AA/R6) Subwoofer (SKW-420) Indoor FM antenna (Connector type varies ...
Supplied Accessories Make sure you have the following accessories: HT-R430 HT-R430 Surround speakers (SKM-330S L/R) Surround Back speaker (SKB-330) Remote controller & two batteries (AA/R6) Subwoofer (SKW-420) Indoor FM antenna (Connector type varies ...
Owner Manual
Page 7
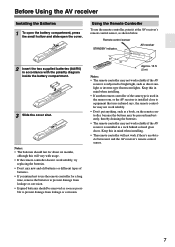
Notes: • The batteries should be pressed inadvertently, thereby draining the batteries. • The remote controller may not work reliably if the AV receiver is subjected to prevent damage from leakage or corrosion. • Expired batteries should last for a long time, remove the batteries to prevent damage from leakage or corrosion. Approx. 16 ft. (5 m) Notes: • The remote controller may not work reliably if the AV receiver is installed in mind when installing. • If another remote controller of batteries. • If you intend not to use the remote ...
Notes: • The batteries should be pressed inadvertently, thereby draining the batteries. • The remote controller may not work reliably if the AV receiver is subjected to prevent damage from leakage or corrosion. • Expired batteries should last for a long time, remove the batteries to prevent damage from leakage or corrosion. Approx. 16 ft. (5 m) Notes: • The remote controller may not work reliably if the AV receiver is installed in mind when installing. • If another remote controller of batteries. • If you intend not to use the remote ...
Owner Manual
Page 8
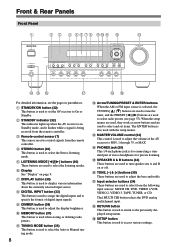
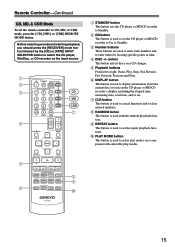
H DIGITAL INPUT button (33) This button is used to set items. The ENTER button is used with the setup menus. J MEMORY button (37) This button is used to assign the digital inputs and to MIN, 1 through 79, or MAX N PHONES jack (39) This 1/4-inch phone jack is for connecting a standard pair of digital input signals. M MASTER VOLUME control (34) This control is used to access various settings. Q Input selector buttons (34) These buttons are used to return to select from the following input sources: MULTI CH, DVD, VIDEO 1/VCR, VIDEO 2, VIDEO 3, TAPE, TUNER, or CD. R ...
H DIGITAL INPUT button (33) This button is used to set items. The ENTER button is used with the setup menus. J MEMORY button (37) This button is used to assign the digital inputs and to MIN, 1 through 79, or MAX N PHONES jack (39) This 1/4-inch phone jack is for connecting a standard pair of digital input signals. M MASTER VOLUME control (34) This control is used to access various settings. Q Input selector buttons (34) These buttons are used to return to select from the following input sources: MULTI CH, DVD, VIDEO 1/VCR, VIDEO 2, VIDEO 3, TAPE, TUNER, or CD. R ...
Owner Manual
Page 9
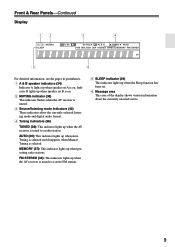
MEMORY (37): This indicator lights up when Auto Tuning is selected and disappears when Manual Tuning is selected. Indicator B lights up when speaker set . 6 Message area This area of the display shows various information about the currently selected source. 9 FM STEREO (36): This indicator lights up when the AV receiver is tuned to a radio station. Front & Rear Panels-Continued Display 12 3 4 5 6 For detailed information, see the pages in parentheses. 1 A & B speaker indicators (34) Indicator A lights up when speaker set A is on . 2 MUTING indicator (38) This indicator fl...
MEMORY (37): This indicator lights up when Auto Tuning is selected and disappears when Manual Tuning is selected. Indicator B lights up when speaker set . 6 Message area This area of the display shows various information about the currently selected source. 9 FM STEREO (36): This indicator lights up when the AV receiver is tuned to a radio station. Front & Rear Panels-Continued Display 12 3 4 5 6 For detailed information, see the pages in parentheses. 1 A & B speaker indicators (34) Indicator A lights up when speaker set A is on . 2 MUTING indicator (38) This indicator fl...
Owner Manual
Page 10
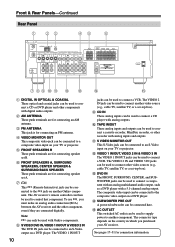
The AV receiver's remote controller can only be used with Onkyo components. Note: can then be used to control that component. The VIDEO 2 IN jack can be connected to the composite video output on the country ... a component with an analog multichannel audio output, such as a DVD player with analog outputs. O AC OUTLET This switched AC outlet can be connected to another Onkyo component.
The AV receiver's remote controller can only be used with Onkyo components. Note: can then be used to control that component. The VIDEO 2 IN jack can be connected to the composite video output on the country ... a component with an analog multichannel audio output, such as a DVD player with analog outputs. O AC OUTLET This switched AC outlet can be connected to another Onkyo component.

Owner Manual
Page 11
...position (the indicator goes out). Other models require M5 (5 mm) screws. E STANDBY/ON indicator Red: Subwoofer in Standby mode. To turn on your HT-R430 AV receiver, amp, or other receiver with the supplied speaker cables. Speaker Package Front, Center, Surround, & Subwoofer speakers (SKF-330F, SKC-330C,...-coded for about 20 minutes, the SKW-420 automatically enters Standby mode. The supplied speaker cables are for connecting the speaker to the HT-R430 with supplied RCA cable. Simply connect each cable to wall-mount the speaker. B Keyhole slots These keyhole slots can be used...
...position (the indicator goes out). Other models require M5 (5 mm) screws. E STANDBY/ON indicator Red: Subwoofer in Standby mode. To turn on your HT-R430 AV receiver, amp, or other receiver with the supplied speaker cables. Speaker Package Front, Center, Surround, & Subwoofer speakers (SKF-330F, SKC-330C,...-coded for about 20 minutes, the SKW-420 automatically enters Standby mode. The supplied speaker cables are for connecting the speaker to the HT-R430 with supplied RCA cable. Simply connect each cable to wall-mount the speaker. B Keyhole slots These keyhole slots can be used...

Owner Manual
Page 12
... supported by using the five REMOTE MODE buttons. ■ RECEIVER/TAPE Mode In RECEIVER/TAPE mode, you can control the AV receiver and an Onkyo cassette recorder connected via . ■ DVD, CD, MD, & CDR Modes With these modes, you can be used to RECEIVER mode, press the [RECEIVER... that mode to control the component. Remote Controller How to Use the Remote Controller Including the AV receiver, the remote controller can control an DVD Onkyo DVD player and CD/MD/CDR player/recorder. LEVEL+ PLAY MODE DISPLAY OR-EQ L NIGHT CINE FLTR RC-606S R S T 12 C D MD CDR 1 Use...
... supported by using the five REMOTE MODE buttons. ■ RECEIVER/TAPE Mode In RECEIVER/TAPE mode, you can control the AV receiver and an Onkyo cassette recorder connected via . ■ DVD, CD, MD, & CDR Modes With these modes, you can be used to RECEIVER mode, press the [RECEIVER... that mode to control the component. Remote Controller How to Use the Remote Controller Including the AV receiver, the remote controller can control an DVD Onkyo DVD player and CD/MD/CDR player/recorder. LEVEL+ PLAY MODE DISPLAY OR-EQ L NIGHT CINE FLTR RC-606S R S T 12 C D MD CDR 1 Use...

Owner Manual
Page 13
... the previous display when changing settings. R CINE FLTR button (45) This button is used to turn on the OptiResponse equalizer, which optimizes performance when the HT-R430 is used with small volume. 13
... the previous display when changing settings. R CINE FLTR button (45) This button is used to turn on the OptiResponse equalizer, which optimizes performance when the HT-R430 is used with small volume. 13
Owner Manual
Page 14
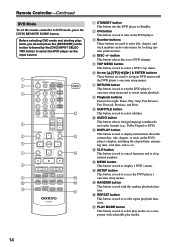
E TOP MENU button This button is used to exit the DVD player's onscreen setup menu and to restart menu playback. F Arrow ENTER buttons These buttons are used to select a DVD's top menu. G RETURN button This button is used to enter times for locating specific points in time. L CLR button This button is used to enter title, chapter, and track numbers and to navigate DVD menus and the DVD player's onscreen setup menus. C Number buttons These buttons are used to select subtitles. D DISC +/- I J K ON STANDBY REMOTE MODE RECEIVER DVD TAPE/AMP INPUT SELECTOR ...
E TOP MENU button This button is used to exit the DVD player's onscreen setup menu and to restart menu playback. F Arrow ENTER buttons These buttons are used to select a DVD's top menu. G RETURN button This button is used to enter times for locating specific points in time. L CLR button This button is used to enter title, chapter, and track numbers and to navigate DVD menus and the DVD player's onscreen setup menus. C Number buttons These buttons are used to select subtitles. D DISC +/- I J K ON STANDBY REMOTE MODE RECEIVER DVD TAPE/AMP INPUT SELECTOR ...
Owner Manual
Page 15
DIMMER SLEEP CH DISC VOL TOP MENU SP A / B ENTER MENU MUTING CD MD CDR G E F RETURN SETUP LISTENING MODE STEREO SURROUND AUDIO SUBTITLE RANDOM REPEAT TEST TONE CH SEL LEVEL- B ON button This button is used to cancel functions and to On or Standby. D DISC +/- J PLAY MODE button This button is used to set the CD player or MD/CD recorder to clear entered numbers. A B C D ON STANDBY REMOTE MODE RECEIVER DVD TAPE/AMP INPUT SELECTOR 1 2 3 C D V1 V2 V3 4 5 6 MD MULTI CH DVD 7 8 9 CDR TAPE TUNER C D +10 0 CLR --/--- G CLR button This button ...
DIMMER SLEEP CH DISC VOL TOP MENU SP A / B ENTER MENU MUTING CD MD CDR G E F RETURN SETUP LISTENING MODE STEREO SURROUND AUDIO SUBTITLE RANDOM REPEAT TEST TONE CH SEL LEVEL- B ON button This button is used to cancel functions and to On or Standby. D DISC +/- J PLAY MODE button This button is used to set the CD player or MD/CD recorder to clear entered numbers. A B C D ON STANDBY REMOTE MODE RECEIVER DVD TAPE/AMP INPUT SELECTOR 1 2 3 C D V1 V2 V3 4 5 6 MD MULTI CH DVD 7 8 9 CDR TAPE TUNER C D +10 0 CLR --/--- G CLR button This button ...
Owner Manual
Page 16
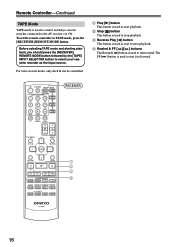
... start rewind. Remote Controller-Continued TAPE Mode TAPE mode is used to start reverse playback. C Reverse Play [ ] button This button is used to control an Onkyo cassette recorder connected to the AV receiver via .
... start rewind. Remote Controller-Continued TAPE Mode TAPE mode is used to start reverse playback. C Reverse Play [ ] button This button is used to control an Onkyo cassette recorder connected to the AV receiver via .

Owner Manual
Page 17
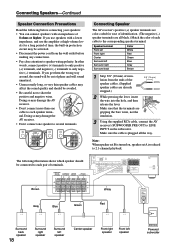
Connecting Speakers Enjoying Home Theater You can use two sets of the LFE (Low-Frequency Effects) channel. When speaker set B is turned on , speaker set A is reduced to provide a solid anchor for dialog. Speakers can be positioned in the standard position for stereo speakers or however you should be installed in your listening room to get the very best from each speaker arrives at the listener's ears at the sides of each individual speaker so that the listening position is to 2-channel playback. In movies it's used with Dolby Digital and DTS surround material. It's ...
Connecting Speakers Enjoying Home Theater You can use two sets of the LFE (Low-Frequency Effects) channel. When speaker set B is turned on , speaker set A is reduced to provide a solid anchor for dialog. Speakers can be positioned in the standard position for stereo speakers or however you should be installed in your listening room to get the very best from each speaker arrives at the listener's ears at the sides of each individual speaker so that the listening position is to 2-channel playback. In movies it's used with Dolby Digital and DTS surround material. It's ...
Owner Manual
Page 18
If you use speakers with an impedance of terminals. Speaker terminal Front left Front right Center Surround left speaker Powered subwoofer Make sure that the terminals are already stripped.) 3/8" (10 mm) 2 While pressing the lever, insert the wire into the hole, and then release the lever. Brown Gray Blue Green White Red Surround back speaker 18 Surround right speaker Surround left speaker Center speaker Front right speaker Front left Surround right Surround back Color White Red Green Blue Gray Brown 1 Strip 3/8" (10 mm) of insulation from the wall outlet before ...
If you use speakers with an impedance of terminals. Speaker terminal Front left Front right Center Surround left speaker Powered subwoofer Make sure that the terminals are already stripped.) 3/8" (10 mm) 2 While pressing the lever, insert the wire into the hole, and then release the lever. Brown Gray Blue Green White Red Surround back speaker 18 Surround right speaker Surround left speaker Center speaker Front right speaker Front left Surround right Surround back Color White Red Green Blue Gray Brown 1 Strip 3/8" (10 mm) of insulation from the wall outlet before ...

Owner Manual
Page 19
Threaded insert To mount the center speaker horizontally, use a cable/pipe detector to hang each speaker on the rear of the SKC-330C 7" (175 mm) 19 Rubber stoppers Bottom of the SKF-330F/ SKM-330S/ SKB-330 3" (75 mm) Bottom of each speaker. Other models require M5 (5 mm) screws. The rubber stoppers prevent the speakers from vibrating against the wall, attach four of the supplied spacers to the manual supplied with the Speakers We recommend using the keyhole slots. Center speaker (SKC-330C) Keyhole slots for wall mounting Note: The portion of the screw that goes into ...
Threaded insert To mount the center speaker horizontally, use a cable/pipe detector to hang each speaker on the rear of the SKC-330C 7" (175 mm) 19 Rubber stoppers Bottom of the SKF-330F/ SKM-330S/ SKB-330 3" (75 mm) Bottom of each speaker. Other models require M5 (5 mm) screws. The rubber stoppers prevent the speakers from vibrating against the wall, attach four of the supplied spacers to the manual supplied with the Speakers We recommend using the keyhole slots. Center speaker (SKC-330C) Keyhole slots for wall mounting Note: The portion of the screw that goes into ...
Owner Manual
Page 20
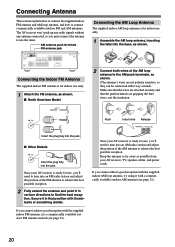
Connecting the Indoor FM Antenna The supplied indoor FM antenna is for indoor use only. 1 Attach the FM antenna, as shown. (The antenna's wires are not polarity sensitive, so they can be connected either way around). Keep the antenna as far away as shown. Connecting Antenna This section explains how to connect the supplied indoor FM antenna and AM loop antenna, and how to use the tuner. The AV receiver won't pick up any radio signals without any antenna connected, so you must connect the antenna to connect commercially available outdoor FM and AM antennas. AM antenna push terminals ...
Connecting the Indoor FM Antenna The supplied indoor FM antenna is for indoor use only. 1 Attach the FM antenna, as shown. (The antenna's wires are not polarity sensitive, so they can be connected either way around). Keep the antenna as far away as shown. Connecting Antenna This section explains how to connect the supplied indoor FM antenna and AM loop antenna, and how to use the tuner. The AV receiver won't pick up any radio signals without any antenna connected, so you must connect the antenna to connect commercially available outdoor FM and AM antennas. AM antenna push terminals ...