
Owner Manual
Page 1
...enable you for future reference. 6.1ch Home Theater System HT-S680 AV Receiver (HT-R430) Front Speakers (SKF-330F L/R) Center Speaker (SKC-330C) Surround Speakers (SKM-330S L/R) Surround Back Speaker (SKB-330) Powered Subwoofer (SKW-420) Instruction ...Manual Thank you to obtain optimum performance and listening enjoyment from your AV components ....... 34 Using the Tuner 36 Enjoying the Listening Modes ..... 40 Advanced Operation 44 Troubleshooting 52 Specification 54 En Please read this manual for purchasing an Onkyo...
...enable you for future reference. 6.1ch Home Theater System HT-S680 AV Receiver (HT-R430) Front Speakers (SKF-330F L/R) Center Speaker (SKC-330C) Surround Speakers (SKM-330S L/R) Surround Back Speaker (SKB-330) Powered Subwoofer (SKW-420) Instruction ...Manual Thank you to obtain optimum performance and listening enjoyment from your AV components ....... 34 Using the Tuner 36 Enjoying the Listening Modes ..... 40 Advanced Operation 44 Troubleshooting 52 Specification 54 En Please read this manual for purchasing an Onkyo...

Owner Manual
Page 4
...causing burning or wire breakage: 1. Note that discoloration can be used to control Onkyo CD, CDR, MD components, and cassette tape deck Front / Center / Surround Speakers • Color-coded speaker terminals and speaker cables • 3-1/8" (8 cm) cone woofer • Ceramic tweeter Subwoofer ...and the double-D symbol are trademarks of Digital Theater Systems, Inc. "DTS" and "Neo:6" are registered trademarks of Onkyo Corporation. *2. Speaker Precautions Features Placement • The subwoofer cabinet is made out of wood and is therefore sensitive to extreme temperatures and ...
...causing burning or wire breakage: 1. Note that discoloration can be used to control Onkyo CD, CDR, MD components, and cassette tape deck Front / Center / Surround Speakers • Color-coded speaker terminals and speaker cables • 3-1/8" (8 cm) cone woofer • Ceramic tweeter Subwoofer ...and the double-D symbol are trademarks of Digital Theater Systems, Inc. "DTS" and "Neo:6" are registered trademarks of Onkyo Corporation. *2. Speaker Precautions Features Placement • The subwoofer cabinet is made out of wood and is therefore sensitive to extreme temperatures and ...
Owner Manual
Page 5
...Player or Turntable .......... 29 Connecting a Cassette, CDR, MiniDisc, or DAT Recorder 30 Connecting the Power Cord of Another Component 30 Connecting Onkyo Components 31 Connecting the Power Cord 31 Turning On & First Time Setup Turning On 32 Turning On the AV Receiver 32 First Time ...the Audio Adjust Functions 44 Using the Late Night Function (Dolby Digital only 45 Using the CinemaFILTER 45 Advanced Setup 46 Advanced Speaker Settings 46 Digital Input Signal Formats 50 Recording 51 Recording the Input Source 51 Recording from Different AV Sources ..........51 Troubleshooting ...
...Player or Turntable .......... 29 Connecting a Cassette, CDR, MiniDisc, or DAT Recorder 30 Connecting the Power Cord of Another Component 30 Connecting Onkyo Components 31 Connecting the Power Cord 31 Turning On & First Time Setup Turning On 32 Turning On the AV Receiver 32 First Time ...the Audio Adjust Functions 44 Using the Late Night Function (Dolby Digital only 45 Using the CinemaFILTER 45 Advanced Setup 46 Advanced Speaker Settings 46 Digital Input Signal Formats 50 Recording 51 Recording the Input Source 51 Recording from Different AV Sources ..........51 Troubleshooting ...

Owner Manual
Page 6
... ft. (3 m) Power-plug adapter Only supplied in certain countries. Supplied Accessories Make sure you have the following accessories: HT-R430 HT-R430 Surround speakers (SKM-330S L/R) Surround Back speaker (SKB-330) Remote controller & two batteries (AA/R6) Subwoofer (SKW-420) Indoor FM antenna (Connector type varies from country to country.) AM loop antenna (Red...
... ft. (3 m) Power-plug adapter Only supplied in certain countries. Supplied Accessories Make sure you have the following accessories: HT-R430 HT-R430 Surround speakers (SKM-330S L/R) Surround Back speaker (SKB-330) Remote controller & two batteries (AA/R6) Subwoofer (SKW-420) Indoor FM antenna (Connector type varies from country to country.) AM loop antenna (Red...
Owner Manual
Page 8
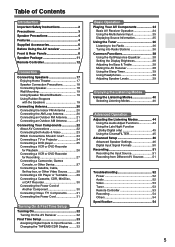
...are used to select and set the AV receiver to select from the remote controller. I DIMMER button (38) This button is used to turn speaker sets A and B on page 9. J MEMORY button (37) This button is used to select the Stereo listening mode. S SETUP button This...FM input source is used to the previously displayed setup menu. Front & Rear Panels Front Panel 1 2 3 4 5 6 78 9JK L STANDBY/ON A SPEAKERS B PHONES TUNING / PRESET STANDBY ENTER TONE MULTl CH + STEREO LISTENING MODE DISPLAY DIGITAL INPUT DVD VIDEO 1/VCR VIDEO 2 VIDEO 3 DIMMER MEMORY TUNING MODE ...
...are used to select and set the AV receiver to select from the remote controller. I DIMMER button (38) This button is used to turn speaker sets A and B on page 9. J MEMORY button (37) This button is used to select the Stereo listening mode. S SETUP button This...FM input source is used to the previously displayed setup menu. Front & Rear Panels Front Panel 1 2 3 4 5 6 78 9JK L STANDBY/ON A SPEAKERS B PHONES TUNING / PRESET STANDBY ENTER TONE MULTl CH + STEREO LISTENING MODE DISPLAY DIGITAL INPUT DVD VIDEO 1/VCR VIDEO 2 VIDEO 3 DIMMER MEMORY TUNING MODE ...
Owner Manual
Page 9
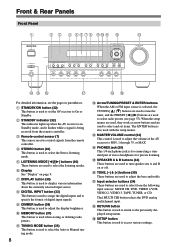
...selected and disappears when Manual Tuning is selected. Front & Rear Panels-Continued Display 12 3 4 5 6 For detailed information, see the pages in parentheses. 1 A & B speaker indicators (34) Indicator A lights up when presetting radio stations. AUTO (36): This indicator lights up when the Sleep function has been set B is tuned to... a radio station. FM STEREO (36): This indicator lights up when the AV receiver is on . Indicator B lights up when speaker set . 6 Message area This area of the display shows various information about the currently selected source. 9
...selected and disappears when Manual Tuning is selected. Front & Rear Panels-Continued Display 12 3 4 5 6 For detailed information, see the pages in parentheses. 1 A & B speaker indicators (34) Indicator A lights up when presetting radio stations. AUTO (36): This indicator lights up when the Sleep function has been set B is tuned to... a radio station. FM STEREO (36): This indicator lights up when the AV receiver is on . Indicator B lights up when speaker set . 6 Message area This area of the display shows various information about the currently selected source. 9
Owner Manual
Page 10
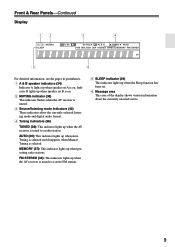
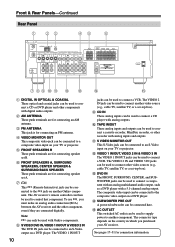
...CENTER, and SUBWOOFER jacks can be used to connect a cassette recorder, MiniDisc recorder, or other components with analog outputs. E FRONT SPEAKERS B These push terminals are connected digitally. Note: can only be used to connect a CD player with digital audio outputs. I...video input on another Onkyo component. O AC OUTLET This switched AC outlet can be connected here. B AM ANTENNA These push terminals are for connecting an AM antenna. F FRONT SPEAKERS A, SURROUND SPEAKERS, CENTER SPEAKER & SURROUND BACK SPEAKER These push terminals are for connecting speaker set A. N ...
...CENTER, and SUBWOOFER jacks can be used to connect a cassette recorder, MiniDisc recorder, or other components with analog outputs. E FRONT SPEAKERS B These push terminals are connected digitally. Note: can only be used to connect a CD player with digital audio outputs. I...video input on another Onkyo component. O AC OUTLET This switched AC outlet can be connected here. B AM ANTENNA These push terminals are for connecting an AM antenna. F FRONT SPEAKERS A, SURROUND SPEAKERS, CENTER SPEAKER & SURROUND BACK SPEAKER These push terminals are for connecting speaker set A. N ...

Owner Manual
Page 11
...INPUT This RCA input should be connected to a speaker mount or bracket. Note: The Auto Standby function turns the subwoofer on your HT-R430 AV receiver, amp, or other receiver with the supplied speaker cables. Simply connect each cable to the HT-R430 with supplied RCA cable. Other models require...3 1 2 2 SKC-330C 3 1 SKW-420 OUTPUT LEVEL MIN MAX RED : STANDBY GREEN : ON LINE INPUT 45 67 To AC outlet A Speaker terminals These push terminals are color-coded for easy identification. See page 19 for about 20 minutes, the SKW-420 automatically enters Standby...
...INPUT This RCA input should be connected to a speaker mount or bracket. Note: The Auto Standby function turns the subwoofer on your HT-R430 AV receiver, amp, or other receiver with the supplied speaker cables. Simply connect each cable to the HT-R430 with supplied RCA cable. Other models require...3 1 2 2 SKC-330C 3 1 SKW-420 OUTPUT LEVEL MIN MAX RED : STANDBY GREEN : ON LINE INPUT 45 67 To AC outlet A Speaker terminals These push terminals are color-coded for easy identification. See page 19 for about 20 minutes, the SKW-420 automatically enters Standby...

Owner Manual
Page 13
...This button selects the Dolby and DTS listening modes. [ ]/[ ] buttons These buttons can enjoy a powerful sound with movies or music with the speakers included in parentheses. Q SETUP button This button is used to mute the AV receiver. P MUTING button (38) This button is used to ... Remote Controller-Continued For detailed information, see the pages in the HTP-430 Home Theater Speaker Package. G SP A/B button (34) This button is used to turn speaker sets A and B on the OptiResponse equalizer, which optimizes performance when the HT-R430 is used to select any of each...
...This button selects the Dolby and DTS listening modes. [ ]/[ ] buttons These buttons can enjoy a powerful sound with movies or music with the speakers included in parentheses. Q SETUP button This button is used to mute the AV receiver. P MUTING button (38) This button is used to ... Remote Controller-Continued For detailed information, see the pages in the HTP-430 Home Theater Speaker Package. G SP A/B button (34) This button is used to turn speaker sets A and B on the OptiResponse equalizer, which optimizes performance when the HT-R430 is used to select any of each...

Owner Manual
Page 17
...should be equidistant from the listener. 1/3 wall length To get the best from your subwoofer will depend on top) facing forward at the sides of speakers with the listener at the same time (see page 47.) 17 In general, a good bass sound can be positioned at a specific ...home theater is within the range of the LFE (Low-Frequency Effects) channel. Angle them at about ear level, and equidistant from each individual speaker so that the listening position is to achieve an equal balance (see page 46). Position it close to your listening room to enjoy certain ...
...should be equidistant from the listener. 1/3 wall length To get the best from your subwoofer will depend on top) facing forward at the sides of speakers with the listener at the same time (see page 47.) 17 In general, a good bass sound can be positioned at a specific ...home theater is within the range of the LFE (Low-Frequency Effects) channel. Angle them at about ear level, and equidistant from each individual speaker so that the listening position is to achieve an equal balance (see page 46). Position it close to your listening room to enjoy certain ...
Owner Manual
Page 18
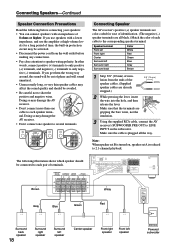
... are gripping the bare wires, not the insulation. 3 Using the supplied RCA cable, connect the AV receiver's SUBWOOFER PRE OUT to the corresponding speaker terminal. Doing so may affect the sound quality and should be out of phase and will be connected to short the positive and negative wires... of 8 ohms or higher. If you get them the wrong way around, the sound will sound unnatural. • Unnecessarily long, or very thin speaker cables may damage the AV receiver. • Don't connect one cable to each pair of time, the built-in protection circuit may damage the AV...
... are gripping the bare wires, not the insulation. 3 Using the supplied RCA cable, connect the AV receiver's SUBWOOFER PRE OUT to the corresponding speaker terminal. Doing so may affect the sound quality and should be out of phase and will be connected to short the positive and negative wires... of 8 ohms or higher. If you get them the wrong way around, the sound will sound unnatural. • Unnecessarily long, or very thin speaker cables may damage the AV receiver. • Don't connect one cable to each pair of time, the built-in protection circuit may damage the AV...

Owner Manual
Page 19
... details. If there are no studs, or the walls are provided on the rear of each speaker for wall-mounting with your speakers. Refer to hang each speaker on two screws that 's securely screwed into the wall. With hollow walls, use suitable wall anchors...between Wall 5/16" (7 mm) and 7/16" (10 mm) between 1/4" - 5/16" (5 mm - 8 mm) long. Use screws with the Speakers We recommend using the keyhole slots. To prevent the speaker from moving, providing a more stable setup. Other models require M5 (5 mm) screws. Mount or bracket 1/4" - 3/8" (5 mm) - (8 mm) 1/4"...
... details. If there are no studs, or the walls are provided on the rear of each speaker for wall-mounting with your speakers. Refer to hang each speaker on two screws that 's securely screwed into the wall. With hollow walls, use suitable wall anchors...between Wall 5/16" (7 mm) and 7/16" (10 mm) between 1/4" - 5/16" (5 mm - 8 mm) long. Use screws with the Speakers We recommend using the keyhole slots. To prevent the speaker from moving, providing a more stable setup. Other models require M5 (5 mm) screws. Mount or bracket 1/4" - 3/8" (5 mm) - (8 mm) 1/4"...
Owner Manual
Page 20
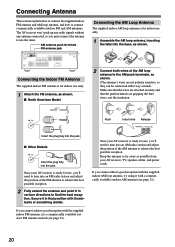
... it with the supplied indoor FM antenna, try using it in various directions to tune into the base, as shown. Once your AV receiver, TV, speaker cables, and power cords. Push Insert wire Release Insert the plug fully into the jack. ■ Other Models Insert the plug fully into an AM...
... it with the supplied indoor FM antenna, try using it in various directions to tune into the base, as shown. Once your AV receiver, TV, speaker cables, and power cords. Push Insert wire Release Insert the plug fully into the jack. ■ Other Models Insert the plug fully into an AM...

Owner Manual
Page 22
... to make good connections (loose connections can cause noise or malfunctions). • To prevent interference, keep audio and video cables away from power cords and speaker cables. Use red plugs to connect DVD players with your other video equipment. It's the most common connection format for optical. Use only dedicated composite...
... to make good connections (loose connections can cause noise or malfunctions). • To prevent interference, keep audio and video cables away from power cords and speaker cables. Use red plugs to connect DVD players with your other video equipment. It's the most common connection format for optical. Use only dedicated composite...

Owner Manual
Page 23
Speakers (see page 18 for Recording CD player, etc. The format you choose will depend on the AV receiver. : Signal Flow Video Video Audio Audio TV, ...
Speakers (see page 18 for Recording CD player, etc. The format you choose will depend on the AV receiver. : Signal Flow Video Video Audio Audio TV, ...

Owner Manual
Page 31
Connecting Your Components-Continued Connecting Onkyo Components Step 1: Be sure that the Onkyo component is connected to the AV receiver with your speakers and AV components. • Turning on the AV receiver may not support all channels because the Direct Change function ...function will not work if a component's power cord is for connections. cables are supplied with other manufacturer's components may cause them to only Onkyo components. Connecting to Standby, all of your components. If the DVD player is set to other electrical equipment on a component connected via ,...
Connecting Your Components-Continued Connecting Onkyo Components Step 1: Be sure that the Onkyo component is connected to the AV receiver with your speakers and AV components. • Turning on the AV receiver may not support all channels because the Direct Change function ...function will not work if a component's power cord is for connections. cables are supplied with other manufacturer's components may cause them to only Onkyo components. Connecting to Standby, all of your components. If the DVD player is set to other electrical equipment on a component connected via ,...
Owner Manual
Page 32
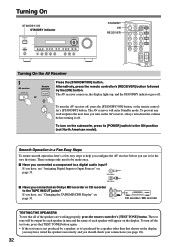
...1 AV receiver Remote controller STANDBY/ON or Press the [STANDBY/ON] button. To turn on the AV receiver, always turn and the name of the speakers are working properly, press the remote controller's [TEST TONE] button. If you use it for the very first time. COAXIAL OPTICAL ■ ... goes off , press the [STANDBY/ON] button, or the remote controller's [STANDBY] button. The AV receiver comes on the display, you connected an Onkyo MD recorder or CD recorder OUT IN to a digital audio input? These settings only need to Input Sources" on the display. If you have wired...
...1 AV receiver Remote controller STANDBY/ON or Press the [STANDBY/ON] button. To turn on the AV receiver, always turn and the name of the speakers are working properly, press the remote controller's [TEST TONE] button. If you use it for the very first time. COAXIAL OPTICAL ■ ... goes off , press the [STANDBY/ON] button, or the remote controller's [STANDBY] button. The AV receiver comes on the display, you connected an Onkyo MD recorder or CD recorder OUT IN to a digital audio input? These settings only need to Input Sources" on the display. If you have wired...
Owner Manual
Page 33
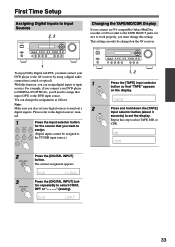
...for the source that input (OPT) to send out a digital signals. First Time Setup Assigning Digital Inputs to Input Sources 2, 3 STANDBY/ON A SPEAKERS B PHONES TUNING / PRESET STANDBY ENTER TONE MULTl CH + STEREO LISTENING MODE DISPLAY DIGITAL INPUT RT/PTY/TP MEMORY TUNING MODE RETURN SETUP CLEAR DVD... and DTS, you must change the assignments as follows. This setting can assign digital inputs to work properly, you connect an -compatible Onkyo MiniDisc recorder or CD recorder to the TAPE IN/OUT jacks, for to input sources. Repeat this function, you can only be changed...
...for the source that input (OPT) to send out a digital signals. First Time Setup Assigning Digital Inputs to Input Sources 2, 3 STANDBY/ON A SPEAKERS B PHONES TUNING / PRESET STANDBY ENTER TONE MULTl CH + STEREO LISTENING MODE DISPLAY DIGITAL INPUT RT/PTY/TP MEMORY TUNING MODE RETURN SETUP CLEAR DVD... and DTS, you must change the assignments as follows. This setting can assign digital inputs to work properly, you connect an -compatible Onkyo MiniDisc recorder or CD recorder to the TAPE IN/OUT jacks, for to input sources. Repeat this function, you can only be changed...

Owner Manual
Page 34
...the video input that you think is reduced to MIN, 1 through the following settings: Speaker Set A → Speaker Set A&B → Speaker Set B → Off. The A and B speaker indicators show whether each speaker set to 2.1-channel playback. The volume can be set is designed for home theater ... input source. As a rule of the subwoofer too high. Playing Your AV Components Basic AV Receiver Operation 2 DISPLAY STANDBY/ON A SPEAKERS B PHONES TUNING / PRESET STANDBY ENTER TONE MULTl CH + STEREO LISTENING MODE DISPLAY DIGITAL INPUT RT/PTY/TP MEMORY TUNING MODE RETURN ...
...the video input that you think is reduced to MIN, 1 through the following settings: Speaker Set A → Speaker Set A&B → Speaker Set B → Off. The A and B speaker indicators show whether each speaker set to 2.1-channel playback. The volume can be set is designed for home theater ... input source. As a rule of the subwoofer too high. Playing Your AV Components Basic AV Receiver Operation 2 DISPLAY STANDBY/ON A SPEAKERS B PHONES TUNING / PRESET STANDBY ENTER TONE MULTl CH + STEREO LISTENING MODE DISPLAY DIGITAL INPUT RT/PTY/TP MEMORY TUNING MODE RETURN ...
Owner Manual
Page 35
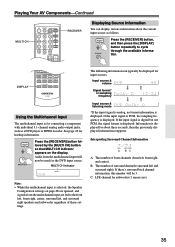
...multichannel input will be displayed for about the current input source as a DVD player or MPEG decoder. Information is selected, the Speaker Configuration settings on the display. If the input signal is PCM, the sampling frequency is displayed. Interpreting Surround Channel Information...information about three seconds, then the previously displayed information reappears. B: The number of front channels (front left , and surround right speakers and subwoofer regardless of those settings. Press the [RECEIVER] button followed by the [MULTI CH] button so that MULTI CH ...
...multichannel input will be displayed for about the current input source as a DVD player or MPEG decoder. Information is selected, the Speaker Configuration settings on the display. If the input signal is PCM, the sampling frequency is displayed. Interpreting Surround Channel Information...information about three seconds, then the previously displayed information reappears. B: The number of front channels (front left , and surround right speakers and subwoofer regardless of those settings. Press the [RECEIVER] button followed by the [MULTI CH] button so that MULTI CH ...


