
User Manual
Page 1
...Ports ...10 Remote Control ...11 Installation Setting up the Projector ...12 Connecting the Computer...12 Connecting the Video ...13 Connecting the Audio Input...14 Connecting the Audio Output-(External Subwoofer/Stereo Systeim 14 Connecting the Audio Output-(2.1 Channel/5.1 Channel 15 Powering On/Off the Projector ...16 Powering On the Projector ...16 Turn On the DVD Player ...17 Powering Off the Projector ...18 Warning Indicator ...19 Adjusting the Projected Image...20 Adjusting the Projector's Height 20 Adjusting the Projector's Focus 21 Adjusting the Projection Image Size 21 Adjusting...
...Ports ...10 Remote Control ...11 Installation Setting up the Projector ...12 Connecting the Computer...12 Connecting the Video ...13 Connecting the Audio Input...14 Connecting the Audio Output-(External Subwoofer/Stereo Systeim 14 Connecting the Audio Output-(2.1 Channel/5.1 Channel 15 Powering On/Off the Projector ...16 Powering On the Projector ...16 Turn On the DVD Player ...17 Powering Off the Projector ...18 Warning Indicator ...19 Adjusting the Projected Image...20 Adjusting the Projector's Height 20 Adjusting the Projector's Focus 21 Adjusting the Projection Image Size 21 Adjusting...
User Manual
Page 2
...-screen Display Menus ...27 How to Operate Projector Menu 27 Menu Tree for Projector ...28 Language ...29 Image-I ...30 Image-II...32 Display ...35 System ...37 Lamp setting...38 How to Operate WMA/MP3/JPEG Program 39 How to Operate DVD Menu...40 Menu Tree for DVD ...41 System Setup ...42 Language Setup...44 Audio Setup...45 Video Setup ...46 Maintenance Troubleshooting ...47 Image Problems ...47 Intermission Problems...49 LED Problems...49 DVD Player Problems ...50 Sound Problems ...51 Remote Control Problems...51 Replacing the Lamp...
...-screen Display Menus ...27 How to Operate Projector Menu 27 Menu Tree for Projector ...28 Language ...29 Image-I ...30 Image-II...32 Display ...35 System ...37 Lamp setting...38 How to Operate WMA/MP3/JPEG Program 39 How to Operate DVD Menu...40 Menu Tree for DVD ...41 System Setup ...42 Language Setup...44 Audio Setup...45 Video Setup ...46 Maintenance Troubleshooting ...47 Image Problems ...47 Intermission Problems...49 LED Problems...49 DVD Player Problems ...50 Sound Problems ...51 Remote Control Problems...51 Replacing the Lamp...
User Manual
Page 3
... may make a loud "popping" sound. DVD Projector * 3 Be sure to replace the lamp when the warning message is displayed. ▀■ After installing a new lamp, reset the lamp life using the onscreen menu. ▀■ Before turning off the product, follow the cooling fan to run for several minutes. ▀■ Turn on until the lamp module has been replaced. carefully follow the lamp replacement instructions listed under "Replacing the Lamp". ENGLISH USAGE NOTICE Precautions...
... may make a loud "popping" sound. DVD Projector * 3 Be sure to replace the lamp when the warning message is displayed. ▀■ After installing a new lamp, reset the lamp life using the onscreen menu. ▀■ Before turning off the product, follow the cooling fan to run for several minutes. ▀■ Turn on until the lamp module has been replaced. carefully follow the lamp replacement instructions listed under "Replacing the Lamp". ENGLISH USAGE NOTICE Precautions...

User Manual
Page 5
... presenters look at all times. ▀■ Minimize standing facing into the beam. The best way to achieve this ensures that projectors are asked to point out something on the screen. ▀■ In order to minimize the lamp power needed to project a visible presentation, use room blinds to stare at the projector lamp. DVD Projector * 5 Keep your back to the...
... presenters look at all times. ▀■ Minimize standing facing into the beam. The best way to achieve this ensures that projectors are asked to point out something on the screen. ▀■ In order to minimize the lamp power needed to project a visible presentation, use room blinds to stare at the projector lamp. DVD Projector * 5 Keep your back to the...
User Manual
Page 6
...: ▀■ Single 16:9 854x480 chip DLPTM technology ▀■ Uses 7 segment GRBWGRB color wheel ▀■ IR remote control ▀■ User-friendly multilingual on-screen display menu ▀■ Advanced digital keystone correction and high quality full screen image re-scaling ▀■ User-friendly control panel ▀■ Video compatibility- SXGA, XGA compression and SVGA, VGA re-sizing ▀■ Pure digital DVD to projector connection ▀■ Built-in 5W x 2 stereo...
...: ▀■ Single 16:9 854x480 chip DLPTM technology ▀■ Uses 7 segment GRBWGRB color wheel ▀■ IR remote control ▀■ User-friendly multilingual on-screen display menu ▀■ Advanced digital keystone correction and high quality full screen image re-scaling ▀■ User-friendly control panel ▀■ Video compatibility- SXGA, XGA compression and SVGA, VGA re-sizing ▀■ Pure digital DVD to projector connection ▀■ Built-in 5W x 2 stereo...

User Manual
Page 8
Connection Ports 10. Elevator Button 6. Projector Panel 9. IR Receivers 5. DVD Panel 8. Speakers Focus Ring 3. Zoom Lever 11 9 10 7. DVD Cover 2. Power Socket 11. ENGLISH INTRODUCTION Product Overview Main Unit 1 2 6 3 4 5 7 8 8 * DVD Projector 11 4 1. Zoom Lens 4.
Connection Ports 10. Elevator Button 6. Projector Panel 9. IR Receivers 5. DVD Panel 8. Speakers Focus Ring 3. Zoom Lever 11 9 10 7. DVD Cover 2. Power Socket 11. ENGLISH INTRODUCTION Product Overview Main Unit 1 2 6 3 4 5 7 8 8 * DVD Projector 11 4 1. Zoom Lens 4.

User Manual
Page 12
VGA cable 2 1 12 * DVD Projector ENGLISH INSTALLATION Setting up the Projector Connecting the Computer/Notebook 1. Power cord 2.
VGA cable 2 1 12 * DVD Projector ENGLISH INSTALLATION Setting up the Projector Connecting the Computer/Notebook 1. Power cord 2.
User Manual
Page 16
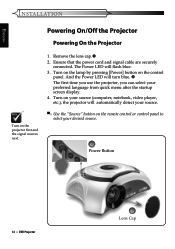
... language from quick menu after the startup screen display. 4. ENGLISH INSTALLATION Powering On/Off the Projector Powering On the Projector Turn on the projector first and the signal sources next. 1. And the Power LED will flash blue. 3. Ensure that the power cord and signal cable are securely connected. The Power LED will turn blue. The first time you use the projector, you can select your source. ▀■ Use the "Source" button on the control panel. Remove the lens cap. 2.
... language from quick menu after the startup screen display. 4. ENGLISH INSTALLATION Powering On/Off the Projector Powering On the Projector Turn on the projector first and the signal sources next. 1. And the Power LED will flash blue. 3. Ensure that the power cord and signal cable are securely connected. The Power LED will turn blue. The first time you use the projector, you can select your source. ▀■ Use the "Source" button on the control panel. Remove the lens cap. 2.
User Manual
Page 17
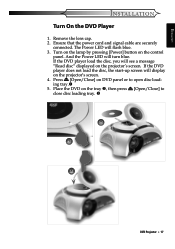
Turn on the lamp by pressing [Power] button on DVD panel or to close disc loading tray. 2 1 3 DVD Projector * 17 Ensure that the power cord and signal cable are securely connected. The Power LED will turn blue. And the Power LED will flash blue. 3. Press [Open/Close] on the control panel. Remove the lens cap. 2. If the DVD player load the disc, you will display on the projector's screen. If the DVD player does not...
Turn on the lamp by pressing [Power] button on DVD panel or to close disc loading tray. 2 1 3 DVD Projector * 17 Ensure that the power cord and signal cable are securely connected. The Power LED will turn blue. And the Power LED will flash blue. 3. Press [Open/Close] on the control panel. Remove the lens cap. 2. If the DVD player load the disc, you will display on the projector's screen. If the DVD player does not...

User Manual
Page 18
... standby mode, simply press [Power] button to turn blue. Please note that if the key is pressed instead, the projector will enter the "Picture Mute" mode and no image will see a message "Power off the projector lamp, you will be displayed. When the Power LED begins flashing, the projector has entered standby mode. Press the [Power] button to turn off the lamp? To exit the "Picture Mute" mode, press the [Power] button again. 2. Press the [Power] button again to operate...
... standby mode, simply press [Power] button to turn blue. Please note that if the key is pressed instead, the projector will enter the "Picture Mute" mode and no image will see a message "Power off the projector lamp, you will be displayed. When the Power LED begins flashing, the projector has entered standby mode. Press the [Power] button to turn off the lamp? To exit the "Picture Mute" mode, press the [Power] button again. 2. Press the [Power] button again to operate...
User Manual
Page 19
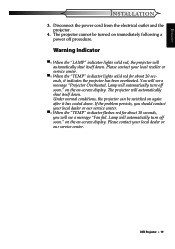
... turned on again after it indicates the projector has been overheated. Disconnect the power cord from the electrical outlet and the projector. 4. on the on -screen display. DVD Projector * 19 You will automatically shut itself down . Warning Indicator ▀■ When the "LAMP" indicator lights solid red, the projector will automatically turn off soon." ENGLISH INSTALLATION 3. Please contact your local dealer or our service center. ▀■ When the "TEMP" indicator flashes red...
... turned on again after it indicates the projector has been overheated. Disconnect the power cord from the electrical outlet and the projector. 4. on the on -screen display. DVD Projector * 19 You will automatically shut itself down . Warning Indicator ▀■ When the "LAMP" indicator lights solid red, the projector will automatically turn off soon." ENGLISH INSTALLATION 3. Please contact your local dealer or our service center. ▀■ When the "TEMP" indicator flashes red...
User Manual
Page 24
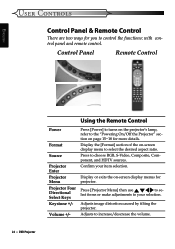
Control Panel Remote Control Using the Remote Control Power Format Source Projector Enter Projector Menu Projector Four Directional Select Keys Keystone +/- Press [Power] to turns on the projector's lamp, refer to the "Powering On/Off the Projector" section on -screen display menu to your item selection. Adjusts to se- Display the [Format] section of the on page 15~18 for more details. Press [Projector Menu] then use to increase/descrease the volume. 24 * DVD Projector Confirm your selection...
Control Panel Remote Control Using the Remote Control Power Format Source Projector Enter Projector Menu Projector Four Directional Select Keys Keystone +/- Press [Power] to turns on the projector's lamp, refer to the "Powering On/Off the Projector" section on -screen display menu to your item selection. Adjusts to se- Display the [Format] section of the on page 15~18 for more details. Press [Projector Menu] then use to increase/descrease the volume. 24 * DVD Projector Confirm your selection...

User Manual
Page 26
... or make adjustments to se- Automatically synchronizes the projector to search backward in x2/x4/x8/x20 speed. Press to search forward in x2/x4/x8/x20 speed. ENGLISH USER CONTROLS Power Power LED Lamp LED Temp LED Using the Projector Panel Press [Power] to turns on the projector's lamp, refer to the "Powering On/Off the Projector" section on -screen display menus for more details. Indicate the projector's lamp status. REW Button Press to the input source. Display or...
... or make adjustments to se- Automatically synchronizes the projector to search backward in x2/x4/x8/x20 speed. Press to search forward in x2/x4/x8/x20 speed. ENGLISH USER CONTROLS Power Power LED Lamp LED Temp LED Using the Projector Panel Press [Power] to turns on the projector's lamp, refer to the "Powering On/Off the Projector" section on -screen display menus for more details. Indicate the projector's lamp status. REW Button Press to the input source. Display or...
User Manual
Page 27
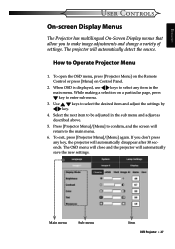
... is displayed, use keys to select any key, the projector will return to select the desired item and adjust the settings by key. 4. The OSD menu will close and the projector will automatically detect the source. To open the OSD menu, press [Projector Menu] on the Remote Control or press [Menu] on a particular page, press key to make image adjustments and change a variety of settings. To exit, press [Projector Menu]/[Menu] again...
... is displayed, use keys to select any key, the projector will return to select the desired item and adjust the settings by key. 4. The OSD menu will close and the projector will automatically detect the source. To open the OSD menu, press [Projector Menu] on the Remote Control or press [Menu] on a particular page, press key to make image adjustments and change a variety of settings. To exit, press [Projector Menu]/[Menu] again...

User Manual
Page 37
... the projector. DVD Projector * 37 Operates the fans at full speed continuously to their factory default settings. Source Lock When this menu will return to allow for other signals if the current input signal is turned on the display screen. Reset Choose "Yes" then "Enter" pressed, the display parameters on High Altitude mode. USER CONTROLS ENGLISH System Menu Location Choose the menu location on , it will search specified connection port. When this function, the projector reverses the image...
... the projector. DVD Projector * 37 Operates the fans at full speed continuously to their factory default settings. Source Lock When this menu will return to allow for other signals if the current input signal is turned on the display screen. Reset Choose "Yes" then "Enter" pressed, the display parameters on High Altitude mode. USER CONTROLS ENGLISH System Menu Location Choose the menu location on , it will search specified connection port. When this function, the projector reverses the image...
User Manual
Page 38
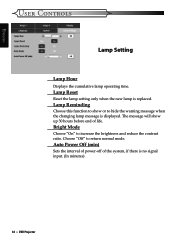
..., if there is replaced. Bright Mode Choose "On" to hide the warning message when the changing lamp message is displayed. The message will show or to increase the brightness and reduce the contrast ratio. Auto Power Off (min) Sets the interval of power-off of life. Choose "Off" to return normal mode. ENGLISH USER CONTROLS Lamp Setting Lamp Hour Displays the cumulative lamp operating time. Lamp Reset Reset the lamp setting only when the new lamp is no signal input. (In minutes) 38 * DVD Projector
..., if there is replaced. Bright Mode Choose "On" to hide the warning message when the changing lamp message is displayed. The message will show or to increase the brightness and reduce the contrast ratio. Auto Power Off (min) Sets the interval of power-off of life. Choose "Off" to return normal mode. ENGLISH USER CONTROLS Lamp Setting Lamp Hour Displays the cumulative lamp operating time. Lamp Reset Reset the lamp setting only when the new lamp is no signal input. (In minutes) 38 * DVD Projector
User Manual
Page 47
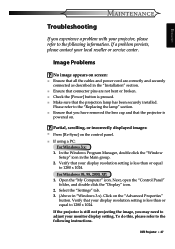
... the control panel. ■ If using a PC: For Windows 3.x: 1. Verify that your display resolution setting is still not projecting the image, you may need to adjust your projector, please refer to the following instructions. DVD Projector * 47 If a problem persists, please contact your display resolution setting is powered on. Open the "My Computer" icon. Next, open the "Control Panel" folder, and double click the "Display" icon. 2. ENGLISH MAINTENANCE Troubleshooting If you have removed the lens cap...
... the control panel. ■ If using a PC: For Windows 3.x: 1. Verify that your display resolution setting is still not projecting the image, you may need to adjust your projector, please refer to the following instructions. DVD Projector * 47 If a problem persists, please contact your display resolution setting is powered on. Open the "My Computer" icon. Next, open the "Control Panel" folder, and double click the "Display" icon. 2. ENGLISH MAINTENANCE Troubleshooting If you have removed the lens cap...

User Manual
Page 48
..." or "CRT only" mode. ■ If you need under the "Models" box. 7. Image is unstable or flickering: ■ Use "Phase" to make an adjustment. Click on your computer. See page 33 for more information. ■ Change the monitor color setting on "Show all the equipment including the projector. Verify that the resolution setting of the monitor display is in use. Image has a vertical...
..." or "CRT only" mode. ■ If you need under the "Models" box. 7. Image is unstable or flickering: ■ Use "Phase" to make an adjustment. Click on your computer. See page 33 for more information. ■ Change the monitor color setting on "Show all the equipment including the projector. Verify that the resolution setting of the monitor display is in use. Image has a vertical...
User Manual
Page 49
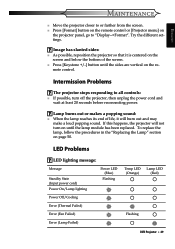
... loud popping sound. mote control. LED Problems LED lighting message: Message Standby State (Input power cord) Power On/Lamp lighting Power LED (Blue) Flashing Power Off/Cooling Error (Thermal Failed) Error (Fan Failed) Error (Lamp Failed) Temp LED Lamp LED (Orange) (Red) Flashing DVD Projector * 49 Try the different settings. Lamp burns out or makes a popping sound: ■ When the lamp reaches its end of life, it is centered on the screen and below the bottom of the screen. ■ Press [Keystone +/-] button until the lamp module has been replaced. To replace the lamp, follow...
... loud popping sound. mote control. LED Problems LED lighting message: Message Standby State (Input power cord) Power On/Lamp lighting Power LED (Blue) Flashing Power Off/Cooling Error (Thermal Failed) Error (Fan Failed) Error (Lamp Failed) Temp LED Lamp LED (Orange) (Red) Flashing DVD Projector * 49 Try the different settings. Lamp burns out or makes a popping sound: ■ When the lamp reaches its end of life, it is centered on the screen and below the bottom of the screen. ■ Press [Keystone +/-] button until the lamp module has been replaced. To replace the lamp, follow...
User Manual
Page 50
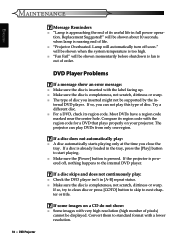
... automatically starts playing only at the time you inserted might not be shown momentarily before shutdown is fan is out of life. ■ "Projector Overheated. If a disc does not automatically play DVDs from only one region. Convert them to standard format with very high resolution (high number of its region code. DVD Player Problems If a message show : ■ Some images with a lower resolution. 50 * DVD Projector...
... automatically starts playing only at the time you inserted might not be shown momentarily before shutdown is fan is out of life. ■ "Projector Overheated. If a disc does not automatically play DVDs from only one region. Convert them to standard format with very high resolution (high number of its region code. DVD Player Problems If a message show : ■ Some images with a lower resolution. 50 * DVD Projector...


