

User Manual
Page 2
... in direct sunlight. q Disconnect the power plug from OSD menu. ! Place in this product to excessive dust and dirt. - Please do not expose this user's manual to cool down and follow all changing instruction. ! Do: q Turn off the product, please keep the cooling fan running for your cleaning. q Use abrasive cleaners...
... in direct sunlight. q Disconnect the power plug from OSD menu. ! Place in this product to excessive dust and dirt. - Please do not expose this user's manual to cool down and follow all changing instruction. ! Do: q Turn off the product, please keep the cooling fan running for your cleaning. q Use abrasive cleaners...
User Manual
Page 4
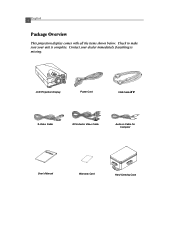
LCD Projection Display Power Cord VGA Cable X 2 S-Video Cable RCA Audio/ Video Cable Audio-in Cable for Computer User's Manual Warranty Card Hard Carrying Case Check to make sure your dealer immediately if anything is complete. 4 English Package Overview This projection display comes with all the items shown below. Contact your unit is missing.
LCD Projection Display Power Cord VGA Cable X 2 S-Video Cable RCA Audio/ Video Cable Audio-in Cable for Computer User's Manual Warranty Card Hard Carrying Case Check to make sure your dealer immediately if anything is complete. 4 English Package Overview This projection display comes with all the items shown below. Contact your unit is missing.
User Manual
Page 11
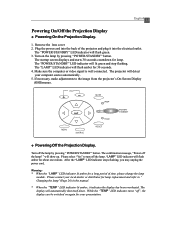
... computer or video signal is well connected. The projector will flash amber for lamp replacement and refer to " Changing the lamp"(Page 26) in the manual. * When the "TEMP" LED indicator lit amber, it into the back of time, please change the lamp module. The "LAMP" LED indicator will detect your...
... computer or video signal is well connected. The projector will flash amber for lamp replacement and refer to " Changing the lamp"(Page 26) in the manual. * When the "TEMP" LED indicator lit amber, it into the back of time, please change the lamp module. The "LAMP" LED indicator will detect your...
User Manual
Page 12
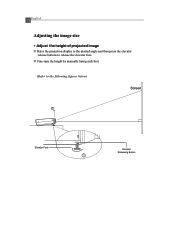
12 English Adjusting the image size M Adjust the height of projected image Q Raise the projection display to the desired angle and then press the elevator release buttons to the following figures below) Screen Elevator Foot Elevator Releasing Button R Fine-tune the height by manually turnig each foot. (Refer to release the elevator foot.
12 English Adjusting the image size M Adjust the height of projected image Q Raise the projection display to the desired angle and then press the elevator release buttons to the following figures below) Screen Elevator Foot Elevator Releasing Button R Fine-tune the height by manually turnig each foot. (Refer to release the elevator foot.


