
User Manual
Page 1
......13 Connect to Video Sources...14 Powering On / Off the Projector 15 Powering On the Projector...15 Powering Off the Projector...16 Warning Indicator...16 Adjusting the Projected Image 17 Adjusting the Projector's Height...17 Adjusting the Zoom / Focus (Zoom Series)...18 ...Problems...45 Intermission Problems...47 Projector Status Indication...48 Remote Control Problems...49 Audio Problems...49 Replacing the Lamp...50 Cleaning the Projector...52 Compatibility Modes...53 RS232 Commands...55 RS232 Protocol Function List...56 Ceiling Installation...59 Optoma Global Offices...60 Regulation ...
......13 Connect to Video Sources...14 Powering On / Off the Projector 15 Powering On the Projector...15 Powering Off the Projector...16 Warning Indicator...16 Adjusting the Projected Image 17 Adjusting the Projector's Height...17 Adjusting the Zoom / Focus (Zoom Series)...18 ...Problems...45 Intermission Problems...47 Projector Status Indication...48 Remote Control Problems...49 Audio Problems...49 Replacing the Lamp...50 Cleaning the Projector...52 Compatibility Modes...53 RS232 Commands...55 RS232 Protocol Function List...56 Ceiling Installation...59 Optoma Global Offices...60 Regulation ...

User Manual
Page 4
... not point the laser beam into the projector's lens when the lamp is approaching the end of its life, the projector will detect the life of the lamp itself. See page 50. This projector will not turn back on the screen. Allow 90 seconds for the projector to change the lamp when it shows warning messages. ▀...
... not point the laser beam into the projector's lens when the lamp is approaching the end of its life, the projector will detect the life of the lamp itself. See page 50. This projector will not turn back on the screen. Allow 90 seconds for the projector to change the lamp when it shows warning messages. ▀...

User Manual
Page 6
The best way to achieve this ensures that projectors are asked to point out something on floor or table top. ▀■ When projector is recommended to avoid the need for the presenter to enter the beam. ▀■ Ensure that , when presenters look at all times. ▀... sight from the screen to the audience; this is by ceiling-mounting the projector rather than placing it on the screen. ▀■ In order to minimize the lamp power needed, use room blinds to stare at the projector lamp. Usage Notice Eye Safety Warnings ▀■ Avoid staring directly into the ...
The best way to achieve this ensures that projectors are asked to point out something on floor or table top. ▀■ When projector is recommended to avoid the need for the presenter to enter the beam. ▀■ Ensure that , when presenters look at all times. ▀... sight from the screen to the audience; this is by ceiling-mounting the projector rather than placing it on the screen. ▀■ In order to minimize the lamp power needed, use room blinds to stare at the projector lamp. Usage Notice Eye Safety Warnings ▀■ Avoid staring directly into the ...

User Manual
Page 15
Ensure that the power cord and signal cable are securely connected. Turn on the lamp by pressing Power either on the top of the projector or on your source automatically. The Power LED flashes rapidly green. Source . The Power LED flashes slowly green ... screen displays in approximately 10 seconds. 4. Turn on the remote. Keystone - Temp Lamp Power Power LED Menu AV-Mute Power 2 Power ZoFoocmus 1 Lens Cap 15 English Installation Powering On / Off the Projector Powering On the Projector 1. v Turn on the remote control to switch between inputs. . Keystone + Enter...
Ensure that the power cord and signal cable are securely connected. Turn on the lamp by pressing Power either on the top of the projector or on your source automatically. The Power LED flashes rapidly green. Source . The Power LED flashes slowly green ... screen displays in approximately 10 seconds. 4. Turn on the remote. Keystone - Temp Lamp Power Power LED Menu AV-Mute Power 2 Power ZoFoocmus 1 Lens Cap 15 English Installation Powering On / Off the Projector Powering On the Projector 1. v Turn on the remote control to switch between inputs. . Keystone + Enter...

User Manual
Page 16
... press Power to operate for about 10 seconds for cooling cycle. Under normal conditions, the projector can be switched on the projector immediately following a power off the projector lamp, a message displays on , you wish to turn the projector back on the projector's screen. 2. If the problem persists, you should contact your local reseller or service center...
... press Power to operate for about 10 seconds for cooling cycle. Under normal conditions, the projector can be switched on the projector immediately following a power off the projector lamp, a message displays on , you wish to turn the projector back on the projector's screen. 2. If the problem persists, you should contact your local reseller or service center...

User Manual
Page 20
... again. Adjust the image Keystone negatively. Power Refer to launch the on-screen display (OSD) menu. Keystone - Enter Confirm your item selection. Lamp LED Indicate the projector's lamp status. Re-Sync Automatically synchronizes the projector to select an input signal. Source Press Source to the input source. Source . English 20 Temp LED Indicate the...
... again. Adjust the image Keystone negatively. Power Refer to launch the on-screen display (OSD) menu. Keystone - Enter Confirm your item selection. Lamp LED Indicate the projector's lamp status. Re-Sync Automatically synchronizes the projector to select an input signal. Source Press Source to the input source. Source . English 20 Temp LED Indicate the...
User Manual
Page 41
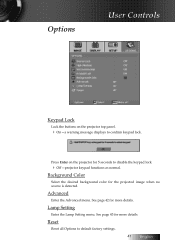
Background Color Select the desired background color for more details. Lamp Setting Enter the Lamp Setting menu. See page 43 for the projected image when no source is detected. Press Enter on the projector top panel. 4 On-a warning message displays to confirm keypad lock. Reset Reset all Options to disable the keypad lock. 4 Off-projector keypad functions as normal. Advanced Enter the Advanced menu. See page 42 for 5 seconds to default factory settings. 41 English Options User Controls Keypad Lock Lock the buttons on the projector for more details.
Background Color Select the desired background color for more details. Lamp Setting Enter the Lamp Setting menu. See page 43 for the projected image when no source is detected. Press Enter on the projector top panel. 4 On-a warning message displays to confirm keypad lock. Reset Reset all Options to disable the keypad lock. 4 Off-projector keypad functions as normal. Advanced Enter the Advanced menu. See page 42 for 5 seconds to default factory settings. 41 English Options User Controls Keypad Lock Lock the buttons on the projector for more details.

User Manual
Page 42
.... 4 Off- The projector powers off the lamp after the specified time period of inactivity (regardless of no signal by default. Auto Power Off Set the Auto Power Off interval. English 42 The following warning is displayed 60 seconds before power off . The projector powers off after 15 ...minutes of signal). Sleep Timer Set the Sleep Timer interval. User Controls Options | Advanced Direct Power On Enable or disable Direct Power On. 4 On-the projector powers on as normal. the projector must be powered on automatically ...
.... 4 Off- The projector powers off the lamp after the specified time period of inactivity (regardless of no signal by default. Auto Power Off Set the Auto Power Off interval. English 42 The following warning is displayed 60 seconds before power off . The projector powers off after 15 ...minutes of signal). Sleep Timer Set the Sleep Timer interval. User Controls Options | Advanced Direct Power On Enable or disable Direct Power On. 4 On-the projector powers on as normal. the projector must be powered on automatically ...

User Manual
Page 45
...to UXGA (1600 x 1200). 6. Next, select Standard monitor types under the Monitor tab. 7. Select the Change button under the SP box; If the projector is still not projecting the whole image, you will also need under the "Models" box. 8. choose the resolution mode you experience a problem with your...No image appears on . Select the Settings tab. 3. Click on the remote. 4 If you are not bent or broken. 4 Check if the projection lamp has been securely installed. Click on the Display icon. 2. Open the My Computer icon, the Control Panel folder, and then double click on the Advanced...
...to UXGA (1600 x 1200). 6. Next, select Standard monitor types under the Monitor tab. 7. Select the Change button under the SP box; If the projector is still not projecting the whole image, you will also need under the "Models" box. 8. choose the resolution mode you experience a problem with your...No image appears on . Select the Settings tab. 3. Click on the remote. 4 If you are not bent or broken. 4 Check if the projection lamp has been securely installed. Click on the Display icon. 2. Open the My Computer icon, the Control Panel folder, and then double click on the Advanced...

User Manual
Page 47
... to or further from the OSD and adjust the projec- Intermission Problems The projector stops responding to the following: 4 Please setup the display format as 4:3 in projector OSD. To replace the lamp, follow the procedures in R��e�p�l�a�c�i�n�g��t�h��e�L��...
... to or further from the OSD and adjust the projec- Intermission Problems The projector stops responding to the following: 4 Please setup the display format as 4:3 in projector OSD. To replace the lamp, follow the procedures in R��e�p�l�a�c�i�n�g��t�h��e�L��...

User Manual
Page 48
Appendices Projector Status Indication Message Over Temp Lamp Fail Thermal Break Status Error Lamp Door Sensor Detect High DMD Error Color Wheel Error Fan 1 error (Lamp Fan Fan 2 error (Power Fan) Fan 3 error (Blower Fan) Power LED (Green) O O 4 7 8 9 6 6 6 Lamp LED (Red) O 4 O O O 1 2 3 Temp LED (Red) O O O O O O O O Steady light � No light � English 48
Appendices Projector Status Indication Message Over Temp Lamp Fail Thermal Break Status Error Lamp Door Sensor Detect High DMD Error Color Wheel Error Fan 1 error (Lamp Fan Fan 2 error (Power Fan) Fan 3 error (Blower Fan) Power LED (Green) O O 4 7 8 9 6 6 6 Lamp LED (Red) O 4 O O O 1 2 3 Temp LED (Red) O O O O O O O O Steady light � No light � English 48
User Manual
Page 49
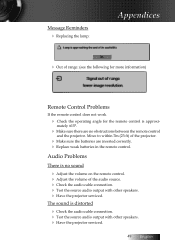
The sound is no obstructions between the remote control and the projector. Move to within 7m (23 ft) of the projector. 4 Make sure the batteries are no sound 4 Adjust the volume on the remote control. 4 Adjust the volume of range: (see the following for ...remote control is approxi- Audio Problems There is distorted 4 Check the audio cable connection. 4 Test the source audio output with other speakers. 4 Have the projector serviced. 49 English mately ±15°. 4 Make sure there are inserted correctly. 4 Replace weak batteries in the remote control. Message Reminders 4 Replacing ...
The sound is no obstructions between the remote control and the projector. Move to within 7m (23 ft) of the projector. 4 Make sure the batteries are no sound 4 Adjust the volume on the remote control. 4 Adjust the volume of range: (see the following for ...remote control is approxi- Audio Problems There is distorted 4 Check the audio cable connection. 4 Test the source audio output with other speakers. 4 Have the projector serviced. 49 English mately ±15°. 4 Make sure there are inserted correctly. 4 Replace weak batteries in the remote control. Message Reminders 4 Replacing ...
User Manual
Page 50
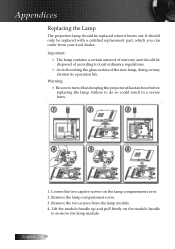
...the glass surface of the new lamp, doing so may shorten its operation life. It should only be disposed of mercury and should be replaced when it burns out. Loosen the two captive screws on the module handle to turn off and unplug the projector at least an hour before ...replacing the lamp. Remove the two screws from your local dealer. Important: 4 The lamp contains a certain amount of according to do so could result in a severe burn. 1. Appendices ...
...the glass surface of the new lamp, doing so may shorten its operation life. It should only be disposed of mercury and should be replaced when it burns out. Loosen the two captive screws on the module handle to turn off and unplug the projector at least an hour before ...replacing the lamp. Remove the two screws from your local dealer. Important: 4 The lamp contains a certain amount of according to do so could result in a severe burn. 1. Appendices ...
User Manual
Page 57
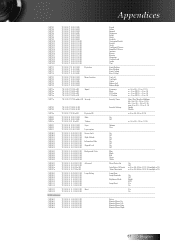
... 0D Security Settings Enable ~XX78 2 7E 30 30 37 38 20 32 0D Disable ~XX79 n 7E 30 30 37 39 20 a 0D Projector ID n=0 (a=30)- 99 (a=39 39) ~XX80 1 7E 30 30 38 30 20 31 0D Mute O n ~XX80 2 7E 30 ... 38 31 20 a 0D Volume n= 0 (a=30) - 10 (a=31 30) ~XX82 1 7E 30 30 38 32 20 31 0D Logo Optoma ~XX82 2 7E 30 30 38 32 20 32 0D User ~XX83 1 7E 30 30 38 33 20 31 0D Logo capture ~XX100 1 7E...~XX110 2 7E 30 30 31 31 30 20 32 0D S TD ~XX111 1 7E 30 30 31 31 31 20 31 0D Lamp Reset Yes ~XX111 2 7E 30 30 31 31 31 20 32 0D N o ~XX112 1 7E 30 30 31 31 32 20...
... 0D Security Settings Enable ~XX78 2 7E 30 30 37 38 20 32 0D Disable ~XX79 n 7E 30 30 37 39 20 a 0D Projector ID n=0 (a=30)- 99 (a=39 39) ~XX80 1 7E 30 30 38 30 20 31 0D Mute O n ~XX80 2 7E 30 ... 38 31 20 a 0D Volume n= 0 (a=30) - 10 (a=31 30) ~XX82 1 7E 30 30 38 32 20 31 0D Logo Optoma ~XX82 2 7E 30 30 38 32 20 32 0D User ~XX83 1 7E 30 30 38 33 20 31 0D Logo capture ~XX100 1 7E...~XX110 2 7E 30 30 31 31 30 20 32 0D S TD ~XX111 1 7E 30 30 31 31 31 20 31 0D Lamp Reset Yes ~XX111 2 7E 30 30 31 31 31 20 32 0D N o ~XX112 1 7E 30 30 31 31 32 20...

User Manual
Page 58
...SEND from projector automatically 232 ASCII Code HEX Code Function Projector Return Description when Standby/Warming/Cooling/Out of Range/Lamp fail INFOn n : 0/1/2/3/4 = Standby/Warming/Cooling/Out of Range/Lamp fail READ from projector 232 ASCII Code HEX Code Function Projector Return Description .../Front-Ceiling/Rear-Ceiling ~XX150 1 7E 30 30 31 35 30 20 31 0D Information OKabbbbcdddde a : 0/1=Off/On bbbb: Lamp Hour c: source 0/1/2/3= None/VGA/S-Video/Video dddd: FW version e : Display mode 0/1/2/3/4/5=Presentation/Bright/Movie/sRGB/User1/User2 ~XX151 ...
...SEND from projector automatically 232 ASCII Code HEX Code Function Projector Return Description when Standby/Warming/Cooling/Out of Range/Lamp fail INFOn n : 0/1/2/3/4 = Standby/Warming/Cooling/Out of Range/Lamp fail READ from projector 232 ASCII Code HEX Code Function Projector Return Description .../Front-Ceiling/Rear-Ceiling ~XX150 1 7E 30 30 31 35 30 20 31 0D Information OKabbbbcdddde a : 0/1=Off/On bbbb: Lamp Hour c: source 0/1/2/3= None/VGA/S-Video/Video dddd: FW version e : Display mode 0/1/2/3/4/5=Presentation/Bright/Movie/sRGB/User1/User2 ~XX151 ...


