
GT1080Darbee User Manual
Page 1
DLP® Projector User manual
DLP® Projector User manual

GT1080Darbee User Manual
Page 2
... Keypad...11 Remote control...12 SETUP AND INSTALLATION 13 Installing the projector...13 Connecting sources to the projector 15 Adjusting the projector image...16 Remote setup...17 USING THE PROJECTOR 19 Powering on / off the projector 19 Selecting an input source...20 USING THE PROJECTOR 21 Menu navigation and features 21 OSD Menu tree...22 Display...
... Keypad...11 Remote control...12 SETUP AND INSTALLATION 13 Installing the projector...13 Connecting sources to the projector 15 Adjusting the projector image...16 Remote setup...17 USING THE PROJECTOR 19 Powering on / off the projector 19 Selecting an input source...20 USING THE PROJECTOR 21 Menu navigation and features 21 OSD Menu tree...22 Display...

GT1080Darbee User Manual
Page 3
... MAINTENANCE 39 Replacing the lamp...39 Installing and cleaning the dust filter 41 ADDITIONAL INFORMATION 42 Compatible resolutions...42 Image size and projection distance 43 Projector dimensions and ceiling mount installation 44 IR remote codes...45 Troubleshooting...47 Warning indicators...49 Specifications...51...
... MAINTENANCE 39 Replacing the lamp...39 Installing and cleaning the dust filter 41 ADDITIONAL INFORMATION 42 Compatible resolutions...42 Image size and projection distance 43 Projector dimensions and ceiling mount installation 44 IR remote codes...45 Troubleshooting...47 Warning indicators...49 Specifications...51...

GT1080Darbee User Manual
Page 4
...Do not block any ventilation openings. Physical damage/abuse would be of sufficient magnitude to constitute a risk of electric shock to persons. The projector may fall over heating, it has been physically damaged or abused. The light will heat the object and my melt, cause burns or ... that does not block ventilation. They may cause electric shock. 4 English The exclamation point within an equilateral triangle is loose inside the projector becomes very hot during operation and the gases may become damaged. ‡‡ Do not block the light coming out of important operating...
...Do not block any ventilation openings. Physical damage/abuse would be of sufficient magnitude to constitute a risk of electric shock to persons. The projector may fall over heating, it has been physically damaged or abused. The light will heat the object and my melt, cause burns or ... that does not block ventilation. They may cause electric shock. 4 English The exclamation point within an equilateral triangle is loose inside the projector becomes very hot during operation and the gases may become damaged. ‡‡ Do not block the light coming out of important operating...
GT1080Darbee User Manual
Page 5
...standard installation may harm your child use attachments/accessories specified by the manufacturer. ‡‡ Do not look into straight into the projector lens during operation. Note: When the lamp reaches the end of time. If the battery/batteries are sleep deprived or under "...stroke when exposed to dangerous voltages or other hazards. Please call Optoma before you to certain flashing images or lights contained in 3D and should avoid utilizing the unit's 3D functionality. The bright light may affect the projector performance. ‡‡ Use a power strip and or surge...
...standard installation may harm your child use attachments/accessories specified by the manufacturer. ‡‡ Do not look into straight into the projector lens during operation. Note: When the lamp reaches the end of time. If the battery/batteries are sleep deprived or under "...stroke when exposed to dangerous voltages or other hazards. Please call Optoma before you to certain flashing images or lights contained in 3D and should avoid utilizing the unit's 3D functionality. The bright light may affect the projector performance. ‡‡ Use a power strip and or surge...
GT1080Darbee User Manual
Page 6
... are the properties of HDMI Licensing LLC in this device and do not resume using it for some viewers. Accordingly, DO NOT place your 3D PROJECTOR near open stairwells, cables, balconies, or other product names used in the United States and other countries. All other objects that users take frequent breaks...
... are the properties of HDMI Licensing LLC in this device and do not resume using it for some viewers. Accordingly, DO NOT place your 3D PROJECTOR near open stairwells, cables, balconies, or other product names used in the United States and other countries. All other objects that users take frequent breaks...

GT1080Darbee User Manual
Page 7
...;‡ Low Voltage Directive 2014/35/EC ‡‡ R & TTE Directive 1999/5/EC (if product has RF function) WEEE Disposal instructions Do not throw this projector. Operation Conditions This device complies with FCC regulations. This device may not cause harmful interference and 2. If this device does cause harmful interference to radio...
...;‡ Low Voltage Directive 2014/35/EC ‡‡ R & TTE Directive 1999/5/EC (if product has RF function) WEEE Disposal instructions Do not throw this projector. Operation Conditions This device complies with FCC regulations. This device may not cause harmful interference and 2. If this device does cause harmful interference to radio...
GT1080Darbee User Manual
Page 8
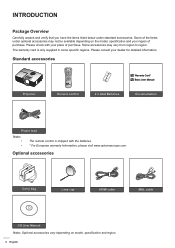
... Keystone Mute DB 3D Sleep Timer Volume Source Re-sync Menu Volume HDMI1 HDMI2 VGA1 VGA2 Video YPbPr Warranty Card* Basic User Manual Projector Remote control 2 x AAA Batteries Documentation Power lead Note: ‡‡ ‡‡ The remote control is only supplied in some specific regions. Some accessories may...
... Keystone Mute DB 3D Sleep Timer Volume Source Re-sync Menu Volume HDMI1 HDMI2 VGA1 VGA2 Video YPbPr Warranty Card* Basic User Manual Projector Remote control 2 x AAA Batteries Documentation Power lead Note: ‡‡ ‡‡ The remote control is only supplied in some specific regions. Some accessories may...

GT1080Darbee User Manual
Page 9
Lens 2. Input / Output Connections 5. Ventilation (outlet) 12. INTRODUCTION Product Overview 12 3 4 5 8 7 13 6 9 10 11 8 12 Note: ‡‡ ‡‡ Do not block projector inlet or outlet air vents. Focus Ring 10. Ventilation (inlet) English 9 IR Receiver 3. Lamp Cover 11. Keep a minimum distance of 20 cm between the "inlet" and "outlet" labels. Tilt-Adjustment Feet 9. KensingtonTM Lock Port 13. No Item 1. Speaker 7. Power Socket 6. Keypad 4. Lens Cap No Item 8.
Lens 2. Input / Output Connections 5. Ventilation (outlet) 12. INTRODUCTION Product Overview 12 3 4 5 8 7 13 6 9 10 11 8 12 Note: ‡‡ ‡‡ Do not block projector inlet or outlet air vents. Focus Ring 10. Ventilation (inlet) English 9 IR Receiver 3. Lamp Cover 11. Keep a minimum distance of 20 cm between the "inlet" and "outlet" labels. Tilt-Adjustment Feet 9. KensingtonTM Lock Port 13. No Item 1. Speaker 7. Power Socket 6. Keypad 4. Lens Cap No Item 8.
GT1080Darbee User Manual
Page 13
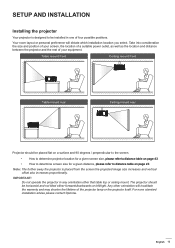
... refer to be installed in any orientation other orientation will dictate which installation location you select. Note: The further away the projector is designed to distance table on page 43. Take into consideration the size and position of your screen, the location of ... as well as the location and distance between the projector and the rest of the projector lamp or the projector itself. For none standard installation advise please contact Optoma. IMPORTANT! SETUP AND INSTALLATION Installing the projector Your projector is placed from the screen the projected image size ...
... refer to be installed in any orientation other orientation will dictate which installation location you select. Note: The further away the projector is designed to distance table on page 43. Take into consideration the size and position of your screen, the location of ... as well as the location and distance between the projector and the rest of the projector lamp or the projector itself. For none standard installation advise please contact Optoma. IMPORTANT! SETUP AND INSTALLATION Installing the projector Your projector is placed from the screen the projected image size ...

GT1080Darbee User Manual
Page 14
...Minimum 200mm (7.87 inches) Minimum 100mm (3.94 inches) Minimum 100mm (3.94 inches) Minimum 100mm (3.94 inches) 14 English Ensure that the projector does not recycle exhaust air, as this may lead to other than the desktop and ceiling mount, otherwise lamp life could decrease dramatically, and...if the enclosure temperature is running, and the air intake and exhaust vents are unobstructed. When operating the projector in a horizontal position. The tilt angle of the projector should not exceed 15 degrees, nor should pass a certified thermal evaluation to ensure that the intake vents ...
...Minimum 200mm (7.87 inches) Minimum 100mm (3.94 inches) Minimum 100mm (3.94 inches) Minimum 100mm (3.94 inches) 14 English Ensure that the projector does not recycle exhaust air, as this may lead to other than the desktop and ceiling mount, otherwise lamp life could decrease dramatically, and...if the enclosure temperature is running, and the air intake and exhaust vents are unobstructed. When operating the projector in a horizontal position. The tilt angle of the projector should not exceed 15 degrees, nor should pass a certified thermal evaluation to ensure that the intake vents ...
GT1080Darbee User Manual
Page 15
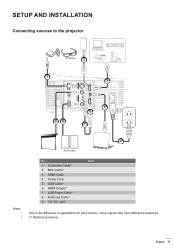
HDMI Dongle* 7. SETUP AND INSTALLATION Connecting sources to the difference in applications for each country, some regions may have different accessories. (*) Optional accessory. Power Cord 5. USB Power Cable* 8. Audio out Cable* 9. 12V DC Jack* Item Due to the projector 3D glasses 2 1 3 98 5 6 7 MOLEX 4 Audio output Note: ‡‡ ‡‡ No 1. 3D Emitter Cable* 2. English 15 USB Cable* 6. HDMI Cable 4. MHL Cable* 3.
HDMI Dongle* 7. SETUP AND INSTALLATION Connecting sources to the difference in applications for each country, some regions may have different accessories. (*) Optional accessory. Power Cord 5. USB Power Cable* 8. Audio out Cable* 9. 12V DC Jack* Item Due to the projector 3D glasses 2 1 3 98 5 6 7 MOLEX 4 Audio output Note: ‡‡ ‡‡ No 1. 3D Emitter Cable* 2. English 15 USB Cable* 6. HDMI Cable 4. MHL Cable* 3.

GT1080Darbee User Manual
Page 16
Locate the adjustable foot you wish to adjust on the underside of 0.5m to raise or lower the projector. Rotate the adjustable foot clockwise or counterclockwise to 3.35m. 16 English SETUP AND INSTALLATION Adjusting the projector image Image height The projector is sharp and legible. Focus Ring Note: The projector will focus at a distance of the projector. 2. Tilt-Adjustment Feet Tilt-Adjustment Ring Focus To adjust the focus, turn the focus ring clockwise or counterclockwise until the image is equipped with elevator feet for adjusting the image height. 1.
Locate the adjustable foot you wish to adjust on the underside of 0.5m to raise or lower the projector. Rotate the adjustable foot clockwise or counterclockwise to 3.35m. 16 English SETUP AND INSTALLATION Adjusting the projector image Image height The projector is sharp and legible. Focus Ring Note: The projector will focus at a distance of the projector. 2. Tilt-Adjustment Feet Tilt-Adjustment Ring Focus To adjust the focus, turn the focus ring clockwise or counterclockwise until the image is equipped with elevator feet for adjusting the image height. 1.
GT1080Darbee User Manual
Page 17
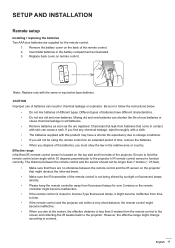
...the remote control for over 2 meters or the remote controller might become malfunction. ‡‡ If the remote control is located on the projector that come in contact with skin can result in the relative area or country. Mixing old and new batteries can shorten the life of ...storage conditions. ‡‡ If you will not be longer than 5 meters from time to time. ‡‡ If the remote control and the projector are supplied for the remote control. 1. Insert AAA batteries in old batteries. ‡‡ Remove batteries as soon as illustrated. 3. If you find any...
...the remote control for over 2 meters or the remote controller might become malfunction. ‡‡ If the remote control is located on the projector that come in contact with skin can result in the relative area or country. Mixing old and new batteries can shorten the life of ...storage conditions. ‡‡ If you will not be longer than 5 meters from time to time. ‡‡ If the remote control and the projector are supplied for the remote control. 1. Insert AAA batteries in old batteries. ‡‡ Remove batteries as soon as illustrated. 3. If you find any...

GT1080Darbee User Manual
Page 19
... select the preferred language, projection orientation, and other settings. When connected, the On/Standby LED will disappear after a power off the projector or ON OFF User1 User2 Contrast Brightness User3 Mode Aspect ratio Keystone ON OFF User1 User2 Brightness Contrast D B User3 Mode Mute Aspect ...Volume Menu Volume SourceHDMI1 HDMI2 VGA1 VGA2 Video YPbPr Re-sync Menu Powering on Volume 1. Note: It is not recommended that the projector is turned on immediately, right after 15 seconds. English 19 A start up screen will shut down. 4. The following message will...
... select the preferred language, projection orientation, and other settings. When connected, the On/Standby LED will disappear after a power off the projector or ON OFF User1 User2 Contrast Brightness User3 Mode Aspect ratio Keystone ON OFF User1 User2 Brightness Contrast D B User3 Mode Mute Aspect ...Volume Menu Volume SourceHDMI1 HDMI2 VGA1 VGA2 Video YPbPr Re-sync Menu Powering on Volume 1. Note: It is not recommended that the projector is turned on immediately, right after 15 seconds. English 19 A start up screen will shut down. 4. The following message will...

GT1080Darbee User Manual
Page 20
... source DB 3D Turn on the screen, such asMuctoemputer, notSelebeop oTikm,ervideo player, etc. If multiple sources are connected, push the source button on the projector keypad or the remote control to display on the connected source that you want to select the desired input. The... projector will automatically detect the source. Volume Source Re-sync or Menu Volume HDMI1ON HDMI2 OFF User1 User2 Brightness Contrast User3 Mode VGA1 VGA2 Video Aspect ...
... source DB 3D Turn on the screen, such asMuctoemputer, notSelebeop oTikm,ervideo player, etc. If multiple sources are connected, push the source button on the projector keypad or the remote control to display on the connected source that you want to select the desired input. The... projector will automatically detect the source. Volume Source Re-sync or Menu Volume HDMI1ON HDMI2 OFF User1 User2 Brightness Contrast User3 Mode VGA1 VGA2 Video Aspect ...

GT1080Darbee User Manual
Page 21
.... 2. Use keys to select the desired item in the main menu. Adjust the settings by using keys. 4. The OSD menu will close and the projector will return to enter sub menu. 3. To open the OSD menu, press on a particular page, press or key to the main menu. 6. Press the ...item in the sub menu and then press or key to confirm, and the screen will automatically save the new settings. USING THE PROJECTOR Menu navigation and features The projector has multilingual on-screen display menus that allow you to be adjusted in the sub menu and adjust as described above. 5. The...
.... 2. Use keys to select the desired item in the main menu. Adjust the settings by using keys. 4. The OSD menu will close and the projector will return to enter sub menu. 3. To open the OSD menu, press on a particular page, press or key to the main menu. 6. Press the ...item in the sub menu and then press or key to confirm, and the screen will automatically save the new settings. USING THE PROJECTOR Menu navigation and features The projector has multilingual on-screen display menus that allow you to be adjusted in the sub menu and adjust as described above. 5. The...

GT1080Darbee User Manual
Page 22
USING THE PROJECTOR OSD Menu tree Main Menu Sub Menu Sub Menu 2 Sub Menu 3 Sub Menu 4 Display Mode [Video] Wall Color [Data] Display Brightness Contrast Sharpness Image Settings Color Tint Gamma Film Video Graphics Standard(2.2) 1.8 2.0 2.4 BrilliantColorTM Color Temperature [Data model] Color Settings Color Matching Color Values Cinema Vivid Game Reference Bright USER 3D ISF Day ISF Night ISF 3D Off [Default] BlackBoard Light Yellow Light Green Light Blue Pink Gray -50~50 -50~50 1~15 -50~50 -50~50 1~10 Warm Standard Cool Cold R [Default] G B C Y M W 22 English
USING THE PROJECTOR OSD Menu tree Main Menu Sub Menu Sub Menu 2 Sub Menu 3 Sub Menu 4 Display Mode [Video] Wall Color [Data] Display Brightness Contrast Sharpness Image Settings Color Tint Gamma Film Video Graphics Standard(2.2) 1.8 2.0 2.4 BrilliantColorTM Color Temperature [Data model] Color Settings Color Matching Color Values Cinema Vivid Game Reference Bright USER 3D ISF Day ISF Night ISF 3D Off [Default] BlackBoard Light Yellow Light Green Light Blue Pink Gray -50~50 -50~50 1~15 -50~50 -50~50 1~10 Warm Standard Cool Cold R [Default] G B C Y M W 22 English

GT1080Darbee User Manual
Page 23
USING THE PROJECTOR Main Menu Sub Menu Sub Menu 2 Sub Menu 3 Color Matching Sub Menu 4 Hue or R Saturation or G Gain or B Reset Color Settings RGB Gain/Bias Exit ...
USING THE PROJECTOR Main Menu Sub Menu Sub Menu 2 Sub Menu 3 Color Matching Sub Menu 4 Hue or R Saturation or G Gain or B Reset Color Settings RGB Gain/Bias Exit ...

GT1080Darbee User Manual
Page 24
... Rear-top Off On [Default] Cancel [Default] Yes (Read only) Yes No Off 300hr 500hr [Default] 800hr 1000hr Cancel [Default] Yes 24 English USING THE PROJECTOR Main Menu Sub Menu 3D Sub Menu 2 3D sync invert Sub Menu 3 Aspect Ratio Display Edge Mask Zoom Image shift Audio Keystone Mute Volume H: 0; V: -50...
... Rear-top Off On [Default] Cancel [Default] Yes (Read only) Yes No Off 300hr 500hr [Default] 800hr 1000hr Cancel [Default] Yes 24 English USING THE PROJECTOR Main Menu Sub Menu 3D Sub Menu 2 3D sync invert Sub Menu 3 Aspect Ratio Display Edge Mask Zoom Image shift Audio Keystone Mute Volume H: 0; V: -50...


