
HD243X User Manuel
Page 1
DLP® Projector User manual
DLP® Projector User manual
HD243X User Manuel
Page 2
... accessories...8 Product Overview...9 Connections...10 Keypad...11 Remote control...12 SETUP AND INSTALLATION 13 Installing the projector...13 Connecting sources to the projector 15 Adjusting the projector image...16 USING THE PROJECTOR 19 Powering on / off the projector 19 Selecting an input source...20 Menu navigation and features 21 OSD Menu tree...22 Display image...
... accessories...8 Product Overview...9 Connections...10 Keypad...11 Remote control...12 SETUP AND INSTALLATION 13 Installing the projector...13 Connecting sources to the projector 15 Adjusting the projector image...16 USING THE PROJECTOR 19 Powering on / off the projector 19 Selecting an input source...20 Menu navigation and features 21 OSD Menu tree...22 Display image...
HD243X User Manuel
Page 3
Setup security menu...36 Setup HDMI link settings menu 36 Setup test pattern menu...37 Setup remote settings menu...37 Setup 12V trigger menu...37 Setup options menu...37 Setup reset menu...38 Info menu...39 MAINTENANCE 40 Replacing the lamp...40 Installing and cleaning the dust filter 42 ADDITIONAL INFORMATION 43 Compatible resolutions...43 Image size and projection distance 44 Projector dimensions and ceiling mount installation 45 IR remote control codes...46 Troubleshooting...48 Warning indicators...50 Specifications...52 Optoma global offices...53 English 3
Setup security menu...36 Setup HDMI link settings menu 36 Setup test pattern menu...37 Setup remote settings menu...37 Setup 12V trigger menu...37 Setup options menu...37 Setup reset menu...38 Info menu...39 MAINTENANCE 40 Replacing the lamp...40 Installing and cleaning the dust filter 42 ADDITIONAL INFORMATION 43 Compatible resolutions...43 Image size and projection distance 44 Projector dimensions and ceiling mount installation 45 IR remote control codes...46 Troubleshooting...48 Warning indicators...50 Specifications...52 Optoma global offices...53 English 3
HD243X User Manuel
Page 4
...177; Unit has been dropped. ±± Power supply cord or plug has been damaged. ±± Liquid has been spilled on to the projector. ±± Projector has been exposed to the presence of electric shock to rain or moisture. The light will heat the object and could result in fire... or electric shock. ‡‡ Do not use the projector in places where flammable gases or explosives gases may touch dangerous voltage points and short out parts that does not block ventilation. Do not install...
...177; Unit has been dropped. ±± Power supply cord or plug has been damaged. ±± Liquid has been spilled on to the projector. ±± Projector has been exposed to the presence of electric shock to rain or moisture. The light will heat the object and could result in fire... or electric shock. ‡‡ Do not use the projector in places where flammable gases or explosives gases may touch dangerous voltage points and short out parts that does not block ventilation. Do not install...
HD243X User Manuel
Page 5
...for a long period of time. ‡‡ Please do not open or disassemble the projector as described on pages 40-41. ‡‡ This projector will detect the life of the lamp itself. Please call Optoma before you suffer from the AC outlet before using the 3D function. ‡‡ ...Even those without a personal or family history of epilepsy or stroke may have a family history of the projector performance. ‡‡ Please follow all warnings ...
...for a long period of time. ‡‡ Please do not open or disassemble the projector as described on pages 40-41. ‡‡ This projector will detect the life of the lamp itself. Please call Optoma before you suffer from the AC outlet before using the 3D function. ‡‡ ...Even those without a personal or family history of epilepsy or stroke may have a family history of the projector performance. ‡‡ Please follow all warnings ...

HD243X User Manuel
Page 6
... vision; (2) light-headedness; (3) dizziness; (4) involuntary movements such as general spectacles, sunglasses, protective goggles, etc.) may cause a headache or fatigue. Accordingly, DO NOT place your 3D PROJECTOR near open stairwells, cables, balconies, or other countries throughout the world. Copyright This publication, including all rights reserved. Trademark Recognition Kensington is protected under international...
... vision; (2) light-headedness; (3) dizziness; (4) involuntary movements such as general spectacles, sunglasses, protective goggles, etc.) may cause a headache or fatigue. Accordingly, DO NOT place your 3D PROJECTOR near open stairwells, cables, balconies, or other countries throughout the world. Copyright This publication, including all rights reserved. Trademark Recognition Kensington is protected under international...
HD243X User Manuel
Page 7
...;‡ Low Voltage Directive 2014/35/EU ‡‡ RED 2014/53/EU (if product has RF function) WEEE Disposal instructions Do not throw this projector. This device may cause undesired operation. Notice: Shielded cables All connections to other computing devices must accept any interference received, including interference that to Part...
...;‡ Low Voltage Directive 2014/35/EU ‡‡ RED 2014/53/EU (if product has RF function) WEEE Disposal instructions Do not throw this projector. This device may cause undesired operation. Notice: Shielded cables All connections to other computing devices must accept any interference received, including interference that to Part...
HD243X User Manuel
Page 8
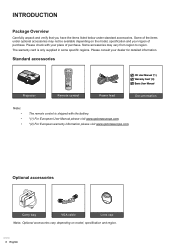
Standard accessories Projector ON OFF User1 User2 Brightness Contrast User3 Mode Aspect ratio Keystone Mute DB 3D Sleep Timer Volume Source Re-sync Menu Volume HDMI1 HDMI2 VGA1 ...
Standard accessories Projector ON OFF User1 User2 Brightness Contrast User3 Mode Aspect ratio Keystone Mute DB 3D Sleep Timer Volume Source Re-sync Menu Volume HDMI1 HDMI2 VGA1 ...
HD243X User Manuel
Page 13
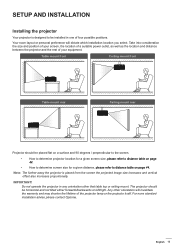
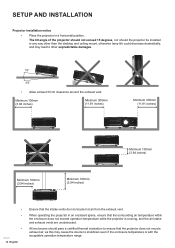
... size and position of your equipment. For none standard installation advise please contact Optoma. English 13 Do not operate the projector in one of four possible positions. Note: The further away the projector is designed to distance table on page 44. ‡‡ How to ... of a suitable power outlet, as well as the location and distance between the projector and the rest of the projector lamp or the projector itself. SETUP AND INSTALLATION Installing the projector Your projector is placed from the screen the projected image size increases and vertical offset also increases...
... size and position of your equipment. For none standard installation advise please contact Optoma. English 13 Do not operate the projector in one of four possible positions. Note: The further away the projector is designed to distance table on page 44. ‡‡ How to ... of a suitable power outlet, as well as the location and distance between the projector and the rest of the projector lamp or the projector itself. SETUP AND INSTALLATION Installing the projector Your projector is placed from the screen the projected image size increases and vertical offset also increases...
HD243X User Manuel
Page 14
...vents do not recycle hot air from the exhaust vent. The tilt angle of the projector should not exceed 15 degrees, nor should pass a certified thermal evaluation to ensure that the projector does not recycle exhaust air, as this may lead to shutdown even if the ...that the surrounding air temperature within the enclosure does not exceed operation temperature while the projector is with the acceptable operation temperature range. SETUP AND INSTALLATION Projector installation notice ‡‡ Place the projector in any way other than the desktop and ceiling mount, otherwise lamp life could ...
...vents do not recycle hot air from the exhaust vent. The tilt angle of the projector should not exceed 15 degrees, nor should pass a certified thermal evaluation to ensure that the projector does not recycle exhaust air, as this may lead to shutdown even if the ...that the surrounding air temperature within the enclosure does not exceed operation temperature while the projector is with the acceptable operation temperature range. SETUP AND INSTALLATION Projector installation notice ‡‡ Place the projector in any way other than the desktop and ceiling mount, otherwise lamp life could ...

HD243X User Manuel
Page 15
HDMI Dongle 9. HDMI / MHL Cable 3. 3D Emitter Cable 4. 12V DC Jack 5. USB Power Cable 8. HDMI Cable 2. Audio Out Cable No Item 6. USB Cable 7. Power Cord English 15 SETUP AND INSTALLATION Connecting sources to the projector 2 3 4 1 8 7 MOLEX 6 5 9 MOLEX No Item 1.
HDMI Dongle 9. HDMI / MHL Cable 3. 3D Emitter Cable 4. 12V DC Jack 5. USB Power Cable 8. HDMI Cable 2. Audio Out Cable No Item 6. USB Cable 7. Power Cord English 15 SETUP AND INSTALLATION Connecting sources to the projector 2 3 4 1 8 7 MOLEX 6 5 9 MOLEX No Item 1.
HD243X User Manuel
Page 16
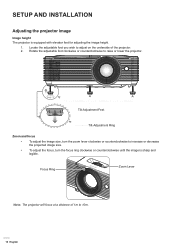
... until the image is equipped with elevator feet for adjusting the image height. 1. Focus Ring Zoom Lever Note: The projector will focus at a distance of the projector. 2. Tilt-Adjustment Feet Tilt-Adjustment Ring Zoom and focus ‡‡ To adjust the image size, turn the ...zoom lever clockwise or counterclockwise to raise or lower the projector. Locate the adjustable foot you wish to adjust on the underside of 1m to 10m. 16 English SETUP AND INSTALLATION Adjusting the projector image Image height The projector is sharp and legible.
... until the image is equipped with elevator feet for adjusting the image height. 1. Focus Ring Zoom Lever Note: The projector will focus at a distance of the projector. 2. Tilt-Adjustment Feet Tilt-Adjustment Ring Zoom and focus ‡‡ To adjust the image size, turn the ...zoom lever clockwise or counterclockwise to raise or lower the projector. Locate the adjustable foot you wish to adjust on the underside of 1m to 10m. 16 English SETUP AND INSTALLATION Adjusting the projector image Image height The projector is sharp and legible.
HD243X User Manuel
Page 18
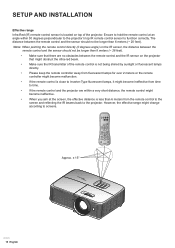
...the screen, the effective distance is less than 6 meters from the remote control to the screen and reflecting the IR beams back to the projector. The distance between the remote control and the sensor should not be longer than 8 meters (~ 26 feet). ‡‡ Make sure ...fluorescent lamps directly. ‡‡ Please keep the remote controller away from time to time. ‡‡ If the remote control and the projector are within a very short distance, the remote control might change according to screens. However, the effective range might become ineffective from fluorescent lamps...
...the screen, the effective distance is less than 6 meters from the remote control to the screen and reflecting the IR beams back to the projector. The distance between the remote control and the sensor should not be longer than 8 meters (~ 26 feet). ‡‡ Make sure ...fluorescent lamps directly. ‡‡ Please keep the remote controller away from time to time. ‡‡ If the remote control and the projector are within a very short distance, the remote control might change according to screens. However, the effective range might become ineffective from fluorescent lamps...
HD243X User Manuel
Page 19
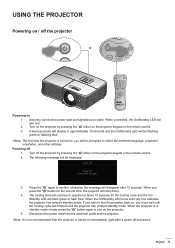
..." button for the cooling cycle and the On/ Standby LED will disappear after a power off 1. Press the " " again to turn the projector back on the projector keypad or the remote control. 3. Press power key again. 3. English 19 When you wish to confirm, otherwise the message will flash green or... flash blue. Securely connect the power lead and signal/source cable. VGA1 VGA2 Video YPbPr 2. Note: The first time the projector is in approximately 10 seconds and the On/Standby LED will be flashing green or flashing blue. The following message will be displayed: ...
..." button for the cooling cycle and the On/ Standby LED will disappear after a power off 1. Press the " " again to turn the projector back on the projector keypad or the remote control. 3. Press power key again. 3. English 19 When you wish to confirm, otherwise the message will flash green or... flash blue. Securely connect the power lead and signal/source cable. VGA1 VGA2 Video YPbPr 2. Note: The first time the projector is in approximately 10 seconds and the On/Standby LED will be flashing green or flashing blue. The following message will be displayed: ...
HD243X User Manuel
Page 20
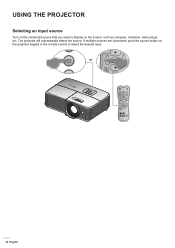
...Mute DB 3D Sleep Timer Volume Source Re-sync Menu Volume HDMI1 HDMI2 VGA1 VGA2 Video YPbPr 20 English The projector will automatically detect the source. ON OFF USING THE PROJECTOR User1 User2 Contrast Brightness User3 Mode Selecting an input source Aspect ratio Keystone Turn on the screen, such as... DcBomput3eDr, notebook, video player, etc. If multiple sourceMsuatere conneScleteep Tdim,erpush the source button on the projector keypad or the remote control to display on the connected source that you want to select the desired input.
...Mute DB 3D Sleep Timer Volume Source Re-sync Menu Volume HDMI1 HDMI2 VGA1 VGA2 Video YPbPr 20 English The projector will automatically detect the source. ON OFF USING THE PROJECTOR User1 User2 Contrast Brightness User3 Mode Selecting an input source Aspect ratio Keystone Turn on the screen, such as... DcBomput3eDr, notebook, video player, etc. If multiple sourceMsuatere conneScleteep Tdim,erpush the source button on the projector keypad or the remote control to display on the connected source that you want to select the desired input.

HD243X User Manuel
Page 21
.... Select the next item to select any item in the main menu. Adjust the settings by using keys. 4. The OSD menu will close and the projector will return to the main menu. 6. Sub Menu Settings Display Main Menu Image Settings Enhanced Gaming 3D Aspect Ratio Edge Mask Zoom Image Shift Keystone.... Use keys to select the desired item in the sub menu and adjust as described above. 5. Press the or to enter sub menu. 3. USING THE PROJECTOR Menu navigation and features The projector has multilingual on-screen display menus that allow you to view further settings. The...
.... Select the next item to select any item in the main menu. Adjust the settings by using keys. 4. The OSD menu will close and the projector will return to the main menu. 6. Sub Menu Settings Display Main Menu Image Settings Enhanced Gaming 3D Aspect Ratio Edge Mask Zoom Image Shift Keystone.... Use keys to select the desired item in the sub menu and adjust as described above. 5. Press the or to enter sub menu. 3. USING THE PROJECTOR Menu navigation and features The projector has multilingual on-screen display menus that allow you to view further settings. The...

HD243X User Manuel
Page 22
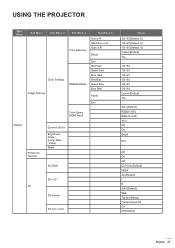
USING THE PROJECTOR OSD Menu tree Main Menu Sub Menu Sub Menu 2 Sub Menu 3 Sub Menu 4 Display Mode [Video] Wall Color Display Brightness Contrast Sharpness Image Settings Color Tint Gamma Film Video Graphics Standard(2.2) 1.8 2.0 2.4 BrilliantColorTM Color Temperature [Video mode] Color Settings Color Matching Color Values Cinema Vivid Game Reference Bright USER 3D ISF Day ISF Night ISF 3D Off [Default] Blackboard Light Yellow Light Green Light Blue Pink Gray -50~50 -50~50 1~15 -50~50 -50~50 1~10 Warm Standard Cool Cold R [Default] G B C Y M W 22 English
USING THE PROJECTOR OSD Menu tree Main Menu Sub Menu Sub Menu 2 Sub Menu 3 Sub Menu 4 Display Mode [Video] Wall Color Display Brightness Contrast Sharpness Image Settings Color Tint Gamma Film Video Graphics Standard(2.2) 1.8 2.0 2.4 BrilliantColorTM Color Temperature [Video mode] Color Settings Color Matching Color Values Cinema Vivid Game Reference Bright USER 3D ISF Day ISF Night ISF 3D Off [Default] Blackboard Light Yellow Light Green Light Blue Pink Gray -50~50 -50~50 1~15 -50~50 -50~50 1~10 Warm Standard Cool Cold R [Default] G B C Y M W 22 English
HD243X User Manuel
Page 23
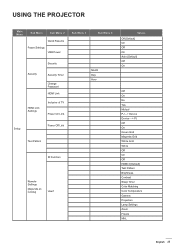
USING THE PROJECTOR Main Menu Sub Menu Sub Menu 2 Sub Menu 3 Color Matching Sub Menu 4 Hue or R Saturation or G Gain or B Reset Color Settings Image Settings RGB Gain/...
USING THE PROJECTOR Main Menu Sub Menu Sub Menu 2 Sub Menu 3 Color Matching Sub Menu 4 Hue or R Saturation or G Gain or B Reset Color Settings Image Settings RGB Gain/...

HD243X User Manuel
Page 24
USING THE PROJECTOR Main Menu Sub Menu Sub Menu 2 Sub Menu 3 Aspect Ratio Display Edge Mask Zoom H Image shift V Keystone Audio Mute Volume Projection Lamp Settings Lamp Reminder ...
USING THE PROJECTOR Main Menu Sub Menu Sub Menu 2 Sub Menu 3 Aspect Ratio Display Edge Mask Zoom H Image shift V Keystone Audio Mute Volume Projection Lamp Settings Lamp Reminder ...
HD243X User Manuel
Page 25
USING THE PROJECTOR Main Menu Sub Menu Sub Menu 2 Quick Resume Power Settings USB Power Sub Menu 3 Sub Menu 4 Security Security HDMI Link Settings Security Timer Change Password ...
USING THE PROJECTOR Main Menu Sub Menu Sub Menu 2 Quick Resume Power Settings USB Power Sub Menu 3 Sub Menu 4 Security Security HDMI Link Settings Security Timer Change Password ...


