

User Manual
Page 1
...Remote Control...11 Installation 12 Connecting the Projector 12 Powering On/Off the Projector 13 Powering On the Projector 13 Powering Off the projector 14 Warning Indicator 14 Adjusting the Projected Image 15 Adjusting the Projector's Height 15 Adjusting the Projector's Zoom / Focus 16 Adjusting Projected...21 Image ...22 Display ...26 Setup...29 System ...32 Appendices 36 Troubleshooting 36 Image Problems 36 Intermission Problems 38 Projector Status Indication 39 Remote Control Problems 40 Replacing the Lamp 41 Compatibility Modes 42 RS232 Commands and Protocol Function List ...
...Remote Control...11 Installation 12 Connecting the Projector 12 Powering On/Off the Projector 13 Powering On the Projector 13 Powering Off the projector 14 Warning Indicator 14 Adjusting the Projected Image 15 Adjusting the Projector's Height 15 Adjusting the Projector's Zoom / Focus 16 Adjusting Projected...21 Image ...22 Display ...26 Setup...29 System ...32 Appendices 36 Troubleshooting 36 Image Problems 36 Intermission Problems 38 Projector Status Indication 39 Remote Control Problems 40 Replacing the Lamp 41 Compatibility Modes 42 RS232 Commands and Protocol Function List ...

User Manual
Page 2
... Class B digital apparatus meets all requirements of fire or electric shock, do not place the projector on a bed, sofa, carpet, or similar surface that may expose you . 8. Please call Optoma to be of sufficient magnitude to rain or moisture, does not oper- Servicing is damaged.... ▀■ Liquid has been spilled or objects have fallen into the apparatus. ▀■ The projector has been exposed to constitute a risk of ...
... Class B digital apparatus meets all requirements of fire or electric shock, do not place the projector on a bed, sofa, carpet, or similar surface that may expose you . 8. Please call Optoma to be of sufficient magnitude to rain or moisture, does not oper- Servicing is damaged.... ▀■ Liquid has been spilled or objects have fallen into the apparatus. ▀■ The projector has been exposed to constitute a risk of ...

User Manual
Page 3
...|Lamp Setting" menu after replacing the lamp module (refer to change the lamp as soon as recommended in operation. Do not use lens cap when projector is approaching to the end of its life time, the message "Replacement suggested" will detect the life of fire or electric shock, do ...not open or disassemble the projector as this projector to cool down , and follow all warnings, precautions and maintenance as possible. 3 turn back on . Do not look into the...
...|Lamp Setting" menu after replacing the lamp module (refer to change the lamp as soon as recommended in operation. Do not use lens cap when projector is approaching to the end of its life time, the message "Replacement suggested" will detect the life of fire or electric shock, do ...not open or disassemble the projector as this projector to cool down , and follow all warnings, precautions and maintenance as possible. 3 turn back on . Do not look into the...

User Manual
Page 5
...students when they do not also have to the audience; this is by ceiling-mounting rather than floor or table-mounting the projector. ▀■ When projector is recommended to avoid the need for the user to enter the beam. ▀■ Ensure that , when presenters look at ...all times. ▀■ Minimize standing facing into the projector beam at the audience, they are located out of the line of sight from the screen to stare at the projector lamp. English Usage Notice Eye Safety Warnings ▀■ Avoid staring directly into the ...
...students when they do not also have to the audience; this is by ceiling-mounting rather than floor or table-mounting the projector. ▀■ When projector is recommended to avoid the need for the user to enter the beam. ▀■ Ensure that , when presenters look at ...all times. ▀■ Minimize standing facing into the projector beam at the audience, they are located out of the line of sight from the screen to stare at the projector lamp. English Usage Notice Eye Safety Warnings ▀■ Avoid staring directly into the ...

User Manual
Page 6
Introduction Product Features This product is a 1080p single chip 0.95" DLP® projector. ing and 1080i High Definition de-interlacing ▀■ Video Compatibility: ▪ 480i-NTSC, NTSC4.43 ▪ 576i-PAL/PAL-M/PAL-N/SECAM &#... back light ▀■ Advanced vertical digital keystone correction and high quality full screen image re-scaling ▀■ User friendly control panel ▀■ Optoma's patent-pending O2AirTM Photo Catalyst air purification technology ▀■ HDMI & DVI support HDCP function. ▀■ HDMI(support HDMI 1.3) x2, DVI-I ...
Introduction Product Features This product is a 1080p single chip 0.95" DLP® projector. ing and 1080i High Definition de-interlacing ▀■ Video Compatibility: ▪ 480i-NTSC, NTSC4.43 ▪ 576i-PAL/PAL-M/PAL-N/SECAM &#... back light ▀■ Advanced vertical digital keystone correction and high quality full screen image re-scaling ▀■ User friendly control panel ▀■ Optoma's patent-pending O2AirTM Photo Catalyst air purification technology ▀■ HDMI & DVI support HDCP function. ▀■ HDMI(support HDMI 1.3) x2, DVI-I ...

User Manual
Page 7
... Card DVI to the difference in European version only 2 x AA Batteries Noottee Due to VGA Adaptor VGA Cable 1.8m 7 English Projector with all the items shown below. Introduction Package Overview This projector comes with lens cap Power Cord 1.8m RS232 Cable 1.8m RCA Component Cable IR Remote Controller for YPbPr 2.0m Available...
... Card DVI to the difference in European version only 2 x AA Batteries Noottee Due to VGA Adaptor VGA Cable 1.8m 7 English Projector with all the items shown below. Introduction Package Overview This projector comes with lens cap Power Cord 1.8m RS232 Cable 1.8m RCA Component Cable IR Remote Controller for YPbPr 2.0m Available...

User Manual
Page 12
Installation Connecting the Projector SCART DVD Player 7 RGB DVI +12V Relay Output 8 9 3 2 1 Video Output 4 56 10 S-Video Output DVD Player, Set-top Box, HDTV receiver Noottee Due to the ...
Installation Connecting the Projector SCART DVD Player 7 RGB DVI +12V Relay Output 8 9 3 2 1 Video Output 4 56 10 S-Video Output DVD Player, Set-top Box, HDTV receiver Noottee Due to the ...

User Manual
Page 13
... detect your source automatically within "Setup" menu, check that the power cord and signal cable are securely connected. The first time you use the projector, you connected multiple sources at the same time, press the "Source" button on the control panel or direct source key on your preferred language from... quick menu after the startup screen display. 4. The startup screen will turn blue. Turn on the lamp by pressing " " button on the projector first and then select the signal sources. 1 2 13 English Installation Powering On/Off the...
... detect your source automatically within "Setup" menu, check that the power cord and signal cable are securely connected. The first time you use the projector, you connected multiple sources at the same time, press the "Source" button on the control panel or direct source key on your preferred language from... quick menu after the startup screen display. 4. The startup screen will turn blue. Turn on the lamp by pressing " " button on the projector first and then select the signal sources. 1 2 13 English Installation Powering On/Off the...

User Manual
Page 14
... flashes red, it indicates the fan has failed. Please contact your local reseller or service centre. When the lights solid red, the projector has entered standby mode. Press the " " button to turn off procedure. Press the " " button again to turn on , you should...the Power LED will flash blue. The cooling fans continue to restart the projector. 3. Installation Powering Off the Projector 1. Do not turn the projector back on the projector immediately following a power off the projector lamp, you will disappear after it has cooled down . See page 47. 14...
... flashes red, it indicates the fan has failed. Please contact your local reseller or service centre. When the lights solid red, the projector has entered standby mode. Press the " " button to turn off procedure. Press the " " button again to turn on , you should...the Power LED will flash blue. The cooling fans continue to restart the projector. 3. Installation Powering Off the Projector 1. Do not turn the projector back on the projector immediately following a power off the projector lamp, you will disappear after it has cooled down . See page 47. 14...

User Manual
Page 15
...;. 2. Use screw in feet to fine-tune the display angle. Press the elevator button. 2. English Installation Adjusting the Projected Image Adjusting the Projector's Height The projector is equipped with elevator feet for adjusting the image height. Elevator Button 1 2 Elevator Feet 3 Tilt-Adjustment Feet 15 To lower the image: 1. Use screw...
...;. 2. Use screw in feet to fine-tune the display angle. Press the elevator button. 2. English Installation Adjusting the Projected Image Adjusting the Projector's Height The projector is equipped with elevator feet for adjusting the image height. Elevator Button 1 2 Elevator Feet 3 Tilt-Adjustment Feet 15 To lower the image: 1. Use screw...
User Manual
Page 16
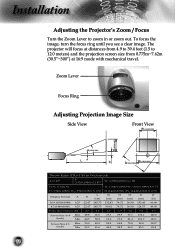
Installation Adjusting the Projector's Zoom / Focus Turn the Zoom Lever to 12.0 meters) and the projection screen size from 0.775m~7.62m (30.5"~300") at distances from 4.9 to 39.4 feet (1.5 ...(A) H (1920x1080)=W0 (1920x1080) X 0.56 Display Format A L B (cm) W1 (1440x1080)=W0 (1920x1080) X 0.75 H (1440x1080)=W1 (1440x1080) X 0.75 W H H' D D' (cm) (cm) (cm) (cm) (in or zoom out. The projector will focus at 16:9 mode with mechanical travel. To focus the image, turn the focus ring until you see a clear image.
Installation Adjusting the Projector's Zoom / Focus Turn the Zoom Lever to 12.0 meters) and the projection screen size from 0.775m~7.62m (30.5"~300") at distances from 4.9 to 39.4 feet (1.5 ...(A) H (1920x1080)=W0 (1920x1080) X 0.56 Display Format A L B (cm) W1 (1440x1080)=W0 (1920x1080) X 0.75 H (1440x1080)=W1 (1440x1080) X 0.75 W H H' D D' (cm) (cm) (cm) (cm) (in or zoom out. The projector will focus at 16:9 mode with mechanical travel. To focus the image, turn the focus ring until you see a clear image.
User Manual
Page 17
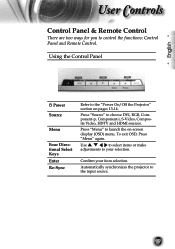
Using the Control Panel Power Source Menu Four Directional Select Keys Enter Re-Sync Refer to the input source. 17 Automatically synchronizes the projector to the "Power On/Off the Projector" section on -screen display (OSD) menu. English User Controls Control Panel & Remote Control There are two ways for you to launch the...
Using the Control Panel Power Source Menu Four Directional Select Keys Enter Re-Sync Refer to the input source. 17 Automatically synchronizes the projector to the "Power On/Off the Projector" section on -screen display (OSD) menu. English User Controls Control Panel & Remote Control There are two ways for you to launch the...

User Manual
Page 18
... 32-33) Gamma There are 10 preset gamma curves. Image AI Switch the Image AI function ON/OFF. (refer to the "Power On/Off the Projector" section on pages 13-14. Edge Mask Choose "On" to mask off a few pixels on -screen display (OSD) menu. Mode Select the display mode from...
... 32-33) Gamma There are 10 preset gamma curves. Image AI Switch the Image AI function ON/OFF. (refer to the "Power On/Off the Projector" section on pages 13-14. Edge Mask Choose "On" to mask off a few pixels on -screen display (OSD) menu. Mode Select the display mode from...

User Manual
Page 20
... automatically detect the source. Main Menu Sub Menu Setting 20 The projector will automatically save the new settings. To open the OSD menu, press "Menu" on a particular page, press or "Enter" key to enter sub menu. 3. How ..." again. Select the next item to select any item in the sub menu and adjust as described above. 5. User Controls On-screen Display Menus The Projector has multilingual On-screen Display menus that allow you to select the desired item and adjust the settings key. 4.
... automatically detect the source. Main Menu Sub Menu Setting 20 The projector will automatically save the new settings. To open the OSD menu, press "Menu" on a particular page, press or "Enter" key to enter sub menu. 3. How ..." again. Select the next item to select any item in the sub menu and adjust as described above. 5. User Controls On-screen Display Menus The Projector has multilingual On-screen Display menus that allow you to select the desired item and adjust the settings key. 4.

User Manual
Page 29
...preferred language. Press or into the next menu as below and then use the or key to select. Input Source Enable input sources. The projector will search for other signals if the current input signal is turned on, it will not search inputs that are de-selected. When this ...function is turned off, the projector will search for a specified connection port. 29 Source Lock When this function is lost. Press "Select (Enter)" to finalize the selection...
...preferred language. Press or into the next menu as below and then use the or key to select. Input Source Enable input sources. The projector will search for other signals if the current input signal is turned on, it will not search inputs that are de-selected. When this ...function is turned off, the projector will search for a specified connection port. 29 Source Lock When this function is lost. Press "Select (Enter)" to finalize the selection...

User Manual
Page 30
... signals. Saturation : Adjusts a video image from black and white to match the fre- Auto Power Off Sets the interval of power-off of the projector. Press the to turn on High Altitude mode. Signal Phase: Changes the display data frequency to fully saturated color. User Controls High Altitude Choose...
... signals. Saturation : Adjusts a video image from black and white to match the fre- Auto Power Off Sets the interval of power-off of the projector. Press the to turn on High Altitude mode. Signal Phase: Changes the display data frequency to fully saturated color. User Controls High Altitude Choose...

User Manual
Page 32
... can project from seeing a movie dynamically 32 ing sure your greatest pleasure from behind a translucent screen. Front-Ceiling When you select this function, the projector turns the image upside down for ceiling-mounted projection. Rear-Ceiling When you select this function, the...
... can project from seeing a movie dynamically 32 ing sure your greatest pleasure from behind a translucent screen. Front-Ceiling When you select this function, the projector turns the image upside down for ceiling-mounted projection. Rear-Ceiling When you select this function, the...

User Manual
Page 34
User Controls 12V Trigger STD: When "STD" is "4:3", "16:9", or "Native", 12V trigger port won't send 12V, it will be 0V. 34 Format change to "LBX",12V trigger port will send 12V when projector turn on. LBX: When 12V trigger set as "LBX" -- 1. Format is selected, 12V Trigger will send 12V. 2.
User Controls 12V Trigger STD: When "STD" is "4:3", "16:9", or "Native", 12V trigger port won't send 12V, it will be 0V. 34 Format change to "LBX",12V trigger port will send 12V when projector turn on. LBX: When 12V trigger set as "LBX" -- 1. Format is selected, 12V Trigger will send 12V. 2.

User Manual
Page 36
...(*) 4. Partial, scrolling or incorrectly displayed image Press "Re-Sync" on the "Advanced Properties" button. If a problem persists, please contact your projector, please refer to UXGA (1600 x 1200) resolution. (*) 36 From the "My Computer" icon, open the "Control Panel" folder, and double click the...installed. Appendices Troubleshooting If you experience a problem with your local reseller or service center. (See page 47 for this projector. 2. Verify that your display resolution setting is recommended for details) Image Problems No image appears on-screen Ensure...
...(*) 4. Partial, scrolling or incorrectly displayed image Press "Re-Sync" on the "Advanced Properties" button. If a problem persists, please contact your projector, please refer to UXGA (1600 x 1200) resolution. (*) 36 From the "My Computer" icon, open the "Control Panel" folder, and double click the...installed. Appendices Troubleshooting If you experience a problem with your local reseller or service center. (See page 47 for this projector. 2. Verify that your display resolution setting is recommended for details) Image Problems No image appears on-screen Ensure...

User Manual
Page 37
...64257;gure the display mode of the monitor display is lower (*) The resolution: than or equal to correct it compatible with the projector. 37 English Appendices 6. Verify that the resolution setting of your computer's manual for more information. Change the monitor color... setting on "Show all equipment including the projector. Each has a different way to adjust resolution of the Notebook or PowerBook computer is in use. Next, select "Standard monitor types"...
...64257;gure the display mode of the monitor display is lower (*) The resolution: than or equal to correct it compatible with the projector. 37 English Appendices 6. Verify that the resolution setting of your computer's manual for more information. Change the monitor color... setting on "Show all equipment including the projector. Each has a different way to adjust resolution of the Notebook or PowerBook computer is in use. Next, select "Standard monitor types"...


