User's Manual
Page 1
... DISPLAY | 3D 31 SETUP 32 SETUP | Signal (RGB 34 SETUP | Security 35 SETUP | Advanced 37 OPTIONS 38 OPTIONS | Advanced 39 OPTIONS | Lamp Settings 40 Appendices 41 Troubleshooting 41 Replacing the lamp 46 Compatibility Modes 48 Computer Compatibility 48 Video Compatibility 50 RS232 Commands and Protocol Function List 51 RS232 Pin Assignments 51 RS232...
... DISPLAY | 3D 31 SETUP 32 SETUP | Signal (RGB 34 SETUP | Security 35 SETUP | Advanced 37 OPTIONS 38 OPTIONS | Advanced 39 OPTIONS | Lamp Settings 40 Appendices 41 Troubleshooting 41 Replacing the lamp 46 Compatibility Modes 48 Computer Compatibility 48 Video Compatibility 50 RS232 Commands and Protocol Function List 51 RS232 Pin Assignments 51 RS232...
User's Manual
Page 3
...; Warning- jector will show on until the ▀■ Warning- To replace the lamp, follow all warnings, precautions and maintenance as possible. the Lamp" section on -screen display "OPTIONS | Lamp Settings" menu after replacing the lamp module (refer to change the lamp as soon under "Replacing as recommended in operation. Follow instructions as this projector to rain or...
...; Warning- jector will show on until the ▀■ Warning- To replace the lamp, follow all warnings, precautions and maintenance as possible. the Lamp" section on -screen display "OPTIONS | Lamp Settings" menu after replacing the lamp module (refer to change the lamp as soon under "Replacing as recommended in operation. Follow instructions as this projector to rain or...
User's Manual
Page 40
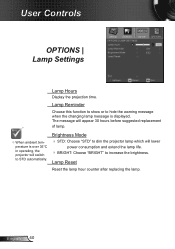
.... The message will appear 30 hours before suggested replacement of lamp. When ambient temperature is displayed. Brightness Mode STD: Choose "STD" to dim the projector lamp which will switch to increase the brightness. Lamp Reset Reset the lamp hour counter after replacing the lamp. English 40 Lamp Reminder Choose this function to show or to hide...
.... The message will appear 30 hours before suggested replacement of lamp. When ambient temperature is displayed. Brightness Mode STD: Choose "STD" to dim the projector lamp which will switch to increase the brightness. Lamp Reset Reset the lamp hour counter after replacing the lamp. English 40 Lamp Reminder Choose this function to show or to hide...
User's Manual
Page 41
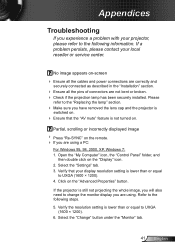
Please refer to the "Replacing the lamp" section. Make sure you have removed the lens cap and the projector is switched on -screen Ensure all the cables and power connections ... If a problem persists, please contact your projector, please refer to change the monitor display you are not bent or broken. Check if the projection lamp has been securely installed. Refer to UXGA (1600 × 1200). 6. Select the "Settings" tab. 3. Appendices Troubleshooting If you experience a problem with your local reseller or...
Please refer to the "Replacing the lamp" section. Make sure you have removed the lens cap and the projector is switched on -screen Ensure all the cables and power connections ... If a problem persists, please contact your projector, please refer to change the monitor display you are not bent or broken. Check if the projection lamp has been securely installed. Refer to UXGA (1600 × 1200). 6. Select the "Settings" tab. 3. Appendices Troubleshooting If you experience a problem with your local reseller or...

User's Manual
Page 44
...; Power LED be ON when OSD appears, be OFF when OSD disappears. LED lighting message Message Standby State (Input power cord) Power on until the lamp module has been replaced. Appendices The projector stops responding to all controls If possible, turn on (Warming) Power LED (Green/Amber) Amber Flashing Green... least 60 seconds before reconnecting power. Check that "Keypad Lock" is not activated by trying to control the projector with the remote control. To replace the lamp, follow the procedures in the "Replacing the Lamp" section on pages 46-47. English 44
...; Power LED be ON when OSD appears, be OFF when OSD disappears. LED lighting message Message Standby State (Input power cord) Power on until the lamp module has been replaced. Appendices The projector stops responding to all controls If possible, turn on (Warming) Power LED (Green/Amber) Amber Flashing Green... least 60 seconds before reconnecting power. Check that "Keypad Lock" is not activated by trying to control the projector with the remote control. To replace the lamp, follow the procedures in the "Replacing the Lamp" section on pages 46-47. English 44
User's Manual
Page 45
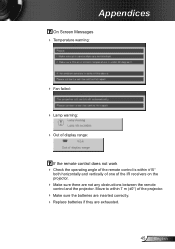
... of the projector. Make sure the batteries are inserted correctly. Replace batteries if they are not any obstructions between the remote control and the projector. Appendices On Screen Messages Temperature warning: Fan failed: Lamp warning: Out of display range: If the remote control does not work...
... of the projector. Make sure the batteries are inserted correctly. Replace batteries if they are not any obstructions between the remote control and the projector. Appendices On Screen Messages Temperature warning: Fan failed: Lamp warning: Out of display range: If the remote control does not work...

User's Manual
Page 46
... safety glasses if changing the bulb when ceiling mounted. Make sure the projector has been cooled down before changing the lamp. It is dropped. Appendices Replacing the lamp The projector automatically detects the lamp life. "Caution must be hot! When you will receive a warning message. Allow it is recommended to prevent any loose parts...
... safety glasses if changing the bulb when ceiling mounted. Make sure the projector has been cooled down before changing the lamp. It is dropped. Appendices Replacing the lamp The projector automatically detects the lamp life. "Caution must be hot! When you will receive a warning message. Allow it is recommended to prevent any loose parts...

User's Manual
Page 47
... the cover. 1 5. Use a dry cloth to shatter. Disconnect the power cord. 4. Appendices 1 2 3 4 Lamp Replacement Procedure: 1. Lift up and remove the cover. 2 6. The screws on the lamp cover and the lamp cannot be removed. The projector cannot be turned on if the lamp cover has not been placed back on the projector and use...
... the cover. 1 5. Use a dry cloth to shatter. Disconnect the power cord. 4. Appendices 1 2 3 4 Lamp Replacement Procedure: 1. Lift up and remove the cover. 2 6. The screws on the lamp cover and the lamp cannot be removed. The projector cannot be turned on if the lamp cover has not been placed back on the projector and use...

