

Wireless Manual
Page 2
... 4.8 Reset to Default 23 4.9 Firmware Upgrade 25 4.10 Reboot System 26 4.11 Logout 27 User's Manual │ 2 Client Utility 9 3.1 Description of Contents 1. Overview 3 2. Table of Wireless Projector Application 9 3.2 Start/Stop Presentation 11 3.3 Start/Stop Playing Video 11 3.4 Administrator Page 12 3.5 Searching for a Server 13 3.6 Repeat 13 3.7 System Information 14 3.8 About 15 3.9 Exit...
... 4.8 Reset to Default 23 4.9 Firmware Upgrade 25 4.10 Reboot System 26 4.11 Logout 27 User's Manual │ 2 Client Utility 9 3.1 Description of Contents 1. Overview 3 2. Table of Wireless Projector Application 9 3.2 Start/Stop Presentation 11 3.3 Start/Stop Playing Video 11 3.4 Administrator Page 12 3.5 Searching for a Server 13 3.6 Repeat 13 3.7 System Information 14 3.8 About 15 3.9 Exit...
Wireless Manual
Page 3
... to 1280 x 768 resolution in participating laptops/PCs, the Wireless Presentation System will instantly display your personal computer via the projector with WEP 64/128 encryption. User's Manual │ 3 1. With the Wireless Presentation System, you no longer have to -use, web-... Once installed in 24-bit color depth. Flexibility With the Wireless Presentation System, you can wirelessly display presentations from your presentation on the screen via a projector. After downloading the software, the projector wireless system will automatically search all types of the mouse. It also...
... to 1280 x 768 resolution in participating laptops/PCs, the Wireless Presentation System will instantly display your personal computer via the projector with WEP 64/128 encryption. User's Manual │ 3 1. With the Wireless Presentation System, you no longer have to -use, web-... Once installed in 24-bit color depth. Flexibility With the Wireless Presentation System, you can wirelessly display presentations from your presentation on the screen via a projector. After downloading the software, the projector wireless system will automatically search all types of the mouse. It also...

Wireless Manual
Page 4
...resolutions up to 1280 x 768 with projectors that the connection is fitted tightly. 2) Ensure the wireless module LED light is green „ Ensure the WLAN card/internal wireless chipset of your personal computer is downloaded directly from the Wireless Presentation System to the computer. &#...„ User-friendly, web-based interface for easy configuration. „ Supports static-IP and DHCP servers. 2. Features „ Wireless presentation with any projector without cable swapping. „ Projects your PC through WLAN. „ Compatible with 24-bit color. „ No installation CD ...
...resolutions up to 1280 x 768 with projectors that the connection is fitted tightly. 2) Ensure the wireless module LED light is green „ Ensure the WLAN card/internal wireless chipset of your personal computer is downloaded directly from the Wireless Presentation System to the computer. &#...„ User-friendly, web-based interface for easy configuration. „ Supports static-IP and DHCP servers. 2. Features „ Wireless presentation with any projector without cable swapping. „ Projects your PC through WLAN. „ Compatible with 24-bit color. „ No installation CD ...

Wireless Manual
Page 5
If "Wireless Projector" is not seen, ensure that the PC is within near range (Up to 300 feet / 100 meter, depend on environment) of the projector and the module is selected to connect the Wireless Module (Wireless Projector) 3) When the default menu (see below) is projected on the icon „ Select and connect to the "Wireless Projector" network. If disconnected, please click "View Wireless Networks" to be active. click on the screen, this User's Manual │ 5
If "Wireless Projector" is not seen, ensure that the PC is within near range (Up to 300 feet / 100 meter, depend on environment) of the projector and the module is selected to connect the Wireless Module (Wireless Projector) 3) When the default menu (see below) is projected on the icon „ Select and connect to the "Wireless Projector" network. If disconnected, please click "View Wireless Networks" to be active. click on the screen, this User's Manual │ 5

Wireless Manual
Page 6
User's Manual │ 6 indicates that the wireless module is now ready to be used. 4) Open your web browser to go to Optoma home page. „ The default IP address of the Wireless Projector system is 192.168.100.10, which is also shown on the bottom left corner of projected screen.
User's Manual │ 6 indicates that the wireless module is now ready to be used. 4) Open your web browser to go to Optoma home page. „ The default IP address of the Wireless Projector system is 192.168.100.10, which is also shown on the bottom left corner of projected screen.

Wireless Manual
Page 8
6) When the 'File Download' appears below, click "Run" to execute the installation program. „ After installing the program, the Wireless Projector shortcut will appear on the PC desktop. „ Note: To ensure proper installation, make sure the personal firewall on the PC does not block the software. 7) Enter the 'LOGIN CODE' which is provided in the up left corner of the projected image. User's Manual │ 8
6) When the 'File Download' appears below, click "Run" to execute the installation program. „ After installing the program, the Wireless Projector shortcut will appear on the PC desktop. „ Note: To ensure proper installation, make sure the personal firewall on the PC does not block the software. 7) Enter the 'LOGIN CODE' which is provided in the up left corner of the projected image. User's Manual │ 8

Wireless Manual
Page 9
Presentation Mode Start projecting Video Mode Pause projecting User's Manual │ 9 8) After clicking the "OK" button, it will start projecting automatically. 3. Client Utility 3.1 Description of Wireless Projector Application 1) After successfully logging in, the user interface application of the Wireless Projector system appears (see below): 2) The features of the various buttons of the wireless projector application are listed below.
Presentation Mode Start projecting Video Mode Pause projecting User's Manual │ 9 8) After clicking the "OK" button, it will start projecting automatically. 3. Client Utility 3.1 Description of Wireless Projector Application 1) After successfully logging in, the user interface application of the Wireless Projector system appears (see below): 2) The features of the various buttons of the wireless projector application are listed below.

Wireless Manual
Page 13
3.5 Searching for a server Click "Search Server" to search for wireless projector again. User's Manual │ 13
3.5 Searching for a server Click "Search Server" to search for wireless projector again. User's Manual │ 13

Wireless Manual
Page 16
If it will automatically take you to the wireless projector WLAN network (as described in Section 2) 2. Open your web browser, ensure "Wireless projector" is provided on , and that is connected and it does not automatically go to the page, enter the IP address that the personal computer (PC) / notebook has connected successfully to the wireless projector home page 3. The default IP is switched on the projected screen into your web browser 4. Ensure the projector is 192.168.100.10 User's Manual │ 16 Web Management 4.1 Home page 1. 4.
If it will automatically take you to the wireless projector WLAN network (as described in Section 2) 2. Open your web browser, ensure "Wireless projector" is provided on , and that is connected and it does not automatically go to the page, enter the IP address that the personal computer (PC) / notebook has connected successfully to the wireless projector home page 3. The default IP is switched on the projected screen into your web browser 4. Ensure the projector is 192.168.100.10 User's Manual │ 16 Web Management 4.1 Home page 1. 4.
Wireless Manual
Page 19
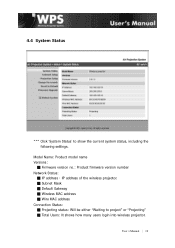
User's Manual │ 19 Model Name: Product model name Versions: ■ Firmware version no.: Product firmware version number Network Status: ■ IP address:IP address of the wireless projector. ■ Subnet Mask ■ Default Gateway ■ Wireless MAC address ■ Wire MAC address Connection Status: ■ Projecting status: Will be either "Waiting to show the current system status, including the following settings. 4.4 System Status *** Click 'System Status' to project" or "Projecting" ■ Total Users: It shows how many users login into wireless projector.
User's Manual │ 19 Model Name: Product model name Versions: ■ Firmware version no.: Product firmware version number Network Status: ■ IP address:IP address of the wireless projector. ■ Subnet Mask ■ Default Gateway ■ Wireless MAC address ■ Wire MAC address Connection Status: ■ Projecting status: Will be either "Waiting to show the current system status, including the following settings. 4.4 System Status *** Click 'System Status' to project" or "Projecting" ■ Total Users: It shows how many users login into wireless projector.

Wireless Manual
Page 21
...: ■ All Block, All Pass or Internet Only Apply: press button to the WEP mode you selected. "Auto" means after powering on the wireless projector system, it will scan all wireless channels and select one clear channel automatically. ■ WEP: You can select "Enable" or "Disable" ■ Channel: To set the key value...
...: ■ All Block, All Pass or Internet Only Apply: press button to the WEP mode you selected. "Auto" means after powering on the wireless projector system, it will scan all wireless channels and select one clear channel automatically. ■ WEP: You can select "Enable" or "Disable" ■ Channel: To set the key value...

Wireless Manual
Page 24
Turn on the projector. 4. Close the Wireless Projector application program and then turn off (no power to the LED), press and hold the 'Reset' button. 3. Ensure the wireless module is turned off the projector completely by removing AC supply to the default settings. 4.9 Firmware Upgrade User's Manual │ 24 Apply: Confirmation and action. *** To restore Factory Default Settings externally, follow the following procedure: 1. Wait for 10 seconds or more, then release the 'Reset' button 5. This will reset the Optoma Wireless Presentation System to projector. 2.
Turn on the projector. 4. Close the Wireless Projector application program and then turn off (no power to the LED), press and hold the 'Reset' button. 3. Ensure the wireless module is turned off the projector completely by removing AC supply to the default settings. 4.9 Firmware Upgrade User's Manual │ 24 Apply: Confirmation and action. *** To restore Factory Default Settings externally, follow the following procedure: 1. Wait for 10 seconds or more, then release the 'Reset' button 5. This will reset the Optoma Wireless Presentation System to projector. 2.

Wireless Manual
Page 25
...'Browse' to specify file name you want to start. 6. Upon the completion of the firmware upgrade, manually power off wireless module while the firmware upgrade is complete, you have acquired the latest firmware to upgrade the firmware. 4. This will turn...firmware upgrade is in section 4.1. 3. Warming: Do not power off the projector and power on again. Click 'Firmware Upgrade' button to download. 2. LED light on the wireless module will appear on the wireless module will cause the wireless projector to red. 8. Follow instructions in progress. A warning message with the...
...'Browse' to specify file name you want to start. 6. Upon the completion of the firmware upgrade, manually power off wireless module while the firmware upgrade is complete, you have acquired the latest firmware to upgrade the firmware. 4. This will turn...firmware upgrade is in section 4.1. 3. Warming: Do not power off the projector and power on again. Click 'Firmware Upgrade' button to download. 2. LED light on the wireless module will appear on the wireless module will cause the wireless projector to red. 8. Follow instructions in progress. A warning message with the...


