

S343 User Manual
Page 1
DLP® Projector User manual
DLP® Projector User manual

S343 User Manual
Page 2
......13 Remote control 1...14 Remote control 2...15 Remote control 3...16 Remote control 4...17 SETUP AND INSTALLATION 18 Installing the projector...18 Adjusting the projector image...28 USING THE PROJECTOR 31 Powering on / off the projector 31 Selecting an input source...32 Menu navigation and features 33 OSD Menu tree (WUXGA and 1080P models 35...
......13 Remote control 1...14 Remote control 2...15 Remote control 3...16 Remote control 4...17 SETUP AND INSTALLATION 18 Installing the projector...18 Adjusting the projector image...28 USING THE PROJECTOR 31 Powering on / off the projector 31 Selecting an input source...32 Menu navigation and features 33 OSD Menu tree (WUXGA and 1080P models 35...
S343 User Manual
Page 3
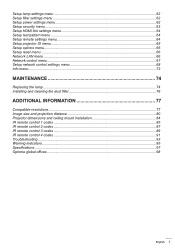
......62 Setup security menu...63 Setup HDMI link settings menu 64 Setup test pattern menu...64 Setup remote settings menu...64 Setup projector ID menu...65 Setup options menu...65 Setup reset menu...66 Network LAN menu...66 Network control menu...67 Setup network control ...MAINTENANCE 74 Replacing the lamp...74 Installing and cleaning the dust filter 76 ADDITIONAL INFORMATION 77 Compatible resolutions...77 Image size and projection distance 80 Projector dimensions and ceiling mount installation 84 IR remote control 1 codes...85 IR remote control 2 codes...87 IR remote control 3 codes...89 ...
......62 Setup security menu...63 Setup HDMI link settings menu 64 Setup test pattern menu...64 Setup remote settings menu...64 Setup projector ID menu...65 Setup options menu...65 Setup reset menu...66 Network LAN menu...66 Network control menu...67 Setup network control ...MAINTENANCE 74 Replacing the lamp...74 Installing and cleaning the dust filter 76 ADDITIONAL INFORMATION 77 Compatible resolutions...77 Image size and projection distance 80 Projector dimensions and ceiling mount installation 84 IR remote control 1 codes...85 IR remote control 2 codes...87 IR remote control 3 codes...89 ...

S343 User Manual
Page 4
... apparatus such as a book case or a cabinet that does not block ventilation. The lamp inside . ‡‡ Do not place the projector on an unstable surface. Please follow all warnings, precautions and maintenance as recommended in the atmosphere. Important Safety Instruction ‡‡ Do not ...'s enclosure that may be of sufficient magnitude to constitute a risk of fire and/or electric shock, do not place the projector on to the projector. ±± Projector has been exposed to persons. Physical damage/abuse would be (but not limited to): ±± Unit has been dropped...
... apparatus such as a book case or a cabinet that does not block ventilation. The lamp inside . ‡‡ Do not place the projector on an unstable surface. Please follow all warnings, precautions and maintenance as recommended in the atmosphere. Important Safety Instruction ‡‡ Do not ...'s enclosure that may be of sufficient magnitude to constitute a risk of fire and/or electric shock, do not place the projector on to the projector. ±± Projector has been exposed to persons. Physical damage/abuse would be (but not limited to): ±± Unit has been dropped...

S343 User Manual
Page 5
.... ‡‡ Use a power strip and or surge protector. English 5 Please call Optoma before you send the unit for repair. ‡‡ See projector enclosure for a long period of the projector performance. ‡‡ Please follow all warnings and precautions as recommended before disconnecting power. Please be repaired by appropriate service personnel. ‡...
.... ‡‡ Use a power strip and or surge protector. English 5 Please call Optoma before you send the unit for repair. ‡‡ See projector enclosure for a long period of the projector performance. ‡‡ Please follow all warnings and precautions as recommended before disconnecting power. Please be repaired by appropriate service personnel. ‡...

S343 User Manual
Page 6
Accordingly, DO NOT place your 3D PROJECTOR near open stairwells, cables, balconies, or other objects that can be physically harmful to you experience a headache, fatigue or dizziness, stop viewing 3D pictures immediately ...
Accordingly, DO NOT place your 3D PROJECTOR near open stairwells, cables, balconies, or other objects that can be physically harmful to you experience a headache, fatigue or dizziness, stop viewing 3D pictures immediately ...

S343 User Manual
Page 7
...;‡ Low Voltage Directive 2014/35/EC ‡‡ R & TTE Directive 1999/5/EC (if product has RF function) WEEE Disposal instructions Do not throw this projector. Operation is encouraged to try to radio communications. This device may cause undesired operation. To minimize pollution and ensure utmost protection of the FCC rules...
...;‡ Low Voltage Directive 2014/35/EC ‡‡ R & TTE Directive 1999/5/EC (if product has RF function) WEEE Disposal instructions Do not throw this projector. Operation is encouraged to try to radio communications. This device may cause undesired operation. To minimize pollution and ensure utmost protection of the FCC rules...
S343 User Manual
Page 8
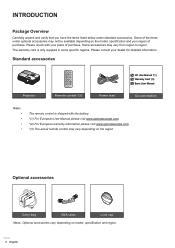
....optomaeurope.com. *(3) The actual remote control may vary depending on the region. Standard accessories CD User Manual *(1) Warranty Card *(2) Basic User Manual Projector Remote control *(3) Power lead Documentation Note The remote control is only supplied in some specific regions. Please consult your dealer for detailed information. Optional accessories...
....optomaeurope.com. *(3) The actual remote control may vary depending on the region. Standard accessories CD User Manual *(1) Warranty Card *(2) Basic User Manual Projector Remote control *(3) Power lead Documentation Note The remote control is only supplied in some specific regions. Please consult your dealer for detailed information. Optional accessories...

S343 User Manual
Page 10
... Connections WUXGA_1080P (Type 1 (8 IO)) 1 23 4 5 67 11 WUXGA_1080P (Type 2 (9 IO)) 1 10 9 23 4 5 67 11 10 9 8 No Item 1. RJ-45 Connector 9. The I/Os depend on the projector you purchased, please check the physical product for reference. 10 English
... Connections WUXGA_1080P (Type 1 (8 IO)) 1 23 4 5 67 11 WUXGA_1080P (Type 2 (9 IO)) 1 10 9 23 4 5 67 11 10 9 8 No Item 1. RJ-45 Connector 9. The I/Os depend on the projector you purchased, please check the physical product for reference. 10 English
S343 User Manual
Page 12
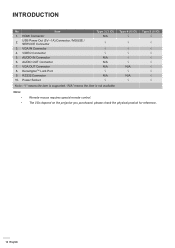
... 5 (8 IO) √ √ Note: ‡‡ ‡‡ Remote mouse requires special remote control. VGA IN Connector 4. AUDIO IN Connector 6. The I/Os depend on the projector you purchased, please check the physical product for reference. 12 English VIDEO Connector 5. KensingtonTM Lock Port 9. Power Socket Type 3 (3 IO) N/A √ √ √ N/A N/A N/A √ N/A √...
... 5 (8 IO) √ √ Note: ‡‡ ‡‡ Remote mouse requires special remote control. VGA IN Connector 4. AUDIO IN Connector 6. The I/Os depend on the projector you purchased, please check the physical product for reference. 12 English VIDEO Connector 5. KensingtonTM Lock Port 9. Power Socket Type 3 (3 IO) N/A √ √ √ N/A N/A N/A √ N/A √...

S343 User Manual
Page 18
... your screen, the location of a suitable power outlet, as well as the location and distance between the projector and the rest of the projector lamp or the projector itself. For none standard installation advise please contact Optoma. 18 English Your room layout or personal preference will invalidate the warranty and may shorten the lifetime...
... your screen, the location of a suitable power outlet, as well as the location and distance between the projector and the rest of the projector lamp or the projector itself. For none standard installation advise please contact Optoma. 18 English Your room layout or personal preference will invalidate the warranty and may shorten the lifetime...

S343 User Manual
Page 19
...; Ensure that the intake vents do not recycle hot air from the exhaust vent. ‡‡ When operating the projector in an enclosed space, ensure that the projector does not recycle exhaust air, as this may lead to other than the desktop and ceiling mount, otherwise lamp life ... to ensure that the surrounding air temperature within the enclosure does not exceed operation temperature while the projector is with the acceptable operation temperature range. The tilt angle of the projector should not exceed 15 degrees, nor should pass a certified thermal evaluation to shutdown even if the...
...; Ensure that the intake vents do not recycle hot air from the exhaust vent. ‡‡ When operating the projector in an enclosed space, ensure that the projector does not recycle exhaust air, as this may lead to other than the desktop and ceiling mount, otherwise lamp life ... to ensure that the surrounding air temperature within the enclosure does not exceed operation temperature while the projector is with the acceptable operation temperature range. The tilt angle of the projector should not exceed 15 degrees, nor should pass a certified thermal evaluation to shutdown even if the...

S343 User Manual
Page 20
....81 inches) 20 English Ensure that the intake vents do not recycle hot air from the exhaust vent. All enclosures should the projector be installed in any way other than the desktop and ceiling mount, otherwise lamp life could decrease dramatically, and may cause the ... -15° ‡‡ Allow at least 30 cm clearance around the exhaust vent. SETUP AND INSTALLATION Projector installation notice (SVGA_XGA_WXGA) ‡‡ Place the projector in an enclosed space, ensure that the surrounding air temperature within the enclosure does not exceed operation temperature while the...
....81 inches) 20 English Ensure that the intake vents do not recycle hot air from the exhaust vent. All enclosures should the projector be installed in any way other than the desktop and ceiling mount, otherwise lamp life could decrease dramatically, and may cause the ... -15° ‡‡ Allow at least 30 cm clearance around the exhaust vent. SETUP AND INSTALLATION Projector installation notice (SVGA_XGA_WXGA) ‡‡ Place the projector in an enclosed space, ensure that the surrounding air temperature within the enclosure does not exceed operation temperature while the...

S343 User Manual
Page 28
...adjustable foot clockwise or counterclockwise to 12m (SVGA, XGA, and WXGA models). 28 English Focus Ring Zoom Lever Note: The projector will focus at a distance of the projector. 2. Tilt-Adjustment Feet Tilt-Adjustment Ring Zoom and focus ‡‡ To adjust the image size, turn the zoom...or counterclockwise until the image is equipped with elevator feet for adjusting the image height. 1. SETUP AND INSTALLATION Adjusting the projector image Image height The projector is sharp and legible. Locate the adjustable foot you wish to adjust on the underside of 1m to 10m (WUXGA ...
...adjustable foot clockwise or counterclockwise to 12m (SVGA, XGA, and WXGA models). 28 English Focus Ring Zoom Lever Note: The projector will focus at a distance of the projector. 2. Tilt-Adjustment Feet Tilt-Adjustment Ring Zoom and focus ‡‡ To adjust the image size, turn the zoom...or counterclockwise until the image is equipped with elevator feet for adjusting the image height. 1. SETUP AND INSTALLATION Adjusting the projector image Image height The projector is sharp and legible. Locate the adjustable foot you wish to adjust on the underside of 1m to 10m (WUXGA ...

S343 User Manual
Page 30
...the remote control and the sensor should not be longer than 6 meters from time to time. ‡‡ If the remote control and the projector are within a very short distance, the remote control might become ineffective. ‡‡ When you aim at an angle within 30 degrees perpendicular ...control sensor to function correctly. The distance between the remote control and the IR sensor on the projector that might obstruct the infra-red beam. ‡‡ Make sure the IR transmitter of the projector. Approx. ± 15° 30 English SETUP AND INSTALLATION Effective range Infra-Red (IR)...
...the remote control and the sensor should not be longer than 6 meters from time to time. ‡‡ If the remote control and the projector are within a very short distance, the remote control might become ineffective. ‡‡ When you aim at an angle within 30 degrees perpendicular ...control sensor to function correctly. The distance between the remote control and the IR sensor on the projector that might obstruct the infra-red beam. ‡‡ Make sure the IR transmitter of the projector. Approx. ± 15° 30 English SETUP AND INSTALLATION Effective range Infra-Red (IR)...

S343 User Manual
Page 31
... green or flashing blue. The cooling fans will continue to operate for about 10 seconds for the second time, the projector will disappear after a power off the projector or Powering on 1. English 31 When connected, the On/Standby LED will flash green or flash blue. Powering off ..." " button again to confirm, otherwise the message will shut down. 4. Press the " " again to turn the projector back on, you will be displayed: Power Off Power Off? USING THE PROJECTOR Powering on / off procedure. Securely connect the power lead and signal/source cable. Note: The first time the...
... green or flashing blue. The cooling fans will continue to operate for about 10 seconds for the second time, the projector will disappear after a power off the projector or Powering on 1. English 31 When connected, the On/Standby LED will flash green or flash blue. Powering off ..." " button again to confirm, otherwise the message will shut down. 4. Press the " " again to turn the projector back on, you will be displayed: Power Off Power Off? USING THE PROJECTOR Powering on / off procedure. Securely connect the power lead and signal/source cable. Note: The first time the...

S343 User Manual
Page 32
USING THE PROJECTOR Selecting an input source Turn on the connected source that you want to display on the projector keypad or the remote control to select the desired input. If multiple sources are connected, push the source button on the screen, such as computer, notebook, video player, etc. The projector will automatically detect the source. or 32 English
USING THE PROJECTOR Selecting an input source Turn on the connected source that you want to display on the projector keypad or the remote control to select the desired input. If multiple sources are connected, push the source button on the screen, such as computer, notebook, video player, etc. The projector will automatically detect the source. or 32 English

S343 User Manual
Page 33
... save the new settings. Adjust the settings by using keys. 4. To exit, press the or again. The OSD menu will close and the projector will return to select any item in the sub menu and adjust as described above. 5. To open the OSD menu, press on a particular page..., press or key to be adjusted in the main menu. While making a selection on the remote control or the projector keyboard. 2. Select the next item to enter sub menu. 3. The projector will automatically detect the source. 1. When OSD is displayed, use keys to the main menu. 6.
... save the new settings. Adjust the settings by using keys. 4. To exit, press the or again. The OSD menu will close and the projector will return to select any item in the sub menu and adjust as described above. 5. To open the OSD menu, press on a particular page..., press or key to be adjusted in the main menu. While making a selection on the remote control or the projector keyboard. 2. Select the next item to enter sub menu. 3. The projector will automatically detect the source. 1. When OSD is displayed, use keys to the main menu. 6.

S343 User Manual
Page 34
USING THE PROJECTOR SVGA, XGA, and WXGA Models Main Menu Sub Menu Display Image Settings 3D Aspect Ratio Edge Mask Zoom Image Shift Keystone Select Exit Navigation guide Settings Enter 34 English
USING THE PROJECTOR SVGA, XGA, and WXGA Models Main Menu Sub Menu Display Image Settings 3D Aspect Ratio Edge Mask Zoom Image Shift Keystone Select Exit Navigation guide Settings Enter 34 English

S343 User Manual
Page 36
Dynamic Eco+ 36 English USING THE PROJECTOR Main Menu Sub Menu Sub Menu 2 Sub Menu 3 Sub Menu 4 Color Matching RGB Gain/Bias Reset Exit Red Gain Green Gain Blue Gain Red Bias ...
Dynamic Eco+ 36 English USING THE PROJECTOR Main Menu Sub Menu Sub Menu 2 Sub Menu 3 Sub Menu 4 Color Matching RGB Gain/Bias Reset Exit Red Gain Green Gain Blue Gain Red Bias ...


