User Manual
Page 3
... 4 Technical Specifications 5 Computer System Requirements 6 Operating Elements Main Unit 7 Battery Charging 8 MicroSD Card Insertion 9 Date and Time Setting 10 Camera Operation Video recording 11 Battery and MicroSD card memory capacity status checking 12 Video screen selection 13 Import video Connecting to a computer with Windows... operation system 14 Connecting to a Mac 14 Computer Software 15 Mounting Tripod mount 16 Vented helmet mount 17 Precautions Camera 18 Waterproof 19 FCC Compliance Statement 20 Information for Users 21 Disclaimer 22-23...
... 4 Technical Specifications 5 Computer System Requirements 6 Operating Elements Main Unit 7 Battery Charging 8 MicroSD Card Insertion 9 Date and Time Setting 10 Camera Operation Video recording 11 Battery and MicroSD card memory capacity status checking 12 Video screen selection 13 Import video Connecting to a computer with Windows... operation system 14 Connecting to a Mac 14 Computer Software 15 Mounting Tripod mount 16 Vented helmet mount 17 Precautions Camera 18 Waterproof 19 FCC Compliance Statement 20 Information for Users 21 Disclaimer 22-23...

User Manual
Page 4
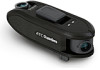
USB cable 6. Quick Start Guide 6. Base mount 3. ATCChameleon - 4 5. Vented mount 4. Quick Start Guide 1. 2. 3. 4. Tripod mount 5. Main Camera Unit 2. Package Contents Thank you for purchasing the ATCChameleon Dual lens Action Camera, this package should contain the: 1.
USB cable 6. Quick Start Guide 6. Base mount 3. ATCChameleon - 4 5. Vented mount 4. Quick Start Guide 1. 2. 3. 4. Tripod mount 5. Main Camera Unit 2. Package Contents Thank you for purchasing the ATCChameleon Dual lens Action Camera, this package should contain the: 1.

User Manual
Page 8
Replace only with the supplied USB cable. When charging starts, the BATTERY indicator will turn red. 3. Remove the camera from the USB port. Switch off . 4. When charging is incorrectly replaced. Battery Charging ATCChameleon has a built-in lithium polymer rechargeable battery, you can recharge the battery via USB. 1. Note • Please fully charge the...
Replace only with the supplied USB cable. When charging starts, the BATTERY indicator will turn red. 3. Remove the camera from the USB port. Switch off . 4. When charging is incorrectly replaced. Battery Charging ATCChameleon has a built-in lithium polymer rechargeable battery, you can recharge the battery via USB. 1. Note • Please fully charge the...

User Manual
Page 9
Open the side hatch. 2. Note • Always insert or remove the MicroSD card when the the camera is off. • MicroSD cards with Class 6 or above are facing down. 3. Ensure the MicroSD card terminals are recommended to use for the best performance during recording. • Supports up to 32GB MicroSD cards. To remove the MicroSD card, push the card until it clicks then pull the card out. Operating Elements - MicroSD card Insertion 1. ATCChameleon - 9 Insert the MicroSD card until it clicks in place.
Open the side hatch. 2. Note • Always insert or remove the MicroSD card when the the camera is off. • MicroSD cards with Class 6 or above are facing down. 3. Ensure the MicroSD card terminals are recommended to use for the best performance during recording. • Supports up to 32GB MicroSD cards. To remove the MicroSD card, push the card until it clicks then pull the card out. Operating Elements - MicroSD card Insertion 1. ATCChameleon - 9 Insert the MicroSD card until it clicks in place.

User Manual
Page 10
... best results. Press SET button to send the PC local time and local main frequency setting to complete the synchronization. ATCChameleon - 10 Connect the camera to reduce banding and flicker effect while recording under certain types of the PC with the supplied USB cable. Download and... install the ATCChameleon PC software from the USB port to the camera. 5. Then switch on the PC software. Click the button on the Slide switch. 4. Unplug the camera from http://atc.oregonscientific.com 2. Date & Time Setting 1.
... best results. Press SET button to send the PC local time and local main frequency setting to complete the synchronization. ATCChameleon - 10 Connect the camera to reduce banding and flicker effect while recording under certain types of the PC with the supplied USB cable. Download and... install the ATCChameleon PC software from the USB port to the camera. 5. Then switch on the PC software. Click the button on the Slide switch. 4. Unplug the camera from http://atc.oregonscientific.com 2. Date & Time Setting 1.
User Manual
Page 11
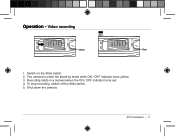
Switch on the Slide switch. 2. Shut down the camera. Operation - To stop recording, switch off the Slide switch. 5. Recording starts in a moment when the ON / OFF indicator turns red. 4. ATCChameleon - 11 The camera is under the stand by mode while ON / OFF indicator turns yellow. 3. Video recording REC Yellow Red 1.
Switch on the Slide switch. 2. Shut down the camera. Operation - To stop recording, switch off the Slide switch. 5. Recording starts in a moment when the ON / OFF indicator turns red. 4. ATCChameleon - 11 The camera is under the stand by mode while ON / OFF indicator turns yellow. 3. Video recording REC Yellow Red 1.

User Manual
Page 12
Open the side door. 2. The ON / OFF indicator turns yellow. 4. The battery and memory indicator turn on for indicating the status. 5. ATCChameleon - 12 Battery and MicroSD card memory capacity status checking 4 3 2 1 1. The camera will be turned off automatically. Operation - Press the STATUS button to check the current battery and MicroSD card memory status. 3.
Open the side door. 2. The ON / OFF indicator turns yellow. 4. The battery and memory indicator turn on for indicating the status. 5. ATCChameleon - 12 Battery and MicroSD card memory capacity status checking 4 3 2 1 1. The camera will be turned off automatically. Operation - Press the STATUS button to check the current battery and MicroSD card memory status. 3.

User Manual
Page 14
...ATCChameleon - 14 Import video Connecting to a computer with Windows operation system Connect the camera to a Macintosh with the provided USB cable. The computer will recognize the camera automatically as a "removable disk". Connecting to a Mac Connect the camera to a computer with the provided USB cable and then turn on the camera... completely the deleted files from the MicroSD card, empty the trash before ejecting the camera. Double click on the Slide switch. The Macintosh will recognize the camera as an external hard drive Please note that in order to open it. Operation ...
...ATCChameleon - 14 Import video Connecting to a computer with Windows operation system Connect the camera to a Macintosh with the provided USB cable. The computer will recognize the camera automatically as a "removable disk". Connecting to a Mac Connect the camera to a computer with the provided USB cable and then turn on the camera... completely the deleted files from the MicroSD card, empty the trash before ejecting the camera. Double click on the Slide switch. The Macintosh will recognize the camera as an external hard drive Please note that in order to open it. Operation ...

User Manual
Page 17
Vented Helmet Mount 1 2 3 4 5 Note The ATCChameleon can be mounted on our range of mountings which are sold separately. ATCChameleon - 17 Mountings warnings • Make sure the mounting is secure before embark. • Do not modify the mounting object structurally to mount the camera. Mounting -
Vented Helmet Mount 1 2 3 4 5 Note The ATCChameleon can be mounted on our range of mountings which are sold separately. ATCChameleon - 17 Mountings warnings • Make sure the mounting is secure before embark. • Do not modify the mounting object structurally to mount the camera. Mounting -

User Manual
Page 18
...long periods of time. Keep it in areas prone to remove fingerprints or dust. • Do not disassemble the camera. • Turn the camera off before storing the camera for long periods of time. This may cause a fire or an electric shock. • Do not leave the...is inserted or removed while the camera is shock resistant, not shock proof. • Do not let operating the camera distract you from your camera • The camera is still on. • Remove the MicroSD card before the MicroSD card. Precautions - ATCChameleon - 18 Camera Notice the following guidelines when using...
...long periods of time. Keep it in areas prone to remove fingerprints or dust. • Do not disassemble the camera. • Turn the camera off before storing the camera for long periods of time. This may cause a fire or an electric shock. • Do not leave the...is inserted or removed while the camera is shock resistant, not shock proof. • Do not let operating the camera distract you from your camera • The camera is still on. • Remove the MicroSD card before the MicroSD card. Precautions - ATCChameleon - 18 Camera Notice the following guidelines when using...

User Manual
Page 19
... liquid off as soon as possible with domestic waste. ATCChameleon - 19 Waterproof • The camera is only permissible within the restrictions imposed. Oregon Scientific will not assume any responsibility • for camera malfunction caused by liquid entering the camera as a result of misuse by the use the camera in the event that the transfer of separately and...
... liquid off as soon as possible with domestic waste. ATCChameleon - 19 Waterproof • The camera is only permissible within the restrictions imposed. Oregon Scientific will not assume any responsibility • for camera malfunction caused by liquid entering the camera as a result of misuse by the use the camera in the event that the transfer of separately and...
