

Handbook
Page 3
... 1 Chapter 1: Setting Up Your Palm™ Zire™ 71 Handheld 3 System requirements 4 Minimum requirements: Windows computers 4 Minimum requirements: Mac computers 5 Audio and video requirements 5 E-mail requirements 5 SMS requirements 5 Upgrade information 6 Step 1: Connect the HotSync® cradle/cable to the computer 6 Step 2: Charge your handheld 6 Step 3: Set up your handheld 7 Step 4: Install software 7 Step 5: Perform a HotSync...
... 1 Chapter 1: Setting Up Your Palm™ Zire™ 71 Handheld 3 System requirements 4 Minimum requirements: Windows computers 4 Minimum requirements: Mac computers 5 Audio and video requirements 5 E-mail requirements 5 SMS requirements 5 Upgrade information 6 Step 1: Connect the HotSync® cradle/cable to the computer 6 Step 2: Charge your handheld 6 Step 3: Set up your handheld 7 Step 4: Install software 7 Step 5: Perform a HotSync...
Handbook
Page 5
... and removing applications 65 Installing files and add-on applications 65 Installing applications and files on a Windows computer 66 Palm Quick Install tips 69 Installing applications and files on a Mac computer 70 Removing applications 72 Removing Palm Desktop software 72 Chapter 5: Using Address Book 75 Creating an Address Book entry 76 Selecting types of...
... and removing applications 65 Installing files and add-on applications 65 Installing applications and files on a Windows computer 66 Palm Quick Install tips 69 Installing applications and files on a Mac computer 70 Removing applications 72 Removing Palm Desktop software 72 Chapter 5: Using Address Book 75 Creating an Address Book entry 76 Selecting types of...
Handbook
Page 14
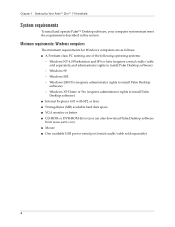
... Pro (requires administrator rights to install Palm Desktop software) - Windows ME - Windows 98 - Chapter 1 Setting Up Your Palm™ Zire™ 71 Handheld System requirements To install and operate Palm™ Desktop software, your computer system must meet the requirements described in this section. Windows XP Home or Pro (requires administrator rights to install Palm Desktop software) s Internet Explorer 4.01 with SP2...
... Pro (requires administrator rights to install Palm Desktop software) - Windows ME - Windows 98 - Chapter 1 Setting Up Your Palm™ Zire™ 71 Handheld System requirements To install and operate Palm™ Desktop software, your computer system must meet the requirements described in this section. Windows XP Home or Pro (requires administrator rights to install Palm Desktop software) s Internet Explorer 4.01 with SP2...
Handbook
Page 17
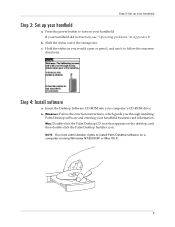
... as you through installing Palm Desktop software and entering your handheld. Windows: Follow the onscreen instructions, which guide you would a pen or pencil, and use it to follow the onscreen directions. b. Press the power button to install Palm Desktop software on the desktop, and... then double-click the Palm Desktop Installer icon. c. b. NOTE You need administrator rights to turn on your handheld business card information. Step 3: Set up your handheld Step 3: Set up your computer 's CD-ROM drive. Insert the Desktop Software...
... as you through installing Palm Desktop software and entering your handheld. Windows: Follow the onscreen instructions, which guide you would a pen or pencil, and use it to follow the onscreen directions. b. Press the power button to install Palm Desktop software on the desktop, and... then double-click the Palm Desktop Installer icon. c. b. NOTE You need administrator rights to turn on your handheld business card information. Step 3: Set up your handheld Step 3: Set up your computer 's CD-ROM drive. Insert the Desktop Software...

Handbook
Page 18
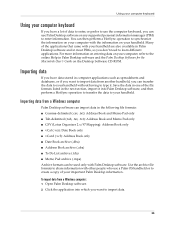
... first HotSync operation. You've set up your handheld, installed Palm Desktop software, and performed your handheld Windows: When the first HotSync operation is complete, double-click the Palm Desktop software icon in Palm Desktop software. Chapter 1 Setting Up Your Palm™ Zire™ 71 Handheld Step 5: Perform a HotSync operation Windows: When prompted, place your handheld, continue reading this guide, open...
... first HotSync operation. You've set up your handheld, installed Palm Desktop software, and performed your handheld Windows: When the first HotSync operation is complete, double-click the Palm Desktop software icon in Palm Desktop software. Chapter 1 Setting Up Your Palm™ Zire™ 71 Handheld Step 5: Perform a HotSync operation Windows: When prompted, place your handheld, continue reading this guide, open...

Handbook
Page 19
CHAPTER 2 Exploring Your Handheld Your Palm™ Zire™ 71 handheld can use your Windows or Mac computer so you connect your schedule in Date Book. s Create and view text memos in Kinoma. s View video clips in Memo Pad. s Compose, ..., and phone numbers in the SMS application when you always have an infrared (IR) port. s Share information with daily tasks while you install the software from the Software Essentials CD-ROM. s Compose, send, and receive SMS messages in Address Book. s Take photos with a GSM mobile phone (sold separately). Use your new handheld...
CHAPTER 2 Exploring Your Handheld Your Palm™ Zire™ 71 handheld can use your Windows or Mac computer so you connect your schedule in Date Book. s Create and view text memos in Kinoma. s View video clips in Memo Pad. s Compose, ..., and phone numbers in the SMS application when you always have an infrared (IR) port. s Share information with daily tasks while you install the software from the Software Essentials CD-ROM. s Compose, send, and receive SMS messages in Address Book. s Take photos with a GSM mobile phone (sold separately). Use your new handheld...
Handbook
Page 45
... on your computer with other people who use a Palm OS handheld or to create a copy of the file formats listed in the next section, import it . Save the data in one of your important Palm Desktop information. To import data from another handheld, ...For more information on entering data on your handheld are also available in Palm Desktop software and in Palm Desktop software and the Palm Desktop Software for the Macintosh User's Guide on your handheld. Importing data from a Windows computer Palm Desktop software can import data in the following file formats: s Comma-delimited (....
... on your computer with other people who use a Palm OS handheld or to create a copy of the file formats listed in the next section, import it . Save the data in one of your important Palm Desktop information. To import data from another handheld, ...For more information on entering data on your handheld are also available in Palm Desktop software and in Palm Desktop software and the Palm Desktop Software for the Macintosh User's Guide on your handheld. Importing data from a Windows computer Palm Desktop software can import data in the following file formats: s Comma-delimited (....

Handbook
Page 46
... following formats: s Comma-separated (*.csv) s Memo Pad archive (*.mpa) s Address Book archive (*.aba) s Text (*.txt) For information on your Windows computer. otherwise, the records are opposite the corresponding imported field on importing and exporting data. From the File menu, select Import. 5. Click Open. With...feature enables you want to import. 6. To import data into the correct Palm Desktop fields, drag fields in the left column so that appear in the imported file also exist in Palm Desktop software and on Your Handheld 3. You can import data stored in any of ...
... following formats: s Comma-separated (*.csv) s Memo Pad archive (*.mpa) s Address Book archive (*.aba) s Text (*.txt) For information on your Windows computer. otherwise, the records are opposite the corresponding imported field on importing and exporting data. From the File menu, select Import. 5. Click Open. With...feature enables you want to import. 6. To import data into the correct Palm Desktop fields, drag fields in the left column so that appear in the imported file also exist in Palm Desktop software and on Your Handheld 3. You can import data stored in any of ...
Handbook
Page 76
... applications and files with Palm Quick Install: s Drag and drop files onto the Palm Quick Install icon on a Windows computer Palm Quick Install makes it to Palm Quick Install. s Use the commands or buttons in the Palm Quick Install window. s Right-click a... file and send it easy to install applications and files during the next HotSync operation. There are a variety of third-party applications available for your new Palm handheld. Chapter 4 Working with Applications s Audio files, including MP3 (requires the audio application from the Software...
... applications and files with Palm Quick Install: s Drag and drop files onto the Palm Quick Install icon on a Windows computer Palm Quick Install makes it to Palm Quick Install. s Use the commands or buttons in the Palm Quick Install window. s Right-click a... file and send it easy to install applications and files during the next HotSync operation. There are a variety of third-party applications available for your new Palm handheld. Chapter 4 Working with Applications s Audio files, including MP3 (requires the audio application from the Software...
Handbook
Page 80
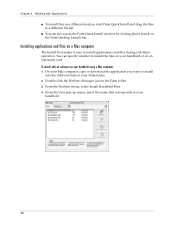
You can also access the Palm Quick Install window by clicking Quick Install on the Palm Desktop Launch bar. To install add-on software on your handheld or on your handheld using a Mac computer: 1. Double-click the HotSync Manager icon in a different location, start Palm Quick Install and drag the files to your Palm folder. 2. From the... a Mac computer The Install Tool makes it easy to install the files on an expansion card. Chapter 4 Working with Applications s To install files in the Palm folder. 3. From the HotSync menu, select Install Handheld Files. 4.
You can also access the Palm Quick Install window by clicking Quick Install on the Palm Desktop Launch bar. To install add-on software on your handheld or on your handheld using a Mac computer: 1. Double-click the HotSync Manager icon in a different location, start Palm Quick Install and drag the files to your Palm folder. 2. From the... a Mac computer The Install Tool makes it easy to install the files on an expansion card. Chapter 4 Working with Applications s To install files in the Palm folder. 3. From the HotSync menu, select Install Handheld Files. 4.
Handbook
Page 83
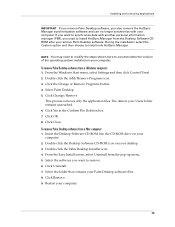
.... 6. NOTE You may need to install HotSync Manager from a Mac computer: 1. From the Windows Start menu, select Settings and then click Control Panel. 2. Insert the Desktop Software CD-ROM into the CD-ROM drive on your computer. 73 Restart your computer. 2. Installing ...The data in the Confirm File Deletion box. 7. Click Close. To remove Palm Desktop software from the Desktop Software CDROM after you want to synchronize data with your Palm Desktop software files. 8. Double-click the Palm Desktop Installer icon. 4. Select the folder that contains your computer. Double-click ...
.... 6. NOTE You may need to install HotSync Manager from a Mac computer: 1. From the Windows Start menu, select Settings and then click Control Panel. 2. Insert the Desktop Software CD-ROM into the CD-ROM drive on your computer. 73 Restart your computer. 2. Installing ...The data in the Confirm File Deletion box. 7. Click Close. To remove Palm Desktop software from the Desktop Software CDROM after you want to synchronize data with your Palm Desktop software files. 8. Double-click the Palm Desktop Installer icon. 4. Select the folder that contains your computer. Double-click ...
Handbook
Page 119
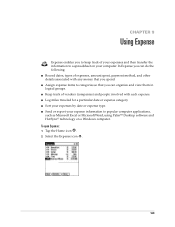
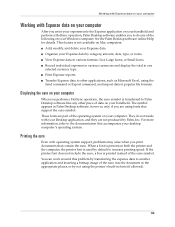
s Sort your expense information to popular computer applications, such as Microsoft Excel or Microsoft Word, using Palm™ Desktop software and HotSync® technology on your computer. Select the Expense icon . 109 s Assign expense items to a spreadsheet on a Windows computer. s Send or export your expenses by date or expense type. s Keep track of vendors...
s Sort your expense information to popular computer applications, such as Microsoft Excel or Microsoft Word, using Palm™ Desktop software and HotSync® technology on your computer. Select the Expense icon . 109 s Assign expense items to a spreadsheet on a Windows computer. s Send or export your expenses by date or expense type. s Keep track of vendors...
Handbook
Page 125
..., amount, date, type, or notes. s Add, modify, and delete your Windows computer. s Transfer Expense data to the documentation that accompanies your computer. s Print Expense reports. See the Palm Desktop software online Help for details. For more information, refer to other piece of the operating.... When a font is printed instead of the euro into the Expense application on your handheld and perform a HotSync operation, Palm Desktop software enables you to another application and inserting a bitmap image of the euro symbol. You can work around this problem by transferring...
..., amount, date, type, or notes. s Add, modify, and delete your Windows computer. s Transfer Expense data to the documentation that accompanies your computer. s Print Expense reports. See the Palm Desktop software online Help for details. For more information, refer to other piece of the operating.... When a font is printed instead of the euro into the Expense application on your handheld and perform a HotSync operation, Palm Desktop software enables you to another application and inserting a bitmap image of the euro symbol. You can work around this problem by transferring...
Handbook
Page 154
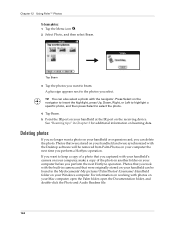
...port on your handheld can also select a photo with the Desktop software will be found in the Mydocuments\My pictures\Palm Photos\Username\Handheld folder on your computer before you want a ...originally stored on your Mac computer, open the Palm folder, open the Documentation folder, and double-click the Photo and Audio Readme file. 144 Photos that you took with the built-in...on your computer, make a copy of the photo in Chapter 3 for additional information on your Windows computer. Chapter 12 Using Palm™ Photos To beam photos: 1. Tap the Menu icon . 2. Tap Beam. 5. See...
...port on your handheld can also select a photo with the Desktop software will be found in the Mydocuments\My pictures\Palm Photos\Username\Handheld folder on your computer before you want a ...originally stored on your Mac computer, open the Palm folder, open the Documentation folder, and double-click the Photo and Audio Readme file. 144 Photos that you took with the built-in...on your computer, make a copy of the photo in Chapter 3 for additional information on your Windows computer. Chapter 12 Using Palm™ Photos To beam photos: 1. Tap the Menu icon . 2. Tap Beam. 5. See...
Handbook
Page 156
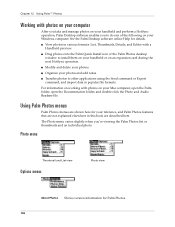
...HotSync operation, Palm Desktop software enables you 're viewing the Palm Photos list or thumbnails and an individual photo. s Modify and delete your handheld or on your reference, and Palm Photos features that are not explained elsewhere in this book are shown here for your Windows computer. ...and List view Options menus Photo view About Photos Shows version information for details. s Drag photos onto the Palm Quick Install icon or the Palm Photos desktop window to other applications using the Send command or Export command, and import data in various formats: List, Thumbnails...
...HotSync operation, Palm Desktop software enables you 're viewing the Palm Photos list or thumbnails and an individual photo. s Modify and delete your handheld or on your reference, and Palm Photos features that are not explained elsewhere in this book are shown here for your Windows computer. ...and List view Options menus Photo view About Photos Shows version information for details. s Drag photos onto the Palm Quick Install icon or the Palm Photos desktop window to other applications using the Send command or Export command, and import data in various formats: List, Thumbnails...
Handbook
Page 173
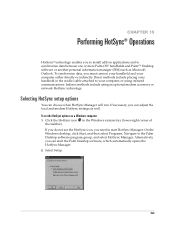
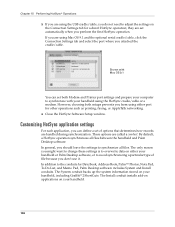
...Windows system tray (lower-right corner of the taskbar). Select Setup. 163 Selecting HotSync setup options You can choose when HotSync Manager will run. Click the HotSync icon in the cradle/cable attached to synchronize data between one or more Palm OS® handhelds and Palm™ Desktop software... or another personal information manager (PIM) such as well. To synchronize data, you need to start the Palm Desktop software, which automatically opens the HotSync Manager. 2. ...
...Windows system tray (lower-right corner of the taskbar). Select Setup. 163 Selecting HotSync setup options You can choose when HotSync Manager will run. Click the HotSync icon in the cradle/cable attached to synchronize data between one or more Palm OS® handhelds and Palm™ Desktop software... or another personal information manager (PIM) such as well. To synchronize data, you need to start the Palm Desktop software, which automatically opens the HotSync Manager. 2. ...
Handbook
Page 176
... handheld using the HotSync cradle/cable or a modem. By default, a HotSync operation synchronizes all files. In addition to synchronize with Mac OS 9.1 You can define a set of file because you attached the cradle/cable. . The Install conduit installs add-on applications on the...; Photos, Note Pad, To Do List, and Memo Pad, Palm Desktop software includes System and Install conduits. they are using the USB cradle/cable, you perform the first HotSync operation. Close the HotSync Software Setup window. These options are using either your handheld, including Graffiti® 2 ...
... handheld using the HotSync cradle/cable or a modem. By default, a HotSync operation synchronizes all files. In addition to synchronize with Mac OS 9.1 You can define a set of file because you attached the cradle/cable. . The Install conduit installs add-on applications on the...; Photos, Note Pad, To Do List, and Memo Pad, Palm Desktop software includes System and Install conduits. they are using the USB cradle/cable, you perform the first HotSync operation. Close the HotSync Software Setup window. These options are using either your handheld, including Graffiti® 2 ...
Handbook
Page 177
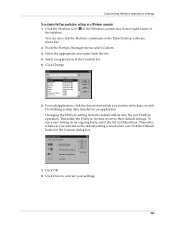
Select the appropriate user name from the default affects only the next HotSync operation. Select an application in the Windows system tray (lower-right corner of the taskbar). For each application, click the direction in which you click the Default button in ... click Do Nothing to skip data transfer for an application. To use a new setting on a Windows computer: 1. Click OK. 8. Click Done to their default settings. You can also click the HotSync command on the Palm Desktop software menu bar. 2. Click Change. 6. Changing the HotSync setting from the list. 4. Click the ...
Select the appropriate user name from the default affects only the next HotSync operation. Select an application in the Windows system tray (lower-right corner of the taskbar). For each application, click the direction in which you click the Default button in ... click Do Nothing to skip data transfer for an application. To use a new setting on a Windows computer: 1. Click OK. 8. Click Done to their default settings. You can also click the HotSync command on the Palm Desktop software menu bar. 2. Click Change. 6. Changing the HotSync setting from the list. 4. Click the ...
Handbook
Page 179
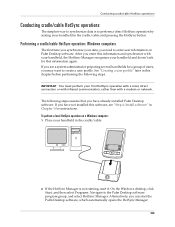
...information and synchronize with a modem or network. If you need to enter user information on a Windows computer: 1. Place your data, you have already installed Palm Desktop software. Alternatively, you synchronize your handheld in the cradle/cable and pressing the HotSync button. If you...several handhelds for this information again. To perform a local HotSync operation on Palm Desktop software. Performing a cradle/cable HotSync operation: Windows computers The first time you can start it: On the Windows desktop, click Start, and then select Programs. Navigate to create a user ...
...information and synchronize with a modem or network. If you need to enter user information on a Windows computer: 1. Place your data, you have already installed Palm Desktop software. Alternatively, you synchronize your handheld in the cradle/cable and pressing the HotSync button. If you...several handhelds for this information again. To perform a local HotSync operation on Palm Desktop software. Performing a cradle/cable HotSync operation: Windows computers The first time you can start it: On the Windows desktop, click Start, and then select Programs. Navigate to create a user ...
Handbook
Page 185
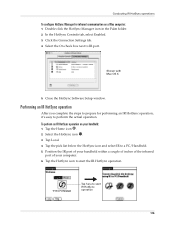
..., it's easy to perform the actual operation. Shown with Mac OS X 5. Position the IR port of your handheld within a couple of inches of the infrared port of your handheld: 1. Double-click the HotSync Manager icon in the Palm folder. 2. Close the HotSync Software Setup window. Tap Local. 4. In the HotSync Controls tab, select Enabled...
..., it's easy to perform the actual operation. Shown with Mac OS X 5. Position the IR port of your handheld within a couple of inches of the infrared port of your handheld: 1. Double-click the HotSync Manager icon in the Palm folder. 2. Close the HotSync Software Setup window. Tap Local. 4. In the HotSync Controls tab, select Enabled...


