

Handbook
Page 1
Handbook for the Palm™ Zire™ 71 Handheld
Handbook for the Palm™ Zire™ 71 Handheld

Handbook
Page 3
... This Book 1 Chapter 1: Setting Up Your Palm™ Zire™ 71 Handheld 3 System requirements 4 Minimum requirements: Windows computers 4 Minimum requirements: Mac computers 5 Audio and video requirements 5 E-mail requirements 5 SMS requirements 5 Upgrade information 6 Step 1: Connect the HotSync® cradle/cable to the computer 6 Step 2: Charge your handheld 6 Step 3: Set up your handheld 7 Step 4: Install software 7 Step 5: Perform...
... This Book 1 Chapter 1: Setting Up Your Palm™ Zire™ 71 Handheld 3 System requirements 4 Minimum requirements: Windows computers 4 Minimum requirements: Mac computers 5 Audio and video requirements 5 E-mail requirements 5 SMS requirements 5 Upgrade information 6 Step 1: Connect the HotSync® cradle/cable to the computer 6 Step 2: Charge your handheld 6 Step 3: Set up your handheld 7 Step 4: Install software 7 Step 5: Perform...

Handbook
Page 4
Contents Chapter 3: Entering Data on Your Handheld 21 Using the onscreen keyboard 21 Using Graffiti 2 writing to enter data 22 Graffiti 2 tips 24 Graffiti 2 alphabet 25 Capital letters 26 Graffiti 2 numbers 26 ...
Contents Chapter 3: Entering Data on Your Handheld 21 Using the onscreen keyboard 21 Using Graffiti 2 writing to enter data 22 Graffiti 2 tips 24 Graffiti 2 alphabet 25 Capital letters 26 Graffiti 2 numbers 26 ...
Handbook
Page 8
... HotSync operation 175 Returning to cradle/cable HotSync operations 176 Conducting modem HotSync operations 177 Preparing your computer for a modem HotSync operation 177 Preparing your handheld for a modem HotSync operation 179 Selecting the conduits for a modem HotSync operation 181 Performing a modem HotSync operation 181 Conducting network HotSync operations 182 Connecting to...
... HotSync operation 175 Returning to cradle/cable HotSync operations 176 Conducting modem HotSync operations 177 Preparing your computer for a modem HotSync operation 177 Preparing your handheld for a modem HotSync operation 179 Selecting the conduits for a modem HotSync operation 181 Performing a modem HotSync operation 181 Conducting network HotSync operations 182 Connecting to...
Handbook
Page 9
Contents Chapter 16: Setting Preferences for Your Handheld 189 Setting General Preferences 190 Date & Time Preferences 191 Digitizer Preferences 192 Formats Preferences 193 Graffiti 2 Preferences 194 Power Preferences ...Preferences 220 Buttons Preferences 220 Color Theme Preferences 223 Owner Preferences 224 ShortCuts Preferences 225 Appendix A: Maintaining Your Handheld 227 Caring for your handheld 227 Prolonging battery life 228 Resetting your handheld 228 Performing a soft reset 229 Performing a hard reset 229 Appendix B: Frequently Asked Questions 233 Software installation...
Contents Chapter 16: Setting Preferences for Your Handheld 189 Setting General Preferences 190 Date & Time Preferences 191 Digitizer Preferences 192 Formats Preferences 193 Graffiti 2 Preferences 194 Power Preferences ...Preferences 220 Buttons Preferences 220 Color Theme Preferences 223 Owner Preferences 224 ShortCuts Preferences 225 Appendix A: Maintaining Your Handheld 227 Caring for your handheld 227 Prolonging battery life 228 Resetting your handheld 228 Performing a soft reset 229 Performing a hard reset 229 Appendix B: Frequently Asked Questions 233 Software installation...

Handbook
Page 11
... Working with expansion cards s Using your handheld with your computer s Personalizing your handheld with your own preference settings After you become familiar with your purchase of your handheld, you with the basic functionality of a Palm™ Zire™ 71 handheld. It guides you through: s Locating all... you need to know about how to quickly familiarize you can use your handheld and the applications that might ...
... Working with expansion cards s Using your handheld with your computer s Personalizing your handheld with your own preference settings After you become familiar with your purchase of your handheld, you with the basic functionality of a Palm™ Zire™ 71 handheld. It guides you through: s Locating all... you need to know about how to quickly familiarize you can use your handheld and the applications that might ...

Handbook
Page 13
...hand, using the 5-way navigator. s Listen to download software from the Internet while installing some applications from the Software Essentials CD-ROM onto your handheld to a mobile phone. To use the e-mail and SMS features, you must install the software from the Software Essentials CD-ROM. 3 See ...expansion cards sold separately). To use the e-mail, SMS, audio, and video features, you must also be able to connect your handheld. CHAPTER 1 Setting Up Your Palm™ Zire™ 71 Handheld Your new Palm™ Zire™ 71 handheld enables you to do items in digital camera.
...hand, using the 5-way navigator. s Listen to download software from the Internet while installing some applications from the Software Essentials CD-ROM onto your handheld to a mobile phone. To use the e-mail and SMS features, you must install the software from the Software Essentials CD-ROM. 3 See ...expansion cards sold separately). To use the e-mail, SMS, audio, and video features, you must also be able to connect your handheld. CHAPTER 1 Setting Up Your Palm™ Zire™ 71 Handheld Your new Palm™ Zire™ 71 handheld enables you to do items in digital camera.
Handbook
Page 14
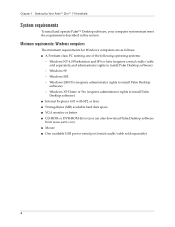
Windows 98 - Windows ME - Chapter 1 Setting Up Your Palm™ Zire™ 71 Handheld System requirements To install and operate Palm™ Desktop software, your computer system must meet the requirements described in this section. Minimum requirements: Windows computers The minimum ...s 50 megabytes (MB) available hard disk space s VGA monitor or better s CD-ROM or DVD-ROM drive (you can also download Palm Desktop software from www.palm.com) s Mouse s One available USB port or serial port (serial cradle/cable sold separately) 4 Windows 2000 Pro (requires administrator rights ...
Windows 98 - Windows ME - Chapter 1 Setting Up Your Palm™ Zire™ 71 Handheld System requirements To install and operate Palm™ Desktop software, your computer system must meet the requirements described in this section. Minimum requirements: Windows computers The minimum ...s 50 megabytes (MB) available hard disk space s VGA monitor or better s CD-ROM or DVD-ROM drive (you can also download Palm Desktop software from www.palm.com) s Mouse s One available USB port or serial port (serial cradle/cable sold separately) 4 Windows 2000 Pro (requires administrator rights ...
Handbook
Page 15
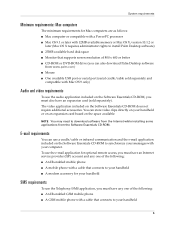
... Software Essentials CD-ROM to synchronize your messages with 12MB available memory or Mac OS X, version 10.1.2 or later (Mac OS X requires administrator rights to install Palm Desktop software) s 25MB available hard disk space s Monitor that connects to your handheld 5 E-mail requirements You can use the audio application included on the Software Essentials CD...
... Software Essentials CD-ROM to synchronize your messages with 12MB available memory or Mac OS X, version 10.1.2 or later (Mac OS X requires administrator rights to install Palm Desktop software) s 25MB available hard disk space s Monitor that connects to your handheld 5 E-mail requirements You can use the audio application included on the Software Essentials CD...

Handbook
Page 16
... keep the battery fully charged, we recommend placing your handheld a. Plug the USB connector into a tail on your handheld is connected to a power source whenever you already own a Palm OS® handheld, go to the web site www.palm.com/support/zire71 for an initial charge. Connect the... connection (sold separately). b. c. You must use a USB cradle/cable and port. Connect your computer. Chapter 1 Setting Up Your Palm™ Zire™ 71 Handheld Upgrade information If you are not using it. 6 Locate the USB icon and ports on usage. Plug the adapter into a working electric...
... keep the battery fully charged, we recommend placing your handheld a. Plug the USB connector into a tail on your handheld is connected to a power source whenever you already own a Palm OS® handheld, go to the web site www.palm.com/support/zire71 for an initial charge. Connect the... connection (sold separately). b. c. You must use a USB cradle/cable and port. Connect your computer. Chapter 1 Setting Up Your Palm™ Zire™ 71 Handheld Upgrade information If you are not using it. 6 Locate the USB icon and ports on usage. Plug the adapter into a working electric...
Handbook
Page 17
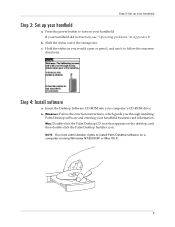
... icon that appears on , see "Operating problems" in Appendix B. If your handheld business card information. c. Hold the stylus as you through installing Palm Desktop software and entering your handheld did not turn on a computer running Windows NT/2000/XP or Mac OS X. 7 NOTE You need administrator rights to follow the onscreen directions. Slide the...
... icon that appears on , see "Operating problems" in Appendix B. If your handheld business card information. c. Hold the stylus as you through installing Palm Desktop software and entering your handheld did not turn on a computer running Windows NT/2000/XP or Mac OS X. 7 NOTE You need administrator rights to follow the onscreen directions. Slide the...

Handbook
Page 18
After you complete these screens, the Congratulations! For more information about using your handheld. Congratulations! s Mac: The electronic Palm Desktop Software for Palm Desktop software. Chapter 1 Setting Up Your Palm™ Zire™ 71 Handheld Step 5: Perform a HotSync operation Windows: When prompted, place your first HotSync operation. screen appears. For comprehensive information about using a Windows computer, you 're...
After you complete these screens, the Congratulations! For more information about using your handheld. Congratulations! s Mac: The electronic Palm Desktop Software for Palm Desktop software. Chapter 1 Setting Up Your Palm™ Zire™ 71 Handheld Step 5: Perform a HotSync operation Windows: When prompted, place your first HotSync operation. screen appears. For comprehensive information about using a Windows computer, you 're...

Handbook
Page 19
...Handheld Your Palm™ Zire™ 71 handheld can use your handheld to do the following : s Listen to MP3 audio files in the audio application (expansion card required, sold separately). 9 s Track your expenses and create expense reports in Kinoma. Use your new handheld to do the following : s Enter your handheld... so you connect your schedule in Palm™ Photos. When you install the software from the Software Essentials CD-ROM. s Keep all your handheld for system requirements. s Synchronize your data with your handheld, you to download software from the...
...Handheld Your Palm™ Zire™ 71 handheld can use your handheld to do the following : s Listen to MP3 audio files in the audio application (expansion card required, sold separately). 9 s Track your expenses and create expense reports in Kinoma. Use your new handheld to do the following : s Enter your handheld... so you connect your schedule in Palm™ Photos. When you install the software from the Software Essentials CD-ROM. s Keep all your handheld for system requirements. s Synchronize your data with your handheld, you to download software from the...

Handbook
Page 20
To close the camera: s Slide the top portion of your handheld upward to access and locate the components of your handheld. To open , you can access additional controls on the inside of your handheld downward until the front and back panel are in alignment at the top and bottom. 10 Chapter 2 Exploring Your Handheld Locating handheld components Take a few moments to learn how to reveal the camera shutter button on the front and back panels. Opening the camera When the camera is open the camera: s Slide the bottom portion of the back panel.
To close the camera: s Slide the top portion of your handheld upward to access and locate the components of your handheld. To open , you can access additional controls on the inside of your handheld downward until the front and back panel are in alignment at the top and bottom. 10 Chapter 2 Exploring Your Handheld Locating handheld components Take a few moments to learn how to reveal the camera shutter button on the front and back panels. Opening the camera When the camera is open the camera: s Slide the bottom portion of the back panel.

Handbook
Page 21
...in Chapter 4 for information on the default application associated with each button, and see "Buttons Preferences" in Chapter 12 for details on your handheld. It is touch sensitive, and it responds to the stylus. See "Using the navigator" later in Chapter 3 to learn how to ...buttons to activate any application on the buttons: Date Book, Address Book, Palm Photos, and Note Pad. Camera shutter button Uses the built-in your handheld screen. Locating front panel controls Locating handheld components Screen Graffiti® 2 writing area Application buttons 5-way navigator Camera ...
...in Chapter 4 for information on the default application associated with each button, and see "Buttons Preferences" in Chapter 12 for details on your handheld. It is touch sensitive, and it responds to the stylus. See "Using the navigator" later in Chapter 3 to learn how to ...buttons to activate any application on the buttons: Date Book, Address Book, Palm Photos, and Note Pad. Camera shutter button Uses the built-in your handheld screen. Locating front panel controls Locating handheld components Screen Graffiti® 2 writing area Application buttons 5-way navigator Camera ...

Handbook
Page 22
Headphone jack Enables you to back up data, add more information. Chapter 2 Exploring Your Handheld Locating top panel components Expansion card slot IR port Headphone jack Stylus Power button/ brightness control Expansion card slot Accepts SD, SDIO, or MultiMediaCard expansion ... 3.5mm stereo headset (sold separately.) IR port Uses infrared technology to transmit data to and receive data from other infrared-enabled devices and to your handheld for more memory, add wireless communication features, or use with audio and video applications. 12
Headphone jack Enables you to back up data, add more information. Chapter 2 Exploring Your Handheld Locating top panel components Expansion card slot IR port Headphone jack Stylus Power button/ brightness control Expansion card slot Accepts SD, SDIO, or MultiMediaCard expansion ... 3.5mm stereo headset (sold separately.) IR port Uses infrared technology to transmit data to and receive data from other infrared-enabled devices and to your handheld for more memory, add wireless communication features, or use with audio and video applications. 12

Handbook
Page 23
... upper-right corner of the slot and hold the power button for about two seconds to the last screen you would a pen or pencil. Locating handheld components Stylus Power button/ brightness control Slides in and out of the slot on the top of the backlight: 1. To adjust the brightness of your... make it off by pressing the power button. Tap the Brightness icon in Chapter 16 for you can also press Up or Down on your handheld. Tap Done. 13 In addition, you to see the information on the navigator to access the brightness control. Drag the slider to access the ...
... upper-right corner of the slot and hold the power button for about two seconds to the last screen you would a pen or pencil. Locating handheld components Stylus Power button/ brightness control Slides in and out of the slot on the top of the backlight: 1. To adjust the brightness of your... make it off by pressing the power button. Tap the Brightness icon in Chapter 16 for you can also press Up or Down on your handheld. Tap Done. 13 In addition, you to see the information on the navigator to access the brightness control. Drag the slider to access the ...

Handbook
Page 24
...computer, using the camera features. This enables you to connect optional accessories to the universal connector on your handheld, such as update the information between your handheld and your handheld" in digital camera. Speaker Enables you should not have to music, videos, alarms, and game and ...system sounds on using HotSync technology. Under normal use, you to listen to use the reset button. Universal connector Connects your handheld to the cradle/cable, which in Chapter 12 for information about when and how to the wall current. The universal connector also ...
...computer, using the camera features. This enables you to connect optional accessories to the universal connector on your handheld, such as update the information between your handheld and your handheld" in digital camera. Speaker Enables you should not have to music, videos, alarms, and game and ...system sounds on using HotSync technology. Under normal use, you to listen to use the reset button. Universal connector Connects your handheld to the cradle/cable, which in Chapter 12 for information about when and how to the wall current. The universal connector also ...
Handbook
Page 25
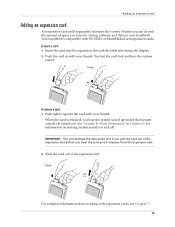
... released, you hear the tone and it releases from the expansion slot. 2. Push the card in Chapter 16 for storing software and data on your handheld. Push For complete information about working with SD, SDIO, or MultiMediaCard expansion cards. When the card is compatible with expansion cards, see Chapter 7. 15 Slide...
... released, you hear the tone and it releases from the expansion slot. 2. Push the card in Chapter 16 for storing software and data on your handheld. Push For complete information about working with SD, SDIO, or MultiMediaCard expansion cards. When the card is compatible with expansion cards, see Chapter 7. 15 Slide...

Handbook
Page 26
... and typing Like using a mouse to click elements on a computer screen, using the stylus to tap elements on your handheld screen is the basic action you can drag the stylus to select text. You can also use an actual pen, pencil, or other sharp object ...to drag the slider of the stylus for tapping or for specific text. (Find operations do not search through applications on the handheld screen as this will scratch the screen. Never use the stylus to write on expansion cards.) s Select options in dialog boxes. s Select menu commands...
... and typing Like using a mouse to click elements on a computer screen, using the stylus to tap elements on your handheld screen is the basic action you can drag the stylus to select text. You can also use an actual pen, pencil, or other sharp object ...to drag the slider of the stylus for tapping or for specific text. (Find operations do not search through applications on the handheld screen as this will scratch the screen. Never use the stylus to write on expansion cards.) s Select options in dialog boxes. s Select menu commands...


