
Owners Manual
Page 1
Right at Your Table MODEL PAB-3000 Please take a few minutes to Specialty Breads Easy and Delicious - By carefully following the instructions, your Auto Bakery will serve you long and well. OWNERS MANUAL AUTO BAKERY From Sandwich Breads to read these instructions before use.
Right at Your Table MODEL PAB-3000 Please take a few minutes to Specialty Breads Easy and Delicious - By carefully following the instructions, your Auto Bakery will serve you long and well. OWNERS MANUAL AUTO BAKERY From Sandwich Breads to read these instructions before use.
Owners Manual
Page 2
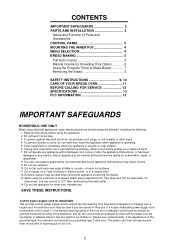
...or has been damaged in any control to "off parts. 7. Do not place on or near children. 6. Extreme caution must not be used , (1) the marked electrical rating of the cord set or extension cord should be at least as great as...PARTS AND INSTALLATION 3 Name and Function of Parts and Accessories CONTROL PANEL 3 MOUNTING THE INNER POT 4 MENU SELECTION 4 BREAD MAKING 5 Full Auto Course 5 Manual Course for Kneading Only Option 6 Using the Program Timer to Make Bread 7 Removing the Bread 8 SAFETY INSTRUCTIONS 9, 10 CARE OF YOUR BREAD OVEN 11 BEFORE CALLING FOR SERVICE 12 SPECIFICATIONS...
...or has been damaged in any control to "off parts. 7. Do not place on or near children. 6. Extreme caution must not be used , (1) the marked electrical rating of the cord set or extension cord should be at least as great as...PARTS AND INSTALLATION 3 Name and Function of Parts and Accessories CONTROL PANEL 3 MOUNTING THE INNER POT 4 MENU SELECTION 4 BREAD MAKING 5 Full Auto Course 5 Manual Course for Kneading Only Option 6 Using the Program Timer to Make Bread 7 Removing the Bread 8 SAFETY INSTRUCTIONS 9, 10 CARE OF YOUR BREAD OVEN 11 BEFORE CALLING FOR SERVICE 12 SPECIFICATIONS...
Owners Manual
Page 3
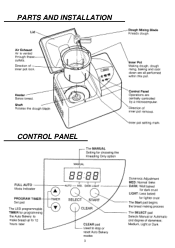
PARTS AND INSTALLATION CONTROL PANEL 3
PARTS AND INSTALLATION CONTROL PANEL 3
Owners Manual
Page 4
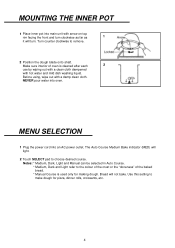
... facing the front and turn . MENU SELECTION 1 Plug the power cord into oven. Bread will not bake. Use this setting to remove. 2 Position the dough blade onto shaft. Turn counter clockwise to make dough for making dough. Make sure interior of the baked bread. * Manual Course is cleaned after each 2 use by wiping out with a clean cloth dampened with a damp clean cloth.
... facing the front and turn . MENU SELECTION 1 Plug the power cord into oven. Bread will not bake. Use this setting to remove. 2 Position the dough blade onto shaft. Turn counter clockwise to make dough for making dough. Make sure interior of the baked bread. * Manual Course is cleaned after each 2 use by wiping out with a clean cloth dampened with a damp clean cloth.
Owners Manual
Page 5
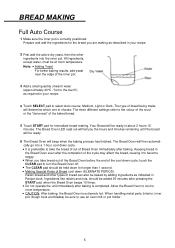
... sure the inner pot is extremely hot. The type of the baked bread. 5 Touch START pad for immediate bread making as described in Recipe book. The three different settings refer to the colour of the crust or the "doneness" of bread being made will determine which one to select Auto course: Medium,...soggy. The CLEAR pad should be held down for the bread you are making . START pad, when the Bread Oven beeps 10 times. When handling metal parts (interior, inner pot, dough hook and blades) be sure to . Note: Adding Yeast For better baking results, add yeast near the edge of the inner ...
... sure the inner pot is extremely hot. The type of the baked bread. 5 Touch START pad for immediate bread making as described in Recipe book. The three different settings refer to the colour of the crust or the "doneness" of bread being made will determine which one to select Auto course: Medium,...soggy. The CLEAR pad should be held down for the bread you are making . START pad, when the Bread Oven beeps 10 times. When handling metal parts (interior, inner pot, dough hook and blades) be sure to . Note: Adding Yeast For better baking results, add yeast near the edge of the inner ...
Owners Manual
Page 6
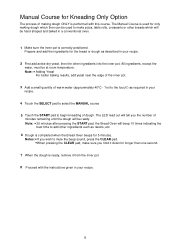
...Dough is performed with the instructions given in your recipe. 6 Note: Adding Yeast For better baking results, add yeast near the edge of the inner pot. 3 Add a small quantity of warm water (approximately 40°C - All ingredients, except the . The LED read out will be ready. Manual Course for Kneading.... 7 When the dough is correctly positioned. The Manual Course is used to add other ingredients such as required in your recipe. 2 First add active dry yeast, then the other breads which then can be used for only making dough ONLY is completed when the Bread Oven beeps for 5...
...Dough is performed with the instructions given in your recipe. 6 Note: Adding Yeast For better baking results, add yeast near the edge of the inner pot. 3 Add a small quantity of warm water (approximately 40°C - All ingredients, except the . The LED read out will be ready. Manual Course for Kneading.... 7 When the dough is correctly positioned. The Manual Course is used to add other ingredients such as required in your recipe. 2 First add active dry yeast, then the other breads which then can be used for only making dough ONLY is completed when the Bread Oven beeps for 5...

Owners Manual
Page 7
... down for longer than one second in the programmed amount of time. Manual Course 1 hour 10 hrs. . Do no use the PROGRAM TIMER when making bread or dough containing ingredients that rapidly adsorb liquids such as eggs or milk, or ...recipe. 4 Touch SELECT pad to Make Bread or Dough 1 Make sure the inner pot is correctly positioned. Note: Adding Yeast For better baking results, add yeast near the edge of the inner pot 3 Add specified amount of hours and minutes remaining. The same procedure applies for the bread or dough you are making dough with the Manual setting...
... down for longer than one second in the programmed amount of time. Manual Course 1 hour 10 hrs. . Do no use the PROGRAM TIMER when making bread or dough containing ingredients that rapidly adsorb liquids such as eggs or milk, or ...recipe. 4 Touch SELECT pad to Make Bread or Dough 1 Make sure the inner pot is correctly positioned. Note: Adding Yeast For better baking results, add yeast near the edge of the inner pot 3 Add specified amount of hours and minutes remaining. The same procedure applies for the bread or dough you are making dough with the Manual setting...

Owners Manual
Page 8
Removing the Bread 1 Turn the inner pot counter clockwise to remove it from the main unit. 1 2 Turn the inner pot upside down to carefully remove the baked bread. 2 3 With a plastic or other non metallic utensil, remove the dough blade which is imbedded in 3 the bottom of the bread. 4 Let the bread cool to room temperature then cut as desired and serve. 4 CAUTION: All metal components of the Bread Oven are extremely hot during and after the baking process. Use oven mitts or a pot holder when handling the inner pot, dough blade or the dough hook. 8
Removing the Bread 1 Turn the inner pot counter clockwise to remove it from the main unit. 1 2 Turn the inner pot upside down to carefully remove the baked bread. 2 3 With a plastic or other non metallic utensil, remove the dough blade which is imbedded in 3 the bottom of the bread. 4 Let the bread cool to room temperature then cut as desired and serve. 4 CAUTION: All metal components of the Bread Oven are extremely hot during and after the baking process. Use oven mitts or a pot holder when handling the inner pot, dough blade or the dough hook. 8
Owners Manual
Page 9
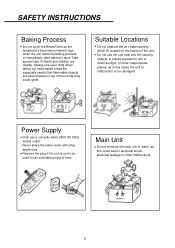
... other inappropriate places, as the temperature becomes extremely high when the unit starts the baking process, or immediately after baking is not to electrical shock, electrical leakage or other . SAFETY INSTRUCTIONS Baking Process . SuitabIe Locations . Never share the same outlet with other malfunctions. 9 Remove...it may cause the unit to malfunction or be used for an extended period of the unit. Always use oven mitts when taking out fresh-baked bread Be especially careful that flammable objects are nearby. Do not use a correctly wired 240V AC 50Hz socket outlet. ...
... other inappropriate places, as the temperature becomes extremely high when the unit starts the baking process, or immediately after baking is not to electrical shock, electrical leakage or other . SAFETY INSTRUCTIONS Baking Process . SuitabIe Locations . Never share the same outlet with other malfunctions. 9 Remove...it may cause the unit to malfunction or be used for an extended period of the unit. Always use oven mitts when taking out fresh-baked bread Be especially careful that flammable objects are nearby. Do not use a correctly wired 240V AC 50Hz socket outlet. ...
Owners Manual
Page 10
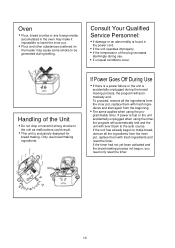
... transmit strong shocks to insert the inner pot. Only use . dients and start again from the inner pot, replace them with fresh ingredients and reset the timer. If the timer had not yet been activated and the bread making . Consult Your Qualified Service Personnel: . alarmingly during baking. Handling of the plug increases . the unit as...
... transmit strong shocks to insert the inner pot. Only use . dients and start again from the inner pot, replace them with fresh ingredients and reset the timer. If the timer had not yet been activated and the bread making . Consult Your Qualified Service Personnel: . alarmingly during baking. Handling of the plug increases . the unit as...

Owners Manual
Page 11
... Unit . from getting scratched and damaged, do not use . thoroughly with a . Next wipe with a sponge or soft cloth. Nylon and metal brushes cannot be used . CARE OF YOUR BREAD OVEN Inner Pot and Dough Blade .Clean these parts thoroughly using a sponge or soft cloth dampened in hot water and... . Remove all foreign matter, etc. Be sure to remove baked on the bottom of the oven, use a clean cloth dampened ...
... Unit . from getting scratched and damaged, do not use . thoroughly with a . Next wipe with a sponge or soft cloth. Nylon and metal brushes cannot be used . CARE OF YOUR BREAD OVEN Inner Pot and Dough Blade .Clean these parts thoroughly using a sponge or soft cloth dampened in hot water and... . Remove all foreign matter, etc. Be sure to remove baked on the bottom of the oven, use a clean cloth dampened ...
Owners Manual
Page 12
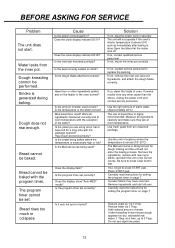
... normal (18°-20°C) The Manual course is highly recommended. Remove the ingredients, replace with the exception of water used correct? Water leaks from the inner pot. Is the seal correctly seated on the heater in the oven burned? Is it been stored incorrectly? Dough kneading cannot be set. Does the clock display indicate OE...
... normal (18°-20°C) The Manual course is highly recommended. Remove the ingredients, replace with the exception of water used correct? Water leaks from the inner pot. Is the seal correctly seated on the heater in the oven burned? Is it been stored incorrectly? Dough kneading cannot be set. Does the clock display indicate OE...

Owners Manual
Page 13
SPECIFICATIONS System CPU Power supply Auto-blend method 4 Bit 6KB AC 240V, 50Hz Power consumption 450W Size Weight Weight of bread Size of bread 430(W) x 325(D) 330(H) mm Approx. 6.5kg (1 4.8 Ibs) Approx. 360g (0.81 Ibs.) Approx. 135(D) x 160(H) mm *Specifications subject to change without notice. 13
SPECIFICATIONS System CPU Power supply Auto-blend method 4 Bit 6KB AC 240V, 50Hz Power consumption 450W Size Weight Weight of bread Size of bread 430(W) x 325(D) 330(H) mm Approx. 6.5kg (1 4.8 Ibs) Approx. 360g (0.81 Ibs.) Approx. 135(D) x 160(H) mm *Specifications subject to change without notice. 13

Owners Manual
Page 14
PALSONIC CORPORATION PTY LTD 1 JOYNTON AVENUE WATERLOO NSW 2017 AUSTRALIA TEL:(02)9313 7111 FAX:(02)9313 7555 www.palsonic.com.au PALSONIC CUSTOMER SERVICE TELEPHONE AUSTRALIA: 1300 657 888 F4565
PALSONIC CORPORATION PTY LTD 1 JOYNTON AVENUE WATERLOO NSW 2017 AUSTRALIA TEL:(02)9313 7111 FAX:(02)9313 7555 www.palsonic.com.au PALSONIC CUSTOMER SERVICE TELEPHONE AUSTRALIA: 1300 657 888 F4565

