Palsonic TFTV435 Support and Manuals
Get Help and Manuals for this Palsonic item

View All Support Options Below
Free Palsonic TFTV435 manuals!
Problems with Palsonic TFTV435?
Ask a Question
Free Palsonic TFTV435 manuals!
Problems with Palsonic TFTV435?
Ask a Question
Popular Palsonic TFTV435 Manual Pages
Owners Manual - Page 1

OWNER'S MANUAL
43CM CORDLESS REMOTE LCD TV/MONITOR MODEL: TFTV435
N111
PALSONIC CORPORATION PTY LTD 1 JOYNTON AVENUE
WATERLOO NSW 2017 AUSTRALIA TEL: (02) 9313 7111 FAX: (02) 9313 7555 www.palsonic.com.au
PALSONIC CUSTOMER SERVICE TELEPHONE
AUSTRALIA: 1300 657 888
Owners Manual - Page 2

... 21 Audio Setting 22 System Setting 23 OSD Setting 24 Timer setting 25 Operations in this manual may differ from the actual model.
Contents Index
Important Safety Cautions 1 Identification of this manual in an easily accessible location for future reference.
Keep this unit. Note: Screen displays and illustrations in RGB/YPbPr mode 26 Troubleshooting 28 Specifications 29
Owners Manual - Page 4
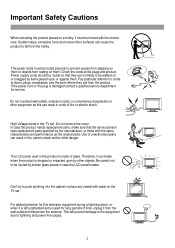
...service person uses replacement parts specified by other objects. Pay particular attention to cords at the plugs and product. Do not overload wall outlets, extension cords, or convenience receptacles on other danger.
Don't try to be injured by items placed upon by the manufacturer, or those with water on the TV set...In case the product needs replacement parts, make sure that they exit...
Owners Manual - Page 6
...( )
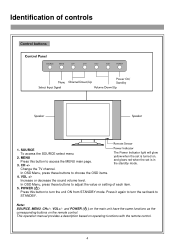
Press this button to
STANDBY.
CH +/-
VOL +/- Press it again to adjust the value or setting of controls
1. In OSD Menu, press these buttons to turn the unit ON from STANDBY mode. Note... remote control.
4
In OSD Menu, press these buttons to turn the set is in the standby mode. Change the TV channel. Identification of each item.
5. Increase or decrease...
Owners Manual - Page 13
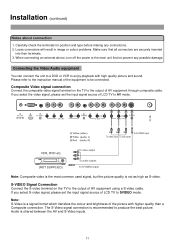
...problems. Make sure that all connectors are securely inserted
into their terminals. 3. S-VIDEO Signal Connection Connect the S-video terminal on the TV to be connected. Installation (continued)
1. If you select the video signal, please set... S-Video inputs.
11
Please refer to the instruction manual of the equipment to the output of LCD TV to enjoy playback with higher quality than...
Owners Manual - Page 14
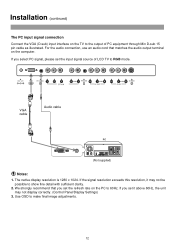
...12 VGA cable
Audio cable
(Not supplied)
Notes: 1.
If you select PC signal, please set the input signal source of PC equipment through Min D-sub 15 pin cable as illustrated. If .... For the audio connection, use an audio cord that you set it may not display correctly. (Control Panel/Display Settings) 3. Installation (continued)
The PC input signal connection Connect the VGA (D-sub...
Owners Manual - Page 15
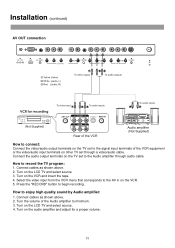
... a video/audio cable. Press the "RECORD" button to minimum. 3. Turn on the TV set through audio cable. Connect cables as shown above . 2. Connect the audio output terminals on the audio amplifier and adjust for a proper volume.
13 Installation (continued)
AV OUT connection
How to connect: Connect the video/audio output terminals on...
Owners Manual - Page 16
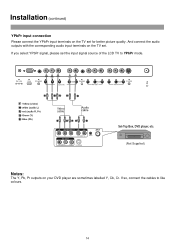
... audio outputs with the corresponding audio input terminals on your DVD player are sometimes labelled Y, Cb, Cr. If so, connect the cables to YPbPr mode. Installation (continued)
YPbPr input connection
Please connect the YPbPr input terminals on the TV set the input signal source of the LCD TV to like colours.
14
Owners Manual - Page 17
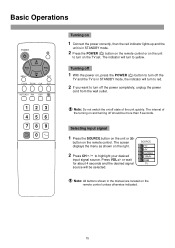
... menu as shown on the remote control. Note: Do not switch the on/off state of the turning on the TV set.
Press VOL+/- Note: All buttons shown in the manual are located on
1 Connect the power correctly, then the red indicator lights up and the
unit is in STANDBY mode.
2 Press...
Owners Manual - Page 18
...
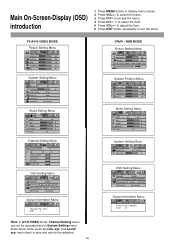
brightness
50
contrast
60
color temp 5000K 7300K 9300K user
customer temp setting
System Position Menu
h position
50
v position
50
frequency
866
phase
15
Audio Setting Menu
SRS bass treble balance AVC
on
manual search
auto search
fine tune
channel edit
OSD Setting Menu
language
English
OSD position
OSD background opaque translucent
OSD timeout...
Owners Manual - Page 19
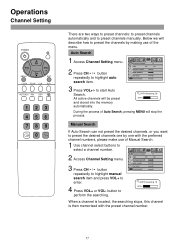
... searching stops, this channel is then memorised with the preferred channel numbers, please make use of Manual Search.
1 Use channel select buttons to select a channel number.
2 Access Channel Setting menu.
3 Press CH
button
repeatedly to highlight manual
search item and press VOL+ to preset the channels by one with the preset channel number...
Owners Manual - Page 20
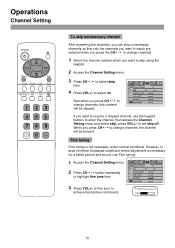
... broadcast conditions where adjustment is not necessary under normal conditions.
channel number
9
skip
off
on
manual search
auto search
fine tune
channel edit
If you want to resume a skipped channel, use Fine tuning.
1 Access the Channel Setting menu.
2 Press CH
button repeatedly
to highlight fine tune item.
3 Press VOL+/-
to fine tune...
Owners Manual - Page 21
Operations
Channel Setting
POWER
CH
VOL
VOL
-
+
CH
MENU
EXIT
C.SYS ZOOM CLK SLP
AUTO.ADJ P.M DSP
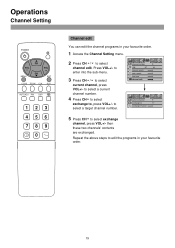
1 23 4...programs in your favourite order.
1 Access the Channel Setting menu.
2 Press CH
to select exchange
channel, press VOL+/-
then these two channels' contents are exchanged. channel number
9
skip
off
on
manual search
auto search
fine tune
channel edit
current channel
9...
Owners Manual - Page 23
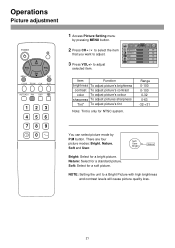
... button.
2 Press CH
to select the item
brightness
50
that you want to adjust. There are four picture modes: Bright, Nature, Soft and User. NOTE: Setting the unit to adjust
tint
0
selected item. Operations
Picture adjustment
POWER
CH
VOL
VOL
-
+
CH
MENU
EXIT
C.SYS ZOOM CLK SLP
AUTO.ADJ P.M DSP
1 23...
Owners Manual - Page 30
... the sound is output to repair a defective TV yourself.
28...
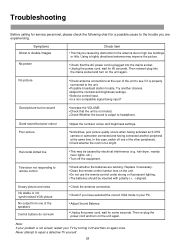
Note: If your problem is not solved, restart your ...the other peripherals. Replace if necessary. Snowy...settings. Check whether the room is plugged into the mains socket and turn on the unit again. Troubleshooting
Before calling for service personnel, please check the following chart for a possible cause to the trouble...
Palsonic TFTV435 Reviews
We have not received any reviews for Palsonic yet.