

Owners Manual
Page 1
OWNER'S MANUAL 43CM CORDLESS REMOTE LCD TV/MONITOR MODEL: TFTV435 N111 PALSONIC CORPORATION PTY LTD 1 JOYNTON AVENUE WATERLOO NSW 2017 AUSTRALIA TEL: (02) 9313 7111 FAX: (02) 9313 7555 www.palsonic.com.au PALSONIC CUSTOMER SERVICE TELEPHONE AUSTRALIA: 1300 657 888
OWNER'S MANUAL 43CM CORDLESS REMOTE LCD TV/MONITOR MODEL: TFTV435 N111 PALSONIC CORPORATION PTY LTD 1 JOYNTON AVENUE WATERLOO NSW 2017 AUSTRALIA TEL: (02) 9313 7111 FAX: (02) 9313 7555 www.palsonic.com.au PALSONIC CUSTOMER SERVICE TELEPHONE AUSTRALIA: 1300 657 888

Owners Manual
Page 2
... actual model. Note: Screen displays and illustrations in this manual in RGB/YPbPr mode 26 Troubleshooting 28 Specifications 29 Congratulation on your purchase of this LCD TV We recommend that you read this manual thoroughly before use to fully enjoy the many functions and excellent features of controls 4 Control buttons 4 Back 5 Remote control 6 Installation 8 Basic operations 5 Main OSD introduction 16 Operations 17 Channel Setting 17 Selecting channel 20 Picture adjustment 21 Audio Setting 22 System Setting...
... actual model. Note: Screen displays and illustrations in this manual in RGB/YPbPr mode 26 Troubleshooting 28 Specifications 29 Congratulation on your purchase of this LCD TV We recommend that you read this manual thoroughly before use to fully enjoy the many functions and excellent features of controls 4 Control buttons 4 Back 5 Remote control 6 Installation 8 Basic operations 5 Main OSD introduction 16 Operations 17 Channel Setting 17 Selecting channel 20 Picture adjustment 21 Audio Setting 22 System Setting...

Owners Manual
Page 3
..., turn off the power supply at once and remove the plug from a low temperature to fall, resulting in fire, electric shock, or other heat generating products (including amplifiers). Use a damp cloth for working.... Do not cover or block these vents and openings since they can cause the product to high temperature environment, as radiators heaters, stoves other hazards. Use only a trolley, stand, tripod, and bracket or table recommended by the manufacturer or sold with the product. 1 Do not place the product on an unstable trolley, stand, tripod or table...
..., turn off the power supply at once and remove the plug from a low temperature to fall, resulting in fire, electric shock, or other heat generating products (including amplifiers). Use a damp cloth for working.... Do not cover or block these vents and openings since they can cause the product to high temperature environment, as radiators heaters, stoves other hazards. Use only a trolley, stand, tripod, and bracket or table recommended by the manufacturer or sold with the product. 1 Do not place the product on an unstable trolley, stand, tripod or table...
Owners Manual
Page 6
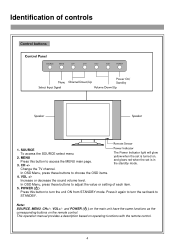
... light will glow yellow when the set is turned on, and glows red when the set back to turn the unit ON from STANDBY mode. Change the TV channel. Note: SOURCE, MENU, CH+/-, VOL+/- and POWER ( ) on the main unit have the same functions as the corresponding buttons on operating functions with the remote control. 4 Increase or decrease the sound volume level. Identification of each item. 5. This operation manual provides a description based...
... light will glow yellow when the set is turned on, and glows red when the set back to turn the unit ON from STANDBY mode. Change the TV channel. Note: SOURCE, MENU, CH+/-, VOL+/- and POWER ( ) on the main unit have the same functions as the corresponding buttons on operating functions with the remote control. 4 Increase or decrease the sound volume level. Identification of each item. 5. This operation manual provides a description based...

Owners Manual
Page 7
...cable & Antenna input 5 HDTV input (Y, Pb, Pr, Audio L, R) Connect to record programs. 6. Identification of the Power Adapter 2. Headphone 3.5mm jack 5. S-Video input Receive a S-Video signal from external sources such as VCR or DVD player. 8. AV outputs (Video, Audio L, R) Connect to the VCR input jacks to the Y/Pb/Pr (or Y/Cb/Cr) and audio output jacks of a Set-Top Box or DVD player. 4. Connect to the DC output of controls (continued) 1. AV inputs (Video, Audio L, R) Receive video/audio signals from external source such as VCR or DVD player. 7. VGA input / PC- DC POWER input...
...cable & Antenna input 5 HDTV input (Y, Pb, Pr, Audio L, R) Connect to record programs. 6. Identification of the Power Adapter 2. Headphone 3.5mm jack 5. S-Video input Receive a S-Video signal from external sources such as VCR or DVD player. 8. AV outputs (Video, Audio L, R) Connect to the VCR input jacks to the Y/Pb/Pr (or Y/Cb/Cr) and audio output jacks of a Set-Top Box or DVD player. 4. Connect to the DC output of controls (continued) 1. AV inputs (Video, Audio L, R) Receive video/audio signals from external source such as VCR or DVD player. 7. VGA input / PC- DC POWER input...

Owners Manual
Page 8
... menu Setting sleep timer Clock setting Previous channel Display the current state Direct channel selector Select OSD menu position Adjust the treble Flip the cover, open in the arrow direction. 6 Remote Control Power on/standby Volume up /down selector; OSD S.MODE POSITION Bass+ Treb+ Bass - Treb- In the menu operation, adjust the selected item Access the menu Colour system select Zoom mode selection Auto correct picture Select picture mode between Bright, Nature, Soft & User Select the input signal source Sound mode selection Adjust...
... menu Setting sleep timer Clock setting Previous channel Display the current state Direct channel selector Select OSD menu position Adjust the treble Flip the cover, open in the arrow direction. 6 Remote Control Power on/standby Volume up /down selector; OSD S.MODE POSITION Bass+ Treb+ Bass - Treb- In the menu operation, adjust the selected item Access the menu Colour system select Zoom mode selection Auto correct picture Select picture mode between Bright, Nature, Soft & User Select the input signal source Sound mode selection Adjust...

Owners Manual
Page 9
... different types of the TV, the remote operation can be come erratic. 8. Do not drop or dampen the remote control. 3. There should be used for a long period of the remote control Notes: 1. If the remote control does not work, please check whether the batteries are worn out, remove the batteries. 2. Use the remote control within the effective range as shown in the figure on the remote sensor...
... different types of the TV, the remote operation can be come erratic. 8. Do not drop or dampen the remote control. 3. There should be used for a long period of the remote control Notes: 1. If the remote control does not work, please check whether the batteries are worn out, remove the batteries. 2. Use the remote control within the effective range as shown in the figure on the remote sensor...

Owners Manual
Page 11
... adapter. 2. Installation (continued) Power connection Connect to the wall outlet as illustrated. This product should only be operated with the type source marked on the label on your area. 9 Always unplug the AC adapter from the product and power outlet when the LCD TV is secure. 1. Connecting the male plug to the DC input socket of the back of the set. 3. Connecting the female plug to fully insert plug...
... adapter. 2. Installation (continued) Power connection Connect to the wall outlet as illustrated. This product should only be operated with the type source marked on the label on your area. 9 Always unplug the AC adapter from the product and power outlet when the LCD TV is secure. 1. Connecting the male plug to the DC input socket of the back of the set. 3. Connecting the female plug to fully insert plug...
Owners Manual
Page 13
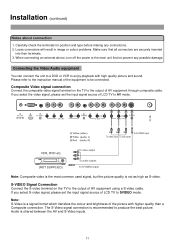
... S-video signal, please set the input signal source of LCD TV to SVIDEO mode. Audio is not as high as S-video. Installation (continued) 1. When connecting an external device, turn off the power to enjoy playback with higher quality than a Composite connection. If you select the video signal, please set the input signal source of LCD TV to be connected. Note: S-Video is recommended to the instruction manual of the picture with high quality picture and sound. Connecting the Video/Audio equipment You can connect...
... S-video signal, please set the input signal source of LCD TV to SVIDEO mode. Audio is not as high as S-video. Installation (continued) 1. When connecting an external device, turn off the power to enjoy playback with higher quality than a Composite connection. If you select the video signal, please set the input signal source of LCD TV to be connected. Note: S-Video is recommended to the instruction manual of the picture with high quality picture and sound. Connecting the Video/Audio equipment You can connect...
Owners Manual
Page 14
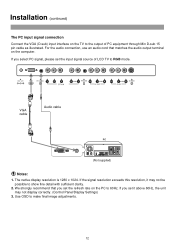
...) The PC input signal connection Connect the VGA (D-sub) input interface on the TV to make final image adjustments. 12 For the audio connection, use an audio cord that you set it may not display correctly. (Control Panel/Display Settings) 3. If you set the refresh rate on the PC to show fine detail with sufficient clarity. 2. The native display resolution is 1280 x 1024. Use OSD to the output of LCD TV to RGB mode.
...) The PC input signal connection Connect the VGA (D-sub) input interface on the TV to make final image adjustments. 12 For the audio connection, use an audio cord that you set it may not display correctly. (Control Panel/Display Settings) 3. If you set the refresh rate on the PC to show fine detail with sufficient clarity. 2. The native display resolution is 1280 x 1024. Use OSD to the output of LCD TV to RGB mode.
Owners Manual
Page 15
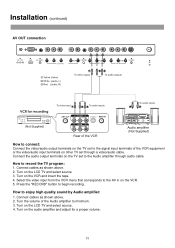
... TV program: 1. How to enjoy high quality sound by Audio amplifier: 1. Turn the volume of the VCR equipment or the video/audio input terminals on other TV set to the Audio amplifier through a video/audio cable. Turn on the LCD TV and select source. 4. Connect cables as shown above . 2. Turn on the VCR and insert the tape. 4. Installation (continued) AV OUT connection How to connect: Connect the video/audio output terminals on the TV set to the signal input...
... TV program: 1. How to enjoy high quality sound by Audio amplifier: 1. Turn the volume of the VCR equipment or the video/audio input terminals on other TV set to the Audio amplifier through a video/audio cable. Turn on the LCD TV and select source. 4. Connect cables as shown above . 2. Turn on the VCR and insert the tape. 4. Installation (continued) AV OUT connection How to connect: Connect the video/audio output terminals on the TV set to the signal input...
Owners Manual
Page 16
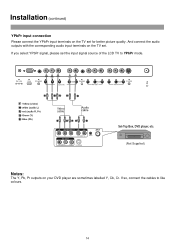
If so, connect the cables to YPbPr mode. Installation (continued) YPbPr input connection Please connect the YPbPr input terminals on your DVD player are sometimes labelled Y, Cb, Cr. If you select YPbPr signal, please set the input signal source of the LCD TV to like colours. 14 Notes: The Y, Pb, Pr outputs on the TV set . And connect the audio outputs with the corresponding audio input terminals on the TV set for better picture quality.
If so, connect the cables to YPbPr mode. Installation (continued) YPbPr input connection Please connect the YPbPr input terminals on your DVD player are sometimes labelled Y, Cb, Cr. If you select YPbPr signal, please set the input signal source of the LCD TV to like colours. 14 Notes: The Y, Pb, Pr outputs on the TV set . And connect the audio outputs with the corresponding audio input terminals on the TV set for better picture quality.
Owners Manual
Page 17
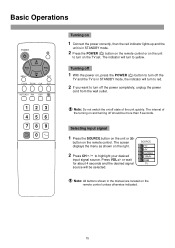
... 5 seconds. Turning on 1 Connect the power correctly, then the red indicator lights up and the unit is in STANDBY mode. 2 Press the POWER ( ) button on the remote control or on the unit to turn to turn off the TV and the TV is in the manual are located on , press the POWER ( ) button to yellow. Turning off 1 With the power on the remote control unless otherwise indicated. 15 The screen displays the menu as...
... 5 seconds. Turning on 1 Connect the power correctly, then the red indicator lights up and the unit is in STANDBY mode. 2 Press the POWER ( ) button on the remote control or on the unit to turn to turn off the TV and the TV is in the manual are located on , press the POWER ( ) button to yellow. Turning off 1 With the power on the remote control unless otherwise indicated. 15 The screen displays the menu as...
Owners Manual
Page 18
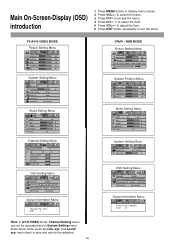
... sound sys. to adjust the item. 6 Press EXIT button repeatedly to display menu screen. 2 Press VOL+/- sleep time on 6 fill all Auto I 10 minutes Audio Setting Menu SRS bass treble balance AVC on off 0 0 0 off Channel Setting Menu channel number 9 skip off on off 0 0 0 off System Setting Menu sleep time back light 20 minutes 6 OSD Setting Menu language English OSD position OSD background opaque translucent OSD timeout 30 seconds Signal Information Menu resolution: 640 x 480/60Hz mode: 40 menu...
... sound sys. to adjust the item. 6 Press EXIT button repeatedly to display menu screen. 2 Press VOL+/- sleep time on 6 fill all Auto I 10 minutes Audio Setting Menu SRS bass treble balance AVC on off 0 0 0 off Channel Setting Menu channel number 9 skip off on off 0 0 0 off System Setting Menu sleep time back light 20 minutes 6 OSD Setting Menu language English OSD position OSD background opaque translucent OSD timeout 30 seconds Signal Information Menu resolution: 640 x 480/60Hz mode: 40 menu...

Owners Manual
Page 22
... -/-- Using previous channel button Press button to know current channel number information. 20 Using Keypad buttons 1 To select one-digit channel numbers: Input the channel using the 09 number button. button to display ---, then input the channel using the 0-9 number button, then wait for about 2 seconds. 2 To select two-digit channel numbers: Press -/-- Using Channel up/down buttons 1 Press CH button, the channel number increases; 2 Press CH button, the channel number decreases. Operations Selecting channel POWER CH VOL VOL - + CH MENU EXIT C.SYS ZOOM CLK SLP AUTO...
... -/-- Using previous channel button Press button to know current channel number information. 20 Using Keypad buttons 1 To select one-digit channel numbers: Input the channel using the 09 number button. button to display ---, then input the channel using the 0-9 number button, then wait for about 2 seconds. 2 To select two-digit channel numbers: Press -/-- Using Channel up/down buttons 1 Press CH button, the channel number increases; 2 Press CH button, the channel number decreases. Operations Selecting channel POWER CH VOL VOL - + CH MENU EXIT C.SYS ZOOM CLK SLP AUTO...
Owners Manual
Page 23
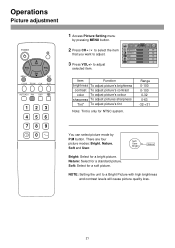
... brightness To adjust picture's brightness contrast To adjust picture's contrast color To adjust picture's colour sharpness To adjust pictures sharpness Tint* To adjust picture's tint Note: Tint is only for a standard picture. Soft: Select for a bright picture. Soft User Bright Nature Bright: Select for a soft picture. Operations Picture adjustment POWER CH VOL VOL - + CH MENU EXIT C.SYS ZOOM CLK SLP AUTO.ADJ P.M DSP 1 23 4 56 789 0 -/-- 1 Access Picture Setting menu by P.M button. contrast 50 color 16 sharpness...
... brightness To adjust picture's brightness contrast To adjust picture's contrast color To adjust picture's colour sharpness To adjust pictures sharpness Tint* To adjust picture's tint Note: Tint is only for a standard picture. Soft: Select for a bright picture. Soft User Bright Nature Bright: Select for a soft picture. Operations Picture adjustment POWER CH VOL VOL - + CH MENU EXIT C.SYS ZOOM CLK SLP AUTO.ADJ P.M DSP 1 23 4 56 789 0 -/-- 1 Access Picture Setting menu by P.M button. contrast 50 color 16 sharpness...

Owners Manual
Page 24
... sound output when the modulation signal is incorporated under USER mode. 22 Music: Select for a movie program. Operations Audio Setting POWER CH VOL VOL - + CH MENU EXIT C.SYS ZOOM CLK SLP AUTO.ADJ P.M DSP 1 23 4 56 789 0 -/-- You can press S.M button on the remote control to switch the sound mode between user, movie, music, and news. SRS technology is low. Press the button again to adjust the volume every time the channel is an audio...
... sound output when the modulation signal is incorporated under USER mode. 22 Music: Select for a movie program. Operations Audio Setting POWER CH VOL VOL - + CH MENU EXIT C.SYS ZOOM CLK SLP AUTO.ADJ P.M DSP 1 23 4 56 789 0 -/-- You can press S.M button on the remote control to switch the sound mode between user, movie, music, and news. SRS technology is low. Press the button again to adjust the volume every time the channel is an audio...

Owners Manual
Page 25
... ZOOM button on the remote control to adjust selected item. to set screen display size. 23 Selects colour system. Sleep Time Setting sleep timer. Normally please set will display Blue Screen blue background when there is no input signal (in TV, AV, SVIDEO mode). sleep time on 6 fill all Auto I 10 minutes Item Function Choice/Range If you want to select until the sound is normal. Backlight Adjusts the backlight brightness. 0 - 10 Scaler Mode Setting screen display size. You...
... ZOOM button on the remote control to adjust selected item. to set screen display size. 23 Selects colour system. Sleep Time Setting sleep timer. Normally please set will display Blue Screen blue background when there is no input signal (in TV, AV, SVIDEO mode). sleep time on 6 fill all Auto I 10 minutes Item Function Choice/Range If you want to select until the sound is normal. Backlight Adjusts the backlight brightness. 0 - 10 Scaler Mode Setting screen display size. You...

Owners Manual
Page 28
... signal format is changed or when you switch to the best status by pressing the AUTO. The screen displays the menu shown as you can not adjust the picture to RGB mode from your screen. 26 During the process of the LCD panel is finished. Press VOL+/- or wait about 4 seconds and the signal source is VGA input signal. The signal format should be sure that there is selected. Note: The resolution...
... signal format is changed or when you switch to the best status by pressing the AUTO. The screen displays the menu shown as you can not adjust the picture to RGB mode from your screen. 26 During the process of the LCD panel is finished. Press VOL+/- or wait about 4 seconds and the signal source is VGA input signal. The signal format should be sure that there is selected. Note: The resolution...
Owners Manual
Page 30
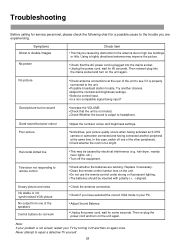
.... Is a non-compatible signal being input? Possible broadcast station trouble. Clean the remote control sensor lens on the unit again. Then re-plug the power cord and turn on the unit. Troubleshooting Before calling for service personnel, please check the following chart for a possible cause to the trouble you have selected the correct VGA mode in your TV by turning it is properly connected to the unit...
.... Is a non-compatible signal being input? Possible broadcast station trouble. Clean the remote control sensor lens on the unit again. Then re-plug the power cord and turn on the unit. Troubleshooting Before calling for service personnel, please check the following chart for a possible cause to the trouble you have selected the correct VGA mode in your TV by turning it is properly connected to the unit...


