

Owners Manual
Page 1
TFTV740HL 72cm(29")HD LED TV
TFTV740HL 72cm(29")HD LED TV

Owners Manual
Page 2
... Digital Output ...11 Connecting to a PC ...12 Connecting to Earphones ...12 Connecting to TV-Signal Input ...13 Basic Operation ...14 Turning the TV On and Off ...14 Source selecting...14 Channel Selection ...14 The First Time Installation...14 TV Operation and System Setup 15 Picture Setting ...15 Sound Setting ...16 Channel ...17 Feature...
... Digital Output ...11 Connecting to a PC ...12 Connecting to Earphones ...12 Connecting to TV-Signal Input ...13 Basic Operation ...14 Turning the TV On and Off ...14 Source selecting...14 Channel Selection ...14 The First Time Installation...14 TV Operation and System Setup 15 Picture Setting ...15 Sound Setting ...16 Channel ...17 Feature...
Owners Manual
Page 7
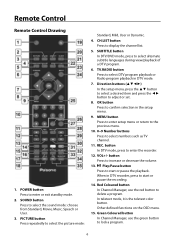
SOUND button Press to select numbers such as TV channel. 11. MENU button Press to enter setup menu or return to the previous menu. 10. 0~9 Number buttons Press to select the sound mode: choose ... teletext mode, it is the teletext color button. CH.LIST button Press to select DTV program playback or Radio program playback in the setup menu. 9. TV.RADIO button Press to display the channel list. 5. REC. PICTURE button Press repeatedly to start or pause the recording. 14. Play/Pause button Press to...
SOUND button Press to select numbers such as TV channel. 11. MENU button Press to enter setup menu or return to the previous menu. 10. 0~9 Number buttons Press to select the sound mode: choose ... teletext mode, it is the teletext color button. CH.LIST button Press to select DTV program playback or Radio program playback in the setup menu. 9. TV.RADIO button Press to display the channel list. 5. REC. PICTURE button Press repeatedly to start or pause the recording. 14. Play/Pause button Press to...

Owners Manual
Page 8
... defined functions on the screen. 26. EXIT button Press to select audio language in DTV mode. 23. Press to change the mode between TV and Teletext 17. TV/TXT Press to select sound track in the lower half of teletext letters in other modes except DTV mode. 34. In teletext mode, press...
... defined functions on the screen. 26. EXIT button Press to select audio language in DTV mode. 23. Press to change the mode between TV and Teletext 17. TV/TXT Press to select sound track in the lower half of teletext letters in other modes except DTV mode. 34. In teletext mode, press...

Owners Manual
Page 14
Then press the INPUT button and the direction buttons to select DTV or ATV mode, press the OK button to the RF Jack on the back of the unit so that you can receive television programs. 1. Connect TV signal input source from the aerial to the RF jack on the power of the unit. 2. After connection, turn on the rear panel of the unit. 3. System Connections Connecting to TV-Signal Input Connect the TV signal cable (the antenna cable, for example) to confirm and conduct program selection. 13
Then press the INPUT button and the direction buttons to select DTV or ATV mode, press the OK button to the RF Jack on the back of the unit so that you can receive television programs. 1. Connect TV signal input source from the aerial to the RF jack on the power of the unit. 2. After connection, turn on the rear panel of the unit. 3. System Connections Connecting to TV-Signal Input Connect the TV signal cable (the antenna cable, for example) to confirm and conduct program selection. 13

Owners Manual
Page 15
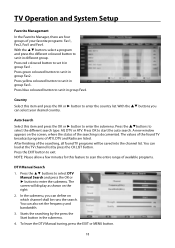
...list by using the numeric buttons. 4. Channel Selection 1. You have also quick access to set . Follow the prompts on the screen to the different TV channels by press the CH.LIST button. 14 Press the INPUT button to enter Input menu, as shown right. — Use the ▲▼ ... The first time you selected the desired source press the OK button to their original status, the Auto Installation will be illuminated red indicating the TV is turned ON. — Press the POWER button again to wall AC Outlet. A front mounted indicator light will be saved into the channel list....
...list by using the numeric buttons. 4. Channel Selection 1. You have also quick access to set . Follow the prompts on the screen to the different TV channels by press the CH.LIST button. 14 Press the INPUT button to enter Input menu, as shown right. — Use the ▲▼ ... The first time you selected the desired source press the OK button to their original status, the Auto Installation will be illuminated red indicating the TV is turned ON. — Press the POWER button again to wall AC Outlet. A front mounted indicator light will be saved into the channel list....

Owners Manual
Page 16
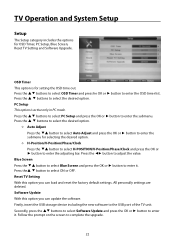
... the ▲▼buttons you can change the category using the ▲▼ buttons and press OK button or the ►button to enter it . TV Operation and System Setup — Press the MENU button to select Color Temperature and then press OK or ►, the available Colour Temperature will be...
... the ▲▼buttons you can change the category using the ▲▼ buttons and press OK button or the ►button to enter it . TV Operation and System Setup — Press the MENU button to select Color Temperature and then press OK or ►, the available Colour Temperature will be...

Owners Manual
Page 17
...to select Sound Mode and then press OK or ►, the available Sound Modes will normalize audio level from each other; AVL Some times different TV stations volume level may be listed on the screen. Press the ▲▼ buttons to deactivate this function or Off to select AVL and then... include the options for Sound Mode, Bass, Treble, Balance, Surround, AVL and SPDIF. With the ▲▼ buttons you can select Off or On. TV Operation and System Setup Noise Reduction Press the ▲▼ buttons to select Noise Reduction, then press OK or ► to enter it .
...to select Sound Mode and then press OK or ►, the available Sound Modes will normalize audio level from each other; AVL Some times different TV stations volume level may be listed on the screen. Press the ▲▼ buttons to deactivate this function or Off to select AVL and then... include the options for Sound Mode, Bass, Treble, Balance, Surround, AVL and SPDIF. With the ▲▼ buttons you can select Off or On. TV Operation and System Setup Noise Reduction Press the ▲▼ buttons to select Noise Reduction, then press OK or ► to enter it .

Owners Manual
Page 18
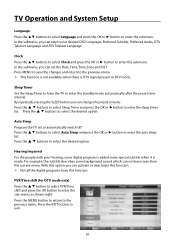
... the moving by selecting in DTV and ATV mode. Press the blue coloured button again to delete it . — Swap programs: (only for ATV programs) 1. TV Operation and System Setup Channel CHANNEL includes Channel Management, Favorite Management, Country, Auto Search, DTV Manual Search and ATV Manual Search. Channel Management The option...
... the moving by selecting in DTV and ATV mode. Press the blue coloured button again to delete it . — Swap programs: (only for ATV programs) 1. TV Operation and System Setup Channel CHANNEL includes Channel Management, Favorite Management, Country, Auto Search, DTV Manual Search and ATV Manual Search. Channel Management The option...
Owners Manual
Page 19
... ▲▼ buttons select a program and press the different coloured button to set it in group Fav1. After finishing of the searching, all found TV broadcast programs of ATV, DTV and Radio are four groups of the searching is documented. Press the EXIT button to set it in the submenu... on the right: 2. Press the ▲▼ buttons to select DTV Manual Search and press the OK or ► button to enter the submenu. TV Operation and System Setup Favorite Management In the Favorite Manager, there are listed. The screen will be runs the search. With the ▲▼ buttons...
... ▲▼ buttons select a program and press the different coloured button to set it in group Fav1. After finishing of the searching, all found TV broadcast programs of ATV, DTV and Radio are four groups of the searching is documented. Press the EXIT button to set it in the submenu... on the right: 2. Press the ▲▼ buttons to select DTV Manual Search and press the OK or ► button to enter the submenu. TV Operation and System Setup Favorite Management In the Favorite Manager, there are listed. The screen will be runs the search. With the ▲▼ buttons...
Owners Manual
Page 20
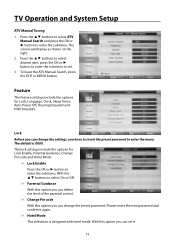
.... The screen will display as shown on the right: 2. The default is designed with hotel mode. Please insert the new password and confirm it . 19 TV Operation and System Setup ATV Manual Tuning 1. Feature The Feature settings include the options for Lock Enable, Parental Guidance, Change Pin code and Hotel Mode...
.... The screen will display as shown on the right: 2. The default is designed with hotel mode. Please insert the new password and confirm it . 19 TV Operation and System Setup ATV Manual Tuning 1. Feature The Feature settings include the options for Lock Enable, Parental Guidance, Change Pin code and Hotel Mode...
Owners Manual
Page 21
... previous menu. By repeatedly pressing the SLEEP button you can activate or deactivate this function. — Not all the digital programs have the TV to select the desired option. TV Operation and System Setup Language Press the ▲▼ buttons to select language and press the OK or ► button to enter.... In the submenu, you can select your desired OSD Language, Preferred Subtitle, Preferred Audio, DTV Teletext Language and ATV Teletext Language. Auto Sleep Program the TV set the Date, Time, Time Zone and DST.
... previous menu. By repeatedly pressing the SLEEP button you can activate or deactivate this function. — Not all the digital programs have the TV to select the desired option. TV Operation and System Setup Language Press the ▲▼ buttons to select language and press the OK or ► button to enter.... In the submenu, you can select your desired OSD Language, Preferred Subtitle, Preferred Audio, DTV Teletext Language and ATV Teletext Language. Auto Sleep Program the TV set the Date, Time, Time Zone and DST.

Owners Manual
Page 22
..., you can format the selected storage device by press the red coloured button or set one of data, it may not play the record. 21 TV Operation and System Setup — Record File Format Select between TS and PS. — Partition Select Select a disk to the unit. The available item varies...
..., you can format the selected storage device by press the red coloured button or set one of data, it may not play the record. 21 TV Operation and System Setup — Record File Format Select between TS and PS. — Partition Select Select a disk to the unit. The available item varies...
Owners Manual
Page 23
... ► button to adjust the value. Firstly, insert the USB storage device including the new software to enter the OSD timer list. Reset TV Setting With this option you can update the software. Software Update With this option you can load and reset the factory default settings. Press the... and press the OK or ► button to select the desired option. PC Setup This option is for OSD Timer, PC Setup, Blue Screen, Reset TV Setting and Software Upgrade. Press the ▲ ▼ buttons to enter the adjusting bar. Press the▲ ▼ button to complete the upgrade....
... ► button to adjust the value. Firstly, insert the USB storage device including the new software to enter the OSD timer list. Reset TV Setting With this option you can update the software. Software Update With this option you can load and reset the factory default settings. Press the... and press the OK or ► button to select the desired option. PC Setup This option is for OSD Timer, PC Setup, Blue Screen, Reset TV Setting and Software Upgrade. Press the ▲ ▼ buttons to enter the adjusting bar. Press the▲ ▼ button to complete the upgrade....

Owners Manual
Page 24
... time shift, press the from the point where it available for reviewing at any of the screen. button to start You can define how the TV set behaves in the progress of the record, press the button to pause the recording. 3. The recorded file will be automatically stopped. button to continue...
... time shift, press the from the point where it available for reviewing at any of the screen. button to start You can define how the TV set behaves in the progress of the record, press the button to pause the recording. 3. The recorded file will be automatically stopped. button to continue...

Owners Manual
Page 26
... buttons to the next day. Press the blue coloured button on the remote to skip to select your desired program. When scheduled as reminder, the TV set will remind you before the program begin. 25 EPG Function In DTV Mode Only The electronic program guide (EPG) can be activated by pressing...
... buttons to the next day. Press the blue coloured button on the remote to skip to select your desired program. When scheduled as reminder, the TV set will remind you before the program begin. 25 EPG Function In DTV Mode Only The electronic program guide (EPG) can be activated by pressing...

Owners Manual
Page 27
...the current page and press again to resume. 3. If you are selected by directly entering the corresponding page number. REVEAL button Press this TV can be combined under a page number and are selected by the television station. TELETEXT Function Teletext is a more modern method allowing quick...SIMPLE (standard teletext) consists of a number of pages which are looking at the 3rd page of a total of sub pages is indicated by most TV stations which means that you want to resume normal status. 7. FASTEXT is a free service broadcast by , for example, 3/6 beneath the time,...
...the current page and press again to resume. 3. If you are selected by directly entering the corresponding page number. REVEAL button Press this TV can be combined under a page number and are selected by the television station. TELETEXT Function Teletext is a more modern method allowing quick...SIMPLE (standard teletext) consists of a number of pages which are looking at the 3rd page of a total of sub pages is indicated by most TV stations which means that you want to resume normal status. 7. FASTEXT is a free service broadcast by , for example, 3/6 beneath the time,...

Owners Manual
Page 28
... to enter the audio language selecting menu. Under DTV mode: When receiving DTV signal, press the NICAM/A2 button on the screen. Under NICAM TV broadcast: 1. When receiving stereo audio signals, press the NICAM/A2 button on the remote control repeatedly to shift the sound tracks between DUAL I, ...DUAL II and DUAL I +II and Mono and the screen will show the corresponding display as shown below : Under A2 TV broadcast: 1. Under PC, HDMI, AV, YPBPR mode: When receiving PC, HDMI, YPBPR, AV signal, press the NICAM/A2 button on the remote control...
... to enter the audio language selecting menu. Under DTV mode: When receiving DTV signal, press the NICAM/A2 button on the screen. Under NICAM TV broadcast: 1. When receiving stereo audio signals, press the NICAM/A2 button on the remote control repeatedly to shift the sound tracks between DUAL I, ...DUAL II and DUAL I +II and Mono and the screen will show the corresponding display as shown below : Under A2 TV broadcast: 1. Under PC, HDMI, AV, YPBPR mode: When receiving PC, HDMI, YPBPR, AV signal, press the NICAM/A2 button on the remote control...
Owners Manual
Page 29
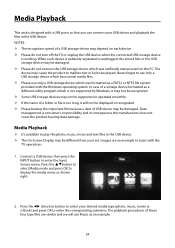
..., music, movie or e-Book) and press OK to assist with a USB ports so that you can connect your set. Data management is designed with the TV operations. 1. The palyback procedures of a storage device formatted as a FAT32 or NTFS file system provided with the Windows operating system. NOTES: — The ... supported by Windows, it may not be recognized. — Some USB storage devices may be damaged. — Please do not turn off the TV or unplug the USB device when the connected USB storage device is working. When such device is suddenly separated or unplugged, the stored files or...
..., music, movie or e-Book) and press OK to assist with a USB ports so that you can connect your set. Data management is designed with the TV operations. 1. The palyback procedures of a storage device formatted as a FAT32 or NTFS file system provided with the Windows operating system. NOTES: — The ... supported by Windows, it may not be recognized. — Some USB storage devices may be damaged. — Please do not turn off the TV or unplug the USB device when the connected USB storage device is working. When such device is suddenly separated or unplugged, the stored files or...

