Instruction Manual
Page 2
Table Of Contents Preparations Guide Safety Information...2 Important Safety Precautions 3 Installed And Connected TV TV Bracket assemble...4 TV Buttons And Terminal Interface 5 External device connection diagram 6 Install And Connect TV...7 TV Stand installation Instructions 7 Remote Controller...8 Function Description Picture Menu...11 Sound Menu...12 TV Channel...13 Feature Menu...15 Setup Menu...16 Multimedia Photo...18 Music...18 Movie...18 eBook...18 Other Features EPG...19 PVR...20 Other Information DVD...22 IMPORTANT NOTICE...24 This user manual for reference only 1
Table Of Contents Preparations Guide Safety Information...2 Important Safety Precautions 3 Installed And Connected TV TV Bracket assemble...4 TV Buttons And Terminal Interface 5 External device connection diagram 6 Install And Connect TV...7 TV Stand installation Instructions 7 Remote Controller...8 Function Description Picture Menu...11 Sound Menu...12 TV Channel...13 Feature Menu...15 Setup Menu...16 Multimedia Photo...18 Music...18 Movie...18 eBook...18 Other Features EPG...19 PVR...20 Other Information DVD...22 IMPORTANT NOTICE...24 This user manual for reference only 1
Instruction Manual
Page 5
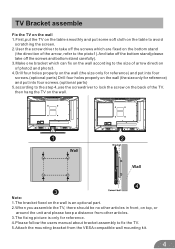
then hang the TV on the back of the TV. TV Bracket assemble Fix the TV on the wall 1.First,put the TV on the table smoothly and put some soft cloth on the table to avoid scratching the screen. 2.User the screw driver to take off the ... screw on the wall. 1 2 VOL+ VOL - CH+ CH - MENU SOURCE 4 3 Note: 1.The bracket fixed on the wall is an optional part. 2.When you assemble the TV, there should be no other articles in front, on top, or around the unit and please keep a distance from other articles. 3.The fixing picture is...
then hang the TV on the back of the TV. TV Bracket assemble Fix the TV on the wall 1.First,put the TV on the table smoothly and put some soft cloth on the table to avoid scratching the screen. 2.User the screw driver to take off the ... screw on the wall. 1 2 VOL+ VOL - CH+ CH - MENU SOURCE 4 3 Note: 1.The bracket fixed on the wall is an optional part. 2.When you assemble the TV, there should be no other articles in front, on top, or around the unit and please keep a distance from other articles. 3.The fixing picture is...
Instruction Manual
Page 6
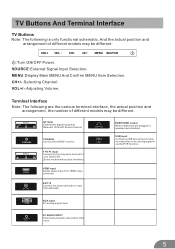
...:Turn ON/OFF Power. VGA input PC analog signal input PC AUDIO INPUT VGA input and audio input when VGA input 5 TV Buttons And Terminal Interface TV Buttons Note: The following are disabled USB input Connect a USB device here to play its media files or to the composite ...terminal of different models may be different. CH+/-:Selecting Channel. VOL+/-:Adjusting Volume. ANT 75 Connect the antennal/cadle tv input (75/VHF/UHF) EARPHONE output When earphones are plugged in, speakers are the various terminal interface, the actual position and arrangement, ...
...:Turn ON/OFF Power. VGA input PC analog signal input PC AUDIO INPUT VGA input and audio input when VGA input 5 TV Buttons And Terminal Interface TV Buttons Note: The following are disabled USB input Connect a USB device here to play its media files or to the composite ...terminal of different models may be different. CH+/-:Selecting Channel. VOL+/-:Adjusting Volume. ANT 75 Connect the antennal/cadle tv input (75/VHF/UHF) EARPHONE output When earphones are plugged in, speakers are the various terminal interface, the actual position and arrangement, ...
Instruction Manual
Page 7
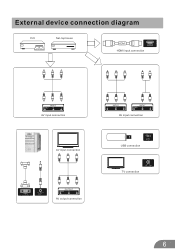
External device connection diagram DVD Set-top boxes HDMI HDMI HDMI input connection INPUT VIDEO R L AV input connection INPUT Y Pb Pr INPUT VIDEO R L AV input connection AV input connection OUTPUT VIDEO R L AV output connection USB connection TV connection 6
External device connection diagram DVD Set-top boxes HDMI HDMI HDMI input connection INPUT VIDEO R L AV input connection INPUT Y Pb Pr INPUT VIDEO R L AV input connection AV input connection OUTPUT VIDEO R L AV output connection USB connection TV connection 6
Instruction Manual
Page 8
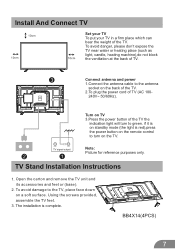
...if it is on a soft surface. Open the carton and remove the TV unit and its accessories and feet or (base). 2. Install And Connect TV Set your TV To put your TV in a firm place which can bear the weight of TV (AC 100- 240V~ 50/60Hz). To avoid danger, please don't ...1.Connect the antenna cable to the TV, place face down on standby mode (the light is complete. BB4X14(4PCS) 7 FM ANT TV ANT TV signal output Note: Picture for reference purposes only. 2 1 TV Stand Installation Instructions 1. Turn on TV 3.Press the power button of the TV the indication light will turn on the...
...if it is on a soft surface. Open the carton and remove the TV unit and its accessories and feet or (base). 2. Install And Connect TV Set your TV To put your TV in a firm place which can bear the weight of TV (AC 100- 240V~ 50/60Hz). To avoid danger, please don't ...1.Connect the antenna cable to the TV, place face down on standby mode (the light is complete. BB4X14(4PCS) 7 FM ANT TV ANT TV signal output Note: Picture for reference purposes only. 2 1 TV Stand Installation Instructions 1. Turn on TV 3.Press the power button of the TV the indication light will turn on the...
Instruction Manual
Page 9
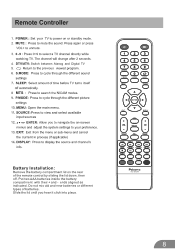
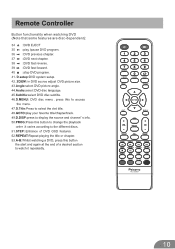
DTV/ATV: Switch between Alanog and Digital TV previous MTS Open the main menu. Press to view and select available input sources ENTER: DTV/ATV P.MODE S.MODE SLEEP MENU SOURCE ENTER EXIT DISPLAY MTS RECLIST FAV/LIST REC FREEZE GUIDE ASPECT CANCEL SUB.PG INDEX TIMESHIFT TV/RADIO SUBTITLE REVEAL SIZE HOLD TEXT RED GREEN YELLOW CYAN RC-3955M 8
DTV/ATV: Switch between Alanog and Digital TV previous MTS Open the main menu. Press to view and select available input sources ENTER: DTV/ATV P.MODE S.MODE SLEEP MENU SOURCE ENTER EXIT DISPLAY MTS RECLIST FAV/LIST REC FREEZE GUIDE ASPECT CANCEL SUB.PG INDEX TIMESHIFT TV/RADIO SUBTITLE REVEAL SIZE HOLD TEXT RED GREEN YELLOW CYAN RC-3955M 8
Instruction Manual
Page 10
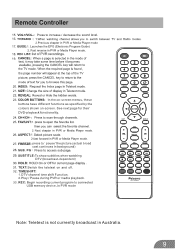
DTV/ATV P.MODE S.MODE SLEEP MENU SOURCE ENTER EXIT DISPLAY MTS RECLIST FAV/LIST REC FREEZE GUIDE ASPECT CANCEL SUB.PG INDEX TIMESHIFT TV/RADIO SUBTITLE REVEAL SIZE HOLD TEXT RED GREEN YELLOW CYAN RC-3955M 9
DTV/ATV P.MODE S.MODE SLEEP MENU SOURCE ENTER EXIT DISPLAY MTS RECLIST FAV/LIST REC FREEZE GUIDE ASPECT CANCEL SUB.PG INDEX TIMESHIFT TV/RADIO SUBTITLE REVEAL SIZE HOLD TEXT RED GREEN YELLOW CYAN RC-3955M 9
Instruction Manual
Page 11
DTV/ATV P.MODE S.MODE SLEEP MENU SOURCE ENTER EXIT DISPLAY MTS RECLIST FAV/LIST REC FREEZE GUIDE ASPECT CANCEL SUB.PG INDEX TIMESHIFT TV/RADIO SUBTITLE REVEAL SIZE HOLD TEXT RED GREEN YELLOW CYAN RC-3955M 10
DTV/ATV P.MODE S.MODE SLEEP MENU SOURCE ENTER EXIT DISPLAY MTS RECLIST FAV/LIST REC FREEZE GUIDE ASPECT CANCEL SUB.PG INDEX TIMESHIFT TV/RADIO SUBTITLE REVEAL SIZE HOLD TEXT RED GREEN YELLOW CYAN RC-3955M 10
Instruction Manual
Page 24
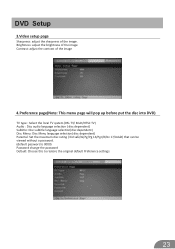
...: adjust the sharpness of the image 4.Preference page(Note: This menu page will pop up before put the disc into DVD) TV type : Select the local TV system (PAL TV/ Mult/NTSC TV) Audio : Disc audio language selection ( disc dependent) Subtitle: Disc subtitle language selection(disc dependent) Disc Menu: Disc Menu language selection( disc...
...: adjust the sharpness of the image 4.Preference page(Note: This menu page will pop up before put the disc into DVD) TV type : Select the local TV system (PAL TV/ Mult/NTSC TV) Audio : Disc audio language selection ( disc dependent) Subtitle: Disc subtitle language selection(disc dependent) Disc Menu: Disc Menu language selection( disc...
Instruction Manual
Page 25
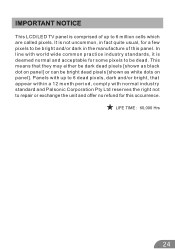
IMPORTANT NOTICE This LCD/LED TV panel is comprised of this occurrence. Panels with up to be dead. It is deemed normal and acceptable for this panel. LIFE TIME : 60,000 Hrs 24 In line with normal industry standard and Palsonic Corporation Pty Ltd reserves the right not to 6 dead pixels, dark and...
IMPORTANT NOTICE This LCD/LED TV panel is comprised of this occurrence. Panels with up to be dead. It is deemed normal and acceptable for this panel. LIFE TIME : 60,000 Hrs 24 In line with normal industry standard and Palsonic Corporation Pty Ltd reserves the right not to 6 dead pixels, dark and...

