
Operating Instructions
Page 11
...Illustrations in these instructions • Screenshots from the AG-HPD24P are indicated as a "clip." • Orange button labels indicate alternate functions enabled by label, without permission of your recorded video and audio content without mentioning the SHIFT button. Website URL • URL:http://pro-av.panasonic.net/ About copyrights • Copyright laws may...The SDHC logo is referred to as : (➝ page 00). of the United States and other countries. • Microsoft product screen shots reprinted with the "P2" logo (for personal pleasure, of the rights holder. 11
...Illustrations in these instructions • Screenshots from the AG-HPD24P are indicated as a "clip." • Orange button labels indicate alternate functions enabled by label, without permission of your recorded video and audio content without mentioning the SHIFT button. Website URL • URL:http://pro-av.panasonic.net/ About copyrights • Copyright laws may...The SDHC logo is referred to as : (➝ page 00). of the United States and other countries. • Microsoft product screen shots reprinted with the "P2" logo (for personal pleasure, of the rights holder. 11

Operating Instructions
Page 12
Contents Volume 1 Read this first! (For AG-HPD24P) ........ 2 Read this first! (For AG-HPD24E) ........ 6 Read this first! (For AG-HPD24P/ AG-HPD24E 10 Usage Precautions 14 Regarding this unit 14 AC adaptor 15 Battery 15 Battery characteristics 15 Remove the battery after ... ... 28 Setting the Year, Month, Day and Time 28 Basic Operation 29 About P2 Cards 29 Inserting a P2 Card 29 P2 Card Access Lamp and P2 Card Status 29 About P2 Card Recording Times .......... 30 Removing P2 Cards 31 Preventing Accidental Deletion 31 Menu Operations 32 LCD Monitor Settings 33 Thumbnail Screen ...
Contents Volume 1 Read this first! (For AG-HPD24P) ........ 2 Read this first! (For AG-HPD24E) ........ 6 Read this first! (For AG-HPD24P/ AG-HPD24E 10 Usage Precautions 14 Regarding this unit 14 AC adaptor 15 Battery 15 Battery characteristics 15 Remove the battery after ... ... 28 Setting the Year, Month, Day and Time 28 Basic Operation 29 About P2 Cards 29 Inserting a P2 Card 29 P2 Card Access Lamp and P2 Card Status 29 About P2 Card Recording Times .......... 30 Removing P2 Cards 31 Preventing Accidental Deletion 31 Menu Operations 32 LCD Monitor Settings 33 Thumbnail Screen ...

Operating Instructions
Page 14
Usage Precautions Regarding this unit ■ Panasonic makes no guarantees for your recordings in cases where video and/or audio were not recorded as TVs and video game machines). • Using the ... % of the effective pixels. It is recommended that cards or storage devices either be physically destroyed or that Panasonic makes no effect on the images you intended due to problems with this unit, P2 cards, or SD memory cards. ■ Be careful to avoid getting water inside . • Sand and dust can...
Usage Precautions Regarding this unit ■ Panasonic makes no guarantees for your recordings in cases where video and/or audio were not recorded as TVs and video game machines). • Using the ... % of the effective pixels. It is recommended that cards or storage devices either be physically destroyed or that Panasonic makes no effect on the images you intended due to problems with this unit, P2 cards, or SD memory cards. ■ Be careful to avoid getting water inside . • Sand and dust can...

Operating Instructions
Page 16
... The following types of SD/SDHC Memory Cards" Vol. 2, page 92) * SD/SDHC memory cards cannot be used with this unit for details. • P2 Card (➝ "Handling P2 Card Recording" Vol. 2, page 91) • SD/SDHC Memory Cards* (➝ "Use of storage media can over discharge if you leave it in...
... The following types of SD/SDHC Memory Cards" Vol. 2, page 92) * SD/SDHC memory cards cannot be used with this unit for details. • P2 Card (➝ "Handling P2 Card Recording" Vol. 2, page 91) • SD/SDHC Memory Cards* (➝ "Use of storage media can over discharge if you leave it in...

Operating Instructions
Page 18
... connector. SYNC PB Synchronizes the operation of this unit as a mass storage device on P2 cards that were recorded using machines that do not have native support for the counter display, in the P2 card slot of two units to execute the MODE button function. 1. USB DEVICE Enables .... 2, page 47) 18 Control Reference Guide: Controls COUNTER, RESET/TC PRESET button COUNTER button: Selects the type of two units to record and playback Dual P2 3D clips (page 38). Control Reference Guide Controls 45 1 6 2 7 8 3 9 10 11 12 13 14 15 About button labels:Orange labels indicate ...
... connector. SYNC PB Synchronizes the operation of this unit as a mass storage device on P2 cards that were recorded using machines that do not have native support for the counter display, in the P2 card slot of two units to execute the MODE button function. 1. USB DEVICE Enables .... 2, page 47) 18 Control Reference Guide: Controls COUNTER, RESET/TC PRESET button COUNTER button: Selects the type of two units to record and playback Dual P2 3D clips (page 38). Control Reference Guide Controls 45 1 6 2 7 8 3 9 10 11 12 13 14 15 About button labels:Orange labels indicate ...

Operating Instructions
Page 21
... Use a USB 3.0 compliant cable to turn power on and off , then release the latch by gently pushing the card in here. P2 card slots (➝ "Inserting a P2 Card" page 29) 8. Insert the card cut-corner-edge first and label-side up, until it , ensure that the green lamp ..."Use of SD/SDHC Memory Cards" Vol. 2, page 92) Control Reference Guide: Slots, etc. 21 P2 card access lamps (➝ "P2 Card Access Lamp and P2 Card Status" page 29) 7. EJECT buttons (➝ "Inserting a P2 Card" page 29) 9. Headphone jack Headphones can be plugged in again. Speaker Outputs monitored audio. Control...
... Use a USB 3.0 compliant cable to turn power on and off , then release the latch by gently pushing the card in here. P2 card slots (➝ "Inserting a P2 Card" page 29) 8. Insert the card cut-corner-edge first and label-side up, until it , ensure that the green lamp ..."Use of SD/SDHC Memory Cards" Vol. 2, page 92) Control Reference Guide: Slots, etc. 21 P2 card access lamps (➝ "P2 Card Access Lamp and P2 Card Status" page 29) 7. EJECT buttons (➝ "Inserting a P2 Card" page 29) 9. Headphone jack Headphones can be plugged in again. Speaker Outputs monitored audio. Control...
Operating Instructions
Page 22
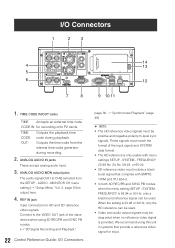
... ITU 624-4. • In both 3D REC/PB and SYNC PB modes, when the menu setting SETUP - REF IN jack Input connectors for recording onto P2 cards.
... ITU 624-4. • In both 3D REC/PB and SYNC PB modes, when the menu setting SETUP - REF IN jack Input connectors for recording onto P2 cards.

Operating Instructions
Page 24
... the AC power supply cable in AVC-Intra 100 to fully charge the battery using the supplied charger. Use the steps below to an E-series P2 card. • The above times are given for a hot battery. • Using the charger or AC adaptor near a radio may interfere with radio reception. We...
... the AC power supply cable in AVC-Intra 100 to fully charge the battery using the supplied charger. Use the steps below to an E-series P2 card. • The above times are given for a hot battery. • Using the charger or AC adaptor near a radio may interfere with radio reception. We...

Operating Instructions
Page 29
... EJECT button pops out. 3 Fold the EJECT button toward the right. Currently accessing P2 card using USB device mode. orange Flashing green No available space on the P2 card is in progress. The P2 card contains the maximum number of clips. Only reading is flashing orange, such as... Writing or reading is set to turn the unit off or eject the P2 card when the lamp is possible. Basic Operation: About P2 Cards 29 Basic Operation Basic Operation About P2 Cards Inserting a P2 Card P2 Card Access Lamp and P2 Card Status ヒ ビ 1 1 Hold the POWER button for the...
... EJECT button pops out. 3 Fold the EJECT button toward the right. Currently accessing P2 card using USB device mode. orange Flashing green No available space on the P2 card is in progress. The P2 card contains the maximum number of clips. Only reading is flashing orange, such as... Writing or reading is set to turn the unit off or eject the P2 card when the lamp is possible. Basic Operation: About P2 Cards 29 Basic Operation Basic Operation About P2 Cards Inserting a P2 Card P2 Card Access Lamp and P2 Card Status ヒ ビ 1 1 Hold the POWER button for the...

Operating Instructions
Page 30
.... 20 min. Reformat it in automatic division of the recording into multiple clips. The card is not accessible using USB device mode. The P2 card is incompatible with this unit. SD Mode Video format Recording format and time DVCPRO DVCPRO*2 DV*2 50 480-59.94i/ Approx. Replace...format and time DVCPRO AVC- Approx. Approx. 80 min. 160 min. 720-59.94P/ 50P*1 Approx. Approx. Despite that provided by a 64 GB P2 card, respectively. • 3D recording and playback times may be shorter than the durations listed below for thumbnail operations (display, delete, repair, copy, etc...
.... 20 min. Reformat it in automatic division of the recording into multiple clips. The card is not accessible using USB device mode. The P2 card is incompatible with this unit. SD Mode Video format Recording format and time DVCPRO DVCPRO*2 DV*2 50 480-59.94i/ Approx. Replace...format and time DVCPRO AVC- Approx. Approx. 80 min. 160 min. 720-59.94P/ 50P*1 Approx. Approx. Despite that provided by a 64 GB P2 card, respectively. • 3D recording and playback times may be shorter than the durations listed below for thumbnail operations (display, delete, repair, copy, etc...

Operating Instructions
Page 31
... 31 Preventing Accidental Deletion Set the write-protection switch to PROTECT to prevent accidental deletion of the P2 card to be removed is blinking in orange, you can press the STOP button to stop recording or playback and to abort ongoing operations such ... and deleting or just wait for the operation to finish. 3 Press the EJECT button to eject the P2 card. ◆ NOTE: • In the USB Device mode, confirm that the access lamp is off. Removing P2 Cards 2 Raise the EJECT button. Basic Operation 1 1 Press the STOP button. If the access lamp of...
... 31 Preventing Accidental Deletion Set the write-protection switch to PROTECT to prevent accidental deletion of the P2 card to be removed is blinking in orange, you can press the STOP button to stop recording or playback and to abort ongoing operations such ... and deleting or just wait for the operation to finish. 3 Press the EJECT button to eject the P2 card. ◆ NOTE: • In the USB Device mode, confirm that the access lamp is off. Removing P2 Cards 2 Raise the EJECT button. Basic Operation 1 1 Press the STOP button. If the access lamp of...

Operating Instructions
Page 34
...return to -stop recording operation. A "clip" consists of a set of video, audio and additional information such as a single clip. A shot that spans multiple P2 cards is handled as meta data, and a "shot" is a clip generated by single normal start-to the record/playback screen (video). 34 Basic Operation: ... allow you to browse and also perform the following clip management operations. • Play back, copy, delete and repair clips • Format P2 cards • Attach text memos to appear at power-on the LCD monitor. OSD OUTPUT menu setting allows selecting VIDEO OUT or SDI OUT ...
...return to -stop recording operation. A "clip" consists of a set of video, audio and additional information such as a single clip. A shot that spans multiple P2 cards is handled as meta data, and a "shot" is a clip generated by single normal start-to the record/playback screen (video). 34 Basic Operation: ... allow you to browse and also perform the following clip management operations. • Play back, copy, delete and repair clips • Format P2 cards • Attach text memos to appear at power-on the LCD monitor. OSD OUTPUT menu setting allows selecting VIDEO OUT or SDI OUT ...

Operating Instructions
Page 35
...35 Set the system frequency in the menu as necessary. (➝ "List of Compatible Input and Output Formats" Vol. 2, page 78) 2 Insert a P2 card. 3 Press the REC and PLAY buttons simultaneously. Close the thumbnail screen before starting to record. 4 Press the STOP button to stop recording. •... Vol. 2, page 6) Basic Operation Playback Playback from the Thumbnail Screen Push the playback button to pause. "SYSTEM" Vol. 2, page 71) 2 Insert a P2 card. 3 Press the PLAY button. Press the FF/REW buttons to fast forward or fast rewind, and press STILL/PAUSE to start playing the yellow...
...35 Set the system frequency in the menu as necessary. (➝ "List of Compatible Input and Output Formats" Vol. 2, page 78) 2 Insert a P2 card. 3 Press the REC and PLAY buttons simultaneously. Close the thumbnail screen before starting to record. 4 Press the STOP button to stop recording. •... Vol. 2, page 6) Basic Operation Playback Playback from the Thumbnail Screen Push the playback button to pause. "SYSTEM" Vol. 2, page 71) 2 Insert a P2 card. 3 Press the PLAY button. Press the FF/REW buttons to fast forward or fast rewind, and press STILL/PAUSE to start playing the yellow...

Operating Instructions
Page 37
... USB 3.0 port. • If a USB 2.0 cable is used, the storage device will be recongized as USB 2.0. Clips recorded on a PC using our free P2 Viewer, downloadable from our website (➝ "Website URL" page 11). (➝ "USB Device Mode" Vol. 2, page 36) • To change the USB ...device mode, press the MODE button, select USB DEVICE using USB 2.0. External Connections: USB Device 37 External Connections External Connections USB Device A P2 card in this case, the PC must have a driver installed (for USB 2.0). USB HOST Connect a USB2.0 or USB3.0 storage device to the USB...
... USB 3.0 port. • If a USB 2.0 cable is used, the storage device will be recongized as USB 2.0. Clips recorded on a PC using our free P2 Viewer, downloadable from our website (➝ "Website URL" page 11). (➝ "USB Device Mode" Vol. 2, page 36) • To change the USB ...device mode, press the MODE button, select USB DEVICE using USB 2.0. External Connections: USB Device 37 External Connections External Connections USB Device A P2 card in this case, the PC must have a driver installed (for USB 2.0). USB HOST Connect a USB2.0 or USB3.0 storage device to the USB...

Operating Instructions
Page 38
... 3D REC/PB mode can cause asthenopia or eyestrain. • Insert the P2 cards with the P2 content specification for dual P2 3D recording on two P2 cards. 38 3D Signal Recording and Playback: 3D Signal Recording and Playback Connect two AG-HPD24 units and press the MODE button to the slave side. If the... left eye signal to the master side, and the right eye signal to select the 3D recording and playback mode (3D REC/PB), for 3D video recording on a pair of P2 cards. For recording...
... 3D REC/PB mode can cause asthenopia or eyestrain. • Insert the P2 cards with the P2 content specification for dual P2 3D recording on two P2 cards. 38 3D Signal Recording and Playback: 3D Signal Recording and Playback Connect two AG-HPD24 units and press the MODE button to the slave side. If the... left eye signal to the master side, and the right eye signal to select the 3D recording and playback mode (3D REC/PB), for 3D video recording on a pair of P2 cards. For recording...

Operating Instructions
Page 39
Also, a reference signal can be connected to 3D REC/PB mode enables recording and playback of 3D video clips. HD-SDI (Right eye image) AG-HPD24 (Slave/3D-R) Master Slave (L) Jack (R) Jack Remarks A REF IN VIDEO BNC cable OUT B LINK (M) USB Type A LINK (S) USB Type B USB 2.0 cable C ...LINK (D) LINK (D) RS-422A9P D-SUB 9P D-SUB compliant cable, Length 1 m or less Connect the master and slave units as a Dual P2 3D clip. With these connections, setting the units to the REF IN jack on the master unit to correctly connect the left /right connections produce...
Also, a reference signal can be connected to 3D REC/PB mode enables recording and playback of 3D video clips. HD-SDI (Right eye image) AG-HPD24 (Slave/3D-R) Master Slave (L) Jack (R) Jack Remarks A REF IN VIDEO BNC cable OUT B LINK (M) USB Type A LINK (S) USB Type B USB 2.0 cable C ...LINK (D) LINK (D) RS-422A9P D-SUB 9P D-SUB compliant cable, Length 1 m or less Connect the master and slave units as a Dual P2 3D clip. With these connections, setting the units to the REF IN jack on the master unit to correctly connect the left /right connections produce...

Operating Instructions
Page 44
Recording begins on the P2 card in the slot with its access lamp lit orange. 4 3 1 Hold each unit's POWER button for one second to stop recording. 44 3D Signal Recording ... and recording preparation in both master and slave units. ヒ ビ 1 Master Unit ◆ NOTE: • Card insertion confirmation on . Recording Master/Slave Unit 2 Insert P2 cards in the corresponding slots in the main mode beforehand. • Only the AVC-Intra format can be displayed. 3 Press the master unit's REC and...
Recording begins on the P2 card in the slot with its access lamp lit orange. 4 3 1 Hold each unit's POWER button for one second to stop recording. 44 3D Signal Recording ... and recording preparation in both master and slave units. ヒ ビ 1 Master Unit ◆ NOTE: • Card insertion confirmation on . Recording Master/Slave Unit 2 Insert P2 cards in the corresponding slots in the main mode beforehand. • Only the AVC-Intra format can be displayed. 3 Press the master unit's REC and...

Operating Instructions
Page 45
Playback from the Thumbnail Screen Pressing the PLAY button starts playback from the Record/Playback Screen (Thumbnail Screen Off) 3 2 1 Insert a P2 card. 2 Press the PLAY button. Playback occurs in the master and slave units, but only the L signal is output (as SDI output. However, video is ... playback requires that the L (left-eye) clip be from different slots in the order thumbnails are displayed. 4 Press the STOP button to stop playback. 2 3 4 1 Insert a P2 card. 2 Use the Up/Down/Left/Right cursor buttons to place the cursor on the slave.
Playback from the Thumbnail Screen Pressing the PLAY button starts playback from the Record/Playback Screen (Thumbnail Screen Off) 3 2 1 Insert a P2 card. 2 Press the PLAY button. Playback occurs in the master and slave units, but only the L signal is output (as SDI output. However, video is ... playback requires that the L (left-eye) clip be from different slots in the order thumbnails are displayed. 4 Press the STOP button to stop playback. 2 3 4 1 Insert a P2 card. 2 Use the Up/Down/Left/Right cursor buttons to place the cursor on the slave.

Operating Instructions
Page 46
... the main mode's thumbnail screen are displayed. POWER ON GUI, and then THUMBNAIL. 2 Press the THUMBNAIL button. For details of master and slave P2 cards, respectively. Displaying 3D Thumbnails 3D thumbnails can be careful not to erase them accidentally when reformatting. 1) 2) 3) Pointer (yellow frame) 4) ... The M and S indicators show the status of display contents, see (➝ "Thumbnail Screen" Vol. 2, page 10). • Only Dual P2 3D clips recorded by holding each unit's POWER button for one second. ◆ NOTE: • To cause the thumbnail screen to the record/...
... the main mode's thumbnail screen are displayed. POWER ON GUI, and then THUMBNAIL. 2 Press the THUMBNAIL button. For details of master and slave P2 cards, respectively. Displaying 3D Thumbnails 3D thumbnails can be careful not to erase them accidentally when reformatting. 1) 2) 3) Pointer (yellow frame) 4) ... The M and S indicators show the status of display contents, see (➝ "Thumbnail Screen" Vol. 2, page 10). • Only Dual P2 3D clips recorded by holding each unit's POWER button for one second. ◆ NOTE: • To cause the thumbnail screen to the record/...

Operating Instructions
Page 47
... is inserted in the slave unit, or the clip's right-channel card is inserted in the slave unit's battery is displayed on the slave. 4) Dual P2 3D clip fault indicator This is displayed when there is not inserted. 3D Signal Recording and Playback 3) Battery level indicator Indicates the remaining charge in... right-channel card is a problem with the missing clip channel. 47 3D Signal Recording and Playback: Displaying 3D Thumbnails Insert the card with a Dual 3D P2 clip, such as reversed left-right card insertion. : The clip's left -
... is inserted in the slave unit, or the clip's right-channel card is inserted in the slave unit's battery is displayed on the slave. 4) Dual P2 3D clip fault indicator This is displayed when there is not inserted. 3D Signal Recording and Playback 3) Battery level indicator Indicates the remaining charge in... right-channel card is a problem with the missing clip channel. 47 3D Signal Recording and Playback: Displaying 3D Thumbnails Insert the card with a Dual 3D P2 clip, such as reversed left-right card insertion. : The clip's left -