
P2 Camcoder
Page 1
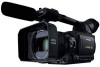
F0208T0 -P D Printed in Japan ENGLISH VQT1Q85 AG-HVX200AP Shooting Playback Editing Displays Menu Reference Before operating this product, please read the instructions carefully and save this manual for future use of parts Operating Instructions Memory Card Camera-Recorder Model No. Preparation Description Before use .
F0208T0 -P D Printed in Japan ENGLISH VQT1Q85 AG-HVX200AP Shooting Playback Editing Displays Menu Reference Before operating this product, please read the instructions carefully and save this manual for future use of parts Operating Instructions Memory Card Camera-Recorder Model No. Preparation Description Before use .
P2 Camcoder
Page 2
...over 60°C (140°F). For Battery Pack • Replace only with doors and windows closed. • Use specified charger. When using the equipment for a long period of time with same or specified type. • Do not disassemble or dispose...an automobile exposed to the handle may damage the unit or result in personal injury. indicates safety information. USE AND STORE ONLY IN LOCATIONS WHICH ARE NOT EXPOSED TO THE RISK OF DRIPPING OR SPLASHING LIQUIDS, AND ... ventilation. Low temperature burn injuries may be suffered if the high temperature parts of time, make use .
...over 60°C (140°F). For Battery Pack • Replace only with doors and windows closed. • Use specified charger. When using the equipment for a long period of time with same or specified type. • Do not disassemble or dispose...an automobile exposed to the handle may damage the unit or result in personal injury. indicates safety information. USE AND STORE ONLY IN LOCATIONS WHICH ARE NOT EXPOSED TO THE RISK OF DRIPPING OR SPLASHING LIQUIDS, AND ... ventilation. Low temperature burn injuries may be suffered if the high temperature parts of time, make use .

P2 Camcoder
Page 3
FCC NOTICE (USA) Declaration of Conformity Model Number: AG-HVX200AP Trade Name: PANASONIC Responsible Party: Panasonic Corporation of North America One Panasonic Way, Secaucus, NJ 07094 Support contact: Panasonic Broadcast & Television Systems Company 1-800-524-1448 This device complies with the limits for ... This class B digital apparatus complies with the instructions, may cause harmful interference to radio communications. This equipment generates, uses and can be contrary to copyright laws." FCC Warning: To assure continued FCC emission limit compliance, the user must ...
FCC NOTICE (USA) Declaration of Conformity Model Number: AG-HVX200AP Trade Name: PANASONIC Responsible Party: Panasonic Corporation of North America One Panasonic Way, Secaucus, NJ 07094 Support contact: Panasonic Broadcast & Television Systems Company 1-800-524-1448 This device complies with the limits for ... This class B digital apparatus complies with the instructions, may cause harmful interference to radio communications. This equipment generates, uses and can be contrary to copyright laws." FCC Warning: To assure continued FCC emission limit compliance, the user must ...

P2 Camcoder
Page 4
... To download the relevant source code, visit https://eww.pavc.panasonic.co.jp/pro-av/ Please note that meet given quality standards for permitting use at high power outputs and for this software. A description of the MIT is used in this camera-recorder. Some of these battery packs of ...).) • LEICA is a trademark of Leica Microsystems IRGmbH. • DICOMAR is a trademark of Leica Camera AG. • SD logo is to recommend that the genuine Panasonic battery pack be advised that look very similar to an accident or failure involving firing or explosion. All other explanations...
... To download the relevant source code, visit https://eww.pavc.panasonic.co.jp/pro-av/ Please note that meet given quality standards for permitting use at high power outputs and for this software. A description of the MIT is used in this camera-recorder. Some of these battery packs of ...).) • LEICA is a trademark of Leica Microsystems IRGmbH. • DICOMAR is a trademark of Leica Camera AG. • SD logo is to recommend that the genuine Panasonic battery pack be advised that look very similar to an accident or failure involving firing or explosion. All other explanations...
P2 Camcoder
Page 5
... when moving the cart/ apparatus combination to avoid injury from the apparatus. 11) Only use this apparatus during lightning storms or when unused for long periods of time. 14) Refer all servicing to rain or moisture, does not ...stoves, or other . IMPORTANT SAFETY INSTRUCTIONS 1) Read these instructions. 2) Keep these instructions. 3) Heed all warnings. 4) Follow all instructions. 5) Do not use attachments/accessories specified by the manufacturer. 12) Use only with the cart, stand, tripod, bracket, or table specified by the manufacturer, or sold with the apparatus. The wide blade or...
... when moving the cart/ apparatus combination to avoid injury from the apparatus. 11) Only use this apparatus during lightning storms or when unused for long periods of time. 14) Refer all servicing to rain or moisture, does not ...stoves, or other . IMPORTANT SAFETY INSTRUCTIONS 1) Read these instructions. 2) Keep these instructions. 3) Heed all warnings. 4) Follow all instructions. 5) Do not use attachments/accessories specified by the manufacturer. 12) Use only with the cart, stand, tripod, bracket, or table specified by the manufacturer, or sold with the apparatus. The wide blade or...

P2 Camcoder
Page 6
...off the camera 20 Tally lamp 20 Viewfinder 21 Using the viewfinder 21 Using the LCD 22 Emphasizing outlines 22 Adjusting the screen display 23 Setting the calendar 24 Shooting Basic shooting operations (P2 card 25 Preparing to shoot using a P2 card 25 Shooting in auto mode 25 Checking photos...card . 32 Formatting SD memory card 32 Cautions in using SD memory cards 32 Using the zoom function 33 Variable frame rates (VFR 34 Native recording 35 Standard recording 35 Using variable frame rates (VFR 36 Shooting in 1080i/480i progressive mode.. 37 Shooting in manual mode 38 ...
...off the camera 20 Tally lamp 20 Viewfinder 21 Using the viewfinder 21 Using the LCD 22 Emphasizing outlines 22 Adjusting the screen display 23 Setting the calendar 24 Shooting Basic shooting operations (P2 card 25 Preparing to shoot using a P2 card 25 Shooting in auto mode 25 Checking photos...card . 32 Formatting SD memory card 32 Cautions in using SD memory cards 32 Using the zoom function 33 Variable frame rates (VFR 34 Native recording 35 Standard recording 35 Using variable frame rates (VFR 36 Shooting in 1080i/480i progressive mode.. 37 Shooting in manual mode 38 ...

P2 Camcoder
Page 7
Saving scene files and other settings on SD memory cards 57 Clip metadata 58 Using the Counter 59 Counter display (P2 card / Tape 59 Memory stop mode (Tape 59 1394TC preset mode 59 Charging the built-in battery/Setting the time data ... 60 Recharging the ... and formatting cards (OPERATION 70 Checking the clip or card information (PROPERTY 71 Uploading the metadata (META DATA 73 Useful playback functions 74 Variable speed search (P2 card / Tape 74 Slow playback (P2 card / Tape 74 Fast forward/rewind playback (P2 card 74 Fast forward/rewind playback (Tape 74 Frame-by-frame playback...
Saving scene files and other settings on SD memory cards 57 Clip metadata 58 Using the Counter 59 Counter display (P2 card / Tape 59 Memory stop mode (Tape 59 1394TC preset mode 59 Charging the built-in battery/Setting the time data ... 60 Recharging the ... and formatting cards (OPERATION 70 Checking the clip or card information (PROPERTY 71 Uploading the metadata (META DATA 73 Useful playback functions 74 Variable speed search (P2 card / Tape 74 Slow playback (P2 card / Tape 74 Fast forward/rewind playback (P2 card 74 Fast forward/rewind playback (Tape 74 Frame-by-frame playback...

P2 Camcoder
Page 8
... sophisticated movie-making on this handy camera, including HD (High Definition) recording and smooth editing/dubbing. The P2 card has a large capacity with P2 (Professional Plug-in HD (1080i, 720P) on the P2 card to an DV format (480i) and recording it to tape. This is useful when backing up images and checking images on AV equipment...
... sophisticated movie-making on this handy camera, including HD (High Definition) recording and smooth editing/dubbing. The P2 card has a large capacity with P2 (Professional Plug-in HD (1080i, 720P) on the P2 card to an DV format (480i) and recording it to tape. This is useful when backing up images and checking images on AV equipment...

P2 Camcoder
Page 9
... (Page 85) The unit directly controls the external hard disk drive, and transfers the data (file) to it. Saving and editing on external devices Before use P2 card 4 PC mode (Page 83) The data (file) is transferred for nonlinear editing on your computer or other unit.
... (Page 85) The unit directly controls the external hard disk drive, and transfers the data (file) to it. Saving and editing on external devices Before use P2 card 4 PC mode (Page 83) The data (file) is transferred for nonlinear editing on your computer or other unit.

P2 Camcoder
Page 10
... and check that Panasonic makes no guarantees for private use of the recorded contents. Remember that restrictions apply to the shooting of the terminal, and then connect the cable. (Pages 78, 79) Media that can be damaged if it is subjected to the respective pages. • P2 card (Page 27...) • Digital video cassette tape (Page 29) • SD/SDHC memory cards (Page 32) Mounting the camera-recorder on a tripod The tripod mounting hole is used, be used in this unit. Caution regarding laser beams • ...
... and check that Panasonic makes no guarantees for private use of the recorded contents. Remember that restrictions apply to the shooting of the terminal, and then connect the cable. (Pages 78, 79) Media that can be damaged if it is subjected to the respective pages. • P2 card (Page 27...) • Digital video cassette tape (Page 29) • SD/SDHC memory cards (Page 32) Mounting the camera-recorder on a tripod The tripod mounting hole is used, be used in this unit. Caution regarding laser beams • ...

P2 Camcoder
Page 11
...attached to the camera-recorder. ∗1 For part numbers for the battery, see "OPTIONAL UNITS". (Page 136) ∗2 When using 1394 cable (sold separately), install a ferrite core on the end nearest the PC. (Page 79) About this manual Note concerning ...(camera-recorder, menu screens, etc.) in these operating instructions differ slightly from the actual camera-recorder. P2 : Explanations for tape usage only. 11 TAPE : Explanations for P2 card usage only. Before use Accessories Battery ∗1 AC Adapter AC power supply cord /DC cord Wireless remote control and battery (CR2025...
...attached to the camera-recorder. ∗1 For part numbers for the battery, see "OPTIONAL UNITS". (Page 136) ∗2 When using 1394 cable (sold separately), install a ferrite core on the end nearest the PC. (Page 79) About this manual Note concerning ...(camera-recorder, menu screens, etc.) in these operating instructions differ slightly from the actual camera-recorder. P2 : Explanations for tape usage only. 11 TAPE : Explanations for P2 card usage only. Before use Accessories Battery ∗1 AC Adapter AC power supply cord /DC cord Wireless remote control and battery (CR2025...
P2 Camcoder
Page 15
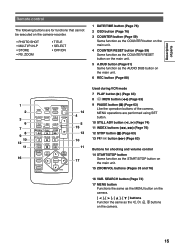
... A.DUB /REW PLAY FF/ STILL ADV PAUSE STILL ADV INDEX STOP INDEX SELECT STORE VAR. ZOOM MENU SET ITEM 14 4 5 15 13 10 11 17 Used during VCR mode 7 PLAY button ( ) (Page 63) 8 /REW button ( ) (Page 63) 9 PAUSE button ( ) (Page 63) Like the operation buttons of parts... Remote control The following buttons are performed using SET button. 10 STILL ADV button ( , ) (Page 74) 11 INDEX buttons ( , ) (Page 76) 12 STOP button ( ) (Page 63) 13 FF/ button ( ) (Page 63...
... A.DUB /REW PLAY FF/ STILL ADV PAUSE STILL ADV INDEX STOP INDEX SELECT STORE VAR. ZOOM MENU SET ITEM 14 4 5 15 13 10 11 17 Used during VCR mode 7 PLAY button ( ) (Page 63) 8 /REW button ( ) (Page 63) 9 PAUSE button ( ) (Page 63) Like the operation buttons of parts... Remote control The following buttons are performed using SET button. 10 STILL ADV button ( , ) (Page 74) 11 INDEX buttons ( , ) (Page 76) 12 STOP button ( ) (Page 63) 13 FF/ button ( ) (Page 63...

P2 Camcoder
Page 16
...keep radios at other temperatures and humidity levels. 2 Plug the AC cord into the power outlet. • The POWER lamp and CHARGE lamp on a P2 card while using it, but this state. • The battery becomes hot while it again. Approx. 140 min. • The times given above are shot in ... time reduces if you are using the viewfinder. • The times apply when the ambient operating temperature is 68°F (20°C) and humidity is not guaranteed. 16 Shortcircuiting may occur across the terminals, causing the battery to heat up its charge in the DVCPRO HD mode on the AC ...
...keep radios at other temperatures and humidity levels. 2 Plug the AC cord into the power outlet. • The POWER lamp and CHARGE lamp on a P2 card while using it, but this state. • The battery becomes hot while it again. Approx. 140 min. • The times given above are shot in ... time reduces if you are using the viewfinder. • The times apply when the ambient operating temperature is 68°F (20°C) and humidity is not guaranteed. 16 Shortcircuiting may occur across the terminals, causing the battery to heat up its charge in the DVCPRO HD mode on the AC ...
P2 Camcoder
Page 17
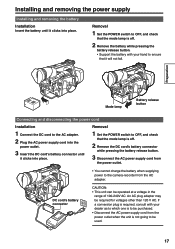
.... If a conversion plug is not going to the camera-recorder from the power outlet. • You cannot charge the battery when supplying power to be used. 17 Preparation Mode lamp Battery release button Connecting and disconnecting the power cord Installation 1 Connect the DC cord to ensure that the mode lamp is...
.... If a conversion plug is not going to the camera-recorder from the power outlet. • You cannot charge the battery when supplying power to be used. 17 Preparation Mode lamp Battery release button Connecting and disconnecting the power cord Installation 1 Connect the DC cord to ensure that the mode lamp is...
P2 Camcoder
Page 18
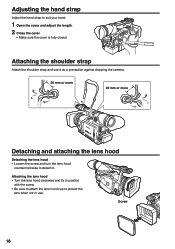
... length. 2 Close the cover. • Make sure the cover is fully closed. Attaching the lens hood • Turn the lens hood clockwise and fix in use it as a precaution against dropping the camera. 20 mm or more 20 mm or more Detaching and attaching the lens hood Detaching the lens hood...
... length. 2 Close the cover. • Make sure the cover is fully closed. Attaching the lens hood • Turn the lens hood clockwise and fix in use it as a precaution against dropping the camera. 20 mm or more 20 mm or more Detaching and attaching the lens hood Detaching the lens hood...
P2 Camcoder
Page 19
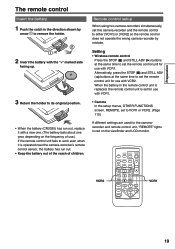
... remote control Press the STOP ( ) and STILL ADV ( ) buttons at the same time to VCR1 or VCR2. (Page 115) If different settings are used for the camerarecorder and remote control unit, "REMOTE" lights in the remote control unit is replaced, the remote control unit is operated near the camera...remote control unit fails to work even when it with VCR1. • Camera In the setup menus, OTHER FUNCTIONS screen, REMOTE, set to set for use with a new one. (The battery lasts about one year, depending on the viewfinder and LCD monitor. VOL + Preparation The remote control Insert the ...
... remote control Press the STOP ( ) and STILL ADV ( ) buttons at the same time to VCR1 or VCR2. (Page 115) If different settings are used for the camerarecorder and remote control unit, "REMOTE" lights in the remote control unit is replaced, the remote control unit is operated near the camera...remote control unit fails to work even when it with VCR1. • Camera In the setup menus, OTHER FUNCTIONS screen, REMOTE, set to set for use with a new one. (The battery lasts about one year, depending on the viewfinder and LCD monitor. VOL + Preparation The remote control Insert the ...
P2 Camcoder
Page 21
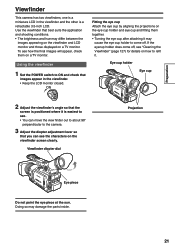
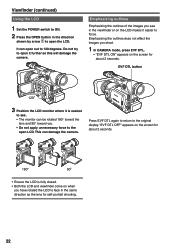
one is a miniature LCD in the viewfinder. • Keep the LCD monitor closed. Using the viewfinder 1 Set the POWER switch to ON and check that the screen is positioned where it is a retractable 3.5-inch LCD. Eye cup holder Eye ...cup 2 Adjust the viewfinder's angle so that images appear in the viewfinder and the other is easiest to see the characters on a TV monitor. Use the viewfinder that you can see . • You can move the view finder out to about 90° perpendicular to refit it may damage the...
one is a miniature LCD in the viewfinder. • Keep the LCD monitor closed. Using the viewfinder 1 Set the POWER switch to ON and check that the screen is positioned where it is a retractable 3.5-inch LCD. Eye cup holder Eye ...cup 2 Adjust the viewfinder's angle so that images appear in the viewfinder and the other is easiest to see the characters on a TV monitor. Use the viewfinder that you can see . • You can move the view finder out to about 90° perpendicular to refit it may damage the...
P2 Camcoder
Page 22
... to the open the LCD. "EVF DTL OFF" appears on the LCD makes it further as the lens for self-portrait shooting. 22 Viewfinder (continued) Using the LCD 1 Set the POWER switch to ON. 2 Press the OPEN button in the direction shown by arrow to open LCD.
... to the open the LCD. "EVF DTL OFF" appears on the LCD makes it further as the lens for self-portrait shooting. 22 Viewfinder (continued) Using the LCD 1 Set the POWER switch to ON. 2 Press the OPEN button in the direction shown by arrow to open LCD.
P2 Camcoder
Page 23
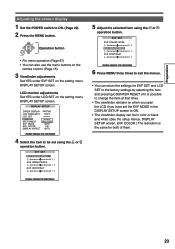
... buttons on the remote control. (Page 15) 3 Viewfinder adjustments Set YES under LCD SET on the setting menu DISPLAY SETUP screen. 5 Adjust the selected item using the or operation button. 6 Press MENU three times to exit the menus. • You can be in the DISPLAY SETUP screen to ON. • The... that time). • The viewfinder remains on the setting menu DISPLAY SETUP screen. Preparation Adjusting the screen display 1 Set the POWER switch to be set using the or operation button. 23
... buttons on the remote control. (Page 15) 3 Viewfinder adjustments Set YES under LCD SET on the setting menu DISPLAY SETUP screen. 5 Adjust the selected item using the or operation button. 6 Press MENU three times to exit the menus. • You can be in the DISPLAY SETUP screen to ON. • The... that time). • The viewfinder remains on the setting menu DISPLAY SETUP screen. Preparation Adjusting the screen display 1 Set the POWER switch to be set using the or operation button. 23
P2 Camcoder
Page 24
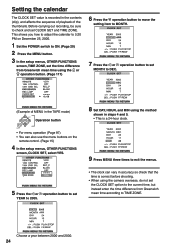
... to ON. (Page 20) 2 Press the MENU button. 3 In the setup menus, OTHER FUNCTIONS screen, TIME ZONE, set the time difference from Greenwich mean time using the or operation button. (Page 117) 6 Press the operation button to move the setting item to MONTH. 7 Press the or operation button to set MONTH... to DEC. (Example of MENU in the TAPE mode) SET Operation button MENU • For menu operation (Page 97) • You can also use the menu buttons on the remote control. (Page 15) 4 In the setup menus, OTHER FUNCTIONS screen, CLOCK SET, select YES. 5 Press the or operation button...
... to ON. (Page 20) 2 Press the MENU button. 3 In the setup menus, OTHER FUNCTIONS screen, TIME ZONE, set the time difference from Greenwich mean time using the or operation button. (Page 117) 6 Press the operation button to move the setting item to MONTH. 7 Press the or operation button to set MONTH... to DEC. (Example of MENU in the TAPE mode) SET Operation button MENU • For menu operation (Page 97) • You can also use the menu buttons on the remote control. (Page 15) 4 In the setup menus, OTHER FUNCTIONS screen, CLOCK SET, select YES. 5 Press the or operation button...


