Panasonic CQRG153U - AUTO RADIO/CASSETTE Support and Manuals
Get Help and Manuals for this Panasonic item

View All Support Options Below
Free Panasonic CQRG153U manuals!
Problems with Panasonic CQRG153U?
Ask a Question
Free Panasonic CQRG153U manuals!
Problems with Panasonic CQRG153U?
Ask a Question
Popular Panasonic CQRG153U Manual Pages
Operating Instructions - Page 5
...
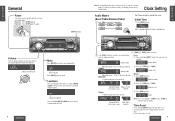
Note: If no operation takes place for more than 2 seconds to activate the time setting mode to cancel. Adjustable range: Balance center 1 to 15 (by 1 step) (...DISC
1
2
SCAN 3
REPEAT 4
RANDOM 5
6 MONO
DISP
w Turn [VOL] (volume) clockwise or counterclock- Clock Setting
E N
G
L
I
S H
Power
Turn the key in volume mode), the display returns to change each level.
...
Operating Instructions - Page 6
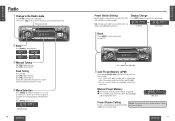
...listening quality of the FM1, FM2, Press [DISP] (display) to switch to the clock display. e Manual Tuning
[l TUNE]: Higher frequency [k TUNE]: Lower frequency
Seek Tuning
Press and hold [BAND] (APM:...BAND BAND
CD-C
USH SEL
CD-C
USH SEL
E N G
Radio
L
I
Preset Station Setting
Display Change
S H
Up to 6 stations can be automatically
saved in the memory under preset buttons from [1] to [6]. &#...
Operating Instructions - Page 7
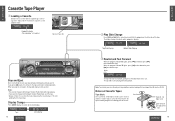
... but not be ejected. Note: To maintain your tape. If a loose tape is used, this may result in the tape becoming tangled in the rotating parts of your cassette player in use. Notes on the other side of the tape. Tape
12 CQ-RG153U
Clock display
E N G L I
S H
q Loading a Cassette
6
Gently insert a cassette...
Operating Instructions - Page 8
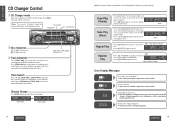
... random selection of each and Disc Number blinks.
• Press and hold [3] (SCAN) for more than 0.5 second to units with the current track. R 5 : Random indicator
Error Display Messages
DISC No.
Track Search
Press and hold [TRACK 7] or [TRACK 6] for more than 2 seconds. CD Changer
Clock display
14 CQ-RG153U
Note: CD...
Operating Instructions - Page 9

... grounding wire to do so.
Reproduction of order. ➡Clean tape running mechanism, or repair it. (Ask a service representative for advice.)
Cause/Step
Left and right balance, or front and rear balance is very high.
❐ Sound Setting
Trouble
No sound from the unit before asking for
• Do not use the unit if...
Operating Instructions - Page 10
...
Installation Guide
E N
G
L
I
S
H
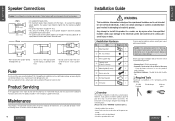
Caution: Please follow the instructions given...support strap
r
Tapping screw (5 mmø × 16 mm)
t Mounting bolt (5 mmø)
y Power connector
u Dismounting plate
i Trim plate
1
Before you encounter problems, please consult your nearest authorized Panasonic Servicenter.
nector. • Install the unit in any other than one set...
Operating Instructions - Page 11
...thick, black wire with the equipment. You can set the unit on , that you have located all ...and then on the ignition to support the unit.
21 CQ-RG153U...installation instructions of the mounting collar with tape so they are usually color coded...tape until you find the fuse port for proper
operation. E N
Installation Guide (Continued)
G
L
I
❐ Final Checks
S H
1.
...
Operating Instructions - Page 12
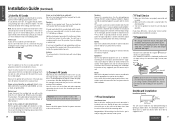
...of car 3 mmø
wHex. Mounting Spring
Mounting Hole
(a) Using the rear support strap e
rTapping screw (5 mmø×16 mm)
Fire wall of the ... careful not to attach any other model.
1 Insert Mounting Collar q into the dashboard, and bend the mounting tabs out with a screwdriver. The removable face plate will be released.
E N
Installation Guide (Continued)
G
L
I S...
Operating Instructions - Page 13

... short-circuit from touching any metal parts. • Remember, if your nearest Panasonic
S
Servicenter. H
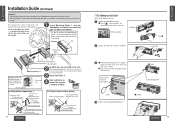
• For connection to a CD changer, refer to the operating instructions of the removable face plate in...10145; page 23) e Gently press the bottom of its memory may result in
w
place. Install Removable Face Plate
q Slide the left side of the CD Changer (CX-DP88U).
19
Cautions:...
Panasonic CQRG153U Reviews
We have not received any reviews for Panasonic yet.