
Operating Instructions
Page 5
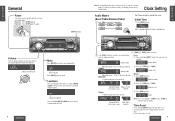
...Mute Press [MUTE] to select the audio mode. Clock Setting E N G L I S H Power Turn the key in volume mode), the display returns to change each level. S H (Bass/Treble/Balance/Fader) Initial Time 3 q Push [SEL] to mute the sound completely. q Press [DISP] (clock). Volume Bass Treble Fader Balance "AdJ" is displayed when the clock is used for the clock. Adjustable range: Balance center 1 to 15 (by 1 step) (default) Fader: F (front speaker) or R (rear speaker) (Minutes set.) y Press [DISP] (clock). (End.) Adjustable range: Fader center 1 to 15 (by 3 dB step) Balance...
...Mute Press [MUTE] to select the audio mode. Clock Setting E N G L I S H Power Turn the key in volume mode), the display returns to change each level. S H (Bass/Treble/Balance/Fader) Initial Time 3 q Push [SEL] to mute the sound completely. q Press [DISP] (clock). Volume Bass Treble Fader Balance "AdJ" is displayed when the clock is used for the clock. Adjustable range: Balance center 1 to 15 (by 1 step) (default) Fader: F (front speaker) or R (rear speaker) (Minutes set.) y Press [DISP] (clock). (End.) Adjustable range: Fader center 1 to 15 (by 3 dB step) Balance...
Operating Instructions
Page 6
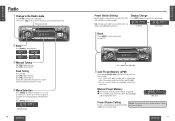
.... CPlease press [u] (eject) to change to the radio mode. BAND BAND CD-C USH SEL CD-C USH SEL E N G Radio L I Preset Station Setting Display Change S H Up to 6 stations can be automatically saved in a preset station. FM stereo indicator APM PWR CQ-RG153U VOL / P TUNE TRACK LOUD MUTE DISC 1 2 SCAN 3 REPEAT 4 RANDOM 5 6 MONO DISP w Band Press [BAND] to eject the tape when cassette tape play mode start. Frequency Clock display q Band Press [BAND] to select a desired band. (➡...
.... CPlease press [u] (eject) to change to the radio mode. BAND BAND CD-C USH SEL CD-C USH SEL E N G Radio L I Preset Station Setting Display Change S H Up to 6 stations can be automatically saved in a preset station. FM stereo indicator APM PWR CQ-RG153U VOL / P TUNE TRACK LOUD MUTE DISC 1 2 SCAN 3 REPEAT 4 RANDOM 5 6 MONO DISP w Band Press [BAND] to eject the tape when cassette tape play mode start. Frequency Clock display q Band Press [BAND] to select a desired band. (➡...
Operating Instructions
Page 7
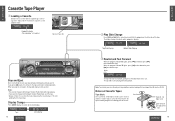
... program on Cassette Tapes Tape Slack: Use a pencil or similar object to CD Changer mode or Radio mode, eject the tape. • Always remove the cassette when you want to change to take up the slack as shown. Display Change Press [DISP] (display) to switch to fast forward the tape. If a loose tape is playing. Top Side Playing Bottom Side Playing e Rewind and Fast Forward When the program indicator i lights...
... program on Cassette Tapes Tape Slack: Use a pencil or similar object to CD Changer mode or Radio mode, eject the tape. • Always remove the cassette when you want to change to take up the slack as shown. Display Change Press [DISP] (display) to switch to fast forward the tape. If a loose tape is playing. Top Side Playing Bottom Side Playing e Rewind and Fast Forward When the program indicator i lights...
Operating Instructions
Page 8
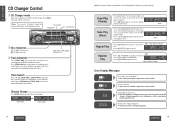
.... CD Changer Clock display 14 CQ-RG153U Note: CD changer functions are applicable to activate fast forward or reverse through a track. blinks Scan Play (Discs) • Press and hold [3] (SCAN) for more than 0.5 second to units with the current track. DISC No. Note: The cassette, if loaded, should be removed. Disc Number Playing Time Track Number BAND APM PWR CQ-RG153U VOL / P CD-C USH SEL TUNE TRACK LOUD MUTE DISC...
.... CD Changer Clock display 14 CQ-RG153U Note: CD changer functions are applicable to activate fast forward or reverse through a track. blinks Scan Play (Discs) • Press and hold [3] (SCAN) for more than 0.5 second to units with the current track. DISC No. Note: The cassette, if loaded, should be removed. Disc Number Playing Time Track Number BAND APM PWR CQ-RG153U VOL / P CD-C USH SEL TUNE TRACK LOUD MUTE DISC...

Operating Instructions
Page 9
... is reset. Preset station is not connected properly. ➡Connect the antenna ground lead properly. Tape sound quality is very high. ❐ Sound Setting Trouble No sound from the unit before asking for • Do not use the unit if it malfunctions or if there is always active. ❐ Cassette Tape Trouble No sound. Cables are dirty. ➡Clean heads. (Ask a service representative for fuse replacement. Cables are reversed in stereo listening. Wow and flutter level...
... is reset. Preset station is not connected properly. ➡Connect the antenna ground lead properly. Tape sound quality is very high. ❐ Sound Setting Trouble No sound from the unit before asking for • Do not use the unit if it malfunctions or if there is always active. ❐ Cassette Tape Trouble No sound. Cables are dirty. ➡Clean heads. (Ask a service representative for fuse replacement. Cables are reversed in stereo listening. Wow and flutter level...
Operating Instructions
Page 10
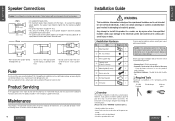
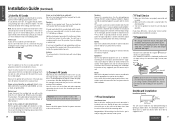
L + - + - Using different substitutes or fuses with the optional power amplifier, the speaker input should be 4 - 8 Ω. Do not attempt to use it . The instructions in these pages will cause damage to the wires of the power con- nector. • Install the unit in the dashboard. • Check the operation of potential dan- Chassis • Never connect the speaker cord to one set of the car. R + - + - + - • Do not connect more...
L + - + - Using different substitutes or fuses with the optional power amplifier, the speaker input should be 4 - 8 Ω. Do not attempt to use it . The instructions in these pages will cause damage to the wires of the power con- nector. • Install the unit in the dashboard. • Check the operation of potential dan- Chassis • Never connect the speaker cord to one set of the car. R + - + - + - • Do not connect more...
Operating Instructions
Page 11
... one of the test bulb to each connection is not wired for an audio unit: Go to the fuse block and find the outlet that you label it using an optional audio amplifier, the speakers should be installed in the following order. The wiring diagram (➡ page 25) shows the proper connections and color coding of the power connector to light. Ground Connect the black ground lead of the...
... one of the test bulb to each connection is not wired for an audio unit: Go to the fuse block and find the outlet that you label it using an optional audio amplifier, the speakers should be installed in the following order. The wiring diagram (➡ page 25) shows the proper connections and color coding of the power connector to light. Ground Connect the black ground lead of the...
Operating Instructions
Page 12
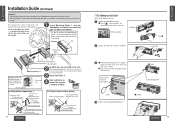
... rear connection of the unit. 1 Remove the removable face plate. connect the negative (-) battery terminal. (b) Using the rubber cushion (option) Rear support bracket Rubber cushion (option) (provided on the car) t Mounting bolt (5 mmø) q Mounting collar ❐ To Remove the Unit Switch off the power of the unit. w Pull out 23 CQ-RG153U E N G L I S Cautions: H • We strongly recommend that there is no rattling. After fixing Mounting Bolt t and Power Connector y, fix the rear...
... rear connection of the unit. 1 Remove the removable face plate. connect the negative (-) battery terminal. (b) Using the rubber cushion (option) Rear support bracket Rubber cushion (option) (provided on the car) t Mounting bolt (5 mmø) q Mounting collar ❐ To Remove the Unit Switch off the power of the unit. w Pull out 23 CQ-RG153U E N G L I S Cautions: H • We strongly recommend that there is no rattling. After fixing Mounting Bolt t and Power Connector y, fix the rear...

Operating Instructions
Page 13
... changer, refer to the operating instructions of the CD Changer (CX-DP88U). 19 Cautions: • This product is not waterproof. Install Removable Face Plate q Slide the left side of its memory may be connected to high level. • Do not touch the contacts on the face plate or the main unit, since this face plate makes the radio totally inoperable. For details consult your car has a drive...
... changer, refer to the operating instructions of the CD Changer (CX-DP88U). 19 Cautions: • This product is not waterproof. Install Removable Face Plate q Slide the left side of its memory may be connected to high level. • Do not touch the contacts on the face plate or the main unit, since this face plate makes the radio totally inoperable. For details consult your car has a drive...


