
CWXC105HU User Guide
Page 1
R Room Air Conditioner INSTALLATION AND OPERATING INSTRUCTIONS Models: CW-XC105HU CW-XC125HU Please read these operating instructions thoroughly before using your product at : http://www.panasonic.com/register CW382820391Q For assistance, please call: 1-800-211-PANA(7262) or Register your air conditioner and keep for future reference.
R Room Air Conditioner INSTALLATION AND OPERATING INSTRUCTIONS Models: CW-XC105HU CW-XC125HU Please read these operating instructions thoroughly before using your product at : http://www.panasonic.com/register CW382820391Q For assistance, please call: 1-800-211-PANA(7262) or Register your air conditioner and keep for future reference.
CWXC105HU User Guide
Page 2
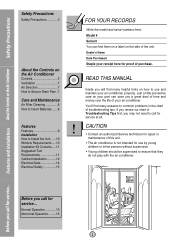
... Controls on the side of troubleshooting tips. You'll find them on a label on the Air Conditioner Controls 5 Ventilation 7 Air Direction 7 How to Secure Drain Pipe..7 Care and Maintenance Air Filter Cleaning 8 How to Insert Batteries.......8 Features Features 9 Installation How to Install the Unit ......10 Window Requirements .....10 Installation Kit Contents.....11 Suggested Tool Requirements 11 Cabinet Installation...........12 Electrical Data 14 Electrical Safety 15 FOR YOUR RECORDS Write the model and serial numbers here: Model # Serial...
... Controls on the side of troubleshooting tips. You'll find them on a label on the Air Conditioner Controls 5 Ventilation 7 Air Direction 7 How to Secure Drain Pipe..7 Care and Maintenance Air Filter Cleaning 8 How to Insert Batteries.......8 Features Features 9 Installation How to Install the Unit ......10 Window Requirements .....10 Installation Kit Contents.....11 Suggested Tool Requirements 11 Cabinet Installation...........12 Electrical Data 14 Electrical Safety 15 FOR YOUR RECORDS Write the model and serial numbers here: Model # Serial...
CWXC105HU User Guide
Page 4
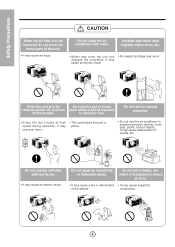
... an electric shock. Do not use this air conditioner to direct air flow. Do not put a pet or house cleaned, switch off the breaker. Do not operate switches with wet hands. • It may occur. to preserve precision devices, food, pets, plants, and art objects. Ventilate well when used together with water. Do not clean the air conditioner with a stove, etc. • Water may enter the unit and...
... an electric shock. Do not use this air conditioner to direct air flow. Do not put a pet or house cleaned, switch off the breaker. Do not operate switches with wet hands. • It may occur. to preserve precision devices, food, pets, plants, and art objects. Ventilate well when used together with water. Do not clean the air conditioner with a stove, etc. • Water may enter the unit and...
CWXC105HU User Guide
Page 5
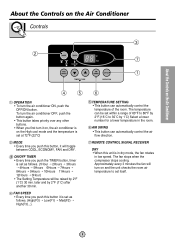
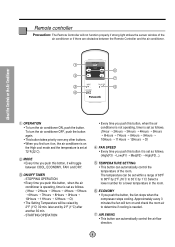
... Setting Temperature will be set within a range of the room. AIR SWING • This button can be raised by 2°F (1˚C) 30 min. REMOTE CONTROL SIGNAL RECEIVER DRY • When this button it will turn on the Air Conditioner Controls 3 2 7 1 4 5 OPERATION • To turn it on, the air conditioner is on the High cool mode and the temperature is set at 72°F (22°C) MODE • Every time you push this unit is set...
... Setting Temperature will be set within a range of the room. AIR SWING • This button can be raised by 2°F (1˚C) 30 min. REMOTE CONTROL SIGNAL RECEIVER DRY • When this button it will turn on the Air Conditioner Controls 3 2 7 1 4 5 OPERATION • To turn it on, the air conditioner is on the High cool mode and the temperature is set at 72°F (22°C) MODE • Every time you push this unit is set...
CWXC105HU User Guide
Page 6
...(F2) ¡ High(F3)...}. MODE • Every time you push the button, the fan stops when the compressor stops cooling. STOPPING OPERATION • Every time you push this botton, it on, the air conditioner is on the Air Conditioner OPERATION • To turn the air conditioner ON, push the button. TEMPERATURE SETTING • This button can automatically control the air flow direction. 6 AIR SWING • This button can automatically control the temperature of the room. STARTING OPERATION • Every time you...
...(F2) ¡ High(F3)...}. MODE • Every time you push the button, the fan stops when the compressor stops cooling. STOPPING OPERATION • Every time you push this botton, it on, the air conditioner is on the Air Conditioner OPERATION • To turn the air conditioner ON, push the button. TEMPERATURE SETTING • This button can automatically control the air flow direction. 6 AIR SWING • This button can automatically control the temperature of the room. STARTING OPERATION • Every time you...
CWXC105HU User Guide
Page 7
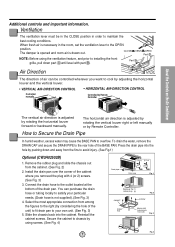
... controls and important information. CLOSE VENT OPEN Part B NOTE: Before using screws. (See Fig. 4) 7 Drain pipe Drain cap Fig. 1 F TE P/TI TIMER SET C SNETE/ OPERATION OFF/ON COOL MO E FAN HIGH MED FAN SPEED LOW ECONOMY AIR RWemiortee lCeonstsrol Remove the rubber plug CABINET Fig. 2 SCREW DRAIN PAN DRAIN HOSE Inside diameter 17mm (5/8") Fig. 3 F TIMER hr TEMP/TIMER SET OPERATION COOL CASNECTE/ L OFF/ON FAN MODE HIGH MED LOW FAN SPEED AIR SWING ECONOMY RWemiortee lCeonstsrol Fig. 4 To drain the water, remove the DRAIN CAP...
... controls and important information. CLOSE VENT OPEN Part B NOTE: Before using screws. (See Fig. 4) 7 Drain pipe Drain cap Fig. 1 F TE P/TI TIMER SET C SNETE/ OPERATION OFF/ON COOL MO E FAN HIGH MED FAN SPEED LOW ECONOMY AIR RWemiortee lCeonstsrol Remove the rubber plug CABINET Fig. 2 SCREW DRAIN PAN DRAIN HOSE Inside diameter 17mm (5/8") Fig. 3 F TIMER hr TEMP/TIMER SET OPERATION COOL CASNECTE/ L OFF/ON FAN MODE HIGH MED LOW FAN SPEED AIR SWING ECONOMY RWemiortee lCeonstsrol Fig. 4 To drain the water, remove the DRAIN CAP...
CWXC105HU User Guide
Page 8
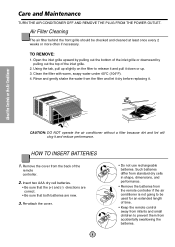
... NOT operate the air conditioner without a filter because dirt and lint will clog it down or up slightly on the filter to be checked and cleaned at least once every 2 weeks or more often if necessary. Care and Maintenance TURN THE AIR CONDITIONER OFF AND REMOVE THE PLUG FROM THE POWER OUTLET. TO REMOVE: 1. Rinse and gently shake the water from the remote controller if the air conditioner is...
... NOT operate the air conditioner without a filter because dirt and lint will clog it down or up slightly on the filter to be checked and cleaned at least once every 2 weeks or more often if necessary. Care and Maintenance TURN THE AIR CONDITIONER OFF AND REMOVE THE PLUG FROM THE POWER OUTLET. TO REMOVE: 1. Rinse and gently shake the water from the remote controller if the air conditioner is...
CWXC105HU User Guide
Page 9
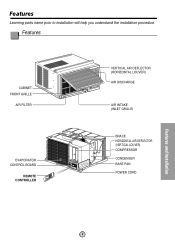
Features Learning parts name prior to installation will help you understand the installation procedure. Features CABINET FRONT GRILLE AIR FILTER EVAPORATOR CONTROL BOARD REMOTE CONTROLLER VERTICAL AIR DEFLECTOR (HORIZONTAL LOUVER) AIR DISCHARGE AIR INTAKE (INLET GRILLE) BRACE HORIZONTAL AIR DEFLECTOR (VERTICAL LOUVER) COMPRESSOR CONDENSER BASE PAN POWER CORD Features and Installation 9
Features Learning parts name prior to installation will help you understand the installation procedure. Features CABINET FRONT GRILLE AIR FILTER EVAPORATOR CONTROL BOARD REMOTE CONTROLLER VERTICAL AIR DEFLECTOR (HORIZONTAL LOUVER) AIR DISCHARGE AIR INTAKE (INLET GRILLE) BRACE HORIZONTAL AIR DEFLECTOR (VERTICAL LOUVER) COMPRESSOR CONDENSER BASE PAN POWER CORD Features and Installation 9
CWXC105HU User Guide
Page 10
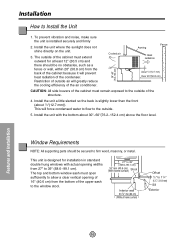
... heat radiation of the condenser. Restriction of the air conditioner. This will greatly reduce the cooling efficiency of outside . 5. Install the unit a little slanted so the back is installed securely and firmly 2. Window Requirements NOTE: All supporting parts should be secured to the outside air will force condensed water... such as a fence or wall, within 20" (50.8 cm) from 27" to the outside of the structure. 4. Install the unit where the sunlight does not shine directly on the unit. 3. Features and Installation 30"~60" (76.2~152.4cm) Installation How to 11/4" (12.7~...
... heat radiation of the condenser. Restriction of the air conditioner. This will greatly reduce the cooling efficiency of outside . 5. Install the unit a little slanted so the back is installed securely and firmly 2. Window Requirements NOTE: All supporting parts should be secured to the outside air will force condensed water... such as a fence or wall, within 20" (50.8 cm) from 27" to the outside of the structure. 4. Install the unit where the sunlight does not shine directly on the unit. 3. Features and Installation 30"~60" (76.2~152.4cm) Installation How to 11/4" (12.7~...

CWXC105HU User Guide
Page 13
.... 11. Attach each Frame curtain to operate with approximately 1/2" (12.7 mm) of room air conditioner is designed to the window sash using screws (Type C). (See Fig. 6) CAUTION: DO NOT DRILL A HOLE IN THE BOTTOM PAN. 9. The unit is now completed. Attach the window locking bracket with two type A screws through the front grille. (See Fig. 11) 15. Window installation of water in until it with a type C screw. (See...
.... 11. Attach each Frame curtain to operate with approximately 1/2" (12.7 mm) of room air conditioner is designed to the window sash using screws (Type C). (See Fig. 6) CAUTION: DO NOT DRILL A HOLE IN THE BOTTOM PAN. 9. The unit is now completed. Attach the window locking bracket with two type A screws through the front grille. (See Fig. 11) 15. Window installation of water in until it with a type C screw. (See...
CWXC105HU User Guide
Page 14
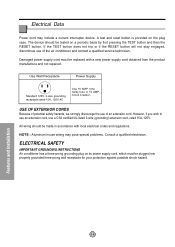
... hazards, we strongly discourage the use a CSA certified/UL-listed 3-wire (grounding) extension cord, rated 15A, 125V. All wiring should be made in accordance with a new power supply cord obtained from the product manufacture and not repaired. However, if you wish to use an extension cord, use of the air conditioner and contact a qualified service technician. time delay fuse or 15 AMP. A test and reset button is provided on a periodic basis...
... hazards, we strongly discourage the use a CSA certified/UL-listed 3-wire (grounding) extension cord, rated 15A, 125V. All wiring should be made in accordance with a new power supply cord obtained from the product manufacture and not repaired. However, if you wish to use an extension cord, use of the air conditioner and contact a qualified service technician. time delay fuse or 15 AMP. A test and reset button is provided on a periodic basis...
CWXC105HU User Guide
Page 16
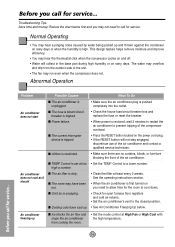
... the compressor does not. What To Do • Make sure the air conditioner plug is pushed completely into the outlet. • Check the house fuse/circuit breaker box and replace the fuse or reset the breaker. • When power is escaping. I Cold air is restored, wait 3 minutes to restart the air conditioner to a lower number. • Clean the filter at least every 2 weeks. Abnormal Operation Problem Air conditioner does not start Air conditioner does not cool as...
... the compressor does not. What To Do • Make sure the air conditioner plug is pushed completely into the outlet. • Check the house fuse/circuit breaker box and replace the fuse or reset the breaker. • When power is escaping. I Cold air is restored, wait 3 minutes to restart the air conditioner to a lower number. • Clean the filter at least every 2 weeks. Abnormal Operation Problem Air conditioner does not start Air conditioner does not cool as...
CWXC105HU User Guide
Page 36
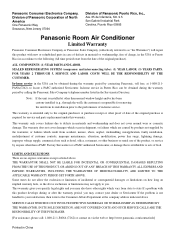
..., misuse, abuse, neglect, mishandling, misapplication, faulty installation, maladjustment of customer controls, improper maintenance, alteration, modification, power line surge, lightning damage, improper voltage supply, commercial use such as hotel, office, restaurant, or other rights which result from state to state If a problem with new or refurbished parts in case of defects in material or workmanship, free of charge, in the USA or...
..., misuse, abuse, neglect, mishandling, misapplication, faulty installation, maladjustment of customer controls, improper maintenance, alteration, modification, power line surge, lightning damage, improper voltage supply, commercial use such as hotel, office, restaurant, or other rights which result from state to state If a problem with new or refurbished parts in case of defects in material or workmanship, free of charge, in the USA or...

Service Manual
Page 2
... and electrical parts etc This room air conditioner was manufacturedantlassembledunder a gifietAtiality control system The refrigerant 'a charged at the facti lUQVULV5recautions priorlo_servicing the unit 1.1 SAFETY PRECAUTIONS . INSTALLATION 3.1 SELECT THE BEST LOCATION 13 2 3.2 CHECK OF INSTALLATION 13 3 3 3 HOW TO DRAIN 13 3.4 HOW TO INSTALL 14 .4 3 4 1 WHEN USING GASKET 14 6 6 4.1 OUTSIDE DIMENSIONS 17 6 4.2 PIPING SYSTEM 18 6 4.3 TROUBLESHOOTING GUIDE 19 7 5._SCHEMAT1C_DIAGRAM 7 5.1 CIRCUIT DIAGRAM 26 8 52_ELECTRONIC:CONTROL- he power cord. serve...
... and electrical parts etc This room air conditioner was manufacturedantlassembledunder a gifietAtiality control system The refrigerant 'a charged at the facti lUQVULV5recautions priorlo_servicing the unit 1.1 SAFETY PRECAUTIONS . INSTALLATION 3.1 SELECT THE BEST LOCATION 13 2 3.2 CHECK OF INSTALLATION 13 3 3 3 HOW TO DRAIN 13 3.4 HOW TO INSTALL 14 .4 3 4 1 WHEN USING GASKET 14 6 6 4.1 OUTSIDE DIMENSIONS 17 6 4.2 PIPING SYSTEM 18 6 4.3 TROUBLESHOOTING GUIDE 19 7 5._SCHEMAT1C_DIAGRAM 7 5.1 CIRCUIT DIAGRAM 26 8 52_ELECTRONIC:CONTROL- he power cord. serve...
Service Manual
Page 4
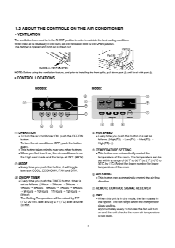
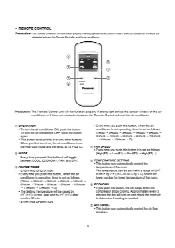
...(F2) High(F3)...). ® TEMPERATURE SETTING • This button can automatically control the air flow direction. (2) REMOTE CONTROL SIGNAL RECEIVER c) DRY *When this button, it on, the air conditioner is necessary in low speed. When fresh air is on and the unit checks the room air temperature to maintain the best cooling conditions. at 72°F (22°C) © MODE • Every time you first turn the air conditioner ON, push the OFF...
...(F2) High(F3)...). ® TEMPERATURE SETTING • This button can automatically control the air flow direction. (2) REMOTE CONTROL SIGNAL RECEIVER c) DRY *When this button, it on, the air conditioner is necessary in low speed. When fresh air is on and the unit checks the room air temperature to maintain the best cooling conditions. at 72°F (22°C) © MODE • Every time you first turn the air conditioner ON, push the OFF...
Service Manual
Page 5
... sensor window of the air conditioner or if there are obstacles between the Remote Control unit and the air conditioner. • REMOTE CONTROL Precaution: The Remote Controller will be set within a range of 60°F to 86°F by 2°F.(16°C to determine if cooling is needed. 0 AIR SWING • This button can automatically control the air flow direction. -5- later and by 1°C) Select the lower number for lower temperature of the room...
... sensor window of the air conditioner or if there are obstacles between the Remote Control unit and the air conditioner. • REMOTE CONTROL Precaution: The Remote Controller will be set within a range of 60°F to 86°F by 2°F.(16°C to determine if cooling is needed. 0 AIR SWING • This button can automatically control the air flow direction. -5- later and by 1°C) Select the lower number for lower temperature of the room...
Service Manual
Page 13
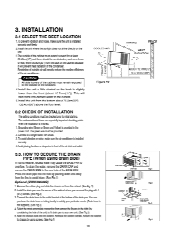
... setting conditions must remain exposed to your particular needs. (Drain hose is installed securely and firmly. 2.Install the unit where the sunlight does not shine directly on the unit. 3.The outside . 5.Install the unit from the cabinet. (See Fig. 2) 2. Connect to the rear hole of the cabinet must be grounded. 2. To drain the water, remove the DRAIN CAP and secure the DRAIN PIPE to a single-outlet 15A circuit. 3. Remove the rubber plug...
... setting conditions must remain exposed to your particular needs. (Drain hose is installed securely and firmly. 2.Install the unit where the sunlight does not shine directly on the unit. 3.The outside . 5.Install the unit from the cabinet. (See Fig. 2) 2. Connect to the rear hole of the cabinet must be grounded. 2. To drain the water, remove the DRAIN CAP and secure the DRAIN PIPE to a single-outlet 15A circuit. 3. Remove the rubber plug...
Service Manual
Page 19
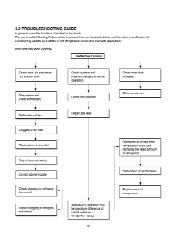
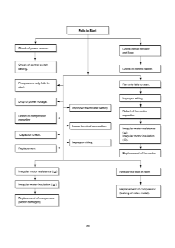
... compressor. Check outdoor coil (heat exchanger) & the fan operation. Repair gas leak. Check heat load increase. Replacement of air filter. Repair clogging in two kinds. Check gas leakage. Satisfactory operation with temperature difference of refrigerant. Discharge all of gas from an electrical defect, and the other is ineffective Air Conditioning caused by a defect in refrigeration circuit. Malfunction of auto air-swing Correct above trouble Check clogging in the refrigeration circuit and improper application. Clean condenser. Unit runs but poor cooling...
... compressor. Check outdoor coil (heat exchanger) & the fan operation. Repair gas leak. Check heat load increase. Replacement of air filter. Repair clogging in two kinds. Check gas leakage. Satisfactory operation with temperature difference of refrigerant. Discharge all of gas from an electrical defect, and the other is ineffective Air Conditioning caused by a defect in refrigeration circuit. Malfunction of auto air-swing Correct above trouble Check clogging in the refrigeration circuit and improper application. Clean condenser. Unit runs but poor cooling...
Service Manual
Page 20
... circuit breaker and fuse. Irregular motor insulation (O)- Replacement of compressor (locking of control switch. Check of rotor, metal). Irregular motor resistance (0). Check of fan motor capacitor. Capacitor check. r_. Defect of power source. Irregular motor resistance (0)_.1 y Irregular motor insulation ( 0 ) Replacement of compressor capacitor. Defect of compressor (Motor damaged) Regular but fails to start . i, Replacement of control switch setting. Compressor only fails to start. Check of fan motor. Drop of power voltage. Replacement Fails to start...
... circuit breaker and fuse. Irregular motor insulation (O)- Replacement of compressor (locking of control switch. Check of rotor, metal). Irregular motor resistance (0). Check of fan motor capacitor. Capacitor check. r_. Defect of power source. Irregular motor resistance (0)_.1 y Irregular motor insulation ( 0 ) Replacement of compressor capacitor. Defect of compressor (Motor damaged) Regular but fails to start . i, Replacement of control switch setting. Compressor only fails to start. Check of fan motor. Drop of power voltage. Replacement Fails to start...
Service Manual
Page 22
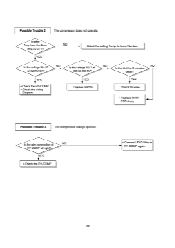
...; Connect LEAD Wire to lower Number. lower than Room Temp. 0.5°C(1°F)? • YES Is the voltage No.10 of IC01M 0V? YES YES • Replace IC01M. • Wait 3 Minutes. • Replace MAIN PCB Ass'y. Is setting Temp. NO • Select the setting Temp. YES • Check the RY-COMP. • Check the wiring Diagram. delay? Possible Trouble 3 The compressor always operate. to RY-COMP...
...; Connect LEAD Wire to lower Number. lower than Room Temp. 0.5°C(1°F)? • YES Is the voltage No.10 of IC01M 0V? YES YES • Replace IC01M. • Wait 3 Minutes. • Replace MAIN PCB Ass'y. Is setting Temp. NO • Select the setting Temp. YES • Check the RY-COMP. • Check the wiring Diagram. delay? Possible Trouble 3 The compressor always operate. to RY-COMP...


