
User Manual
Page 56
...birth is displayed as macro mode. [5 cm (0.16 feet) (Wide)/ 30 cm (0.98 feet) (Tele) to ¶] • ISO sensitivity is fixed to [ ]. (DMC-FX07) • After turning on the camera in [BABY1]/ [BABY2] in scene mode or switching to [BABY1]/[BABY2] from other scene modes, the age and...press [MENU/SET]. 1 1 BABY1 3 WITH AGE WITHOUT AGE 9 months 10 days 10:00 DEC. 1.2006 BIRTHDAY SET. You can set them using the software [LUMIX Simple Viewer] in the CD-ROM (supplied). (For information about printing, refer to the separate operating instructions for about 5 seconds at the bottom of the...
...birth is displayed as macro mode. [5 cm (0.16 feet) (Wide)/ 30 cm (0.98 feet) (Tele) to ¶] • ISO sensitivity is fixed to [ ]. (DMC-FX07) • After turning on the camera in [BABY1]/ [BABY2] in scene mode or switching to [BABY1]/[BABY2] from other scene modes, the age and...press [MENU/SET]. 1 1 BABY1 3 WITH AGE WITHOUT AGE 9 months 10 days 10:00 DEC. 1.2006 BIRTHDAY SET. You can set them using the software [LUMIX Simple Viewer] in the CD-ROM (supplied). (For information about printing, refer to the separate operating instructions for about 5 seconds at the bottom of the...

User Manual
Page 58
... You Take the Picture If you set the departure date in advance, you play back a picture, the date on each picture by using the software [LUMIX Simple Viewer] in the CD-ROM (supplied). (For information about printing, refer to the separate operating instructions for PC connection.) SETUP 1/4 CLOCK SET WORLD TIME...
... You Take the Picture If you set the departure date in advance, you play back a picture, the date on each picture by using the software [LUMIX Simple Viewer] in the CD-ROM (supplied). (For information about printing, refer to the separate operating instructions for PC connection.) SETUP 1/4 CLOCK SET WORLD TIME...
User Manual
Page 81
... 1/3 OFF OOFFN ON MENU /SET • The pictures are displayed without being rotated when you want to be printed remain on the card. • Use [LUMIX Simple Viewer] on the screen shown in 90° steps. ∫ Rotate display (The picture is automatically rotated and displayed.) 1 Press 4 to select [ON] and...
... 1/3 OFF OOFFN ON MENU /SET • The pictures are displayed without being rotated when you want to be printed remain on the card. • Use [LUMIX Simple Viewer] on the screen shown in 90° steps. ∫ Rotate display (The picture is automatically rotated and displayed.) 1 Press 4 to select [ON] and...

User Manual
Page 89
... a time is finished. The data on the built-in memory or the card may be able to copy them if they were edited with a Panasonic digital camera (LUMIX) will stop halfway. • Do not turn the camera off or perform any other operations before copying is copied from the card to the... built-in memory to a card.) COPY COPY PICTURES FROM BUILT-IN MEMORY TO MEMORY CARD ? [COPY] (DMC-FX3) Copying the picture data Press [ MENU ] to display...
... a time is finished. The data on the built-in memory or the card may be able to copy them if they were edited with a Panasonic digital camera (LUMIX) will stop halfway. • Do not turn the camera off or perform any other operations before copying is copied from the card to the... built-in memory to a card.) COPY COPY PICTURES FROM BUILT-IN MEMORY TO MEMORY CARD ? [COPY] (DMC-FX3) Copying the picture data Press [ MENU ] to display...

User Manual
Page 91
The software [LUMIX Simple Viewer] (for Windows®) in advance, it to the computer. optional) • Use a battery with sufficient battery power or the AC adaptor (DMW-AC5; ... easily acquire pictures recorded with the camera to a PC, print them and send them by connecting the camera and the PC. For information about installing [LUMIX Simple Viewer] etc., refer to the separate operating instructions for the AC adaptor (DMW-AC5; Connecting to other equipment Connecting to a PC You can deform...
The software [LUMIX Simple Viewer] (for Windows®) in advance, it to the computer. optional) • Use a battery with sufficient battery power or the AC adaptor (DMW-AC5; ... easily acquire pictures recorded with the camera to a PC, print them and send them by connecting the camera and the PC. For information about installing [LUMIX Simple Viewer] etc., refer to the separate operating instructions for the AC adaptor (DMW-AC5; Connecting to other equipment Connecting to a PC You can deform...

User Manual
Page 92
...drive then appears on the [My Computer] folder. [Macintosh] The drive is displayed on the screen. • The drive is displayed as [LUMIX] when you connect the camera with no card inserted. • The drive is displayed as [NO_NAME] or [Untitled] when you connect the ... displayed as follows. [DCIM] Folders from the following illustration. ≥SD Memory Card ≥SDHC Memory Card ≥MultiMediaCard ≥Built-in memory (DMC-FX3) DCIM 100_PANA 1 100_PANA P1000001.JPG 23 P1000002.JPG P1000999.JPG 101_PANA 999_PANA MISC 1 Folder number 2 File number 3 JPG: pictures MOV: motion ...
...drive then appears on the [My Computer] folder. [Macintosh] The drive is displayed on the screen. • The drive is displayed as [LUMIX] when you connect the camera with no card inserted. • The drive is displayed as [NO_NAME] or [Untitled] when you connect the ... displayed as follows. [DCIM] Folders from the following illustration. ≥SD Memory Card ≥SDHC Memory Card ≥MultiMediaCard ≥Built-in memory (DMC-FX3) DCIM 100_PANA 1 100_PANA P1000001.JPG 23 P1000002.JPG P1000999.JPG 101_PANA 999_PANA MISC 1 Folder number 2 File number 3 JPG: pictures MOV: motion ...
User Manual
Page 95
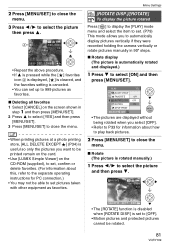
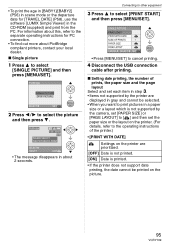
... CD-ROM (supplied) and print from the PC. For information about this, refer to the separate operating instructions for [TRAVEL DATE] (P58), use the software [LUMIX Simple Viewer] in about PictBridge compliant printers, contact your local dealer. ∫ Single picture 1 Press 3 to select [PRINT START] and then press [MENU/SET]. Connecting...
... CD-ROM (supplied) and print from the PC. For information about this, refer to the separate operating instructions for [TRAVEL DATE] (P58), use the software [LUMIX Simple Viewer] in about PictBridge compliant printers, contact your local dealer. ∫ Single picture 1 Press 3 to select [PRINT START] and then press [MENU/SET]. Connecting...


