Digital Still Camera
Page 2
... has parts that contain a small amount of explosion if battery is incorrectly replaced. It also contains lead in your Digital Camera may infringe copyright laws. Disposal of the companies concerned. RBRC A lithium ion/polymer battery that the actual controls and components, menu items, etc....We would like to take this opportunity to recycle this Panasonic Digital Camera. of Information for purposes other published or broadcast material for Your certain material may be regulated in some components. Please call 1-800-8-BATTERY TM Li-ion for future reference. Even for the...
... has parts that contain a small amount of explosion if battery is incorrectly replaced. It also contains lead in your Digital Camera may infringe copyright laws. Disposal of the companies concerned. RBRC A lithium ion/polymer battery that the actual controls and components, menu items, etc....We would like to take this opportunity to recycle this Panasonic Digital Camera. of Information for purposes other published or broadcast material for Your certain material may be regulated in some components. Please call 1-800-8-BATTERY TM Li-ion for future reference. Even for the...

Digital Still Camera
Page 4
... Information for Your Safety 2 Preparation Standard Accessories 6 Names of the Components 8 Quick Guide 10 Charging the Battery 12 About the Battery 13 Inserting the Battery 14 Removing the Battery 15 Using the AC Adaptor 16 About the Card 17 Inserting the Card 18 Removing the Card 19 Attaching the...72 Taking Pictures using Spot Mode...... 73 Setting ISO Sensitivity 74 Taking Pictures with Audio 75 Using the Continuous AF 76 Using the Digital Zoom 77 Using the Color Effect 78 Adjusting the Quality of the Picture (Picture Adjustment 79 Using the Optical Image Stabilizer .... 80...
... Information for Your Safety 2 Preparation Standard Accessories 6 Names of the Components 8 Quick Guide 10 Charging the Battery 12 About the Battery 13 Inserting the Battery 14 Removing the Battery 15 Using the AC Adaptor 16 About the Card 17 Inserting the Card 18 Removing the Card 19 Attaching the...72 Taking Pictures using Spot Mode...... 73 Setting ISO Sensitivity 74 Taking Pictures with Audio 75 Using the Continuous AF 76 Using the Digital Zoom 77 Using the Color Effect 78 Adjusting the Quality of the Picture (Picture Adjustment 79 Using the Optical Image Stabilizer .... 80...
Digital Still Camera
Page 6
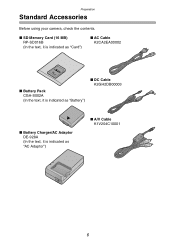
Preparation Preparation Standard Accessories Before using your camera, check the contents. ∫ SD Memory Card (16 MB) RP-SD016B (In the text, it is indicated as "Card") ∫ AC Cable K2CA2EA00002 ∫ Battery Pack CGA-S002A (In the text, it is indicated as "Battery") ∫ DC Cable K2GH2DB00003 ∫ Battery Charger/AC Adaptor DE-928A (In the text, it is indicated as "AC Adaptor") ∫ A/V Cable K1V204C10001 6
Preparation Preparation Standard Accessories Before using your camera, check the contents. ∫ SD Memory Card (16 MB) RP-SD016B (In the text, it is indicated as "Card") ∫ AC Cable K2CA2EA00002 ∫ Battery Pack CGA-S002A (In the text, it is indicated as "Battery") ∫ DC Cable K2GH2DB00003 ∫ Battery Charger/AC Adaptor DE-928A (In the text, it is indicated as "AC Adaptor") ∫ A/V Cable K1V204C10001 6

Digital Still Camera
Page 9
26 30 31 32 Preparation 26 Focus Switch (P65) 27 [A/V OUT] Socket (P106) 28 [USB] Socket (5pin) (P109, 110, 112) 29 Terminal Door 27 28 29 30 Strap Eyelet (P20) 31 [DC IN] Socket (P16) 32 [DC IN] Terminal Door (P16) 33 Card/Battery Door (P14, 18) 34 Card/Battery Door Open Lever (P14, 18) 35 Tripod Receptacle 33 34 35 2 3 4 5 ª Battery Charger/AC Adaptor 1 (P12, 16) 1 [AC INT] Terminal 2 [POWER] Indicator 3 [CHARGE] Indicator 4 Battery Attachment Part 5 [DC OUT] Terminal 9
26 30 31 32 Preparation 26 Focus Switch (P65) 27 [A/V OUT] Socket (P106) 28 [USB] Socket (5pin) (P109, 110, 112) 29 Terminal Door 27 28 29 30 Strap Eyelet (P20) 31 [DC IN] Socket (P16) 32 [DC IN] Terminal Door (P16) 33 Card/Battery Door (P14, 18) 34 Card/Battery Door Open Lever (P14, 18) 35 Tripod Receptacle 33 34 35 2 3 4 5 ª Battery Charger/AC Adaptor 1 (P12, 16) 1 [AC INT] Terminal 2 [POWER] Indicator 3 [CHARGE] Indicator 4 Battery Attachment Part 5 [DC OUT] Terminal 9

Digital Still Camera
Page 10
Quick Guide Preparation • Charge the battery before using. • Prepare the Camera/AC cable/Battery/AC adaptor/Card. • Check that the camera is turned off and that the lens is retracted. • Close the flash. (P38) ª Preparation 1 Charge the battery. (P12) 3 1 Insert the card. (P18) 2 Close the card/battery door. 1 2 • The battery cannot be charged when the DC cable is connected to the AC adaptor. 2 1 Slide the lever to open the card/battery door. 2 Insert the battery. (P14) MEMORY CARD/ BATTERY OPEN 10
Quick Guide Preparation • Charge the battery before using. • Prepare the Camera/AC cable/Battery/AC adaptor/Card. • Check that the camera is turned off and that the lens is retracted. • Close the flash. (P38) ª Preparation 1 Charge the battery. (P12) 3 1 Insert the card. (P18) 2 Close the card/battery door. 1 2 • The battery cannot be charged when the DC cable is connected to the AC adaptor. 2 1 Slide the lever to open the card/battery door. 2 Insert the battery. (P14) MEMORY CARD/ BATTERY OPEN 10
Digital Still Camera
Page 12
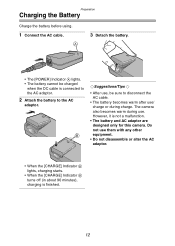
... the AC adaptor. ¬Suggestions/Tips ¬ • After use, be sure to disconnect the AC cable. • The battery becomes warm after use them with any other equipment. • Do not disassemble or alter the AC adaptor. • When the [CHARGE] Indicator B lights, charging ...starts. • When the [CHARGE] Indicator B turns off (in about 90 minutes), charging is not a malfunction. • The battery and AC adaptor are designed only for this camera. The camera also becomes warm during charge.
... the AC adaptor. ¬Suggestions/Tips ¬ • After use, be sure to disconnect the AC cable. • The battery becomes warm after use them with any other equipment. • Do not disassemble or alter the AC adaptor. • When the [CHARGE] Indicator B lights, charging ...starts. • When the [CHARGE] Indicator B turns off (in about 90 minutes), charging is not a malfunction. • The battery and AC adaptor are designed only for this camera. The camera also becomes warm during charge.
Digital Still Camera
Page 13
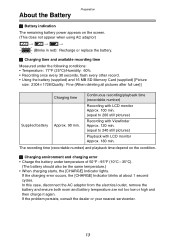
....) • When charging starts, the [CHARGE] Indicator lights. Preparation About the Battery ª Battery indication The remaining battery power appears on the condition. ª Charging environment and charging error • Charge the battery under the following conditions: • Temperature: 77°F (25°C)/Humidity: 60... monitor Approx. 180 min. In this case, disconnect the AC adaptor from the electrical outlet, remove the battery and ensure both room and battery temperature are not too low or high and then charge it again. If the problem persists, consult the ...
....) • When charging starts, the [CHARGE] Indicator lights. Preparation About the Battery ª Battery indication The remaining battery power appears on the condition. ª Charging environment and charging error • Charge the battery under the following conditions: • Temperature: 77°F (25°C)/Humidity: 60... monitor Approx. 180 min. In this case, disconnect the AC adaptor from the electrical outlet, remove the battery and ensure both room and battery temperature are not too low or high and then charge it again. If the problem persists, consult the ...

Digital Still Camera
Page 14
MEMORY CARD/ BATTERY OPEN 2 Insert the charged battery until it clicks. 14 Preparation Inserting the Battery Preparation • Check that the camera is turned off and that the lens is retracted. • Close the flash. 1 Slide the lever to open the card/ battery door. 3 Close the card/battery door.
MEMORY CARD/ BATTERY OPEN 2 Insert the charged battery until it clicks. 14 Preparation Inserting the Battery Preparation • Check that the camera is turned off and that the lens is retracted. • Close the flash. 1 Slide the lever to open the card/ battery door. 3 Close the card/battery door.

Digital Still Camera
Page 15
... hours, the clock setting is stored (in the camera) for this case, set the clock again. (P22) • Do not open the card/ battery door. 3 Close the card/battery door. In this camera. Preparation Removing the Battery Preparation • Check that the camera is turned off and that the lens is retracted....• If you will not use it with the elapsed time after the battery is inserted. (The time may be lost. Do not use the camera for a long time, remove the battery. • After the fully charged battery has been inserted for more than 3 months has passed, the clock setting ...
... hours, the clock setting is stored (in the camera) for this case, set the clock again. (P22) • Do not open the card/ battery door. 3 Close the card/battery door. In this camera. Preparation Removing the Battery Preparation • Check that the camera is turned off and that the lens is retracted....• If you will not use it with the elapsed time after the battery is inserted. (The time may be lost. Do not use the camera for a long time, remove the battery. • After the fully charged battery has been inserted for more than 3 months has passed, the clock setting ...

Digital Still Camera
Page 16
...connecting to an AC adaptor. This is not a malfunction. • Disconnect the AC adaptor and DC cable when the camera is not in use. • The battery cannot be charged in the camera even if the AC adaptor is retracted. • Close the flash. 1 Connect the AC cable. 3 Connect the... DC cable. 2 Open the [DC IN] terminal door. ¬Suggestions/Tips ¬ • Use the supplied DC cable. Preparation • Check that the camera is turned...
...connecting to an AC adaptor. This is not a malfunction. • Disconnect the AC adaptor and DC cable when the camera is not in use. • The battery cannot be charged in the camera even if the AC adaptor is retracted. • Close the flash. 1 Connect the AC cable. 3 Connect the... DC cable. 2 Open the [DC IN] terminal door. ¬Suggestions/Tips ¬ • Use the supplied DC cable. Preparation • Check that the camera is turned...
Digital Still Camera
Page 17
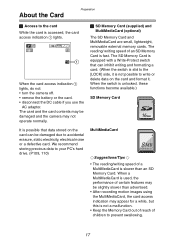
...card. (When the switch is slid to the [LOCK] side, it . When a MultiMediaCard is used, the performance of certain features may be damaged and the camera may appear for a while, but this is not a malfunction. • Keep the Memory Card out of reach of children to accidental erasure, static electricity, ... lightweight, removable external memory cards. The SD Memory Card is fast. P 2304 1 19 When the card access indication 1 lights, do not: • turn the camera off. • remove the battery or the card. • disconnect the DC cable if you use the AC adaptor.
...card. (When the switch is slid to the [LOCK] side, it . When a MultiMediaCard is used, the performance of certain features may be damaged and the camera may appear for a while, but this is not a malfunction. • Keep the Memory Card out of reach of children to accidental erasure, static electricity, ... lightweight, removable external memory cards. The SD Memory Card is fast. P 2304 1 19 When the card access indication 1 lights, do not: • turn the camera off. • remove the battery or the card. • disconnect the DC cable if you use the AC adaptor.

Digital Still Camera
Page 18
Preparation Inserting the Card Preparation • Check that the camera is turned off and that the lens is retracted. • Close the flash. 1 Slide the lever to open the card/ battery door. 3 Close the card/battery door. MEMORY CARD/ BATTERY OPEN 2 Insert the card with the label facing the front of the card. 18 If the card will not insert freely, it locks in place. Do not force the card. • Do not touch the connection terminals on the back side of the camera until it clicks. • Insert the card, pressing gently until it may be reversed.
Preparation Inserting the Card Preparation • Check that the camera is turned off and that the lens is retracted. • Close the flash. 1 Slide the lever to open the card/ battery door. 3 Close the card/battery door. MEMORY CARD/ BATTERY OPEN 2 Insert the card with the label facing the front of the card. 18 If the card will not insert freely, it locks in place. Do not force the card. • Do not touch the connection terminals on the back side of the camera until it clicks. • Insert the card, pressing gently until it may be reversed.
Digital Still Camera
Page 19
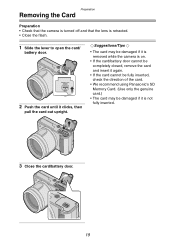
...pull the card out upright. ¬Suggestions/Tips ¬ • The card may be damaged if it is removed while the camera is on. • If the card/battery door cannot be completely closed, remove the card and insert it again. • If the card cannot be fully inserted, check the... • We recommend using Panasonic's SD Memory Card. (Use only the genuine card.) • The card may be damaged if it is retracted. • Close the flash. 1 Slide the lever to open the card/ battery door. Preparation Removing the Card Preparation • Check that the camera is turned off and that the...
...pull the card out upright. ¬Suggestions/Tips ¬ • The card may be damaged if it is removed while the camera is on. • If the card/battery door cannot be completely closed, remove the card and insert it again. • If the card cannot be fully inserted, check the... • We recommend using Panasonic's SD Memory Card. (Use only the genuine card.) • The card may be damaged if it is retracted. • Close the flash. 1 Slide the lever to open the card/ battery door. Preparation Removing the Card Preparation • Check that the camera is turned off and that the...
Digital Still Camera
Page 23
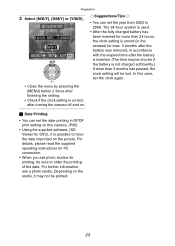
... been inserted for more than 24 hours, the clock setting is stored (in the camera) for max. 3 months after the battery is inserted. (The time may not be printed. 23 In this camera. (P95) • Using the supplied software, [SD Viewer for printing, be lost. Depending on the picture. CLOCK SET 1 0 : 0 0 1 DEC. 1 1...• Check if the clock setting is correct, after turning the camera off and on. ¬Suggestions/Tips ¬ • You can set the date printing in accordance with the elapsed time after the battery was removed, in DPOF print setting on this case, set the ...
... been inserted for more than 24 hours, the clock setting is stored (in the camera) for max. 3 months after the battery is inserted. (The time may not be printed. 23 In this camera. (P95) • Using the supplied software, [SD Viewer for printing, be lost. Depending on the picture. CLOCK SET 1 0 : 0 0 1 DEC. 1 1...• Check if the clock setting is correct, after turning the camera off and on. ¬Suggestions/Tips ¬ • You can set the date printing in accordance with the elapsed time after the battery was removed, in DPOF print setting on this case, set the ...

Digital Still Camera
Page 31
... is not focused. Recording pictures (basic) Taking Pictures Recording pictures (basic) Preparation • Insert the charged battery (P14) or connect the AC adaptor (P16). • Insert the card. (P18) • Remove the lens cap. 1 1 Turn the camera on. 2 Select Program AE mode [ ]. 3 Slide the focus switch to [AF]. 3 Focus on the subject...
... is not focused. Recording pictures (basic) Taking Pictures Recording pictures (basic) Preparation • Insert the charged battery (P14) or connect the AC adaptor (P16). • Insert the card. (P18) • Remove the lens cap. 1 1 Turn the camera on. 2 Select Program AE mode [ ]. 3 Slide the focus switch to [AF]. 3 Focus on the subject...

Digital Still Camera
Page 32
...) - When you set the shutter speed slower (P35, 53, 54) When recording with LCD Monitor Lighting: • When turning the camera on Blinking: • When the card/battery door is open • When the card is not inserted • When there is no remaining capacity on the card • When... the card is locked in the recording mode • When the remaining battery power is low (blinking slowly) When recording with Viewfinder Position of feet ª Focusing • The focus range is 0.98 feet (30 cm) ...
...) - When you set the shutter speed slower (P35, 53, 54) When recording with LCD Monitor Lighting: • When turning the camera on Blinking: • When the card/battery door is open • When the card is not inserted • When there is no remaining capacity on the card • When... the card is locked in the recording mode • When the remaining battery power is low (blinking slowly) When recording with Viewfinder Position of feet ª Focusing • The focus range is 0.98 feet (30 cm) ...
Digital Still Camera
Page 50
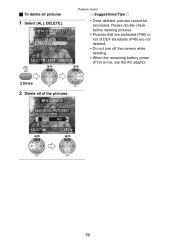
... REVIEW SET REVIEW SET 50 ª To delete all of DCF standards (P45) are not deleted. • Do not turn off the camera while deleting. • When the remaining battery power (P13) is low, use the AC adaptor. Please double-check before deleting pictures. • Pictures that are protected (P96) or not...
... REVIEW SET REVIEW SET 50 ª To delete all of DCF standards (P45) are not deleted. • Do not turn off the camera while deleting. • When the remaining battery power (P13) is low, use the AC adaptor. Please double-check before deleting pictures. • Pictures that are protected (P96) or not...

Digital Still Camera
Page 76
... after finishing the setting. 2 Take the picture. Recording pictures (advanced) Using the Continuous AF This function allows you cannot use the continuous AF. • The battery is depleted more quickly using continuous AF. • It may take time to focus on the screen may be paused.
... after finishing the setting. 2 Take the picture. Recording pictures (advanced) Using the Continuous AF This function allows you cannot use the continuous AF. • The battery is depleted more quickly using continuous AF. • It may take time to focus on the screen may be paused.

Digital Still Camera
Page 105
... to your PC before proceeding. • During formatting, do not turn the camera off. • When the remaining battery power (P13) is low, use the AC adaptor. • If the card is not necessary to : digitalstillcam@panasonic.com For Canadian assistance, please call: 1-800-561-5505 or visit us at... www.panasonic.ca 105 FORMAT REVIEW SET DELETE ALL DATA ON THE MEMORY CARD...
... to your PC before proceeding. • During formatting, do not turn the camera off. • When the remaining battery power (P13) is low, use the AC adaptor. • If the card is not necessary to : digitalstillcam@panasonic.com For Canadian assistance, please call: 1-800-561-5505 or visit us at... www.panasonic.ca 105 FORMAT REVIEW SET DELETE ALL DATA ON THE MEMORY CARD...

Digital Still Camera
Page 109
Then turn the camera off and charge the battery. • When connecting to a PC via the USB connection cable (supplied). Playback (advanced) Connecting to a PC (Mass Storage) A/V OUT USB 1 Turn the camera on the screen. ¬Suggestions/Tips ¬ • When connecting to a PC, we recommend... using the AC adaptor as the power source. • If the remaining battery power becomes low during communication, the power indicator blinks and the...
Then turn the camera off and charge the battery. • When connecting to a PC via the USB connection cable (supplied). Playback (advanced) Connecting to a PC (Mass Storage) A/V OUT USB 1 Turn the camera on the screen. ¬Suggestions/Tips ¬ • When connecting to a PC, we recommend... using the AC adaptor as the power source. • If the remaining battery power becomes low during communication, the power indicator blinks and the...


