Digital Still Camera
Page 1
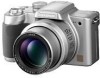
For USA assistance, please call: 1-800-272-7033 or send e-mail to : digitalstillcam@panasonic.com For Canadian assistance, please call: 1-800-561-5505 or visit us at www.panasonic.ca VQT0Q09 Operating Instructions Digital Camera Model No.DMC-FZ5PP DMC-FZ4PP Before connecting, operating or adjusting this product, please read the instructions completely.
For USA assistance, please call: 1-800-272-7033 or send e-mail to : digitalstillcam@panasonic.com For Canadian assistance, please call: 1-800-561-5505 or visit us at www.panasonic.ca VQT0Q09 Operating Instructions Digital Camera Model No.DMC-FZ5PP DMC-FZ4PP Before connecting, operating or adjusting this product, please read the instructions completely.

Digital Still Camera
Page 2
... Use Before Use Dear Customer, Carefully observe copyright laws. We would like to take this opportunity to recycle this Panasonic discs or other than your Digital Camera may look somewhat WARNING different from those shown in the TO REDUCE THE RISK OF FIRE OR illustrations in your local authorities, or the Electronics ...
... Use Before Use Dear Customer, Carefully observe copyright laws. We would like to take this opportunity to recycle this Panasonic discs or other than your Digital Camera may look somewhat WARNING different from those shown in the TO REDUCE THE RISK OF FIRE OR illustrations in your local authorities, or the Electronics ...
Digital Still Camera
Page 4
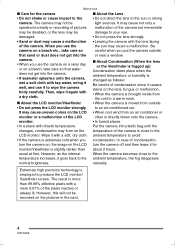
...care so that sand or dust does not get into the or near a window. However, as follows: Be careful of condensation, turn the camera on, the image on the pictures in the card. 4 VQT0Q09 When you condensation. to produce the LCD monitor/ Viewfinder screen. In case ...of condensation since it to the ambient temperature, the fog disappears normal brightness. The camera may cause a malfunction. Then, wipe it again with a soft, dry cloth. usual at first. Extremely high precision technology is moved from ...
...care so that sand or dust does not get into the or near a window. However, as follows: Be careful of condensation, turn the camera on, the image on the pictures in the card. 4 VQT0Q09 When you condensation. to produce the LCD monitor/ Viewfinder screen. In case ...of condensation since it to the ambient temperature, the fog disappears normal brightness. The camera may cause a malfunction. Then, wipe it again with a soft, dry cloth. usual at first. Extremely high precision technology is moved from ...
Digital Still Camera
Page 5
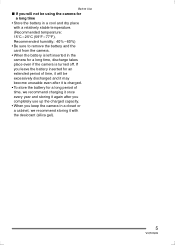
...completely use up the charged capacity. • When you leave the battery inserted for a long time, discharge takes place even if the camera is left inserted in a cool and dry place with the desiccant (silica gel). 5 VQT0Q09 Before Use ∫ If you will be using the... camera for a long time • Store the battery in the camera for an extended period of time, it with a relatively stable temperature. (Recommended temperature: 15oC - 25oC (59oF - 77oF), Recommended ...
...completely use up the charged capacity. • When you leave the battery inserted for a long time, discharge takes place even if the camera is left inserted in a cool and dry place with the desiccant (silica gel). 5 VQT0Q09 Before Use ∫ If you will be using the... camera for a long time • Store the battery in the camera for an extended period of time, it with a relatively stable temperature. (Recommended temperature: 15oC - 25oC (59oF - 77oF), Recommended ...
Digital Still Camera
Page 6
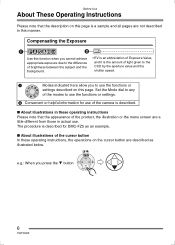
...Mode dial to any of the modes to use the functions or settings described on this page. SCN 2 Convenient or helpful information for DMC-FZ5 as an example. ∫ About illustrations of the cursor button In these operating instructions Please note that the description on this page ... in these operating instructions, the operations on the cursor button are described as illustrated below. The procedure is described for use of the camera is a sample and all pages are not described in actual use. Before Use About These Operating Instructions Please note that the appearance of...
...Mode dial to any of the modes to use the functions or settings described on this page. SCN 2 Convenient or helpful information for DMC-FZ5 as an example. ∫ About illustrations of the cursor button In these operating instructions Please note that the description on this page ... in these operating instructions, the operations on the cursor button are described as illustrated below. The procedure is described for use of the camera is a sample and all pages are not described in actual use. Before Use About These Operating Instructions Please note that the appearance of...
Digital Still Camera
Page 8
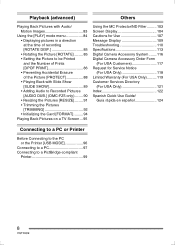
...the Picture [PROTECT 88 • Playing Back with Slide Show [SLIDE SHOW 89 • Adding Audio to Recorded Pictures [AUDIO DUB.] (DMC-FZ5 only)........ 90 • Resizing the Pictures [RESIZE] ........ 91 • Trimming the Pictures [TRIMMING 92 • Initializing the Card... MC Protector/ND Filter ......... 103 Screen Display 104 Cautions for Use 107 Message Display 109 Troubleshooting 110 Specifications 113 Digital Camera Accessory System ....... 116 Digital Camera Accessory Order Form (For USA Customers 117 Request for Service Notice (For USA Only 118 Limited Warranty (For USA...
...the Picture [PROTECT 88 • Playing Back with Slide Show [SLIDE SHOW 89 • Adding Audio to Recorded Pictures [AUDIO DUB.] (DMC-FZ5 only)........ 90 • Resizing the Pictures [RESIZE] ........ 91 • Trimming the Pictures [TRIMMING 92 • Initializing the Card... MC Protector/ND Filter ......... 103 Screen Display 104 Cautions for Use 107 Message Display 109 Troubleshooting 110 Specifications 113 Digital Camera Accessory System ....... 116 Digital Camera Accessory Order Form (For USA Customers 117 Request for Service Notice (For USA Only 118 Limited Warranty (For USA...
Digital Still Camera
Page 9
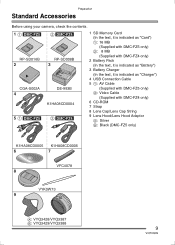
... using your camera, check the contents. 1 1 DMC-FZ5 2 DMC-FZ4 RP-SD016B 2 RP-SD008B 3 CGA-S002A 4 DE-993B K1HA08CD0004 5 1 DMC-FZ5 2 DMC-FZ4 1 SD Memory Card (In the text, it is indicated as "Card") 1: 16 MB (Supplied with DMC-FZ5 only) 2: 8 MB (Supplied with DMC-FZ4 only) 2... as "Charger") 4 USB Connection Cable 5 1: AV Cable (Supplied with DMC-FZ5 only) 2: Video Cable (Supplied with DMC-FZ4 only) 6 CD-ROM 7 Strap 8 Lens Cap/Lens Cap String 9 Lens Hood/Lens Hood Adaptor A: Silver B: Black (DMC-FZ5 only) K1HA08CD0005 K1HA08CD0006 6 7 VFC4078 8 VYK0W73 9 A: VYQ3428/VYQ3387 ...
... using your camera, check the contents. 1 1 DMC-FZ5 2 DMC-FZ4 RP-SD016B 2 RP-SD008B 3 CGA-S002A 4 DE-993B K1HA08CD0004 5 1 DMC-FZ5 2 DMC-FZ4 1 SD Memory Card (In the text, it is indicated as "Card") 1: 16 MB (Supplied with DMC-FZ5 only) 2: 8 MB (Supplied with DMC-FZ4 only) 2... as "Charger") 4 USB Connection Cable 5 1: AV Cable (Supplied with DMC-FZ5 only) 2: Video Cable (Supplied with DMC-FZ4 only) 6 CD-ROM 7 Strap 8 Lens Cap/Lens Cap String 9 Lens Hood/Lens Hood Adaptor A: Silver B: Black (DMC-FZ5 only) K1HA08CD0005 K1HA08CD0006 6 7 VFC4078 8 VYK0W73 9 A: VYQ3428/VYQ3387 ...

Digital Still Camera
Page 10
Preparation Names of the Components 1 2 34 1 Lens (P4) 2 Flash (P40) 3 Microphone (DMC-FZ5 only) (P61, 75) 4 Self-timer Indicator (P44) AF Assist Lamp (P78) 5 6 7 8 9 10 11 12... 9 [DISPLAY] Button (P27) 10 [EXPOSURE] Button (P55, 56, 57) 11 Power Indicator (P31) 12 Camera ON/OFF Switch (P12) 13 LCD Monitor (P27, 104) DMC-FZ5: Size 1.8q DMC-FZ4: Size 1.5q 14 [MENU] Button (P23) 15 Delete (P53)/[FOCUS] (P67, 77) Button 16 Cursor Buttons... (P72)/Flash Output Adjustment (P42)/Backlight Compensation in Simple Mode (P37) Button 17 Speaker (P83) (DMC-FZ5) Speaker for Operational Sound only (DMC-FZ4)
Preparation Names of the Components 1 2 34 1 Lens (P4) 2 Flash (P40) 3 Microphone (DMC-FZ5 only) (P61, 75) 4 Self-timer Indicator (P44) AF Assist Lamp (P78) 5 6 7 8 9 10 11 12... 9 [DISPLAY] Button (P27) 10 [EXPOSURE] Button (P55, 56, 57) 11 Power Indicator (P31) 12 Camera ON/OFF Switch (P12) 13 LCD Monitor (P27, 104) DMC-FZ5: Size 1.8q DMC-FZ4: Size 1.5q 14 [MENU] Button (P23) 15 Delete (P53)/[FOCUS] (P67, 77) Button 16 Cursor Buttons... (P72)/Flash Output Adjustment (P42)/Backlight Compensation in Simple Mode (P37) Button 17 Speaker (P83) (DMC-FZ5) Speaker for Operational Sound only (DMC-FZ4)
Digital Still Camera
Page 12
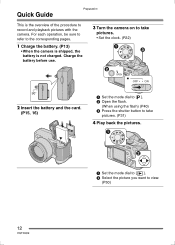
... operation, be sure to refer to the corresponding pages. 1 Charge the battery. (P13) • When the camera is shipped, the battery is the overview of the procedure to record and playback pictures with the camera. P M 1 Set the mode dial to [ ]. 2 Select the picture you want to take pictures. (...P31) 4 Play back the pictures. Charge the battery before use. 3 Turn the camera on to take pictures. • Set the clock. (P22) A P OPEN OFF ON M S S A 2 Insert the battery and the card. (P15, 16) 1 Set the mode ...
... operation, be sure to refer to the corresponding pages. 1 Charge the battery. (P13) • When the camera is shipped, the battery is the overview of the procedure to record and playback pictures with the camera. P M 1 Set the mode dial to [ ]. 2 Select the picture you want to take pictures. (...P31) 4 Play back the pictures. Charge the battery before use. 3 Turn the camera on to take pictures. • Set the clock. (P22) A P OPEN OFF ON M S S A 2 Insert the battery and the card. (P15, 16) 1 Set the mode ...
Digital Still Camera
Page 13
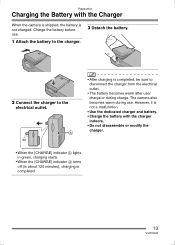
However, it is not a malfunction. • Use the dedicated charger and battery. • Charge the battery with the Charger When the camera is shipped, the battery is completed. 13 VQT0Q09 Preparation Charging the Battery with the charger indoors. • Do not disassemble or modify the charger. • ... charging is completed, be sure to disconnect the charger from the electrical outlet. • The battery becomes warm after use/ charge or during use. The camera also becomes warm during charge.
However, it is not a malfunction. • Use the dedicated charger and battery. • Charge the battery with the Charger When the camera is shipped, the battery is completed. 13 VQT0Q09 Preparation Charging the Battery with the charger indoors. • Do not disassemble or modify the charger. • ... charging is completed, be sure to disconnect the charger from the electrical outlet. • The battery becomes warm after use/ charge or during use. The camera also becomes warm during charge.

Digital Still Camera
Page 14
...Humidity: 50% when LCD monitor is on the recording interval time. If the [CHARGE] indicator still blinks even if you use the camera along with CIPA standard.) Number of Approx. 320 pictures recordable pictures (Approx. 160 min.) 14 VQT0Q09 Playback time when using the ...pictures varies depending on . • Using the supplied SD Memory Card (DMC-FZ5; 16 MB/DMC-FZ4; 8 MB) • Using the supplied battery. • Recording starts 30 seconds after the camera is an abbreviation of [Camera & Imaging Products Association]. If the recording interval time becomes longer, the...
...Humidity: 50% when LCD monitor is on the recording interval time. If the [CHARGE] indicator still blinks even if you use the camera along with CIPA standard.) Number of Approx. 320 pictures recordable pictures (Approx. 160 min.) 14 VQT0Q09 Playback time when using the ...pictures varies depending on . • Using the supplied SD Memory Card (DMC-FZ5; 16 MB/DMC-FZ4; 8 MB) • Using the supplied battery. • Recording starts 30 seconds after the camera is an abbreviation of [Camera & Imaging Products Association]. If the recording interval time becomes longer, the...
Digital Still Camera
Page 15
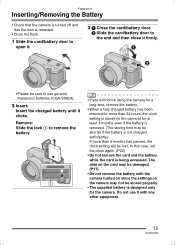
...battery while the card is designed only for the camera. Do not use genuine Panasonic batteries (CGA-S002A). 2 Insert: Insert the charged battery until it clicks. Remove: Slide the lock 1 to use it with the camera turned on since the settings on the camera may not be lost. The data on the ...may be damaged. (P17) • Do not remove the battery with any other equipment. 15 VQT0Q09 Preparation Inserting/Removing the Battery • Check that the camera is turned off and that the lens is retracted. • Close the flash. 1 Slide the card/battery door to open it. 3 1 Close the ...
...battery while the card is designed only for the camera. Do not use genuine Panasonic batteries (CGA-S002A). 2 Insert: Insert the charged battery until it clicks. Remove: Slide the lock 1 to use it with the camera turned on since the settings on the camera may not be lost. The data on the ...may be damaged. (P17) • Do not remove the battery with any other equipment. 15 VQT0Q09 Preparation Inserting/Removing the Battery • Check that the camera is turned off and that the lens is retracted. • Close the flash. 1 Slide the card/battery door to open it. 3 1 Close the ...
Digital Still Camera
Page 16
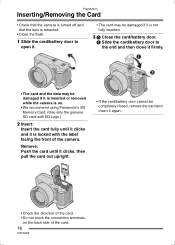
Preparation Inserting/Removing the Card • Check that the camera is turned off and that the lens is retracted. • Close the flash. 1 Slide...it firmly. • The card and the data may be damaged if it is inserted or removed while the camera is locked with the label facing the front of the card. 16 VQT0Q09 Remove: Push the card until it clicks...• Check the direction of the card. • Do not touch the connection terminals on . • We recommend using Panasonic's SD Memory Card. (Use only the genuine SD card with SD Logo.) 2 Insert: Insert the card fully until it clicks...
Preparation Inserting/Removing the Card • Check that the camera is turned off and that the lens is retracted. • Close the flash. 1 Slide...it firmly. • The card and the data may be damaged if it is inserted or removed while the camera is locked with the label facing the front of the card. 16 VQT0Q09 Remove: Push the card until it clicks...• Check the direction of the card. • Do not touch the connection terminals on . • We recommend using Panasonic's SD Memory Card. (Use only the genuine SD card with SD Logo.) 2 Insert: Insert the card fully until it clicks...
Digital Still Camera
Page 17
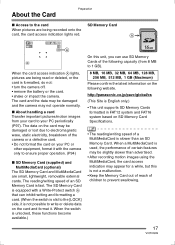
... SD Memory Card is formatted, do not: • turn the camera off. • remove the battery or the card. • shake or impact the camera. The reading/writing speed of certain features may be slightly slower than an SD Memory Card. http://panasonic.co.jp/pavc/global/cs (This Site is English only...
... SD Memory Card is formatted, do not: • turn the camera off. • remove the battery or the card. • shake or impact the camera. The reading/writing speed of certain features may be slightly slower than an SD Memory Card. http://panasonic.co.jp/pavc/global/cs (This Site is English only...
Digital Still Camera
Page 19
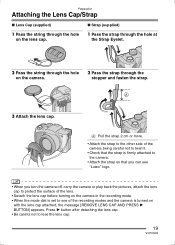
... careful not to twist it. • Check that the strap is firmly attached to the camera. • Attach the strap so that you can see "LUMIX" logo. • When you turn the camera off, carry the camera or play back the pictures, attach the lens cap to protect the surface of the lens. •...; Detach the lens cap before turning on the camera in the recording mode. • When the mode...
... careful not to twist it. • Check that the strap is firmly attached to the camera. • Attach the strap so that you can see "LUMIX" logo. • When you turn the camera off, carry the camera or play back the pictures, attach the lens cap to protect the surface of the lens. •...; Detach the lens cap before turning on the camera in the recording mode. • When the mode...
Digital Still Camera
Page 20
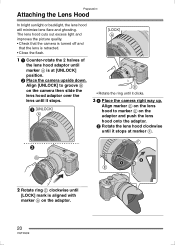
The lens hood cuts out excess light and improves the picture quality. • Check that the camera is turned off and that the lens is retracted. • Close the flash. 1 1 Counter-rotate the 2 halves of the lens hood adaptor until marker A is ... and push the lens hood onto the adaptor. 2 Rotate the lens hood clockwise until it stops at [UNLOCK] position. 2 Place the camera upside down. Align [UNLOCK] to marker E on the camera then slide the lens hood adaptor over the lens until it stops. [UNLOCK] [LOCK] • Rotate the ring until it clicks...
The lens hood cuts out excess light and improves the picture quality. • Check that the camera is turned off and that the lens is retracted. • Close the flash. 1 1 Counter-rotate the 2 halves of the lens hood adaptor until marker A is ... and push the lens hood onto the adaptor. 2 Rotate the lens hood clockwise until it stops at [UNLOCK] position. 2 Place the camera upside down. Align [UNLOCK] to marker E on the camera then slide the lens hood adaptor over the lens until it stops. [UNLOCK] [LOCK] • Rotate the ring until it clicks...
Digital Still Camera
Page 22
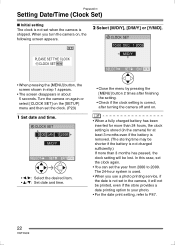
... • For the date print setting, refer to 2099. Preparation Setting Date/Time (Clock Set) ∫ Initial setting The clock is not set when the camera is not charged sufficiently.) If more than 3 months has passed, the clock setting will not be lost. CLOCK SET 00 : 00 JAN .11 . 2005 ...8226; Close the menu by pressing the [MENU] button 2 times after finishing the setting. • Check if the clock setting is correct, after turning the camera off and on. • When a fully charged battery has been inserted for at least 3 months even if the battery is removed. (The storing time ...
... • For the date print setting, refer to 2099. Preparation Setting Date/Time (Clock Set) ∫ Initial setting The clock is not set when the camera is not charged sufficiently.) If more than 3 months has passed, the clock setting will not be lost. CLOCK SET 00 : 00 JAN .11 . 2005 ...8226; Close the menu by pressing the [MENU] button 2 times after finishing the setting. • Check if the clock setting is correct, after turning the camera off and on. • When a fully charged battery has been inserted for at least 3 months even if the battery is removed. (The storing time ...
Digital Still Camera
Page 23
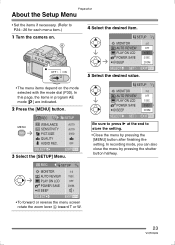
... SAVE BEEP n0 1SEC. ZOOM SELECT SET EXIT MENU Be sure to press 1 at the end to P24- 26 for each menu item.) 1 Turn the camera on the mode selected with the mode dial (P30). OFF 2 MIN. SELECT EXIT MENU • To forward or reverse the menu screen rotate the zoom...
... SAVE BEEP n0 1SEC. ZOOM SELECT SET EXIT MENU Be sure to press 1 at the end to P24- 26 for each menu item.) 1 Turn the camera on the mode selected with the mode dial (P30). OFF 2 MIN. SELECT EXIT MENU • To forward or reverse the menu screen rotate the zoom...
Digital Still Camera
Page 25
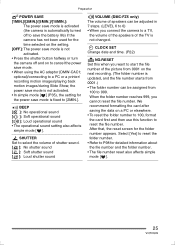
...reset the file number. Select [Yes] to reset the folder number. • Refer to 999. When the folder number reaches 999, you connect the camera to a TV, the volume of the speakers of the picture from 100 to P98 for the folder number appears. SHUTTER Set to save the battery... power save mode is not activated. • Press the shutter button halfway or turn the camera off to select the volume of shutter sound. [ ]: No shutter sound [ ]: Soft shutter sound [ ]: Loud shutter sound VOLUME (DMC-FZ5 only) The volume of speakers can be assigned from 0001 on the setting. [OFF]:...
...reset the file number. Select [Yes] to reset the folder number. • Refer to 999. When the folder number reaches 999, you connect the camera to a TV, the volume of the speakers of the picture from 100 to P98 for the folder number appears. SHUTTER Set to save the battery... power save mode is not activated. • Press the shutter button halfway or turn the camera off to select the volume of shutter sound. [ ]: No shutter sound [ ]: Soft shutter sound [ ]: Loud shutter sound VOLUME (DMC-FZ5 only) The volume of speakers can be assigned from 0001 on the setting. [OFF]:...
Digital Still Camera
Page 26
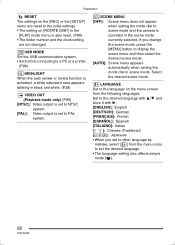
... the scene menu and then select the desired scene mode. [AUTO]: Scene menu appears automatically when setting the mode dial to scene mode and the camera is also reset. (P85) • The folder number and the clock setting are reset to the language on [ROTATE DISP.] in the [PLAY] mode menu...
... the scene menu and then select the desired scene mode. [AUTO]: Scene menu appears automatically when setting the mode dial to scene mode and the camera is also reset. (P85) • The folder number and the clock setting are reset to the language on [ROTATE DISP.] in the [PLAY] mode menu...


