
Digital Still Camera - English/ Spanish
Page 1
Operating Instructions Digital Camera Model No. DMC-TZ1 PP Before connecting, operating or adjusting this product, please read the instructions completely. For USA assistance, please call: 1-800-272-7033 or send e-mail to : digitalstillcam@panasonic.com For Canadian assistance, please call: 1-800-561-5505 or visit us at www.panasonic.ca PP VQT0V40
Operating Instructions Digital Camera Model No. DMC-TZ1 PP Before connecting, operating or adjusting this product, please read the instructions completely. For USA assistance, please call: 1-800-272-7033 or send e-mail to : digitalstillcam@panasonic.com For Canadian assistance, please call: 1-800-561-5505 or visit us at www.panasonic.ca PP VQT0V40

Digital Still Camera - English/ Spanish
Page 2
...laws. Information for Your Safety • Please note that is recyclable powers the product you for purposes other than your Digital Camera may infringe copyright laws. THERE ARE NO USER SERVICEABLE PARTS INSIDE. The socket outlet shall be restricted. DO NOT REMOVE THE ...Logo is incorrectly replaced. Even for the purpose of pre-recorded tapes or discs or other published or broadcast material for purchasing this Panasonic Digital Camera. Replace only with the same or equivalent type recommended by the manufacturer. Dispose of explosion if battery is a trademark. •...
...laws. Information for Your Safety • Please note that is recyclable powers the product you for purposes other than your Digital Camera may infringe copyright laws. THERE ARE NO USER SERVICEABLE PARTS INSIDE. The socket outlet shall be restricted. DO NOT REMOVE THE ...Logo is incorrectly replaced. Even for the purpose of pre-recorded tapes or discs or other published or broadcast material for purchasing this Panasonic Digital Camera. Replace only with the same or equivalent type recommended by the manufacturer. Dispose of explosion if battery is a trademark. •...

Digital Still Camera - English/ Spanish
Page 4
...About the Lens • Do not press the lens with excessive force. • Do not leave the camera with the lens facing the sun as it may form on the LCD monitor and it to produce the ...LCD monitor screen. This is employed to wipe the camera body carefully. The spots will be recorded on pictures on the LCD monitor will not be slightly ... back pictures. • Sand or dust may appear on the LCD monitor in the European Union. The camera may stop operating normally, pictures may not be recorded or the lens may be some dark or bright spots...
...About the Lens • Do not press the lens with excessive force. • Do not leave the camera with the lens facing the sun as it may form on the LCD monitor and it to produce the ...LCD monitor screen. This is employed to wipe the camera body carefully. The spots will be recorded on pictures on the LCD monitor will not be slightly ... back pictures. • Sand or dust may appear on the LCD monitor in the European Union. The camera may stop operating normally, pictures may not be recorded or the lens may be some dark or bright spots...

Digital Still Camera - English/ Spanish
Page 5
... for a long period of time • Store the battery in the camera, it will discharge even if the camera is turned off and leave it causes lens stains, fungus and camera malfunction. - When the camera is taken from the camera. • If the battery is left in a cool and dry place... as described below. Before Use About The Mode Dial Adjust part A to the ambient temperature. In humid places • To prevent condensation, put the camera in a closet or a cabinet. The mode dial can be rotated 360o. ∫ About Condensation (When the lens is fogged up picture of a ...
... for a long period of time • Store the battery in the camera, it will discharge even if the camera is turned off and leave it causes lens stains, fungus and camera malfunction. - When the camera is taken from the camera. • If the battery is left in a cool and dry place... as described below. Before Use About The Mode Dial Adjust part A to the ambient temperature. In humid places • To prevent condensation, put the camera in a closet or a cabinet. The mode dial can be rotated 360o. ∫ About Condensation (When the lens is fogged up picture of a ...
Digital Still Camera - English/ Spanish
Page 6
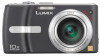
..., the illustration or the menu screen are described as illustrated as shown. Set the mode dial to any of the modes to use of the camera is described. ∫ About illustrations in these operating instructions Please note that the appearance of the cursor button In these operating instructions SCN1 SCN2 Modes...
..., the illustration or the menu screen are described as illustrated as shown. Set the mode dial to any of the modes to use of the camera is described. ∫ About illustrations in these operating instructions Please note that the appearance of the cursor button In these operating instructions SCN1 SCN2 Modes...

Digital Still Camera - English/ Spanish
Page 8
... Display 99 Cautions for Use 101 Message Display 103 Troubleshooting 105 Number of recordable pictures and available recording time 111 Specifications 113 Digital Camera Accessory System ....... 115 Digital Camera Accessory Order Form (For USA Customers 116 Request for Service Notice (For USA Only 117 Limited Warranty (For USA Only) ......... 118 Customer Services...
... Display 99 Cautions for Use 101 Message Display 103 Troubleshooting 105 Number of recordable pictures and available recording time 111 Specifications 113 Digital Camera Accessory System ....... 115 Digital Camera Accessory Order Form (For USA Customers 116 Request for Service Notice (For USA Only 117 Limited Warranty (For USA Only) ......... 118 Customer Services...
Digital Still Camera - English/ Spanish
Page 9
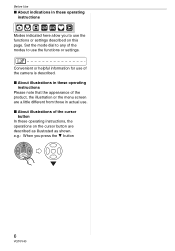
... using a card. (P16) • For information about optional accessories, refer to the "Digital Camera Accessory System". (P115) • If any accessories are lost, customers in the USA should contact Panasonic's parts department at 1 800 833-9626 and customers in the text) 3 USB Connection Cable 4... AV Cable 5 CD-ROM 6 Strap 7 Lens Cap/Lens Cap String 8 Battery Carrying Case • SD Memory Cards are included before using the camera. 1 2 CGA-S007A 3 DE...
... using a card. (P16) • For information about optional accessories, refer to the "Digital Camera Accessory System". (P115) • If any accessories are lost, customers in the USA should contact Panasonic's parts department at 1 800 833-9626 and customers in the text) 3 USB Connection Cable 4... AV Cable 5 CD-ROM 6 Strap 7 Lens Cap/Lens Cap String 8 Battery Carrying Case • SD Memory Cards are included before using the camera. 1 2 CGA-S007A 3 DE...

Digital Still Camera - English/ Spanish
Page 10
optional). • This camera cannot charge the battery even though the AC adaptor (DMW-AC5; Preparation 4 56 17 18 DIGITAL AV OUT... 95, 98) 20 [DC IN] Socket (P92, 95) • Always use a tripod, make sure the tripod is stable when the camera is connected to it . 21 21 Lens cap/Strap eyelet (P17) 22 23 13 14 15 16 10 Speaker (P69) 11 Zoom lever... 12 Optical image stabilizer button (P47) 13 Microphone (P64, 74, 86) 14 Mode dial (P5) 15 Shutter button (P25, 64) 16 Camera ON/OFF switch (P11, 18) 24 22 Release lever (P14, 15) 23 Card/Battery door (P14, 15) 24 Tripod receptacle • ...
optional). • This camera cannot charge the battery even though the AC adaptor (DMW-AC5; Preparation 4 56 17 18 DIGITAL AV OUT... 95, 98) 20 [DC IN] Socket (P92, 95) • Always use a tripod, make sure the tripod is stable when the camera is connected to it . 21 21 Lens cap/Strap eyelet (P17) 22 23 13 14 15 16 10 Speaker (P69) 11 Zoom lever... 12 Optical image stabilizer button (P47) 13 Microphone (P64, 74, 86) 14 Mode dial (P5) 15 Shutter button (P25, 64) 16 Camera ON/OFF switch (P11, 18) 24 22 Release lever (P14, 15) 23 Card/Battery door (P14, 15) 24 Tripod receptacle • ...
Digital Still Camera - English/ Spanish
Page 11
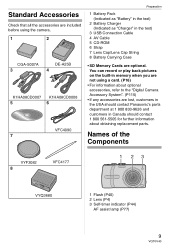
... pictures. • Set the clock. (P18) OFF ON SCN1 SCN2 SCN1 • The battery is not charged when the camera is an overview of how to record and playback pictures with the camera. Refer to P16 when you use the card (optional), you want to the pages indicated in brackets. 1 Charge the... battery. (P12) SCN2 Preparation 3 Turn the camera on the built-in memory (P16). For each step, be sure to refer to...
... pictures. • Set the clock. (P18) OFF ON SCN1 SCN2 SCN1 • The battery is not charged when the camera is an overview of how to record and playback pictures with the camera. Refer to P16 when you use the card (optional), you want to the pages indicated in brackets. 1 Charge the... battery. (P12) SCN2 Preparation 3 Turn the camera on the built-in memory (P16). For each step, be sure to refer to...

Digital Still Camera - English/ Spanish
Page 12
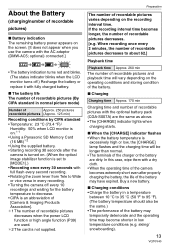
... dedicated charger and battery. • Charge the battery with the Charger The battery is not charged when the camera is completed, be exhausted if left for a long period of time after charging. The camera also becomes warm during and after being charged. Recharge the battery when it and during use. This is...
... dedicated charger and battery. • Charge the battery with the Charger The battery is not charged when the camera is completed, be exhausted if left for a long period of time after charging. The camera also becomes warm during and after being charged. Recharge the battery when it and during use. This is...
Digital Still Camera - English/ Spanish
Page 13
...;C (73.4 °F)/ Humidity: 50% when LCD monitor is on.¢1 • Using a Panasonic SD Memory Card (16 MB)¢2 • Using the supplied battery. • Starting recording 30 seconds after the camera is turned on. (When the optical image stabilizer function is set to [MODE1].) • Recording.../number of recordable pictures) ∫ Battery indication The remaining battery power appears on the screen. [It does not appear when you use the camera with the optional battery pack (CGA-S007A) are the same as above. • The [CHARGE] indicator lights when charging starts. ∫...
...;C (73.4 °F)/ Humidity: 50% when LCD monitor is on.¢1 • Using a Panasonic SD Memory Card (16 MB)¢2 • Using the supplied battery. • Starting recording 30 seconds after the camera is turned on. (When the optical image stabilizer function is set to [MODE1].) • Recording.../number of recordable pictures) ∫ Battery indication The remaining battery power appears on the screen. [It does not appear when you use the camera with the optional battery pack (CGA-S007A) are the same as above. • The [CHARGE] indicator lights when charging starts. ∫...
Digital Still Camera - English/ Spanish
Page 14
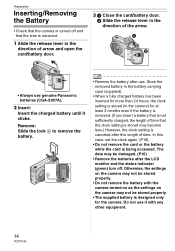
...not remove the battery with any other equipment. 14 VQT0V40 Do not use genuine Panasonic batteries (CGA-S007A). 2 Insert: Insert the charged battery until it with the camera turned on as the settings on the camera may be stored properly. • The supplied battery is designed only for at ... open the card/battery door. 3 1 Close the card/battery door. 2 Slide the release lever in the camera) for the camera. Preparation Inserting/Removing the Battery • Check that the camera is turned off . Remove: Slide the lock A to remove the battery. • Remove the battery after use...
...not remove the battery with any other equipment. 14 VQT0V40 Do not use genuine Panasonic batteries (CGA-S007A). 2 Insert: Insert the charged battery until it with the camera turned on as the settings on the camera may be stored properly. • The supplied battery is designed only for at ... open the card/battery door. 3 1 Close the card/battery door. 2 Slide the release lever in the camera) for the camera. Preparation Inserting/Removing the Battery • Check that the camera is turned off . Remove: Slide the lock A to remove the battery. • Remove the battery after use...
Digital Still Camera - English/ Spanish
Page 15
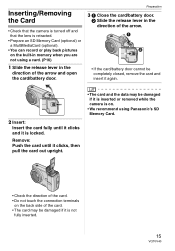
... pull the card out upright. • The card and the data may be damaged if it is inserted or removed while the camera is on. • We recommend using Panasonic's SD Memory Card. • Check the direction of the card. • Do not touch the connection terminals on the built-in memory.../battery door. Remove: Push the card until it clicks and it is not fully inserted. 15 VQT0V40 Inserting/Removing the Card • Check that the camera is turned off and that the lens is retracted. • Prepare an SD Memory Card (optional) or a MultiMediaCard (optional). • You can record or ...
... pull the card out upright. • The card and the data may be damaged if it is inserted or removed while the camera is on. • We recommend using Panasonic's SD Memory Card. • Check the direction of the card. • Do not touch the connection terminals on the built-in memory.../battery door. Remove: Push the card until it clicks and it is not fully inserted. 15 VQT0V40 Inserting/Removing the Card • Check that the camera is turned off and that the lens is retracted. • Prepare an SD Memory Card (optional) or a MultiMediaCard (optional). • You can record or ...
Digital Still Camera - English/ Spanish
Page 16
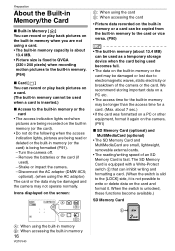
..., these functions become available.) SD Memory Card 2 ïð A: When using the built-in memory B: When accessing the built-in memory 16 VQT0V40 Turn the camera off. - The SD Memory Card is equipped with a Write-Protect switch E that can inhibit writing and formatting a card. (When the switch is slid to the... storage device when the card being used becomes full. • The data on the built-in memory or the card may be damaged and the camera may be longer than the access time for a card. (Max. Remove the batteries or the card (if used). - Preparation About the Built-in Memory/...
..., these functions become available.) SD Memory Card 2 ïð A: When using the built-in memory B: When accessing the built-in memory 16 VQT0V40 Turn the camera off. - The SD Memory Card is equipped with a Write-Protect switch E that can inhibit writing and formatting a card. (When the switch is slid to the... storage device when the card being used becomes full. • The data on the built-in memory or the card may be damaged and the camera may be longer than the access time for a card. (Max. Remove the batteries or the card (if used). - Preparation About the Built-in Memory/...
Digital Still Camera - English/ Spanish
Page 17
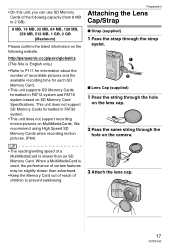
...). 8 MB, 16 MB, 32 MB, 64 MB, 128 MB, 256 MB, 512 MB, 1 GB, 2 GB (Maximum) Please confirm the latest information on the camera. • The reading/writing speed of a MultiMediaCard is slower than advertised. • Keep the Memory Card out of reach of children to P111 for information... than an SD Memory Card. When a MultiMediaCard is English only.) • Refer to prevent swallowing. 3 Attach the lens cap. 17 VQT0V40 http://panasonic.co.jp/pavc/global/cs (This Site is used, the performance of recordable pictures and the available recording time for each SD Memory Card. •...
...). 8 MB, 16 MB, 32 MB, 64 MB, 128 MB, 256 MB, 512 MB, 1 GB, 2 GB (Maximum) Please confirm the latest information on the camera. • The reading/writing speed of a MultiMediaCard is slower than advertised. • Keep the Memory Card out of reach of children to P111 for information... than an SD Memory Card. When a MultiMediaCard is English only.) • Refer to prevent swallowing. 3 Attach the lens cap. 17 VQT0V40 http://panasonic.co.jp/pavc/global/cs (This Site is used, the performance of recordable pictures and the available recording time for each SD Memory Card. •...
Digital Still Camera - English/ Spanish
Page 18
...the surface of the lens. • Detach the lens cap before the lens cap. Turn the camera off and on and then rotate the zoom lever when the lens cap is attached, the message [REMOVE THE... LENS CAP AND TURN THE CAMERA ON AGAIN] appears. If you attach the lens cap first, it . • When using the ... Cursor buttons • The screen disappears after about 5 seconds. Preparation • When you turn the camera off, carry the camera or play back the pictures, attach the lens cap to loosen the knot and then detach it may ...
...the surface of the lens. • Detach the lens cap before the lens cap. Turn the camera off and on and then rotate the zoom lever when the lens cap is attached, the message [REMOVE THE... LENS CAP AND TURN THE CAMERA ON AGAIN] appears. If you attach the lens cap first, it . • When using the ... Cursor buttons • The screen disappears after about 5 seconds. Preparation • When you turn the camera off, carry the camera or play back the pictures, attach the lens cap to loosen the knot and then detach it may ...
Digital Still Camera - English/ Spanish
Page 19
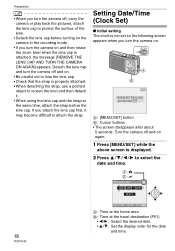
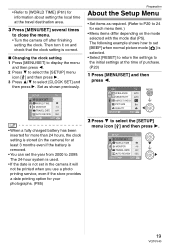
... battery has been inserted for more than 24 hours, the clock setting is stored (in the camera it on the mode selected with the mode dial (P5). SELECT EXIT MENU 19 VQT0V40 Then turn...the travel destination area. 3 Press [MENU/SET] several times to close the menu. • Turn the camera off after finishing setting the clock. Set as required. (Refer to P20 to 24 for each menu item.)... The following example shows how to set [BEEP] when normal picture mode [ ] is not set in the camera) for at least 3 months even if the battery is correct. ∫ Changing the clock setting 1 Press ...
... battery has been inserted for more than 24 hours, the clock setting is stored (in the camera it on the mode selected with the mode dial (P5). SELECT EXIT MENU 19 VQT0V40 Then turn...the travel destination area. 3 Press [MENU/SET] several times to close the menu. • Turn the camera off after finishing setting the clock. Set as required. (Refer to P20 to 24 for each menu item.)... The following example shows how to set [BEEP] when normal picture mode [ ] is not set in the camera) for at least 3 months even if the battery is correct. ∫ Changing the clock setting 1 Press ...
Digital Still Camera - English/ Spanish
Page 21
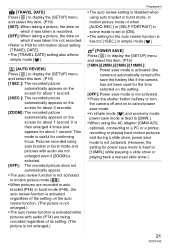
... the [SETUP] menu and select this item. (P19) [1MIN.]/[2MIN.]/[5MIN.]/[10MIN.]: Power save mode is activated (the camera is automatically turned off to save the battery life) if the camera has not been used for the time selected on the setting. [OFF]: Power save mode is not activated. •... Press the shutter button halfway or turn the camera off and on the screen for about 1 second. Pictures recorded using auto bracket or burst mode and pictures with audio are not enlarged even if...
... the [SETUP] menu and select this item. (P19) [1MIN.]/[2MIN.]/[5MIN.]/[10MIN.]: Power save mode is activated (the camera is automatically turned off to save the battery life) if the camera has not been used for the time selected on the setting. [OFF]: Power save mode is not activated. •... Press the shutter button halfway or turn the camera off and on the screen for about 1 second. Pictures recorded using auto bracket or burst mode and pictures with audio are not enlarged even if...
Digital Still Camera - English/ Spanish
Page 22
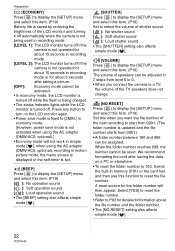
... when using the AC adaptor (DMW-AC5; Preparation [ECONOMY] Press [ MENU SET ] to display the [SETUP] menu and select this when you connect the camera to a TV, the volume of the TV speakers does not change. [NO.RESET] Press [ MENU SET ] to display the [SETUP] menu and select ... is saved by reducing the brightness of the LCD monitor and turning it off automatically when the camera is not being used in recording mode. [LEVEL 1]: The LCD monitor turns off if the camera is not operated for about 15 seconds in recording mode. [LEVEL 2]: The LCD monitor turns ...
... when using the AC adaptor (DMW-AC5; Preparation [ECONOMY] Press [ MENU SET ] to display the [SETUP] menu and select this when you connect the camera to a TV, the volume of the TV speakers does not change. [NO.RESET] Press [ MENU SET ] to display the [SETUP] menu and select ... is saved by reducing the brightness of the LCD monitor and turning it off automatically when the camera is not being used in recording mode. [LEVEL 1]: The LCD monitor turns off if the camera is not operated for about 15 seconds in recording mode. [LEVEL 2]: The LCD monitor turns ...
Digital Still Camera - English/ Spanish
Page 23
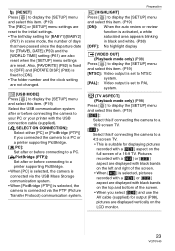
... your PC or your printer with black bands on the top and bottom of the screen. • When you connected the camera to a PC or a printer supporting PictBridge. [ PC]: Set after or before connecting to a PC. [ PictBridge (PTP)]: Set after or before connecting to a 4:3...are not changed. [USB MODE] Press [ MENU SET ] to display the [SETUP] menu and select this if connecting the camera to a printer supporting PictBridge. • When [PC] is selected, the camera is connected via the USB Mass Storage communication system. • When [PictBridge (PTP)] is selected, the...
... your PC or your printer with black bands on the top and bottom of the screen. • When you connected the camera to a PC or a printer supporting PictBridge. [ PC]: Set after or before connecting to a PC. [ PictBridge (PTP)]: Set after or before connecting to a 4:3...are not changed. [USB MODE] Press [ MENU SET ] to display the [SETUP] menu and select this if connecting the camera to a printer supporting PictBridge. • When [PC] is selected, the camera is connected via the USB Mass Storage communication system. • When [PictBridge (PTP)] is selected, the...


