

DMCFH1 User Guide
Page 1
Operating Instructions for advanced features Digital Camera Model No. DMC-FH20 DMC-FH3 DMC-FH1 Before connecting, operating or adjusting this product, please read the instructions completely. VQT2N95
Operating Instructions for advanced features Digital Camera Model No. DMC-FH20 DMC-FH3 DMC-FH1 Before connecting, operating or adjusting this product, please read the instructions completely. VQT2N95
DMCFH1 User Guide
Page 2
... (such as when it is not in the center of the composition of the picture you want to take 36 • Preventing jitter (camera shake) .......37 • Direction detection function 37 Taking Pictures with the Zoom 38 • Using the Optical Zoom/ Using the Extended Optical... Zoom (EZ)/Using the Digital Zoom 38 Playing back Pictures ([NORMAL PLAY 40 • Displaying Multiple Screens (Multi Playback 41 • Using the Playback Zoom 41 • Switching...
... (such as when it is not in the center of the composition of the picture you want to take 36 • Preventing jitter (camera shake) .......37 • Direction detection function 37 Taking Pictures with the Zoom 38 • Using the Optical Zoom/ Using the Extended Optical... Zoom (EZ)/Using the Digital Zoom 38 Playing back Pictures ([NORMAL PLAY 40 • Displaying Multiple Screens (Multi Playback 41 • Using the Playback Zoom 41 • Switching...
DMCFH1 User Guide
Page 4
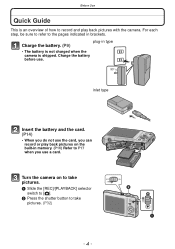
...P14) • When you do not use the card, you can record or play back pictures with the camera. For each step, be sure to refer to the pages indicated in memory. (P16) Refer to P17 when you use . Turn... the camera on to take pictures. 1 Slide the [REC]/[PLAYBACK] selector switch to [!]. 2 Press the shutter button to record and... shipped. Charge the battery. (P9) plug-in type • The battery is not charged when the camera is an overview of how to take pictures. (P32) OFF ON - 4 -
...P14) • When you do not use the card, you can record or play back pictures with the camera. For each step, be sure to refer to the pages indicated in memory. (P16) Refer to P17 when you use . Turn... the camera on to take pictures. 1 Slide the [REC]/[PLAYBACK] selector switch to [!]. 2 Press the shutter button to record and... shipped. Charge the battery. (P9) plug-in type • The battery is not charged when the camera is an overview of how to take pictures. (P32) OFF ON - 4 -
DMCFH1 User Guide
Page 6
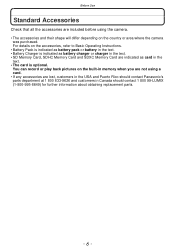
...is optional. You can record or play back pictures on the country or area where the camera was purchased. Before Use Standard Accessories Check that all the accessories are included before using the camera. • The accessories and their shape will differ depending on the built-in memory when... you are not using a card. • If any accessories are indicated as card in Canada should contact Panasonic's parts department at 1 800 833-9626 and...
...is optional. You can record or play back pictures on the country or area where the camera was purchased. Before Use Standard Accessories Check that all the accessories are included before using the camera. • The accessories and their shape will differ depending on the built-in memory when... you are not using a card. • If any accessories are indicated as card in Canada should contact Panasonic's parts department at 1 800 833-9626 and...
DMCFH1 User Guide
Page 8
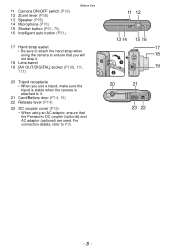
..., 70) 16 Intelligent auto button (P31) Before Use 17 Hand strap eyelet • Be sure to attach the hand strap when using the camera to ensure that the Panasonic DC coupler (optional) and AC adaptor (optional) are used. For connection details, refer to it. 21 Card/Battery door (P14, 15) 22 Release... AC adaptor, ensure that you will not drop it. 18 Lens barrel 19 [AV OUT/DIGITAL] socket (P108, 111, 117) 20 Tripod receptacle • When you use a tripod, make sure the tripod is stable when the camera is attached to P15. 11 12 13 14 15 16 17 18 19 20 21...
..., 70) 16 Intelligent auto button (P31) Before Use 17 Hand strap eyelet • Be sure to attach the hand strap when using the camera to ensure that the Panasonic DC coupler (optional) and AC adaptor (optional) are used. For connection details, refer to it. 21 Card/Battery door (P14, 15) 22 Release... AC adaptor, ensure that you will not drop it. 18 Lens barrel 19 [AV OUT/DIGITAL] socket (P108, 111, 117) 20 Tripod receptacle • When you use a tripod, make sure the tripod is stable when the camera is attached to P15. 11 12 13 14 15 16 17 18 19 20 21...

DMCFH1 User Guide
Page 9
... which have been manufactured by other companies and are not genuine Panasonic products. ∫ Charging • The battery is not charged when the camera is used. • Use the dedicated charger and battery. • The camera has a function for use . • Charge the battery ...with this unit are genuine Panasonic products and batteries manufactured by other companies and certified by Panasonic. (Batteries which look very...
... which have been manufactured by other companies and are not genuine Panasonic products. ∫ Charging • The battery is not charged when the camera is used. • Use the dedicated charger and battery. • The camera has a function for use . • Charge the battery ...with this unit are genuine Panasonic products and batteries manufactured by other companies and certified by Panasonic. (Batteries which look very...
DMCFH1 User Guide
Page 11
... with a dry cloth. ∫ Battery indication The battery indication is displayed on the LCD monitor. [It does not appear when you use the camera with the AC adaptor (optional) connected.] • The indication turns red and blinks if the remaining battery power is fully charged. (Since characteristic ...swelling may be recharged even when it still has some charge left, but it with a fully charged battery. This is not a malfunction. • The battery can be caused by short-...
... with a dry cloth. ∫ Battery indication The battery indication is displayed on the LCD monitor. [It does not appear when you use the camera with the AC adaptor (optional) connected.] • The indication turns red and blinks if the remaining battery power is fully charged. (Since characteristic ...swelling may be recharged even when it still has some charge left, but it with a fully charged battery. This is not a malfunction. • The battery can be caused by short-...
DMCFH1 User Guide
Page 12
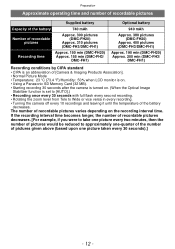
...Recording conditions by CIPA standard • CIPA is an abbreviation of [Camera & Imaging Products Association]. • Normal Picture Mode • Temperature: 23 oC (73.4 oF)/Humidity: 50% when LCD monitor is on. • Using a Panasonic SD Memory Card (32 MB). • Starting recording 30 seconds after... the camera is turned on the recording interval time. If the recording interval time becomes longer, the number of recordable ...
...Recording conditions by CIPA standard • CIPA is an abbreviation of [Camera & Imaging Products Association]. • Normal Picture Mode • Temperature: 23 oC (73.4 oF)/Humidity: 50% when LCD monitor is on. • Using a Panasonic SD Memory Card (32 MB). • Starting recording 30 seconds after... the camera is turned on the recording interval time. If the recording interval time becomes longer, the number of recordable ...

DMCFH1 User Guide
Page 13
Buy a new battery. - 13 - In low-temperature environments, such as flash and zoom are used repeatedly. • When the operating time of the camera becomes extremely short even after properly charging the battery, the life of recordable pictures is reduced. - When operations such as on ski slopes. - When using [...
Buy a new battery. - 13 - In low-temperature environments, such as flash and zoom are used repeatedly. • When the operating time of the camera becomes extremely short even after properly charging the battery, the life of recordable pictures is reduced. - When operations such as on ski slopes. - When using [...
DMCFH1 User Guide
Page 15
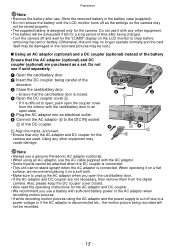
...not be recorded. - 15 - Using any other equipment may cause damage. Preparation Note • Remove the battery after being charged. • Turn the camera off and wait for the "LUMIX" display on a soft cloth. • Make sure to unplug the AC adaptor when you use . Also, please keep... it on a flat surface, we recommend placing it is connected. Store the removed battery in an open the coupler cover from the digital camera. Note • Always use a genuine Panasonic AC adaptor (optional). • When using the AC adaptor and the power supply is cut off as a set.
...not be recorded. - 15 - Using any other equipment may cause damage. Preparation Note • Remove the battery after being charged. • Turn the camera off and wait for the "LUMIX" display on a soft cloth. • Make sure to unplug the AC adaptor when you use . Also, please keep... it on a flat surface, we recommend placing it is connected. Store the removed battery in an open the coupler cover from the digital camera. Note • Always use a genuine Panasonic AC adaptor (optional). • When using the AC adaptor and the power supply is cut off as a set.
DMCFH1 User Guide
Page 17
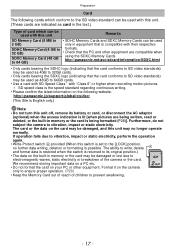
...; with their respective SDHC Memory Card (4 GB to prevent swallowing. - 17 - Furthermore, do not subject the camera to the [LOCK] position, no longer operate normally. http://panasonic.jp/support/global/cs/dsc/ (This Site is English only.) Note • Do not turn this switch is... the speed standard regarding continuous writing. • Please confirm the latest information on the camera only to ensure proper operation. (P28) ...
...; with their respective SDHC Memory Card (4 GB to prevent swallowing. - 17 - Furthermore, do not subject the camera to the [LOCK] position, no longer operate normally. http://panasonic.jp/support/global/cs/dsc/ (This Site is English only.) Note • Do not turn this switch is... the speed standard regarding continuous writing. • Please confirm the latest information on the camera only to ensure proper operation. (P28) ...
DMCFH1 User Guide
Page 18
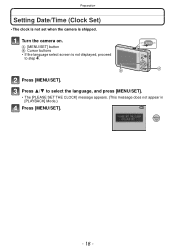
Press [MENU/SET]. Press 3/4 to step 4. Preparation Setting Date/Time (Clock Set) • The clock is not set when the camera is not displayed, proceed to select the language, and press [MENU/SET]. • The [PLEASE SET THE CLOCK] message appears. (This message does not appear in [PLAYBACK] Mode.) Press [MENU/SET]. - 18 - A [MENU/SET] button B Cursor buttons • If the language select screen is shipped. Turn the camera on.
Press [MENU/SET]. Press 3/4 to step 4. Preparation Setting Date/Time (Clock Set) • The clock is not set when the camera is not displayed, proceed to select the language, and press [MENU/SET]. • The [PLEASE SET THE CLOCK] message appears. (This message does not appear in [PLAYBACK] Mode.) Press [MENU/SET]. - 18 - A [MENU/SET] button B Cursor buttons • If the language select screen is shipped. Turn the camera on.
DMCFH1 User Guide
Page 19
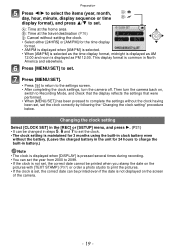
... 12:00. This display format is set, the correct date can be printed when you stamp the date on the screen of the camera. - 19 - Then turn the camera off. A: Time at the home area B: Time at the travel destination (P76) ,: Cancel without setting the clock. • Select either [24HRS] ... on the pictures with [TEXT STAMP] (P97) or order a photo studio to the settings screen. • After completing the clock settings, turn the camera back on, switch to Recording Mode, and check that the display reflects the settings that were performed. • When [MENU/SET] has been pressed to...
... 12:00. This display format is set, the correct date can be printed when you stamp the date on the screen of the camera. - 19 - Then turn the camera off. A: Time at the home area B: Time at the travel destination (P76) ,: Cancel without setting the clock. • Select either [24HRS] ... on the pictures with [TEXT STAMP] (P97) or order a photo studio to the settings screen. • After completing the clock settings, turn the camera back on, switch to Recording Mode, and check that the display reflects the settings that were performed. • When [MENU/SET] has been pressed to...
DMCFH1 User Guide
Page 20
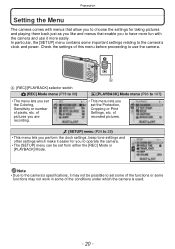
...the [SETUP] menu contains some important settings relating to set from either the [REC] Mode or [PLAYBACK] Mode. Note • Due to the camera's specifications, it may not work in some functions may not be set some of the functions or some of pixels, etc. of pictures you are ... and menus that allow you to choose the settings for you to operate the camera. • The [SETUP] menu can be possible to the camera's clock and power. Preparation Setting the Menu The camera comes with the camera and use the camera. Check the settings of recorded pictures. [SETUP] menu (P24 to 28)...
...the [SETUP] menu contains some important settings relating to set from either the [REC] Mode or [PLAYBACK] Mode. Note • Due to the camera's specifications, it may not work in some functions may not be set some of the functions or some of pixels, etc. of pictures you are ... and menus that allow you to choose the settings for you to operate the camera. • The [SETUP] menu can be possible to the camera's clock and power. Preparation Setting the Menu The camera comes with the camera and use the camera. Check the settings of recorded pictures. [SETUP] menu (P24 to 28)...

DMCFH1 User Guide
Page 21
... item at the very bottom, and press 4 to move to display the menu. • You can be displayed in the Normal Picture Mode Turn the camera on the item, its setting may not appear or it may be used for the [PLAYBACK] menu and [SETUP] menu as well. Example: Setting [AF...
... item at the very bottom, and press 4 to move to display the menu. • You can be displayed in the Normal Picture Mode Turn the camera on the item, its setting may not appear or it may be used for the [PLAYBACK] menu and [SETUP] menu as well. Example: Setting [AF...
DMCFH1 User Guide
Page 25
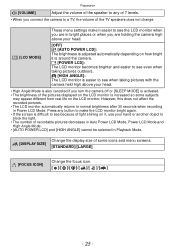
Press any of 7 levels. • When you connect the camera to normal brightness after 30 seconds when recording in Power LCD Mode. These menu settings make... monitor when you are in bright places or when you are holding the camera high above your head. • High Angle Mode is also canceled if you turn the camera off or [SLEEP MODE] is activated. • The brightness of the...„ [AUTO POWER LCD]: The brightness is adjusted automatically depending on how bright it is around the camera. ... [POWER LCD]: The LCD monitor becomes brighter and easier to see when taking pictures with the...
Press any of 7 levels. • When you connect the camera to normal brightness after 30 seconds when recording in Power LCD Mode. These menu settings make... monitor when you are in bright places or when you are holding the camera high above your head. • High Angle Mode is also canceled if you turn the camera off or [SLEEP MODE] is activated. • The brightness of the...„ [AUTO POWER LCD]: The brightness is adjusted automatically depending on how bright it is around the camera. ... [POWER LCD]: The LCD monitor becomes brighter and easier to see when taking pictures with the...

DMCFH1 User Guide
Page 26
... not been used for the time selected on the setting. [OFF]/[2MIN.]/[5MIN.]/[10MIN.] • Press the shutter button halfway or turn the camera off and on to cancel [SLEEP MODE]. • [SLEEP MODE] is also performed at the same time. w [RESET] The [REC] or [SETUP] menu settings are ...
... not been used for the time selected on the setting. [OFF]/[2MIN.]/[5MIN.]/[10MIN.] • Press the shutter button halfway or turn the camera off and on to cancel [SLEEP MODE]. • [SLEEP MODE] is also performed at the same time. w [RESET] The [REC] or [SETUP] menu settings are ...
DMCFH1 User Guide
Page 27
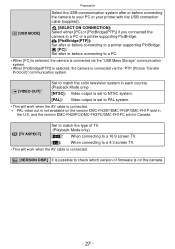
...FH1P sold in the U.S. y [SELECT ON CONNECTION]: Select either [PC] or [PictBridge(PTP)] if you connected the camera to a PC or a printer supporting PictBridge. { [PictBridge(PTP)]: Set after or before connecting the camera to your PC or your printer with the USB connection cable (supplied). and the version DMC-FH20PC/DMC...-FH3PC/DMC-FH1PC sold in Canada. [TV ASPECT] Set to match the type of firmware is not available on the camera. - 27 - Preparation x [USB MODE] Select the USB communication system after or before connecting to a printer supporting PictBridge.
...FH1P sold in the U.S. y [SELECT ON CONNECTION]: Select either [PC] or [PictBridge(PTP)] if you connected the camera to a PC or a printer supporting PictBridge. { [PictBridge(PTP)]: Set after or before connecting the camera to your PC or your printer with the USB connection cable (supplied). and the version DMC-FH20PC/DMC...-FH3PC/DMC-FH1PC sold in Canada. [TV ASPECT] Set to match the type of firmware is not available on the camera. - 27 - Preparation x [USB MODE] Select the USB communication system after or before connecting to a printer supporting PictBridge.

DMCFH1 User Guide
Page 28
...contactinfo For Canadian assistance, please call: 1-800-99-LUMIX (1-800-995-8649) or send e-mail to: lumixconcierge@ca.panasonic.com ~ [LANGUAGE] Set the language displayed on the camera again. • It may take longer to format the built-in memory than the card. • If the ... by mistake, select [~] from the menu icons to set the desired language. DEMO [DEMO MODE] Displays the amount of jitter the camera has detected ([STABILIZER DEMO.]) The camera's features are displayed as Slide Shows. ([AUTO DEMO]) [STABILIZER DEMO.] A Amount of jitter B Amount of jitter after correction AB ...
...contactinfo For Canadian assistance, please call: 1-800-99-LUMIX (1-800-995-8649) or send e-mail to: lumixconcierge@ca.panasonic.com ~ [LANGUAGE] Set the language displayed on the camera again. • It may take longer to format the built-in memory than the card. • If the ... by mistake, select [~] from the menu icons to set the desired language. DEMO [DEMO MODE] Displays the amount of jitter the camera has detected ([STABILIZER DEMO.]) The camera's features are displayed as Slide Shows. ([AUTO DEMO]) [STABILIZER DEMO.] A Amount of jitter B Amount of jitter after correction AB ...

DMCFH1 User Guide
Page 29
... Mode which the optimal settings are recorded using settings automatically selected by the camera. ∫ To select a [REC] modes from the [REC] modes list Turn the camera on. Preparation Selecting the [REC] Mode When the [REC] Mode is selected, the camera can be set to the Intelligent Auto Mode in which enables you...
... Mode which the optimal settings are recorded using settings automatically selected by the camera. ∫ To select a [REC] modes from the [REC] modes list Turn the camera on. Preparation Selecting the [REC] Mode When the [REC] Mode is selected, the camera can be set to the Intelligent Auto Mode in which enables you...


