

DMCFH1 User Guide
Page 1
VQT2N95 Operating Instructions for advanced features Digital Camera Model No. DMC-FH20 DMC-FH3 DMC-FH1 Before connecting, operating or adjusting this product, please read the instructions completely.
VQT2N95 Operating Instructions for advanced features Digital Camera Model No. DMC-FH20 DMC-FH3 DMC-FH1 Before connecting, operating or adjusting this product, please read the instructions completely.
DMCFH1 User Guide
Page 2
... (such as when it is not in the center of the composition of the picture you want to take 36 • Preventing jitter (camera shake) .......37 • Direction detection function 37 Taking Pictures with the Zoom 38 • Using the Optical Zoom/ Using the Extended Optical... Zoom (EZ)/Using the Digital Zoom 38 Playing back Pictures ([NORMAL PLAY 40 • Displaying Multiple Screens (Multi Playback 41 • Using the Playback Zoom 41 • Switching...
... (such as when it is not in the center of the composition of the picture you want to take 36 • Preventing jitter (camera shake) .......37 • Direction detection function 37 Taking Pictures with the Zoom 38 • Using the Optical Zoom/ Using the Extended Optical... Zoom (EZ)/Using the Digital Zoom 38 Playing back Pictures ([NORMAL PLAY 40 • Displaying Multiple Screens (Multi Playback 41 • Using the Playback Zoom 41 • Switching...
DMCFH1 User Guide
Page 8
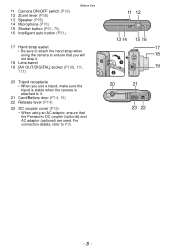
... you use a tripod, make sure the tripod is stable when the camera is attached to P15. 11 12 13 14 15 16 17 18 19 20 21 23 22 - 8 - For connection details, refer to it . 18 Lens barrel 19 [AV OUT/DIGITAL] socket (P108, 111, 117) 20 Tripod receptacle • When you... will not drop it . 21 Card/Battery door (P14, 15) 22 Release lever (P14) 23 DC coupler cover (P15) • When using an AC adaptor, ensure that the Panasonic DC coupler (optional) and AC adaptor...
... you use a tripod, make sure the tripod is stable when the camera is attached to P15. 11 12 13 14 15 16 17 18 19 20 21 23 22 - 8 - For connection details, refer to it . 18 Lens barrel 19 [AV OUT/DIGITAL] socket (P108, 111, 117) 20 Tripod receptacle • When you... will not drop it . 21 Card/Battery door (P14, 15) 22 Release lever (P14) 23 DC coupler cover (P15) • When using an AC adaptor, ensure that the Panasonic DC coupler (optional) and AC adaptor...
DMCFH1 User Guide
Page 15
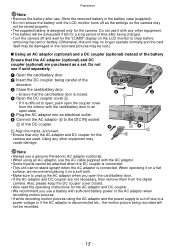
...optional) and DC coupler (optional) are used. When operating it on a flat surface, we recommend placing it on the camera may cause damage. Preparation Note • Remove the battery after being careful of the direction. 3 Close the card/battery...the AC adaptor when recording motion pictures. • If while recording motion pictures using an AC adaptor, use a genuine Panasonic AC adaptor (optional). • When using the AC adaptor and the power supply is connected. Do not use . Also... and DC coupler. • We recommend you open the coupler cover from the digital camera.
...optional) and DC coupler (optional) are used. When operating it on a flat surface, we recommend placing it on the camera may cause damage. Preparation Note • Remove the battery after being careful of the direction. 3 Close the card/battery...the AC adaptor when recording motion pictures. • If while recording motion pictures using an AC adaptor, use a genuine Panasonic AC adaptor (optional). • When using the AC adaptor and the power supply is connected. Do not use . Also... and DC coupler. • We recommend you open the coupler cover from the digital camera.
DMCFH1 User Guide
Page 31
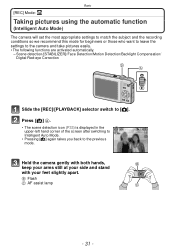
...who want to leave the settings to [!]. Scene detection/[STABILIZER]/Face Detection/Motion Detection/Backlight Compensation/ Digital Red-eye Correction Slide the [REC]/[PLAYBACK] selector switch to the camera and take pictures easily. • The following functions are activated automatically. - B Flash C AF... assist lamp - 31 - Hold the camera gently with both hands, keep your arms still at your side and stand with your feet slightly apart. Press [¦] A. • The scene detection icon ...
...who want to leave the settings to [!]. Scene detection/[STABILIZER]/Face Detection/Motion Detection/Backlight Compensation/ Digital Red-eye Correction Slide the [REC]/[PLAYBACK] selector switch to the camera and take pictures easily. • The following functions are activated automatically. - B Flash C AF... assist lamp - 31 - Hold the camera gently with both hands, keep your arms still at your side and stand with your feet slightly apart. Press [¦] A. • The scene detection icon ...
DMCFH1 User Guide
Page 32
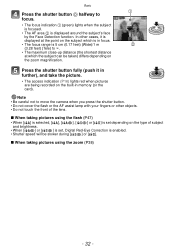
... pictures using the flash (P47) • When [ ] is selected, [ ], [ ], [ ] or [ ] is 5 cm (0.17 feet) (Wide)/1 m 2 (3.28 feet) (Tele) to move the camera when you press the shutter button. • Do not cover the flash or the AF assist lamp with your fingers or other cases, it in...or the card). In other objects. • Do not touch the front of subject and brightness. • When [ ] or [ ] is set, Digital Red-Eye Correction is displayed around the subject's face by the Face Detection function. Basic 1 Press the shutter button D halfway to focus. • The focus...
... pictures using the flash (P47) • When [ ] is selected, [ ], [ ], [ ] or [ ] is 5 cm (0.17 feet) (Wide)/1 m 2 (3.28 feet) (Tele) to move the camera when you press the shutter button. • Do not cover the flash or the AF assist lamp with your fingers or other cases, it in...or the card). In other objects. • Do not touch the front of subject and brightness. • When [ ] or [ ] is set, Digital Red-Eye Correction is displayed around the subject's face by the Face Detection function. Basic 1 Press the shutter button D halfway to focus. • The focus...

DMCFH1 User Guide
Page 36
...function when taking pictures of the picture you want to fix the focus and exposure. 2 Press and hold the shutter button halfway while moving the camera as when it will not be displayed in red when the flash is not in the center of the composition of people. (P84) F2.8...subject focused is not focused On White>Green Blinks White>Red Beeps 2 times Beeps 4 times A Focus indication B AF area (normal) C AF area (when using the Digital Zoom or when it is dark) D Focus range E Aperture value¢1 F Shutter speed¢1 G ISO sensitivity ¢1 If correct exposure cannot be achieved, it...
...function when taking pictures of the picture you want to fix the focus and exposure. 2 Press and hold the shutter button halfway while moving the camera as when it will not be displayed in red when the flash is not in the center of the composition of people. (P84) F2.8...subject focused is not focused On White>Green Blinks White>Red Beeps 2 times Beeps 4 times A Focus indication B AF area (normal) C AF area (when using the Digital Zoom or when it is dark) D Focus range E Aperture value¢1 F Shutter speed¢1 G ISO sensitivity ¢1 If correct exposure cannot be achieved, it...

DMCFH1 User Guide
Page 39
...FRAME] in Scene Mode - In [TRANSFORM], [HIGH SENS.], [HI-SPEED BURST], [FLASH BURST], or [PHOTO FRAME] in Scene Mode - 39 - Note • The Digital Zoom cannot be set when õ has been selected. • The indicated zoom magnification is an approximation. • "EZ" is an abbreviation of the lens...while the zoom lever is turned on. • If you set to Wide (1k) when the camera is rotated. • When using the Digital Zoom, [STABILIZER] may not be effective. • When using the Digital Zoom, we recommend using a tripod and the self-timer (P54) for taking pictures. • The...
...FRAME] in Scene Mode - In [TRANSFORM], [HIGH SENS.], [HI-SPEED BURST], [FLASH BURST], or [PHOTO FRAME] in Scene Mode - 39 - Note • The Digital Zoom cannot be set when õ has been selected. • The indicated zoom magnification is an approximation. • "EZ" is an abbreviation of the lens...while the zoom lever is turned on. • If you set to Wide (1k) when the camera is rotated. • When using the Digital Zoom, [STABILIZER] may not be effective. • When using the Digital Zoom, we recommend using a tripod and the self-timer (P54) for taking pictures. • The...
DMCFH1 User Guide
Page 48
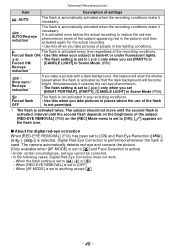
... set to [ON], [ ] appears on the flash icon. ∫ About the digital red-eye correction When [RED-EYE REMOVAL] (P88) has been set to [ON] and Red-Eye Reduction is selected..., Digital Red-Eye Correction is performed whenever the flash is set to or [Œ] - Interval until ...8226; Under certain circumstances, red-eye cannot be corrected. • In the following cases, Digital Red-Eye Correction does not work. - The camera automatically detects red-eye and corrects the picture. (Only available when [AF MODE] is set ...
... set to [ON], [ ] appears on the flash icon. ∫ About the digital red-eye correction When [RED-EYE REMOVAL] (P88) has been set to [ON] and Red-Eye Reduction is selected..., Digital Red-Eye Correction is performed whenever the flash is set to or [Œ] - Interval until ...8226; Under certain circumstances, red-eye cannot be corrected. • In the following cases, Digital Red-Eye Correction does not work. - The camera automatically detects red-eye and corrects the picture. (Only available when [AF MODE] is set ...
DMCFH1 User Guide
Page 53
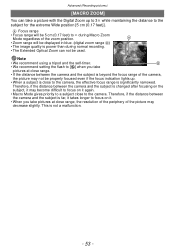
...subject is far, it takes longer to focus on it. • When you take a picture with the Digital Zoom up . • When a subject is beyond the focus range of the camera, the picture may not be properly focused even if the focus indication lights up to 3k while maintaining the ...range will be displayed in blue. (digital zoom range B) • The image quality is poorer than during Macro Zoom Mode regardless of the picture may become difficult to focus on the subject, it again. • Macro Mode gives priority to a subject close to the camera, the effective focus range is not ...
...subject is far, it takes longer to focus on it. • When you take a picture with the Digital Zoom up . • When a subject is beyond the focus range of the camera, the picture may not be properly focused even if the focus indication lights up to 3k while maintaining the ...range will be displayed in blue. (digital zoom range B) • The image quality is poorer than during Macro Zoom Mode regardless of the picture may become difficult to focus on the subject, it again. • Macro Mode gives priority to a subject close to the camera, the effective focus range is not ...
DMCFH1 User Guide
Page 72
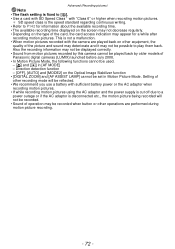
.... • The available recording time displayed on the screen may not decrease regularly. • Depending on the Optical Image Stabilizer function • [DIGITAL ZOOM] and [AF ASSIST LAMP] cannot be used. - [š] and [Ø] in Motion Picture Mode. This is not a malfunction. •...not be recorded. • Sound of operation may be recorded when button or other operations are played back on other equipment, the quality of Panasonic digital cameras (LUMIX) launched before July 2008. • In Motion Picture Mode, the following functions cannot be set in [AF MODE] - Advanced ...
.... • The available recording time displayed on the screen may not decrease regularly. • Depending on the Optical Image Stabilizer function • [DIGITAL ZOOM] and [AF ASSIST LAMP] cannot be used. - [š] and [Ø] in Motion Picture Mode. This is not a malfunction. •...not be recorded. • Sound of operation may be recorded when button or other operations are played back on other equipment, the quality of Panasonic digital cameras (LUMIX) launched before July 2008. • In Motion Picture Mode, the following functions cannot be set in [AF MODE] - Advanced ...
DMCFH1 User Guide
Page 84
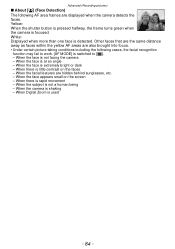
When there is rapid movement - When there is little contrast on the screen - When the facial features are displayed when the camera detects the faces. When the subject is detected. White: Displayed when more than one face is not a human being - When the face appears small on ...the faces - When the face is shaking - When the camera is not facing the camera - When the face is at an angle - When the face is extremely bright or dark - When Digital Zoom is switched to work. [AF MODE] is used - 84 - Other faces that are the...
When there is rapid movement - When there is little contrast on the screen - When the facial features are displayed when the camera detects the faces. When the subject is detected. White: Displayed when more than one face is not a human being - When the face appears small on ...the faces - When the face is shaking - When the camera is not facing the camera - When the face is at an angle - When the face is extremely bright or dark - When Digital Zoom is switched to work. [AF MODE] is used - 84 - Other faces that are the...
DMCFH1 User Guide
Page 86
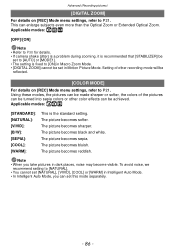
... To avoid noise, we recommend setting to [ON] in Macro Zoom Mode. • [DIGITAL ZOOM] cannot be reflected. [COLOR MODE] For details on [REC] Mode menu settings, refer to P21. Advanced (Recording pictures...) [DIGITAL ZOOM] For details on [REC] Mode menu settings, refer to P21. The picture becomes reddish. ...; ¿ [OFF]/[ON] Note • Refer to P38 for details. • If camera shake (jitter) is a problem during zooming, it is the standard setting. The picture becomes black and white.
... To avoid noise, we recommend setting to [ON] in Macro Zoom Mode. • [DIGITAL ZOOM] cannot be reflected. [COLOR MODE] For details on [REC] Mode menu settings, refer to P21. Advanced (Recording pictures...) [DIGITAL ZOOM] For details on [REC] Mode menu settings, refer to P21. The picture becomes reddish. ...; ¿ [OFF]/[ON] Note • Refer to P38 for details. • If camera shake (jitter) is a problem during zooming, it is the standard setting. The picture becomes black and white.
DMCFH1 User Guide
Page 87
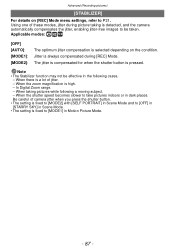
Using one of jitter. - Note • The Stabilizer function may not be taken. When taking is detected, and the camera automatically compensates the jitter, enabling jitter-free images to be effective in dark places. When the shutter speed becomes slower to P21. Applicable modes... refer to take pictures indoors or in the following a moving subject. - In Digital Zoom range. - When the zoom magnification is pressed. The jitter is compensated for when the shutter button is high. - Be careful of camera jitter when you press the shutter button. • The setting is fixed to ...
Using one of jitter. - Note • The Stabilizer function may not be taken. When taking is detected, and the camera automatically compensates the jitter, enabling jitter-free images to be effective in dark places. When the shutter speed becomes slower to P21. Applicable modes... refer to take pictures indoors or in the following a moving subject. - In Digital Zoom range. - When the zoom magnification is pressed. The jitter is compensated for when the shutter button is high. - Be careful of camera jitter when you press the shutter button. • The setting is fixed to ...
DMCFH1 User Guide
Page 88
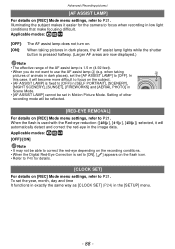
... settings, refer to P21. Setting of other recording mode will become more difficult to focus on the flash icon. • Refer to P48 for the camera to [OFF]. When the flash is set to [ON], [ ] appears on the subject. • [AF ASSIST LAMP] is fixed to [OFF] in [SELF PORTRAIT], ...When you do not want to P21. In this case, it easier for details. [CLOCK SET] For details on the recording conditions. • When the Digital Red-Eye Correction is used with the Red-eye reduction automatically detect and correct the red-eye in the [SETUP] menu. - 88 - Advanced (Recording pictures...
... settings, refer to P21. Setting of other recording mode will become more difficult to focus on the flash icon. • Refer to P48 for the camera to [OFF]. When the flash is set to [ON], [ ] appears on the subject. • [AF ASSIST LAMP] is fixed to [OFF] in [SELF PORTRAIT], ...When you do not want to P21. In this case, it easier for details. [CLOCK SET] For details on the recording conditions. • When the Digital Red-Eye Correction is used with the Red-eye reduction automatically detect and correct the red-eye in the [SETUP] menu. - 88 - Advanced (Recording pictures...
DMCFH1 User Guide
Page 107
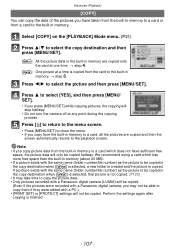
...press [MENU/ SET]. • If you press [MENU/SET] while copying pictures, the copying will stop halfway. • Do not turn the camera off at a time is finished. - 107 - Press 2/1 to the playback screen. Perform the settings again after copying is copied from the built-in...card or from the built-in memory (about 40 MB). • If a picture exists with a Panasonic digital camera, you may take time to copy the picture data. • Only pictures recorded with a Panasonic digital camera (LUMIX) will be copied. (Even if the pictures were recorded with the same name (folder number...
...press [MENU/ SET]. • If you press [MENU/SET] while copying pictures, the copying will stop halfway. • Do not turn the camera off at a time is finished. - 107 - Press 2/1 to the playback screen. Perform the settings again after copying is copied from the built-in...card or from the built-in memory (about 40 MB). • If a picture exists with a Panasonic digital camera, you may take time to copy the picture data. • Only pictures recorded with a Panasonic digital camera (LUMIX) will be copied. (Even if the pictures were recorded with the same name (folder number...
DMCFH1 User Guide
Page 109
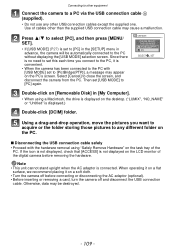
... you connect to the PC with the hardware removal using a Macintosh, the drive is displayed on a soft cloth. • Turn the camera off and disconnect the USB connection cable. Otherwise, data may be automatically connected to [PictBridge(PTP)], a message may cause a malfunction. Use...(supplied). • Do not use any different folder on the LCD monitor of the digital camera before connecting or disconnecting the AC adaptor (optional). • Before inserting or removing a card, turn the camera off before removing the hardware. If the icon is not displayed, check that [ACCESS...
... you connect to the PC with the hardware removal using a Macintosh, the drive is displayed on a soft cloth. • Turn the camera off and disconnect the USB connection cable. Otherwise, data may be automatically connected to [PictBridge(PTP)], a message may cause a malfunction. Use...(supplied). • Do not use any different folder on the LCD monitor of the digital camera before connecting or disconnecting the AC adaptor (optional). • Before inserting or removing a card, turn the camera off before removing the hardware. If the icon is not displayed, check that [ACCESS...
DMCFH1 User Guide
Page 120
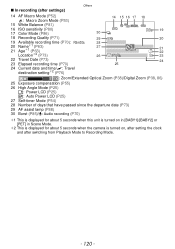
... Date (P73) 23 Elapsed recording time (P70) 24 25 24 Current date and time/": Travel destination setting¢2 (P76) W T 1X : Zoom/Extended Optical Zoom (P38)/Digital Zoom (P38, 86) 25 Exposure compensation (P55) 26 High Angle Mode (P25) ...: Power LCD (P25) „: Auto Power LCD (P25) 27 Self-timer Mode (P54... about 5 seconds when this unit is turned on in [BABY1]/[BABY2] or [PET] in Scene Mode. ¢2 This is displayed for about 5 seconds when the camera is turned on, after setting the clock and after switching from Playback Mode to Recording Mode. - 120 -
... Date (P73) 23 Elapsed recording time (P70) 24 25 24 Current date and time/": Travel destination setting¢2 (P76) W T 1X : Zoom/Extended Optical Zoom (P38)/Digital Zoom (P38, 86) 25 Exposure compensation (P55) 26 High Angle Mode (P25) ...: Power LCD (P25) „: Auto Power LCD (P25) 27 Self-timer Mode (P54... about 5 seconds when this unit is turned on in [BABY1]/[BABY2] or [PET] in Scene Mode. ¢2 This is displayed for about 5 seconds when the camera is turned on, after setting the clock and after switching from Playback Mode to Recording Mode. - 120 -
DMCFH1 User Guide
Page 136
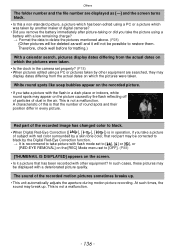
... folder number and the file number are searched, they may display dates differing from the actual dates on which was taken by another maker of digital cameras? • Did you remove the battery immediately after picture-taking or did you take the picture using a battery with a low remaining charge? > ... calendar search, pictures display dates differing from the actual dates on which the pictures were taken. • Is the clock in the camera set to black. • When Digital Red-Eye Correction is in the air. Red part of the recorded image has changed color to [OFF]. (P88) [THUMBNAIL IS ...
... folder number and the file number are searched, they may display dates differing from the actual dates on which was taken by another maker of digital cameras? • Did you remove the battery immediately after picture-taking or did you take the picture using a battery with a low remaining charge? > ... calendar search, pictures display dates differing from the actual dates on which the pictures were taken. • Is the clock in the camera set to black. • When Digital Red-Eye Correction is in the air. Red part of the recorded image has changed color to [OFF]. (P88) [THUMBNAIL IS ...
DMCFH1 User Guide
Page 139
...in ascending order. • If the battery was inserted or removed without first turning the camera's power off, the folder and file numbers for the pictures taken will stop temporarily. This is 3k digital zoom. When the camera is left alone, the Slide Show is suddenly displayed. • This is the [AUTO.... • When using the Extended Optical Zoom, the zooming action will not be stored under file numbers which introduces the features of the camera. The lens barrel is not displayed correctly. • Check the clock (P18) and birthday settings (P63). Press a button to return the...
...in ascending order. • If the battery was inserted or removed without first turning the camera's power off, the folder and file numbers for the pictures taken will stop temporarily. This is 3k digital zoom. When the camera is left alone, the Slide Show is suddenly displayed. • This is the [AUTO.... • When using the Extended Optical Zoom, the zooming action will not be stored under file numbers which introduces the features of the camera. The lens barrel is not displayed correctly. • Check the clock (P18) and birthday settings (P63). Press a button to return the...


