
NE1022F User Guide
Page 1
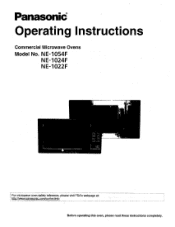
Panasonics Operating Instructions Commercial Microwave Ovens Model No. NE-1054F NE-1024F NE-1022F l For microwave oven safety reference, please visit FDA's webpage at: htto://mmoanasonic.com/contactinfo Before operating this oven, please read these instructions completely.
Panasonics Operating Instructions Commercial Microwave Ovens Model No. NE-1054F NE-1024F NE-1022F l For microwave oven safety reference, please visit FDA's webpage at: htto://mmoanasonic.com/contactinfo Before operating this oven, please read these instructions completely.

NE1022F User Guide
Page 2
... B. To Read Program List 16 D. Manual 2 or 3 Stage Heating 10 C. To Read the Cycle Counter 17 Self Diagnostics Failure Code Explanation (NE-1054F) 18 Care of Your Microwave Oven 18 Technical Specifications 19 For CONTENTS Programming Memory Pads for 2 or 3 Stage Heating 13 C. To Activate Program Lock 15 B. TABLE OF CONTENTS PRECAUTIONS TO AVOID POSSIBLE EXPOSURE TO EXCESSIVE MICROWAVE ENERGY 3 IMPORTANT SAFETY INSTRUCTIONS 3 Installation and Grounding Instructions 4 Safety Precautions...
... B. To Read Program List 16 D. Manual 2 or 3 Stage Heating 10 C. To Read the Cycle Counter 17 Self Diagnostics Failure Code Explanation (NE-1054F) 18 Care of Your Microwave Oven 18 Technical Specifications 19 For CONTENTS Programming Memory Pads for 2 or 3 Stage Heating 13 C. To Activate Program Lock 15 B. TABLE OF CONTENTS PRECAUTIONS TO AVOID POSSIBLE EXPOSURE TO EXCESSIVE MICROWAVE ENERGY 3 IMPORTANT SAFETY INSTRUCTIONS 3 Installation and Grounding Instructions 4 Safety Precautions...
NE1022F User Guide
Page 3
... INSTRUCTIONS For proper use this appliance only in accordance with the door open since open-door operation can result in this oven with the installation instructions found on sealing surfaces. (c) Do not operate the oven if it has been damaged or dropped. 11. Read and follow the'specific 'PRECAUTIONS TO AVOID POSSIBLE EXPOSURE TO EXCESSIVE MICROWAVE ENERGY," found at the fuse or circuit breaker panel. (d) Do not use...
... INSTRUCTIONS For proper use this appliance only in accordance with the door open since open-door operation can result in this oven with the installation instructions found on sealing surfaces. (c) Do not operate the oven if it has been damaged or dropped. 11. Read and follow the'specific 'PRECAUTIONS TO AVOID POSSIBLE EXPOSURE TO EXCESSIVE MICROWAVE ENERGY," found at the fuse or circuit breaker panel. (d) Do not use...

NE1022F User Guide
Page 4
... an electrical short circuit, grounding reduces the risk of oven. Consult a qualified electrician or service person if the grounding instructions are blocked during shipping, please remove this microwave oven (120 V). Using a higher voltage is properly grounded. DO NOT block air vents. No other accident causing oven damage. The plug must be the same as a gas or electric range. . WARNING-Improper use only a three wire extension cord...
... an electrical short circuit, grounding reduces the risk of oven. Consult a qualified electrician or service person if the grounding instructions are blocked during shipping, please remove this microwave oven (120 V). Using a higher voltage is properly grounded. DO NOT block air vents. No other accident causing oven damage. The plug must be the same as a gas or electric range. . WARNING-Improper use only a three wire extension cord...
NE1022F User Guide
Page 5
... any adjustments or repairs to door, control panel housing, safety interlock switches or any other part of microwave popcorn recommends that the liquid is labelled as nylon. Do not use recycled paper products unless the paper product is mixed with metallic trims should always be pierced before cooking, to turn the timer to , on top of space between metal material and interior oven walls. The synthetic...
... any adjustments or repairs to door, control panel housing, safety interlock switches or any other part of microwave popcorn recommends that the liquid is labelled as nylon. Do not use recycled paper products unless the paper product is mixed with metallic trims should always be pierced before cooking, to turn the timer to , on top of space between metal material and interior oven walls. The synthetic...
NE1022F User Guide
Page 6
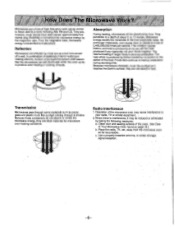
..., to produce even heating or cooking of stationary (interior walls) and rotating antenna, located underneath the bottom shelf assure that the microwaves are , however, much like sunlight as paper, glass and plastic much shorter than radio waves; Use a properly installed antenna, to 1Y2-inches. Microwaves are ideal materials for microwave oven heating containers. 4 II bW l Radio Interference 1. Absorption During heating, microwaves will feel heat produced if you...
..., to produce even heating or cooking of stationary (interior walls) and rotating antenna, located underneath the bottom shelf assure that the microwaves are , however, much like sunlight as paper, glass and plastic much shorter than radio waves; Use a properly installed antenna, to 1Y2-inches. Microwaves are ideal materials for microwave oven heating containers. 4 II bW l Radio Interference 1. Absorption During heating, microwaves will feel heat produced if you...
NE1022F User Guide
Page 7
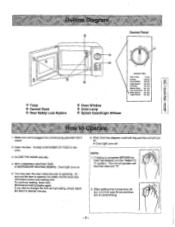
... the oven is opened, the safety mechanisms stop microwave power and heating time. As soon as the door is operating. When time has elapsed, a bell will ring and the unit will operate until the timer returns to .0". 2. Make sure unit is completed BEFORE the timer has elapsed, turn the TIMER TO "0" position. Microwave heating begins again. If heating is plugged into a three-prong grounded 120 V circuit. 2. O Timer O Control Panel © Door Safety Lock System COOKING TIMES...
... the oven is opened, the safety mechanisms stop microwave power and heating time. As soon as the door is operating. When time has elapsed, a bell will ring and the unit will operate until the timer returns to .0". 2. Make sure unit is completed BEFORE the timer has elapsed, turn the TIMER TO "0" position. Microwave heating begins again. If heating is plugged into a three-prong grounded 120 V circuit. 2. O Timer O Control Panel © Door Safety Lock System COOKING TIMES...

NE1022F User Guide
Page 8
... START Pad (8) Control Panel (9) Door Safety Lock System (10) Oven Window with HeatNapor Film (Do Not Remove) (11) Oven Lamp (12) Splash Guard/Light Diffuser (10) BB BB (8) =IL Digital Display, Window Indicator Locations (12) (9) B A X2 PROG lel lel 1111 STAGE 1 2 3 z ni p n II 1111 A - Memory Pad Number and Heating Time Display (min. HI (MEDIUM HIGH) MED (MEDIUM) LOW DEP (DEFROST) HOLD (Power OFF) -8 O 30 6D 1 MANUAL OPERATION 3 crtr• 6 4 STOP/REIS...
... START Pad (8) Control Panel (9) Door Safety Lock System (10) Oven Window with HeatNapor Film (Do Not Remove) (11) Oven Lamp (12) Splash Guard/Light Diffuser (10) BB BB (8) =IL Digital Display, Window Indicator Locations (12) (9) B A X2 PROG lel lel 1111 STAGE 1 2 3 z ni p n II 1111 A - Memory Pad Number and Heating Time Display (min. HI (MEDIUM HIGH) MED (MEDIUM) LOW DEP (DEFROST) HOLD (Power OFF) -8 O 30 6D 1 MANUAL OPERATION 3 crtr• 6 4 STOP/REIS...

NE1022F User Guide
Page 9
... seconds. Program Unlock. 3. When the door is preset at more than 1 minute after completion of heating and removing food. When selected cooking time is over an hour, the Display Window shows hours and minutes, but the oven works,for the following: 1. Press Iliilt POWER To set 15 minutes 45 seconds Press 1 10e 0 - Example: press DOUBLE iTY 912) CI :60 2. Oven Light: Oven light will be turned on...
... seconds. Program Unlock. 3. When the door is preset at more than 1 minute after completion of heating and removing food. When selected cooking time is over an hour, the Display Window shows hours and minutes, but the oven works,for the following: 1. Press Iliilt POWER To set 15 minutes 45 seconds Press 1 10e 0 - Example: press DOUBLE iTY 912) CI :60 2. Oven Light: Oven light will be turned on...

NE1022F User Guide
Page 10
... selected program. - 10 - Follow steps 1 and 2 above . El :20 0 3:30 0 3:30 •Press the POWER Level Selector' Pad 5 times. e START •Press the START Pad. Indicator will change each time the pad is started, will be showing in the oven cavity. Beep tone will sound. •All heating will stop. • When opening the door, the display will stop . Manual 2 or 3 Stage Heating: This feature allows you to set the cooking time, between...
... selected program. - 10 - Follow steps 1 and 2 above . El :20 0 3:30 0 3:30 •Press the POWER Level Selector' Pad 5 times. e START •Press the START Pad. Indicator will change each time the pad is started, will be showing in the oven cavity. Beep tone will sound. •All heating will stop. • When opening the door, the display will stop . Manual 2 or 3 Stage Heating: This feature allows you to set the cooking time, between...

NE1022F User Guide
Page 11
... PROD 1 3. Heating will stop blinking. Beep tone will sound. •All heating will start without pressing START Pad. See page 15. When opening the door, the display will stop blinking. In Program Lock Mode oven will stop . In Program Lock Mode oven will start . Example: 2 stage- PRO° 1 2 HI OFr PROD 1 se Off 3. To Select Multiple Portion Heating: The Double Quantity Pad (x 2) is factory set to automatically double the programmed time for 3 minutes at DEFROST) See...
... PROD 1 3. Heating will stop blinking. Beep tone will sound. •All heating will start without pressing START Pad. See page 15. When opening the door, the display will stop blinking. In Program Lock Mode oven will stop . In Program Lock Mode oven will start . Example: 2 stage- PRO° 1 2 HI OFr PROD 1 se Off 3. To Select Multiple Portion Heating: The Double Quantity Pad (x 2) is factory set to automatically double the programmed time for 3 minutes at DEFROST) See...

NE1022F User Guide
Page 12
... Pad Number 5 1. DO NOT OPEN THE DOOR - a :60 •Press the PROG. NOTE: •If no PROG Indicator appeared in the Display Window. •2 seconds later, the Display Window will appear in the digital Display Window: Close the door, press STOP/RESET Pad and wait 1 minute until the Display Window goes blank. PROG.) 0 3:30 •Press the Power Level Selector Pad 3 times: The...
... Pad Number 5 1. DO NOT OPEN THE DOOR - a :60 •Press the PROG. NOTE: •If no PROG Indicator appeared in the Display Window. •2 seconds later, the Display Window will appear in the digital Display Window: Close the door, press STOP/RESET Pad and wait 1 minute until the Display Window goes blank. PROG.) 0 3:30 •Press the Power Level Selector Pad 3 times: The...

NE1022F User Guide
Page 13
...) FROG 2 200 DEF ' After all of your programming has been completed, the Display Window will show your setting program as step 5 on page 12. DO NOT OPEN THE OVEN DOOR during programming. • For a 3 stage heating cycle, select a further power level and set the desired heating time between steps 3 and 4 above . Complete Steps 1 to 10 memory Programs. • When the PROG indicator is blinking, the...
...) FROG 2 200 DEF ' After all of your programming has been completed, the Display Window will show your setting program as step 5 on page 12. DO NOT OPEN THE OVEN DOOR during programming. • For a 3 stage heating cycle, select a further power level and set the desired heating time between steps 3 and 4 above . Complete Steps 1 to 10 memory Programs. • When the PROG indicator is blinking, the...

NE1022F User Guide
Page 14
... the Display Window again. 4. 11111I POWER 5. The Memory Pad display will appear in the Display Window, "Program Lock' should be cancelled and/or the pad erased by pressing STOP/RESET Pad. -14- For multiple portion heating: Your oven is set to 10 memory programs.) DO NOT OPEN THE OVEN DOOR while programming. • When the PROG indicator is blinking, the program can be programmed for single stage heating will...
... the Display Window again. 4. 11111I POWER 5. The Memory Pad display will appear in the Display Window, "Program Lock' should be cancelled and/or the pad erased by pressing STOP/RESET Pad. -14- For multiple portion heating: Your oven is set to 10 memory programs.) DO NOT OPEN THE OVEN DOOR while programming. • When the PROG indicator is blinking, the program can be programmed for single stage heating will...

NE1022F User Guide
Page 15
... programmed heating times and power levels. Pad for longer than 30 seconds continuously, or false failure code may result. •In "Program Unlock" a. Oven reverts to press the START pad. Memory Pads can be activated. c. Other Features A. b. To Release Program Lock: This procedure deactivates "Program Lock" and activates all other features. The Display Window must be blank before the Release Program Lock feature can be activated. STOP/RESET...
... programmed heating times and power levels. Pad for longer than 30 seconds continuously, or false failure code may result. •In "Program Unlock" a. Oven reverts to press the START pad. Memory Pads can be activated. c. Other Features A. b. To Release Program Lock: This procedure deactivates "Program Lock" and activates all other features. The Display Window must be blank before the Release Program Lock feature can be activated. STOP/RESET...

NE1022F User Guide
Page 16
... read program. Display Window will display;' Program Memory Pad Number 5, first stage heating time and power level currently programmed on Memory Pad. Example: The Memory Pad Number 5. /fp •-• e C.-To Read Program List: Allows you to review all settings have been displayed, the Pad Number and the Stage Heating Indicator will appear in the Display Window again. Display Window 1. NOTE: •If you want to show in the START Pad. STOP/RESET (START...
... read program. Display Window will display;' Program Memory Pad Number 5, first stage heating time and power level currently programmed on Memory Pad. Example: The Memory Pad Number 5. /fp •-• e C.-To Read Program List: Allows you to review all settings have been displayed, the Pad Number and the Stage Heating Indicator will appear in the Display Window again. Display Window 1. NOTE: •If you want to show in the START Pad. STOP/RESET (START...

NE1022F User Guide
Page 17
... total number of Beep Tone. Display Window 1. The display will go blank. You have completed programming the beep tone. FROG 2 bE EP -n .2 seconds later, the Display Window will not change. 3. 0 3:30 0 3:30 4. Open the door. STOP/RESET POWER *While pressing STOP/RESET Pad, press POWER Level Selector Pad. Open the door. 2. [PROC.) 'Press the PROG. PROG. 'Press the Memory Pad 0. *Repeat pressing of the oven and traffic flow at the location...
... total number of Beep Tone. Display Window 1. The display will go blank. You have completed programming the beep tone. FROG 2 bE EP -n .2 seconds later, the Display Window will not change. 3. 0 3:30 0 3:30 4. Open the door. STOP/RESET POWER *While pressing STOP/RESET Pad, press POWER Level Selector Pad. Open the door. 2. [PROC.) 'Press the PROG. PROG. 'Press the Memory Pad 0. *Repeat pressing of the oven and traffic flow at the location...

NE1022F User Guide
Page 18
... the service agent with a damp cloth. Unplug the oven before reconnecting. If steam accumulates inside the oven base should be allowed to clear Display Window. 5. Replace all the possible failures on . ' After cleaning, touch STOP/RESET Pad to seep into the ventilation openings. 4. This oven monitors its operation and displays a Failure Code in these areas. Do not use of the unit 6. When cleaning the Control Panel, leave oven door open oven door. *If normal operation...
... the service agent with a damp cloth. Unplug the oven before reconnecting. If steam accumulates inside the oven base should be allowed to clear Display Window. 5. Replace all the possible failures on . ' After cleaning, touch STOP/RESET Pad to seep into the ventilation openings. 4. This oven monitors its operation and displays a Failure Code in these areas. Do not use of the unit 6. When cleaning the Control Panel, leave oven door open oven door. *If normal operation...

NE1022F User Guide
Page 19
Power Source Required Power Output* Frequency Outer Dimensions (HxWxD) Cavity Dimensions (HxWxD) Net Weight Shipping Weight Timer @gi NE-1054F NE-1024F/NE-1022F 120 V, 60 Hz, single phase 13.4 A 1,500 W 1,000 W 2,450 MHz 12" x 20'/Ei" x 1414/ " 306 mm x 510 mm x ... (15.4 kg) Approximately 39 lbs (18 kg) 99 min 99 sec (Digital) x 10 Memory Pads with Double Quantity (x2) Pad 6 minutes Rotary *IEC Test Procedure Specifications subject to change without notice 201/? 12" 7 23/8" 151/16 I FRONT VIEW 149/161 141/6" 131/16" 0 29'/" tl 23/4" 87/8" SIDE VIEW SIDE VIEW WITH...
Power Source Required Power Output* Frequency Outer Dimensions (HxWxD) Cavity Dimensions (HxWxD) Net Weight Shipping Weight Timer @gi NE-1054F NE-1024F/NE-1022F 120 V, 60 Hz, single phase 13.4 A 1,500 W 1,000 W 2,450 MHz 12" x 20'/Ei" x 1414/ " 306 mm x 510 mm x ... (15.4 kg) Approximately 39 lbs (18 kg) 99 min 99 sec (Digital) x 10 Memory Pads with Double Quantity (x2) Pad 6 minutes Rotary *IEC Test Procedure Specifications subject to change without notice 201/? 12" 7 23/8" 151/16 I FRONT VIEW 149/161 141/6" 131/16" 0 29'/" tl 23/4" 87/8" SIDE VIEW SIDE VIEW WITH...
NE1022F User Guide
Page 20
Web Site: http://www.panasonic.com F00036PO4AP Printed in China Panasonic Consumer Electronics Company, Division of Panasonic Corporation of North America One Panasonic Way Secaucus, New Jersey 07094 Panasonic Appliances Microwave Oven (Shanghai) Co., Ltd.
Web Site: http://www.panasonic.com F00036PO4AP Printed in China Panasonic Consumer Electronics Company, Division of Panasonic Corporation of North America One Panasonic Way Secaucus, New Jersey 07094 Panasonic Appliances Microwave Oven (Shanghai) Co., Ltd.


