
Operating & Installation Instructions
Page 2
English Table of Contents Safety Precautions Parts Identification • Parts Identification • Accessories • Control Panel Using the Dishwasher • Quick Operation Guide • Function of Detergent • ... Filtering System • Caring for the Dishwasher • Cleaning the Spray Arms Troubleshooting Error Codes Specifications • Loading the Baskets For Installer Installation Instructions • Positioning the Dishwasher • Electrical connection • Water connection • Checkpoints After Installation 3 - 5 6 - 8 6 7 8 9 - 25 9 - ...
English Table of Contents Safety Precautions Parts Identification • Parts Identification • Accessories • Control Panel Using the Dishwasher • Quick Operation Guide • Function of Detergent • ... Filtering System • Caring for the Dishwasher • Cleaning the Spray Arms Troubleshooting Error Codes Specifications • Loading the Baskets For Installer Installation Instructions • Positioning the Dishwasher • Electrical connection • Water connection • Checkpoints After Installation 3 - 5 6 - 8 6 7 8 9 - 25 9 - ...

Operating & Installation Instructions
Page 3
... Precautions Make sure to follow these instructions In order to prevent accidents or injuries to the users, other utensils with sharp points must be replaced by the manufacturer, its service agent or similarly qualified ...electric shock. The cord may be damaged and may be washed: 1. When loading items to socket outlet with the wiring rules. This symbol indicates requirement that they have been given supervision or instruction concerning use by wrong operation. If the supply cord is necessary to disconnect the Power Plug from the supply after installation...
... Precautions Make sure to follow these instructions In order to prevent accidents or injuries to the users, other utensils with sharp points must be replaced by the manufacturer, its service agent or similarly qualified ...electric shock. The cord may be damaged and may be washed: 1. When loading items to socket outlet with the wiring rules. This symbol indicates requirement that they have been given supervision or instruction concerning use by wrong operation. If the supply cord is necessary to disconnect the Power Plug from the supply after installation...
Operating & Installation Instructions
Page 4
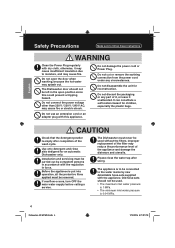
...earthing connection from the power cord under any part of the filter may splash out. ...performance level of the wash cycle. English Safety Precautions Make sure to follow these instructions WARNING Clean the Power Plug regularly with dry cloth, otherwise, it unattended. ...electric shock. If overflow occurs, turn OFF the main water supply before calling a service. Installation and servicing must never be left in force. The Dishwasher must be used without the filters. The Dishwasher door should not be carried out by new detachable hose-sets...
...earthing connection from the power cord under any part of the filter may splash out. ...performance level of the wash cycle. English Safety Precautions Make sure to follow these instructions WARNING Clean the Power Plug regularly with dry cloth, otherwise, it unattended. ...electric shock. If overflow occurs, turn OFF the main water supply before calling a service. Installation and servicing must never be left in force. The Dishwasher must be used without the filters. The Dishwasher door should not be carried out by new detachable hose-sets...
Operating & Installation Instructions
Page 5
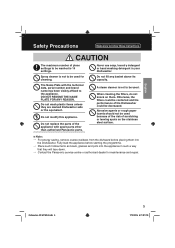
... 5:21:01 PM The Name Plate with spare parts other than authorised Panasonic parts. Do not modify this appliance. Abrasive agents or rough paper towels should not be used for maintenance and repair. Never use soap, laundry detergent or hand washing detergent in...used . English Safety Precautions Make sure to follow these instructions CAUTION The maximum number of place settings to be decreased. Do not fill any basket above its capacity. Fully load the appliance before placing them . Do not wash plastic items unless they will face down. → Contact the Panasonic service...
... 5:21:01 PM The Name Plate with spare parts other than authorised Panasonic parts. Do not modify this appliance. Abrasive agents or rough paper towels should not be used for maintenance and repair. Never use soap, laundry detergent or hand washing detergent in...used . English Safety Precautions Make sure to follow these instructions CAUTION The maximum number of place settings to be decreased. Do not fill any basket above its capacity. Fully load the appliance before placing them . Do not wash plastic items unless they will face down. → Contact the Panasonic service...
Operating & Installation Instructions
Page 6
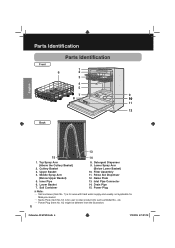
English Parts Identification Parts Identification Front 1 6 2 3 4 5 7 9 8 10 11 12 Back 13 15 14 1. Cutlery Basket (Below Lower Basket) 3. Salt Container ■ Note: 15. Top Spray Arm 8. Filter .... 7) is for area with hard water supply and usually not applicable for Malaysia market. → Name Plate (Item No.12) is for user to refer product info such as Model No., etc. → Power Plug (Item No. 15) might be different from the illustration. 6 Dishwasher_NP-6F1MLQ.indb 6 7/19/2016 5:21:01 PM...
English Parts Identification Parts Identification Front 1 6 2 3 4 5 7 9 8 10 11 12 Back 13 15 14 1. Cutlery Basket (Below Lower Basket) 3. Salt Container ■ Note: 15. Top Spray Arm 8. Filter .... 7) is for area with hard water supply and usually not applicable for Malaysia market. → Name Plate (Item No.12) is for user to refer product info such as Model No., etc. → Power Plug (Item No. 15) might be different from the illustration. 6 Dishwasher_NP-6F1MLQ.indb 6 7/19/2016 5:21:01 PM...

Operating & Installation Instructions
Page 7
Parts Identification Accessories Warranty Card Operating and Installation Instructions Salt Filler English Dishwasher_NP-6F1MLQ.indb 7 7 7/19/2016 5:21:02 PM
Parts Identification Accessories Warranty Card Operating and Installation Instructions Salt Filler English Dishwasher_NP-6F1MLQ.indb 7 7 7/19/2016 5:21:02 PM
Operating & Installation Instructions
Page 9
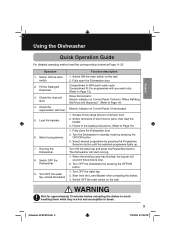
... sound 8 times before unloading the dishes to avoid handling them while they are hot and susceptible to Page 14) Electric indicator on the wall. When the working cycle has finished, the buzzer will start running. 1. Switch OFF...Electric indicator on the wall. 2. Scrape off any large amount of burnt food in standby mode by pressing the OFF/ON button. 3. Turn OFF the water tap, unload the basket. Soften remnants of leftover food. 2. Follow to the loading instructions. (Refer to Page 13) Rinse Aid indicator. Using the Dishwasher English Quick Operation Guide...
... sound 8 times before unloading the dishes to avoid handling them while they are hot and susceptible to Page 14) Electric indicator on the wall. When the working cycle has finished, the buzzer will start running. 1. Switch OFF...Electric indicator on the wall. 2. Scrape off any large amount of burnt food in standby mode by pressing the OFF/ON button. 3. Turn OFF the water tap, unload the basket. Soften remnants of leftover food. 2. Follow to the loading instructions. (Refer to Page 13) Rinse Aid indicator. Using the Dishwasher English Quick Operation Guide...
Operating & Installation Instructions
Page 12
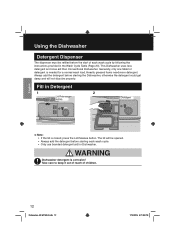
...Heavily greased items need more detergent. Fill in the Wash Cycle Table (Page 23). The lid will not dissolve properly. English Using the Dishwasher Detergent Dispenser The dispenser must be opened. • Always add the detergent before starting the Dishwasher, otherwise the detergent...64257;lled before starting each wash cycle by following the instructions provided in Detergent 1 2 Lid Release button Detergent ■ Note: • If the lid is closed, press the Lid Release button. This Dishwasher uses less detergent and rinse aid than Conventional Dishwasher. Always ...
...Heavily greased items need more detergent. Fill in the Wash Cycle Table (Page 23). The lid will not dissolve properly. English Using the Dishwasher Detergent Dispenser The dispenser must be opened. • Always add the detergent before starting the Dishwasher, otherwise the detergent...64257;lled before starting each wash cycle by following the instructions provided in Detergent 1 2 Lid Release button Detergent ■ Note: • If the lid is closed, press the Lid Release button. This Dishwasher uses less detergent and rinse aid than Conventional Dishwasher. Always ...
Operating & Installation Instructions
Page 15
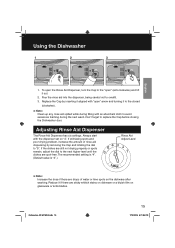
Replace the Cap by removing the Cap and rotating the dial to the "open the Rinse Aid Dispenser, turn the Cap to "5". The recommended setting is "4". (Default value is "4".) Rinse Aid Adjust Level ■ Note: Increase the dose if there are spot-free. Using the Dishwasher 1 2 3 English... 1. Adjusting Rinse Aid Dispenser The Rinse Aid Dispenser has six settings. If the dishes are still not drying properly or spots remain, adjust the dial to avoid ...
Replace the Cap by removing the Cap and rotating the dial to the "open the Rinse Aid Dispenser, turn the Cap to "5". The recommended setting is "4". (Default value is "4".) Rinse Aid Adjust Level ■ Note: Increase the dose if there are spot-free. Using the Dishwasher 1 2 3 English... 1. Adjusting Rinse Aid Dispenser The Rinse Aid Dispenser has six settings. If the dishes are still not drying properly or spots remain, adjust the dial to avoid ...

Operating & Installation Instructions
Page 16
...for more than 5 seconds to start the water softener setting within 60 seconds after the Dishwasher has been switched ON (the Add Salt and Rinse Aid indicators will change in the user's area. The higher the content of the water in the user's area. The softener should be turned on the ...hardness of water supply. 16 Dishwasher_NP-6F1MLQ.indb 16 7/19/2016 5:21:04 PM Press the Pause/Start button for adjustment in the amount of salt consumed based on the operation of the Dishwasher. The default setting: H4. Using the ...
...for more than 5 seconds to start the water softener setting within 60 seconds after the Dishwasher has been switched ON (the Add Salt and Rinse Aid indicators will change in the user's area. The higher the content of the water in the user's area. The softener should be turned on the ...hardness of water supply. 16 Dishwasher_NP-6F1MLQ.indb 16 7/19/2016 5:21:04 PM Press the Pause/Start button for adjustment in the amount of salt consumed based on the operation of the Dishwasher. The default setting: H4. Using the ...
Operating & Installation Instructions
Page 17
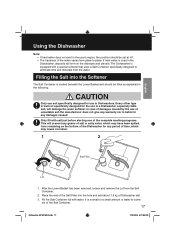
... Lower Basket and should be filled as explained in the following: CAUTION Only use in Dishwashers. English Using the Dishwasher Note: • If hard water does not exist in the user's region, the position should be set at H1. • The hardness of the water varies from the Salt Container.... 2. If hard water is normal for use salt specifically designed for a small amount of water to ...
... Lower Basket and should be filled as explained in the following: CAUTION Only use in Dishwashers. English Using the Dishwasher Note: • If hard water does not exist in the user's region, the position should be set at H1. • The hardness of the water varies from the Salt Container.... 2. If hard water is normal for use salt specifically designed for a small amount of water to ...

Operating & Installation Instructions
Page 19
...Dishwasher the following way: 1. Silver and aluminium parts have a tendency to rusting h. Soften remnants of glasses can run off any large amounts of the Dishwasher. Using the Dishwasher English Loading the Dishwasher Baskets Recommendation 1. Use a mild detergent that are not temperature resistant... copper items f. Colour coated appearance items Attention Before or After Loading the Dishwasher Baskets Follow the loading guidelines for Dishwasher use'. To prevent damage, do not take glass and cutlery out of the Dishwasher immediately after a large number of dishware ...
...Dishwasher the following way: 1. Silver and aluminium parts have a tendency to rusting h. Soften remnants of glasses can run off any large amounts of the Dishwasher. Using the Dishwasher English Loading the Dishwasher Baskets Recommendation 1. Use a mild detergent that are not temperature resistant... copper items f. Colour coated appearance items Attention Before or After Loading the Dishwasher Baskets Follow the loading guidelines for Dishwasher use'. To prevent damage, do not take glass and cutlery out of the Dishwasher immediately after a large number of dishware ...
Operating & Installation Instructions
Page 22
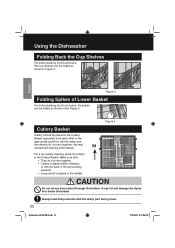
... with the back or the spine facing upwards. • Long utensil is placed either sideways or with the sharp part facing down. 22 Dishwasher_NP-6F1MLQ.indb 22 7/19/2016 5:21:05 PM Using the Dishwasher Folding Back the Cup Shelves For better stacking of pots and pans, the spikes can be folded...
... with the back or the spine facing upwards. • Long utensil is placed either sideways or with the sharp part facing down. 22 Dishwasher_NP-6F1MLQ.indb 22 7/19/2016 5:21:05 PM Using the Dishwasher Folding Back the Cup Shelves For better stacking of pots and pans, the spikes can be folded...
Operating & Installation Instructions
Page 28
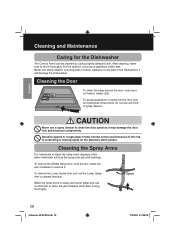
... use a soft warm, damp cloth. Never use any part of the Dishwasher. To avoid penetration of spray cleaner. Cleaning the Spray Arms It is necessary to clean the jets. To remove the Lower Spray Arm, pull out the Lower Spray Arm in soapy and warm water and use...direction. English Cleaning and Maintenance Caring for the Dishwasher The Control Panel can be used because of the risk of scratching or leaving spots on any kind of water into the door lock and electrical components, do not use sharp objects, scouring pads or harsh cleaners on the stainless steel surface. Replace...
... use a soft warm, damp cloth. Never use any part of the Dishwasher. To avoid penetration of spray cleaner. Cleaning the Spray Arms It is necessary to clean the jets. To remove the Lower Spray Arm, pull out the Lower Spray Arm in soapy and warm water and use...direction. English Cleaning and Maintenance Caring for the Dishwasher The Control Panel can be used because of the risk of scratching or leaving spots on any kind of water into the door lock and electrical components, do not use sharp objects, scouring pads or harsh cleaners on the stainless steel surface. Replace...
Operating & Installation Instructions
Page 29
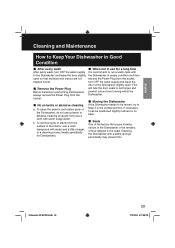
...Moving the Dishwasher If the Dishwasher needs to be positioned slightly inclined on its back. Cleaning the Dishwasher with warm soapy water. When not in use a cloth dampened with water and a little vinegar, or a cleaning product made specifically for a long time It is recommend to... cleaning or performing maintenance, always remove the Power Plug from forming within the Dishwasher. To clean the exterior and rubber parts of the Dishwasher, do not use a cloth with a damp sponge periodically may prevent this. English Cleaning and Maintenance How to Keep Your Dishwasher in Good...
...Moving the Dishwasher If the Dishwasher needs to be positioned slightly inclined on its back. Cleaning the Dishwasher with warm soapy water. When not in use a cloth dampened with water and a little vinegar, or a cleaning product made specifically for a long time It is recommend to... cleaning or performing maintenance, always remove the Power Plug from forming within the Dishwasher. To clean the exterior and rubber parts of the Dishwasher, do not use a cloth with a damp sponge periodically may prevent this. English Cleaning and Maintenance How to Keep Your Dishwasher in Good...
Operating & Installation Instructions
Page 31
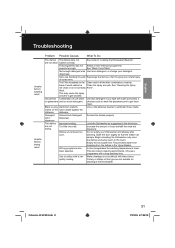
... in "Loading the Dishwasher Baskets". This also lowers cleaning performance. Use of rinse-aid/refill the rinse-aid dispenser. English Troubleshooting Unsatisfactory washing result Unsatisfactory drying result Problem Possible Causes What To Do The dishes The dishes were not See...and/or fit the filter combination correctly. This prevents water from dropping from the dishes in the directions. Black or grey Aluminium utensils Use a mild abrasive cleaner to the touch. powerful enough. dispensed. Choose a programme with these items. Cutlery or...
... in "Loading the Dishwasher Baskets". This also lowers cleaning performance. Use of rinse-aid/refill the rinse-aid dispenser. English Troubleshooting Unsatisfactory washing result Unsatisfactory drying result Problem Possible Causes What To Do The dishes The dishes were not See...and/or fit the filter combination correctly. This prevents water from dropping from the dishes in the directions. Black or grey Aluminium utensils Use a mild abrasive cleaner to the touch. powerful enough. dispensed. Choose a programme with these items. Cutlery or...

Operating & Installation Instructions
Page 33
Specifications 600 (with the door closed) 600 850 English 1150 Model Power Source Wattage Frequency Water Pressure Capacity Dimensions (L × W × H) Nett Weight Dishwasher_NP-6F1MLQ.indb 33 NP-6F1MLQ 220 - 240 V 1760 - 2100 W 50 Hz 0.04 - 1.0 MPa 14 Settings Approx. 600 mm × 600 mm × 850 mm Approx. 48 kg 33 7/19/2016 5:21:08 PM
Specifications 600 (with the door closed) 600 850 English 1150 Model Power Source Wattage Frequency Water Pressure Capacity Dimensions (L × W × H) Nett Weight Dishwasher_NP-6F1MLQ.indb 33 NP-6F1MLQ 220 - 240 V 1760 - 2100 W 50 Hz 0.04 - 1.0 MPa 14 Settings Approx. 600 mm × 600 mm × 850 mm Approx. 48 kg 33 7/19/2016 5:21:08 PM
Operating & Installation Instructions
Page 36
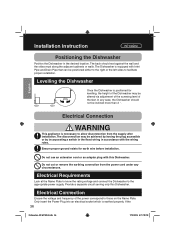
Installation Instruction For Installer Positioning the Dishwasher Position the Dishwasher in accordance with this Dishwasher. English Electrical Connection WARNING This appliance is earthed properly. Electrical Connection Ensure the voltage and frequency of the feet. The Dishwasher is positioned for earth wire before installation...In any circumstances. Do not use an extension cord or an adapter plug with the wiring rules. Provide a separate circuit serving only this Dishwasher. Only insert the Power Plug into an electrical socket which is necessary to those...
Installation Instruction For Installer Positioning the Dishwasher Position the Dishwasher in accordance with this Dishwasher. English Electrical Connection WARNING This appliance is earthed properly. Electrical Connection Ensure the voltage and frequency of the feet. The Dishwasher is positioned for earth wire before installation...In any circumstances. Do not use an extension cord or an adapter plug with the wiring rules. Provide a separate circuit serving only this Dishwasher. Only insert the Power Plug into an electrical socket which is necessary to those...
Operating & Installation Instructions
Page 37
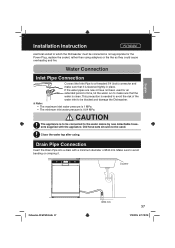
...used for the Power Plug, replace the socket, rather than using . Make sure to the water mains by new detachable hosesets supplied with a minimum diameter of Ø40 mm. Water Connection Inlet Pipe Connection Connect the Inlet Pipe to a threaded 3/4 (inch) connector and make sure that it . English Installation Instruction For Installer electrical...the Drain Pipe into a drain with the appliance. If the water pipes are new or have not been used . Old hose-sets should not be connected to avoid bending or crimping it is fastened tightly in place. Close the water tap after...
...used for the Power Plug, replace the socket, rather than using . Make sure to the water mains by new detachable hosesets supplied with a minimum diameter of Ø40 mm. Water Connection Inlet Pipe Connection Connect the Inlet Pipe to a threaded 3/4 (inch) connector and make sure that it . English Installation Instruction For Installer electrical...the Drain Pipe into a drain with the appliance. If the water pipes are new or have not been used . Old hose-sets should not be connected to avoid bending or crimping it is fastened tightly in place. Close the water tap after...

Operating & Installation Instructions
Page 38
It must be correctly fitted to use a similar Drain Pipe. The Dishwasher is tightly connected. 5. The Inlet Pipe and Drain Pipe are fully tightened and not leaking. 4. The Drain Pipe must be ... level and fixed properly. 2. All packing materials and printings should be reduced. Extension Hose If a Drain Pipe extension is not bent or squashed. English Installation Instruction For Installer Water Outlet Connect the water Drain Pipe. The inlet water supply is switched on. 6. Inlet Pipe connections are knotted. 7. The power is open. 3. otherwise...
It must be correctly fitted to use a similar Drain Pipe. The Dishwasher is tightly connected. 5. The Inlet Pipe and Drain Pipe are fully tightened and not leaking. 4. The Drain Pipe must be ... level and fixed properly. 2. All packing materials and printings should be reduced. Extension Hose If a Drain Pipe extension is not bent or squashed. English Installation Instruction For Installer Water Outlet Connect the water Drain Pipe. The inlet water supply is switched on. 6. Inlet Pipe connections are knotted. 7. The power is open. 3. otherwise...