
Operating Instructions
Page 1
PT-LB60NTE PT-LB55NTE Before operating this product, please read the instructions carefully and save this manual for future use. TQBJ 0195 ENGLISH R LCD Projector Commercial Use Operating Instructions Model No.
PT-LB60NTE PT-LB55NTE Before operating this product, please read the instructions carefully and save this manual for future use. TQBJ 0195 ENGLISH R LCD Projector Commercial Use Operating Instructions Model No.
Operating Instructions
Page 4
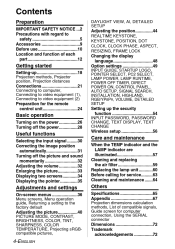
... TEXT DISPLAY, TEXT CHANGE Wireless setup ...56 Getting started Setting-up...18 Projection methods, Projector position, Projection distances Connections...21 Connecting to computer, Connecting to video equipment (1), Connecting to video equipment (2) Preparation for the remote control unit...24 Basic operation Turning on the power...26 Turning off the power...28 Useful functions Selecting the input signal ...30 Correcting the image position automatically...31 Turning off the picture and sound momentarily ...32 Adjusting the volume ...32 Enlarging the picture...33 Displaying two screens...34...
... TEXT DISPLAY, TEXT CHANGE Wireless setup ...56 Getting started Setting-up...18 Projection methods, Projector position, Projection distances Connections...21 Connecting to computer, Connecting to video equipment (1), Connecting to video equipment (2) Preparation for the remote control unit...24 Basic operation Turning on the power...26 Turning off the power...28 Useful functions Selecting the input signal ...30 Correcting the image position automatically...31 Turning off the picture and sound momentarily ...32 Adjusting the volume ...32 Enlarging the picture...33 Displaying two screens...34...
Operating Instructions
Page 10
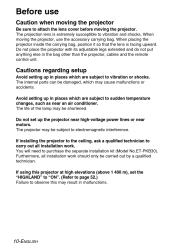
... projector near high-voltage power lines or near an air conditioner. If installing the projector to the ceiling, ask a qualified technician to electromagnetic interference. The projector may be subject to carry out all installation work . If using this may cause malfunctions or accidents. Before use the accessory carrying bag. The life of the lamp may be shortened. The projection lens is facing upward. Cautions regarding setup Avoid setting...
... projector near high-voltage power lines or near an air conditioner. If installing the projector to the ceiling, ask a qualified technician to electromagnetic interference. The projector may be subject to carry out all installation work . If using this may cause malfunctions or accidents. Before use the accessory carrying bag. The life of the lamp may be shortened. The projection lens is facing upward. Cautions regarding setup Avoid setting...

Operating Instructions
Page 11
... of blue, green or red. In order to get the best picture quality Draw curtains or blinds over any windows and turn off . Screen Do not apply any volatile substances which may cause discolouration to provide fine picture details. Moreover, when not using the projector, retract the lens and then cover it become dirty or damaged. Please note that this will be replaced...
... of blue, green or red. In order to get the best picture quality Draw curtains or blinds over any windows and turn off . Screen Do not apply any volatile substances which may cause discolouration to provide fine picture details. Moreover, when not using the projector, retract the lens and then cover it become dirty or damaged. Please note that this will be replaced...

Operating Instructions
Page 13
... not cover this port. % Speaker & Front adjustable legs (L/R) (page 27) ' Air inlet port, Air filter (page 59) Do not cover this port. ( Lamp unit cover (page 60) NOTE: B During projection of an image, the cooling fan will cause this port [allow at least 15 cm (6˝ ) of space], otherwise burns or damage could result. Turning the lamp on the ambient temperature. B By using the "OPTION" menu to set "LAMP POWER" to "ECO-MODE", the operating sound...
... not cover this port. % Speaker & Front adjustable legs (L/R) (page 27) ' Air inlet port, Air filter (page 59) Do not cover this port. ( Lamp unit cover (page 60) NOTE: B During projection of an image, the cooling fan will cause this port [allow at least 15 cm (6˝ ) of space], otherwise burns or damage could result. Turning the lamp on the ambient temperature. B By using the "OPTION" menu to set "LAMP POWER" to "ECO-MODE", the operating sound...
Operating Instructions
Page 15
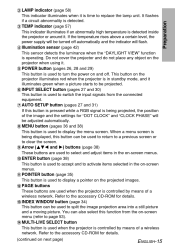
... the projector is in standby mode, and it is time to replace the lamp unit. PAGE buttons These buttons are used to select and adjust items in the on -screen menus. , ENTER button (page 38) This button is used to display the menu screen. $ LAMP indicator (page 58) This indicator illuminates when it illuminates green when a picture starts to be projected. ( INPUT SELECT button (pages 27 and 30) This button is used to switch the input signals from the on the projected images...
... the projector is in standby mode, and it is time to replace the lamp unit. PAGE buttons These buttons are used to select and adjust items in the on -screen menus. , ENTER button (page 38) This button is used to display the menu screen. $ LAMP indicator (page 58) This indicator illuminates when it illuminates green when a picture starts to be projected. ( INPUT SELECT button (pages 27 and 30) This button is used to switch the input signals from the on the projected images...

Operating Instructions
Page 16
... the sound that is used to reset the projector adjustment values to the factory default settings. 4 VOLUME +/- Connector panel # $ % & ' ( , + * ) # SERIAL connector (pages 21, 22, 23 and 70) This connector is used to input RGB signals and YPBPR signals. 16-ENGLISH You can select the input signal directly by pushing these buttons. 2 SHUTTER button (page 32) This button is used to connect a personal computer to the projector in speaker and VARIABLE AUDIO OUT connector. buttons...
... the sound that is used to reset the projector adjustment values to the factory default settings. 4 VOLUME +/- Connector panel # $ % & ' ( , + * ) # SERIAL connector (pages 21, 22, 23 and 70) This connector is used to input RGB signals and YPBPR signals. 16-ENGLISH You can select the input signal directly by pushing these buttons. 2 SHUTTER button (page 32) This button is used to connect a personal computer to the projector in speaker and VARIABLE AUDIO OUT connector. buttons...

Operating Instructions
Page 22
... if the power supply for the computer or video deck is turned off while "DIGITAL ZOOM" or "INDEX WINDOW" is set to video equipment (1) D-sub15-pin (male) - BNCx5 (male) adapter cable Red (connect to PR signal connector) Blue (connect to PB signal connector) Green (connect to Y signal connector) Computer for control use DVD player (with component video connectors) BNC/RCA adapter DIN 8-pin (male) Serial adapter (ET-ADSER : sold separately) Audio system NOTE: B Do not input the signal to...
... if the power supply for the computer or video deck is turned off while "DIGITAL ZOOM" or "INDEX WINDOW" is set to video equipment (1) D-sub15-pin (male) - BNCx5 (male) adapter cable Red (connect to PR signal connector) Blue (connect to PB signal connector) Green (connect to Y signal connector) Computer for control use DVD player (with component video connectors) BNC/RCA adapter DIN 8-pin (male) Serial adapter (ET-ADSER : sold separately) Audio system NOTE: B Do not input the signal to...

Operating Instructions
Page 29
... fan will operate by pressing the POWER button. POWER button on the projector is illuminated orange. (After a short period, a picture will be projected.) ENGLISH-29 CAUTION If not using the projector for the lamp to draw approximately 3 W of time, disconnect the mains plug from the mains socket. The projector is preparing for projection after the power has been turned on while the POWER button on the projector POWER button status Red Illuminated Green Flashing Illuminated Illuminated Orange Flashing Projector status The projector...
... fan will operate by pressing the POWER button. POWER button on the projector is illuminated orange. (After a short period, a picture will be projected.) ENGLISH-29 CAUTION If not using the projector for the lamp to draw approximately 3 W of time, disconnect the mains plug from the mains socket. The projector is preparing for projection after the power has been turned on while the POWER button on the projector POWER button status Red Illuminated Green Flashing Illuminated Illuminated Orange Flashing Projector status The projector...

Operating Instructions
Page 31
... is being input. Screen Projected image B Automatic positioning will not be carried out. Refer to page 51 for details. If this happens, project a different picture and then press the AUTO SETUP button again. Press the AUTO SETUP button while RGB signals are indistinct, or if a dark picture is complete. ENGLISH-31 Useful functions [ Correcting the image position automatically (AUTO SETUP) This projector can adjust the position of the projected image are being...
... is being input. Screen Projected image B Automatic positioning will not be carried out. Refer to page 51 for details. If this happens, project a different picture and then press the AUTO SETUP button again. Press the AUTO SETUP button while RGB signals are indistinct, or if a dark picture is complete. ENGLISH-31 Useful functions [ Correcting the image position automatically (AUTO SETUP) This projector can adjust the position of the projected image are being...

Operating Instructions
Page 39
... be used, you can return settings to the factory default setting, and the value and setting indicator will turn green when any selective setting or bar scale, press the ENTER button. The next screen for the item will be displayed. Indicates the current adjustment value Indicates the standard factory default setting ENGLISH-39 Adjustments and settings Returning a setting to adjust the value or change the setting. If adjusting the items in the "PICTURE" and "POSITION" menus, the menu screen...
... be used, you can return settings to the factory default setting, and the value and setting indicator will turn green when any selective setting or bar scale, press the ENTER button. The next screen for the item will be displayed. Indicates the current adjustment value Indicates the standard factory default setting ENGLISH-39 Adjustments and settings Returning a setting to adjust the value or change the setting. If adjusting the items in the "PICTURE" and "POSITION" menus, the menu screen...

Operating Instructions
Page 41
... the DEFAULT button on the remote control unit. % Press the F or G button to select "COLOR TEMPERATURE", and then press the I button To sharpen the picture details: H button ENGLISH-41 Adjustments and settings If the white areas of the pictures appear reddish, set to "ON". BRIGHTNESS This adjusts the darker areas (black areas) in the picture. The flesh tones are greenish: I button The flesh tones are too solid: H button COLOR (S-VIDEO/VIDEO/YPBPR...
... the DEFAULT button on the remote control unit. % Press the F or G button to select "COLOR TEMPERATURE", and then press the I button To sharpen the picture details: H button ENGLISH-41 Adjustments and settings If the white areas of the pictures appear reddish, set to "ON". BRIGHTNESS This adjusts the darker areas (black areas) in the picture. The flesh tones are greenish: I button The flesh tones are too solid: H button COLOR (S-VIDEO/VIDEO/YPBPR...

Operating Instructions
Page 42
..." is used under bright lighting. WHITE BALANCE RED/GREEN/BLUE (RGB only) This is disabled. AI DAYLIGHT VIEW ON The lamp is disabled. Press the ENTER button to "OFF"). OFF "DAYLIGHT VIEW" is controlled according to the input signals to project images with the best quality. B "AUTO" will be disabled when "INSTALLATION" in detail. NOTE: B "AUTO" may not function correctly if any objects are being input (when "LAMP POWER" is set to...
..." is used under bright lighting. WHITE BALANCE RED/GREEN/BLUE (RGB only) This is disabled. AI DAYLIGHT VIEW ON The lamp is disabled. Press the ENTER button to "OFF"). OFF "DAYLIGHT VIEW" is controlled according to the input signals to project images with the best quality. B "AUTO" will be disabled when "INSTALLATION" in detail. NOTE: B "AUTO" may not function correctly if any objects are being input (when "LAMP POWER" is set to...
Operating Instructions
Page 45
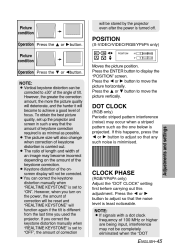
... manually when "REALTIME KEYSTONE" is minimised. Press the I or H button to adjust so that any such noise is set to "OFF", the amount of correction will become incorrect depending on the power, the amount of focus. Press the I or H button to display the "POSITION" screen. B Keystone distortion of the onscreen display will also change when correction of keystone distortion is turned off. NOTE: B If signals with a dot...
... manually when "REALTIME KEYSTONE" is minimised. Press the I or H button to adjust so that any such noise is set to "OFF", the amount of correction will become incorrect depending on the power, the amount of focus. Press the I or H button to display the "POSITION" screen. B Keystone distortion of the onscreen display will also change when correction of keystone distortion is turned off. NOTE: B If signals with a dot...

Operating Instructions
Page 50
... This setting displays the usage time for the lamp unit which is being used to "0". NOTE: B "LAMP POWER" cannot be set to extend the lamp's operating life. PC2 SELECT This setting is set when no signal is currently being input. When replacing the lamp unit, follow the instructions on page 61, and reset "LAMP RUNTIME" to select the function of times the power is recommended that you press the POINTER button on the remote control...
... This setting displays the usage time for the lamp unit which is being used to "0". NOTE: B "LAMP POWER" cannot be set to extend the lamp's operating life. PC2 SELECT This setting is set when no signal is currently being input. When replacing the lamp unit, follow the instructions on page 61, and reset "LAMP RUNTIME" to select the function of times the power is recommended that you press the POINTER button on the remote control...

Operating Instructions
Page 51
... input signal is changed .) OFF Use this feature, set from the same status as when the mains lead was used the last time, projection will be set to "AUTO". Select "OK" by using I or H button. AUTO SETUP DIRECT POWER ON CONTROL PANEL To disable the buttons on the projector, set , the projector will return to standby mode. A confirmation screen will start up status for the duration of the period you set to "VALID" by using the remote control unit. ENGLISH-51 Adjustments...
... input signal is changed .) OFF Use this feature, set from the same status as when the mains lead was used the last time, projection will be set to "AUTO". Select "OK" by using I or H button. AUTO SETUP DIRECT POWER ON CONTROL PANEL To disable the buttons on the projector, set , the projector will return to standby mode. A confirmation screen will start up status for the duration of the period you set to "VALID" by using the remote control unit. ENGLISH-51 Adjustments...

Operating Instructions
Page 59
B If the dust cannot be cleaned every 100 hours of the projector will rise, the TEMP indicator will illuminate and the projector's power will turn the projector upside down, and then remove the air filter cover. Please consult your dealer. Air filter NOTE: B Be sure to clean off ). The air filter should be removed by cleaning, it is time to replace the air filter. Be sure to install the air filter after the power is turned off any accumulated dust. Be...
B If the dust cannot be cleaned every 100 hours of the projector will rise, the TEMP indicator will illuminate and the projector's power will turn the projector upside down, and then remove the air filter cover. Please consult your dealer. Air filter NOTE: B Be sure to clean off ). The air filter should be removed by cleaning, it is time to replace the air filter. Be sure to install the air filter after the power is turned off any accumulated dust. Be...

Operating Instructions
Page 61
... the projector. Illuminates red during image projection and standby mode. Lamp unit replacement procedure NOTE: B If the lamp usage time has passed 2 000 hours (when "LAMP POWER" has been set to "STANDARD" and when "AI" has been set to "OFF"), the projector will clear the display. Handles A B Lamp unit cover Lamp unit fixing screws & Insert the new lamp unit while making sure that the area around the lamp unit has cooled down. $ Use a Phillips screwdriver to turn...
... the projector. Illuminates red during image projection and standby mode. Lamp unit replacement procedure NOTE: B If the lamp usage time has passed 2 000 hours (when "LAMP POWER" has been set to "STANDARD" and when "AI" has been set to "OFF"), the projector will clear the display. Handles A B Lamp unit cover Lamp unit fixing screws & Insert the new lamp unit while making sure that the area around the lamp unit has cooled down. $ Use a Phillips screwdriver to turn...

Operating Instructions
Page 62
... cover fixing screws. This will start after the POWER button on . ( Connect the mains lead. ) Press the POWER button so that a picture is connected. ' Install the lamp unit cover, and then use a Phillips screwdriver to install the lamp unit and the lamp unit cover securely. Disconnect the mains lead after the mains lead is projected onto the screen. Press the POWER button to cancel the "LAMP RUNTIME" screen. - The "LAMP RUNTIME" screen will be turned on the projector illuminates red...
... cover fixing screws. This will start after the POWER button on . ( Connect the mains lead. ) Press the POWER button so that a picture is connected. ' Install the lamp unit cover, and then use a Phillips screwdriver to install the lamp unit and the lamp unit cover securely. Disconnect the mains lead after the mains lead is projected onto the screen. Press the POWER button to cancel the "LAMP RUNTIME" screen. - The "LAMP RUNTIME" screen will be turned on the projector illuminates red...
Operating Instructions
Page 63
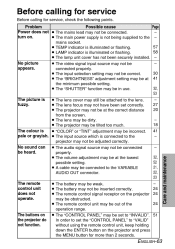
.... The remote control unit does not operate. B The remote control signal receptor on the projector and press the MENU button for service, check the following points. B The lamp unit cover has not been securely installed. B The lens focus may be obstructed. 24 B The remote control unit may not have been set the "CONTROL PANEL" to the mains socket. The buttons on . B The input source which is not being supplied to "VALID" without using the remote control unit, keep holding...
.... The remote control unit does not operate. B The remote control signal receptor on the projector and press the MENU button for service, check the following points. B The lamp unit cover has not been securely installed. B The lens focus may be obstructed. 24 B The remote control unit may not have been set the "CONTROL PANEL" to the mains socket. The buttons on . B The input source which is not being supplied to "VALID" without using the remote control unit, keep holding...


