
PTD6000U User Guide
Page 5
... page 19. Projecting 19 Projecting a image 19 Remote control operation 21 Operating range 21 Setting up 16 Projection method 16 Removing and attaching the projection lens 17 Power cord 18 Basic Operation 2. Connect with other devices See the functional instructions in the CD-ROM that is provided with regard to safety...
... page 19. Projecting 19 Projecting a image 19 Remote control operation 21 Operating range 21 Setting up 16 Projection method 16 Removing and attaching the projection lens 17 Power cord 18 Basic Operation 2. Connect with other devices See the functional instructions in the CD-ROM that is provided with regard to safety...

PTD6000U User Guide
Page 7
...your hands or face, or objects which can result if this port [allow it away from remote control unit, keep it to the projection lens. Before replacing the lamp, be sure to use the accessory wire (install in fire, electric shocks or plastic deterioration. Heated air comes ...advice. Fire or electric shocks can result. Electric shocks or explosions can cause fire or damage to disconnect the power plug from the projector's lens. Do not use the projector in narrow, badly ventilated places such as these materials could result. Do not place the projector in a ...
...your hands or face, or objects which can result if this port [allow it away from remote control unit, keep it to the projection lens. Before replacing the lamp, be sure to use the accessory wire (install in fire, electric shocks or plastic deterioration. Heated air comes ...advice. Fire or electric shocks can result. Electric shocks or explosions can cause fire or damage to disconnect the power plug from the projector's lens. Do not use the projector in narrow, badly ventilated places such as these materials could result. Do not place the projector in a ...

PTD6000U User Guide
Page 9
...ceiling, ask a qualified technician to carry out all installation work . If this projector at the bottom securely. If the surface of the lens becomes dirty from shining onto the screen. Replacement of the set which are constantly making efforts to observe this will result. Do not .... Please take non repairable units back to observe this may result in places which will collect inside the projector and problems with the lens cover when transporting the projector. Be sure to be shortened. Moreover, when not using this not done, dust will recirculate the exhaust...
...ceiling, ask a qualified technician to carry out all installation work . If this projector at the bottom securely. If the surface of the lens becomes dirty from shining onto the screen. Replacement of the set which are constantly making efforts to observe this will result. Do not .... Please take non repairable units back to observe this may result in places which will collect inside the projector and problems with the lens cover when transporting the projector. Be sure to be shortened. Moreover, when not using this not done, dust will recirculate the exhaust...

PTD6000U User Guide
Page 10
... or accidents may explode only occasionally after the instructed lamp replacement timing. Do not use the power cord supplied with the adjustable feet or projection lens cover removed. Connection to external device When connecting the projector to a computer or external device, use projectors with the corresponding device and a commercially available shielded...
... or accidents may explode only occasionally after the instructed lamp replacement timing. Do not use the power cord supplied with the adjustable feet or projection lens cover removed. Connection to external device When connecting the projector to a computer or external device, use projectors with the corresponding device and a commercially available shielded...
PTD6000U User Guide
Page 11
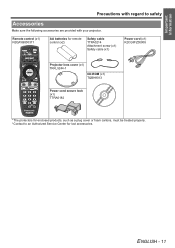
Remote control (x1) N2QAYB000371 AA batteries for remote control (x2) Safety cable TTRA0214 Attachment screw (x1) Safety cable (x1) Power cord (x1) K2CG3FZ00008 Projector lens cover (x1) TKKL5244-1 CD-ROM (x1) TQBH9013 Power cord secure lock (x1) TTRA0182 * The protectors for enclosed products, such as a plug cover or foam cartons, must be treated properly. * Contact to safety Accessories Make sure the following accessories are provided with regard to an Authorized Service Center for lost accessories. Important Information Precautions with your projector. ENGLISH - 11
Remote control (x1) N2QAYB000371 AA batteries for remote control (x2) Safety cable TTRA0214 Attachment screw (x1) Safety cable (x1) Power cord (x1) K2CG3FZ00008 Projector lens cover (x1) TKKL5244-1 CD-ROM (x1) TQBH9013 Power cord secure lock (x1) TTRA0182 * The protectors for enclosed products, such as a plug cover or foam cartons, must be treated properly. * Contact to safety Accessories Make sure the following accessories are provided with regard to an Authorized Service Center for lost accessories. Important Information Precautions with your projector. ENGLISH - 11

PTD6000U User Guide
Page 12
...(page 29) STANDBY(RED)/ ON(GREEN) LAMP TEMP FILTER Lamp unit compartment (page 30) Air exhaust port STANDBY(RED)/ ON(GREEN) LAMP TEMP FILTER Projection lens Focus ring Remote control signal receptor (page 21) Front leg adjusters Screw up/down to adjust focus, zoom and shift by the projection... lens. (page 19) Navigation and ENTER buttons Navigate through the menu items with F G I H, and activate them with the ENTER button. (page 27) AUTO SETUP button ...
...(page 29) STANDBY(RED)/ ON(GREEN) LAMP TEMP FILTER Lamp unit compartment (page 30) Air exhaust port STANDBY(RED)/ ON(GREEN) LAMP TEMP FILTER Projection lens Focus ring Remote control signal receptor (page 21) Front leg adjusters Screw up/down to adjust focus, zoom and shift by the projection... lens. (page 19) Navigation and ENTER buttons Navigate through the menu items with F G I H, and activate them with the ENTER button. (page 27) AUTO SETUP button ...

PTD6000U User Guide
Page 14
...manganese batteries or alkaline batteries with F G I H, and activate them with the ENTER button. (page 27) Remote control indicator Flashes by the projection lens. (page 19) FUNCTION button Assign the frequently use functions from options for repairs. • Do not keep pressing the remote control buttons as this ...projector's internal mechanical shutter to black out the projector. (page 22) ASPECT button Switches the image aspect ratio. (page 22) LENS buttons These buttons are used together with the remote control. • Do not attempt to modify or disassemble the remote control.
...manganese batteries or alkaline batteries with F G I H, and activate them with the ENTER button. (page 27) Remote control indicator Flashes by the projection lens. (page 19) FUNCTION button Assign the frequently use functions from options for repairs. • Do not keep pressing the remote control buttons as this ...projector's internal mechanical shutter to black out the projector. (page 22) ASPECT button Switches the image aspect ratio. (page 22) LENS buttons These buttons are used together with the remote control. • Do not attempt to modify or disassemble the remote control.

PTD6000U User Guide
Page 17
... contact. • Do not touch the surface of the projection lens with your bare hands. • Store the replaced lens where it clicks into place. Lens release button Projection lens NOTE: • Do not touch the lens signal contact. Switch off the POWER button on the projector. 2.... Getting Started 3. Align the guide of the projection lens with the guide groove in the projector, and then insert the lens. When the lens cover is attached securely by rotating the projection lens counterclockwise. Switch off the POWER button on the projector. Rotate the...
... contact. • Do not touch the surface of the projection lens with your bare hands. • Store the replaced lens where it clicks into place. Lens release button Projection lens NOTE: • Do not touch the lens signal contact. Switch off the POWER button on the projector. 2.... Getting Started 3. Align the guide of the projection lens with the guide groove in the projector, and then insert the lens. When the lens cover is attached securely by rotating the projection lens counterclockwise. Switch off the POWER button on the projector. Rotate the...

PTD6000U User Guide
Page 19
...8. After a short period, the indicator will illuminate and the projector will be allowed to adjust the position of the projector Pressing the LENS button changes the setup screen in red. Select the input signal by pressing the INPUT SELECT buttons. 4. Press F G I H to...up takes more , performance the adjustment faster. Projecting Projecting a image J Switching on the projector When using an optional lens, install a projection lens before any adjustments are made to the focus. 1. Select and set the projection scheme of the operating environment is projected...
...8. After a short period, the indicator will illuminate and the projector will be allowed to adjust the position of the projector Pressing the LENS button changes the setup screen in red. Select the input signal by pressing the INPUT SELECT buttons. 4. Press F G I H to...up takes more , performance the adjustment faster. Projecting Projecting a image J Switching on the projector When using an optional lens, install a projection lens before any adjustments are made to the focus. 1. Select and set the projection scheme of the operating environment is projected...

PTD6000U User Guide
Page 20
... lights up even if the power is turned on the projector or SHIFT button of the remote control for the projection lens is the lens position when the lens is being replaced or when the projector is being stored away, and it possible to the home position, a message ...light up orange. Failure to red, the cooling fan stops. Q PT-DW6300U Standard projection position Basic Operation ENGLISH - 20 POWER STANDBY button J Lens home position 1. When the power indicator of the projector. To light up again. • While the cooling fan is accidentally disconnected immediately after...
... lights up even if the power is turned on the projector or SHIFT button of the remote control for the projection lens is the lens position when the lens is being replaced or when the projector is being stored away, and it possible to the home position, a message ...light up orange. Failure to red, the cooling fan stops. Q PT-DW6300U Standard projection position Basic Operation ENGLISH - 20 POWER STANDBY button J Lens home position 1. When the power indicator of the projector. To light up again. • While the cooling fan is accidentally disconnected immediately after...

PTD6000U User Guide
Page 24
... (Default: 16) GEOMETRY (PT-DZ6710U only) OFF CURVED KEYSTONE PC GEOMETRY:KEYSTONE VERTICAL KEYSTONE VERTICAL SUB KEYSTONE HORIZONTAL KEYSTONE HORIZONTAL SUB KEYSTONE LINEARITY GEOMETRY:CURVED LENS THROW RATIO VERTICAL KEYSTONE HORIZONTAL KEYSTONE VERTICAL ARC HORIZONTAL ARC VERTICAL BALANCE HORIZONTAL BALANCE KEYSTONE (PT-DZ6700U/PT-DW6300U/PT-D6000U only) VERTICAL KEYSTONE VERTICAL...
... (Default: 16) GEOMETRY (PT-DZ6710U only) OFF CURVED KEYSTONE PC GEOMETRY:KEYSTONE VERTICAL KEYSTONE VERTICAL SUB KEYSTONE HORIZONTAL KEYSTONE HORIZONTAL SUB KEYSTONE LINEARITY GEOMETRY:CURVED LENS THROW RATIO VERTICAL KEYSTONE HORIZONTAL KEYSTONE VERTICAL ARC HORIZONTAL ARC VERTICAL BALANCE HORIZONTAL BALANCE KEYSTONE (PT-DZ6700U/PT-DW6300U/PT-D6000U only) VERTICAL KEYSTONE VERTICAL...

PTD6000U User Guide
Page 33
... POWER switch is fuzzy. The input selection setting may be at the minimum setting. The BRIGHTNESS adjustment setting may not be correct. The lens may be weak. The remote control does not operate. The picture does not display correctly. The batteries may be dirty. DVI-D IN setting... menu is lit or flashes. No picture appears. TEMP indicator is disabled. The lamp unit cover has not been securely installed. The lens focus may be incorrect setting. CONTROL PANEL of CONTROL DEVICE SETUP in DISPLAY OPTION menu may not have been set correctly. The remote ...
... POWER switch is fuzzy. The input selection setting may be at the minimum setting. The BRIGHTNESS adjustment setting may not be correct. The lens may be weak. The remote control does not operate. The picture does not display correctly. The batteries may be dirty. DVI-D IN setting... menu is lit or flashes. No picture appears. TEMP indicator is disabled. The lamp unit cover has not been securely installed. The lens focus may be incorrect setting. CONTROL PANEL of CONTROL DEVICE SETUP in DISPLAY OPTION menu may not have been set correctly. The remote ...

PTD6000U User Guide
Page 36
... - 2.4:1 • F 1.7 - 2.0, f 25.6 mm - 33.8 mm • PT-DZ6710U/PT-DZ6700U: f = 26.8 - 35.7 • PT-DW6300U/PT-D6000U: f = 25.6 - 33.8 • Lens is optional for the projectors that "L" follows in model number. Temperature: 0 °C - 45 °C (32 °F - 113 °F) Humidity: 20% - 80% (no condensation) H: 15.75... kHz/15.63 kHz, V: 50 Hz/60 Hz H: 15 - 91 kHz, V: 50 - 85 Hz Panasonic Intelligent Auto Scanning (PIAS) Dot clock frequency • PT-DZ6710U/PT-DZ6700U: 162 MHz or less • PT-DW6300U/PT-D6000U: 150 MHz or less...
... - 2.4:1 • F 1.7 - 2.0, f 25.6 mm - 33.8 mm • PT-DZ6710U/PT-DZ6700U: f = 26.8 - 35.7 • PT-DW6300U/PT-D6000U: f = 25.6 - 33.8 • Lens is optional for the projectors that "L" follows in model number. Temperature: 0 °C - 45 °C (32 °F - 113 °F) Humidity: 20% - 80% (no condensation) H: 15.75... kHz/15.63 kHz, V: 50 Hz/60 Hz H: 15 - 91 kHz, V: 50 - 85 Hz Panasonic Intelligent Auto Scanning (PIAS) Dot clock frequency • PT-DZ6710U/PT-DZ6700U: 162 MHz or less • PT-DW6300U/PT-D6000U: 150 MHz or less...

PTD6000U User Guide
Page 37
... Length Height 51 mm (2') 176 mm (6 - 29/32") 22.7 mm (-7/8") (not including surface projection parts) ET-PKD56H (High ceiling), ET-PKD55S (Low ceiling) Options Projection lens Lamp unit ET-DLE150, ET-DLE250, ET-DLE350, ET-DLE450, ET-DLE055 ET-LAD60 (1 bulb), ET-LAD60W (2 bulbs) ACF unit ET-ACF100 *1. Average value.
... Length Height 51 mm (2') 176 mm (6 - 29/32") 22.7 mm (-7/8") (not including surface projection parts) ET-PKD56H (High ceiling), ET-PKD55S (Low ceiling) Options Projection lens Lamp unit ET-DLE150, ET-DLE250, ET-DLE350, ET-DLE450, ET-DLE055 ET-LAD60 (1 bulb), ET-LAD60W (2 bulbs) ACF unit ET-ACF100 *1. Average value.

PTD6000U User Guide
Page 39
... Indicator status 28 Lamp unit compartment 12 LAMP1/LAMP2 indicators 12 Replacing 30 LAN Terminal 13 LENS Control panel button 12 Projection lens 12 Projector lens cover 11 Remote control button 14 Lens home position 20 M Mains lead AC IN terminal 13 Accessories 11 Connecting 18 MENU CD-... panel button 12 Remote control button 14 Switching on/off 19 POWER STANDBY Control panel button 12 Remote control button 14 Projector lens cover Accessories 11 R Remote control 14 Accessories 11 Signal receptor 12 Wired connection 15 REMOTE1 Terminal 13 Wired connection 15 REMOTE2 ...
... Indicator status 28 Lamp unit compartment 12 LAMP1/LAMP2 indicators 12 Replacing 30 LAN Terminal 13 LENS Control panel button 12 Projection lens 12 Projector lens cover 11 Remote control button 14 Lens home position 20 M Mains lead AC IN terminal 13 Accessories 11 Connecting 18 MENU CD-... panel button 12 Remote control button 14 Switching on/off 19 POWER STANDBY Control panel button 12 Remote control button 14 Projector lens cover Accessories 11 R Remote control 14 Accessories 11 Signal receptor 12 Wired connection 15 REMOTE1 Terminal 13 Wired connection 15 REMOTE2 ...